[TOC]
# 流程图

## 效果图

## 配置应用回调地址

## auth-sso模块
使用之前的应用回调地址

```
server:
port: 9997
# context-path: /clientOne #2.0不再使用此方式配置
security:
ignored: /,/favicon.ico,/home.html,/dashboard.html,/js/**,/css/**,/webjars/**
sessions: ALWAYS
user:
password: 123456
oauth2:
sso:
login-path: /dashboard/login
client:
client-id: owen
client-secret: owen
user-authorization-uri: http://127.0.0.1:9200/api-auth/oauth/authorize #直接配置认证中心端口(http://127.0.0.1:9200/oauth/authorize),也可以配置网关端口
access-token-uri: http://127.0.0.1:9200/api-auth/oauth/token #直接配置认证中心端口(http://127.0.0.1:9200/oauth/authorize),也可以配置网关端口
resource:
# user-info-uri: http://127.0.0.1:8000/auth/users #返回认证服务器检查
# prefer-token-info: false
token-info-uri: http://127.0.0.1:9200/api-auth/oauth/check_token #直接配置认证中心端口(http://127.0.0.1:9200/oauth/authorize),也可以配置网关端口
prefer-token-info: true
```
## 访问auth-sso后back-center中获取的令牌

## 代码剖析
### org.springframework.security.oauth2.client.filter.OAuth2ClientContextFilter
重定向
```
protected void redirectUser(UserRedirectRequiredException e,
HttpServletRequest request, HttpServletResponse response)
throws IOException {
String redirectUri = e.getRedirectUri();
UriComponentsBuilder builder = UriComponentsBuilder
.fromHttpUrl(redirectUri);
Map<String, String> requestParams = e.getRequestParams();
for (Map.Entry<String, String> param : requestParams.entrySet()) {
builder.queryParam(param.getKey(), param.getValue());
}
if (e.getStateKey() != null) {
builder.queryParam("state", e.getStateKey());
}
this.redirectStrategy.sendRedirect(request, response, builder.build()
.encode().toUriString());
}
```
### org.springframework.security.oauth2.client.token.grant.code.AuthorizationCodeAccessTokenProvider
* 获取授权码
* 获取token
### CheckToken的目的
当用户携带token 请求资源服务器的资源时,**OAuth2AuthenticationProcessingFilter**拦截token,进行token 和userdetails 过程,把无状态的token 转化成用户信息。

### 详解
1. OAuth2AuthenticationManager.authenticate(),filter执行判断的入口

2. 当用户携带token 去请求微服务模块,被资源服务器拦截调用RemoteTokenServices.loadAuthentication ,执行所谓的check-token过程。
源码如下

3. CheckToken 处理逻辑很简单,就是调用redisTokenStore 查询token的合法性,及其返回用户的部分信息 (username )

4. 继续看 返回给 RemoteTokenServices.loadAuthentication 最后一句
tokenConverter.extractAuthentication 解析组装服务端返回的信息

最重要的 userTokenConverter.extractAuthentication(map);

5,继续看 UerDetailsServiceImpl.loadUserByUsername 根据用户名去换取用户全部信息。

## 传统项目集成sso资料
链接:https://pan.baidu.com/s/1dr7jDDPodJ9r-GO4S_pCnQ
提取码:3wat
### 授权码
AuthCodeInvoker使用演示

## spring security 5以后全新方式集成sso

spring boot部分已经改造完毕,可以使用以下方式拥抱全新的api
##### sso 依赖
```
<dependency>
<groupId>org.springframework.boot</groupId>
<artifactId>spring-boot-starter-oauth2-client</artifactId>
</dependency>
<dependency>
<groupId>org.springframework.boot</groupId>
<artifactId>spring-boot-starter-security</artifactId>
</dependency>
```
##### 资源服务器依赖
```
<dependency>
<groupId>org.springframework.boot</groupId>
<artifactId>spring-boot-starter-oauth2-resource-server</artifactId>
</dependency>
```
#### 首页

#### 认证中心

#### 认证成功

#### maven依赖

#### 代码改造
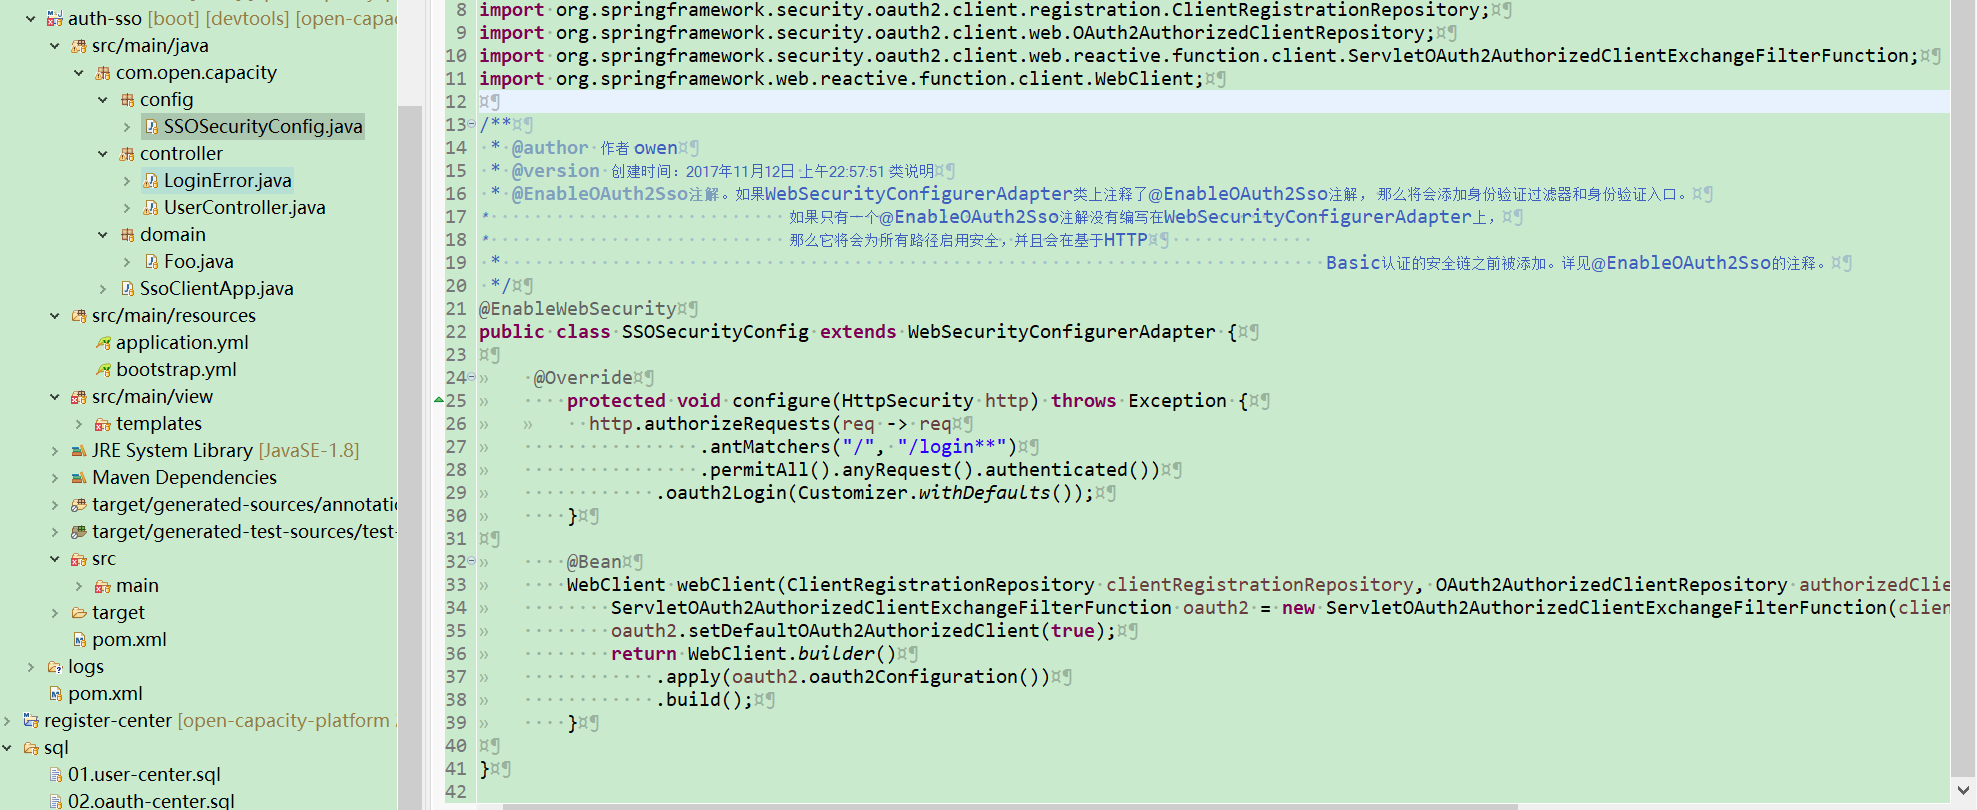
#### 配置

**OAuth2LoginAuthenticationFilter**过滤器进行处理。部分源码如下:
~~~
public class OAuth2LoginAuthenticationFilter extends AbstractAuthenticationProcessingFilter {
public static final String DEFAULT_FILTER_PROCESSES_URI = "/login/oauth2/code/*";
private static final String AUTHORIZATION_REQUEST_NOT_FOUND_ERROR_CODE = "authorization_request_not_found";
private static final String CLIENT_REGISTRATION_NOT_FOUND_ERROR_CODE = "client_registration_not_found";
private ClientRegistrationRepository clientRegistrationRepository;
private OAuth2AuthorizedClientRepository authorizedClientRepository;
private AuthorizationRequestRepository<OAuth2AuthorizationRequest> authorizationRequestRepository =
new HttpSessionOAuth2AuthorizationRequestRepository();
public OAuth2LoginAuthenticationFilter(ClientRegistrationRepository clientRegistrationRepository,
OAuth2AuthorizedClientService authorizedClientService) {
this(clientRegistrationRepository, authorizedClientService, DEFAULT_FILTER_PROCESSES_URI);
}
// ....
}
~~~
- 前言
- 1.项目说明
- 2.项目更新日志
- 3.文档更新日志
- 01.快速开始
- 01.maven构建项目
- 02.环境安装
- 03.STS项目导入
- 03.IDEA项目导入
- 04.数据初始化
- 05.项目启动
- 06.付费文档说明
- 02.总体流程
- 1.oauth接口
- 2.架构设计图
- 3.微服务介绍
- 4.功能介绍
- 5.梳理流程
- 03.模块详解
- 01.老版本1.0.1分支模块讲解
- 01.db-core模块
- 02.api-commons模块
- 03.log-core模块
- 04.security-core模块
- 05.swagger-core模块
- 06.eureka-server模块
- 07.auth-server模块
- 08.auth-sso模块解析
- 09.user-center模块
- 10.api-gateway模块
- 11.file-center模块
- 12.log-center模块
- 13.batch-center模块
- 14.back-center模块
- 02.spring-boot-starter-web那点事
- 03.自定义db-spring-boot-starter
- 04.自定义log-spring-boot-starter
- 05.自定义redis-spring-boot-starter
- 06.自定义common-spring-boot-starter
- 07.自定义swagger-spring-boot-starter
- 08.自定义uaa-server-spring-boot-starter
- 09.自定义uaa-client-spring-boot-starter
- 10.自定义ribbon-spring-boot-starter
- 11.springboot启动原理
- 12.eureka-server模块
- 13.auth-server模块
- 14.user-center模块
- 15.api-gateway模块
- 16.file-center模块
- 17.log-center模块
- 18.back-center模块
- 19.auth-sso模块
- 20.admin-server模块
- 21.zipkin-center模块
- 22.job-center模块
- 23.batch-center
- 04.全新网关
- 01.基于spring cloud gateway的new-api-gateway
- 02.spring cloud gateway整合Spring Security Oauth
- 03.基于spring cloud gateway的redis动态路由
- 04.spring cloud gateway聚合swagger文档
- 05.技术详解
- 01.互联网系统设计原则
- 02.系统幂等性设计与实践
- 03.Oauth最简向导开发指南
- 04.oauth jdbc持久化策略
- 05.JWT token方式启用
- 06.token有效期的处理
- 07.@PreAuthorize注解分析
- 08.获取当前用户信息
- 09.认证授权白名单配置
- 10.OCP权限设计
- 11.服务安全流程
- 12.认证授权详解
- 13.验证码技术
- 14.短信验证码登录
- 15.动态数据源配置
- 16.分页插件使用
- 17.缓存击穿
- 18.分布式主键生成策略
- 19.分布式定时任务
- 20.分布式锁
- 21.网关多维度限流
- 22.跨域处理
- 23.容错限流
- 24.应用访问次数控制
- 25.统一业务异常处理
- 26.日志埋点
- 27.GPRC内部通信
- 28.服务间调用
- 29.ribbon负载均衡
- 30.微服务分布式跟踪
- 31.异步与线程传递变量
- 32.死信队列延时消息
- 33.单元测试用例
- 34.Greenwich.RELEASE升级
- 35.混沌工程质量保证
- 06.开发初探
- 1.开发技巧
- 2.crud例子
- 3.新建服务
- 4.区分前后台用户
- 07.分表分库
- 08.分布式事务
- 1.Seata介绍
- 2.Seata部署
- 09.shell部署
- 01.eureka-server
- 02.user-center
- 03.auth-server
- 04.api-gateway
- 05.file-center
- 06.log-center
- 07.back-center
- 08.编写shell脚本
- 09.集群shell部署
- 10.集群shell启动
- 11.部署阿里云问题
- 10.网关安全
- 1.openresty https保障服务安全
- 2.openresty WAF应用防火墙
- 3.openresty 高可用
- 11.docker配置
- 01.docker安装
- 02.Docker 开启远程API
- 03.采用docker方式打包到服务器
- 04.docker创建mysql
- 05.docker网络原理
- 06.docker实战
- 6.01.安装docker
- 6.02.管理镜像基本命令
- 6.03.容器管理
- 6.04容器数据持久化
- 6.05网络模式
- 6.06.Dockerfile
- 6.07.harbor部署
- 6.08.使用自定义镜像
- 12.统一监控中心
- 01.spring boot admin监控
- 02.Arthas诊断利器
- 03.nginx监控(filebeat+es+grafana)
- 04.Prometheus监控
- 05.redis监控(redis+prometheus+grafana)
- 06.mysql监控(mysqld_exporter+prometheus+grafana)
- 07.elasticsearch监控(elasticsearch-exporter+prometheus+grafana)
- 08.linux监控(node_exporter+prometheus+grafana)
- 09.micoservice监控
- 10.nacos监控
- 11.druid数据源监控
- 12.prometheus.yml
- 13.grafana告警
- 14.Alertmanager告警
- 15.监控微信告警
- 16.关于接口监控告警
- 17.prometheus-HA架构
- 18.总结
- 13.统一日志中心
- 01.统一日志中心建设意义
- 02.通过ELK收集mysql慢查询日志
- 03.通过elk收集微服务模块日志
- 04.通过elk收集nginx日志
- 05.统一日志中心性能优化
- 06.kibana安装部署
- 07.日志清理方案
- 08.日志性能测试指标
- 09.总结
- 14.数据查询平台
- 01.数据查询平台架构
- 02.mysql配置bin-log
- 03.单节点canal-server
- 04.canal-ha部署
- 05.canal-kafka部署
- 06.实时增量数据同步mysql
- 07.canal监控
- 08.clickhouse运维常见脚本
- 15.APM监控
- 1.Elastic APM
- 2.Skywalking
- 01.docker部署es
- 02.部署skywalking-server
- 03.部署skywalking-agent
- 16.压力测试
- 1.ocp.jmx
- 2.test.bat
- 3.压测脚本
- 4.压力报告
- 5.报告分析
- 6.压测平台
- 7.并发测试
- 8.wrk工具
- 9.nmon
- 10.jmh测试
- 17.SQL优化
- 1.oracle篇
- 01.基线测试
- 02.调优前奏
- 03.线上瓶颈定位
- 04.执行计划解读
- 05.高级SQL语句
- 06.SQL tuning
- 07.数据恢复
- 08.深入10053事件
- 09.深入10046事件
- 2.mysql篇
- 01.innodb存储引擎
- 02.BTree索引
- 03.执行计划
- 04.查询优化案例分析
- 05.为什么会走错索引
- 06.表连接优化问题
- 07.Connection连接参数
- 08.Centos7系统参数调优
- 09.mysql监控
- 10.高级SQL语句
- 11.常用维护脚本
- 12.percona-toolkit
- 18.redis高可用方案
- 1.免密登录
- 2.安装部署
- 3.配置文件
- 4.启动脚本
- 19.消息中间件搭建
- 19-01.rabbitmq集群搭建
- 01.rabbitmq01
- 02.rabbitmq02
- 03.rabbitmq03
- 04.镜像队列
- 05.haproxy搭建
- 06.keepalived
- 19-02.rocketmq搭建
- 19-03.kafka集群
- 20.mysql高可用方案
- 1.环境
- 2.mysql部署
- 3.Xtrabackup部署
- 4.Galera部署
- 5.galera for mysql 集群
- 6.haproxy+keepalived部署
- 21.es集群部署
- 22.生产实施优化
- 1.linux优化
- 2.jvm优化
- 3.feign优化
- 4.zuul性能优化
- 23.线上问题诊断
- 01.CPU性能评估工具
- 02.内存性能评估工具
- 03.IO性能评估工具
- 04.网络问题工具
- 05.综合诊断评估工具
- 06.案例诊断01
- 07.案例诊断02
- 08.案例诊断03
- 09.案例诊断04
- 10.远程debug
- 24.fiddler抓包实战
- 01.fiddler介绍
- 02.web端抓包
- 03.app抓包
- 25.疑难解答交流
- 01.有了auth/token获取token了为啥还要配置security的登录配置
- 02.权限数据存放在redis吗,代码在哪里啊
- 03.其他微服务和认证中心的关系
- 04.改包问题
- 05.use RequestContextListener or RequestContextFilter to expose the current request
- 06./oauth/token对应代码在哪里
- 07.验证码出不来
- 08./user/login
- 09.oauth无法自定义权限表达式
- 10.sleuth引发线程数过高问题
- 11.elk中使用7x版本问题
- 12.RedisCommandTimeoutException问题
- 13./oauth/token CPU过高
- 14.feign与权限标识符问题
- 15.动态路由RedisCommandInterruptedException: Command interrupted
- 26.学习资料
- 海量学习资料等你来拿
- 27.持续集成
- 01.git安装
- 02.代码仓库gitlab
- 03.代码仓库gogs
- 04.jdk&&maven
- 05.nexus安装
- 06.sonarqube
- 07.jenkins
- 28.Rancher部署
- 1.rancher-agent部署
- 2.rancher-server部署
- 3.ocp后端部署
- 4.演示前端部署
- 5.elk部署
- 6.docker私服搭建
- 7.rancher-server私服
- 8.rancher-agent docker私服
- 29.K8S部署OCP
- 01.准备OCP的构建环境和部署环境
- 02.部署顺序
- 03.在K8S上部署eureka-server
- 04.在K8S上部署mysql
- 05.在K8S上部署redis
- 06.在K8S上部署auth-server
- 07.在K8S上部署user-center
- 08.在K8S上部署api-gateway
- 09.在K8S上部署back-center
- 30.Spring Cloud Alibaba
- 01.统一的依赖管理
- 02.nacos-server
- 03.生产可用的Nacos集群
- 04.nacos配置中心
- 05.common.yaml
- 06.user-center
- 07.auth-server
- 08.api-gateway
- 09.log-center
- 10.file-center
- 11.back-center
- 12.sentinel-dashboard
- 12.01.sentinel流控规则
- 12.02.sentinel熔断降级规则
- 12.03.sentinel热点规则
- 12.04.sentinel系统规则
- 12.05.sentinel规则持久化
- 12.06.sentinel总结
- 13.sentinel整合openfeign
- 14.sentinel整合网关
- 1.sentinel整合zuul
- 2.sentinel整合scg
- 15.Dubbo与Nacos共存
- 31.Java源码剖析
- 01.基础数据类型和String
- 02.Arrays工具类
- 03.ArrayList源码分析
- 32.面试专题汇总
- 01.JVM专题汇总
- 02.多线程专题汇总
- 03.Spring专题汇总
- 04.springboot专题汇总
- 05.springcloud面试汇总
- 文档问题跟踪处理