
# 2.4.4 Adapter基础讲解
## 本节引言
> 从本节开始我们要讲的UI控件都是跟Adapter(适配器)打交道的,了解并学会使用这个Adapter很重要, Adapter是用来帮助填充数据的中间桥梁,简单点说就是:将各种数据以合适的形式显示到view上,提供 给用户看!
## 1.MVC模式的简单理解
> 在开始学习Adapter之前我们要来了解下这个MVC模式概念: 举个例子:大型的商业程序通常由多人一同开发完成,比如有人负责操作接口的规划与设计, 有人负责程序代码的编写如果要能够做到程序项目的分工就必须在程序的结构上做适合的安排 ,如果,接口设计与修改都涉及到程序代码的改变的话,那么两者的分工就会造成执行上的困难 良好的程序架构师将整个程序项目划分为如图的三个部分:
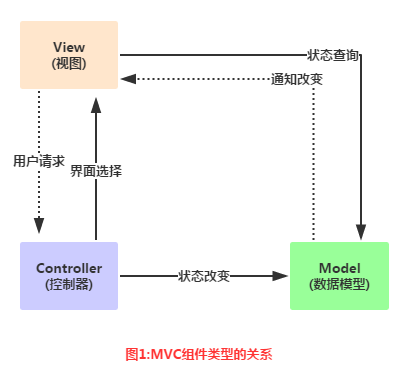
**关系图解析:**
> * **Model**:通常可以理解为数据,负责执行程序的核心运算与判断逻辑,,通过view获得用户 输入的数据,然后根据从数据库查询相关的信息,最后进行运算和判断,再将得到的结果交给view来显示
> * **view**:用户的操作接口,说白了就是GUI,应该使用哪种接口组件,组件间的排列位置与顺序都需要设计
> * **Controller**:控制器,作为model与view之间的枢纽,负责控制程序的执行流程以及对象之间的一个互动
而这个Adapter则是中间的这个Controller的部分: **Model**(数据) ---> **Controller**(以什么方式显示到)---> **View**(用户界面) 这就是简单MVC组件的简单理解!
## 2.Adapter概念解析
官方文档:[Adapter](http://androiddoc.qiniudn.com/reference/android/widget/Adapter.html)
首先我们来看看他的继承结构图:
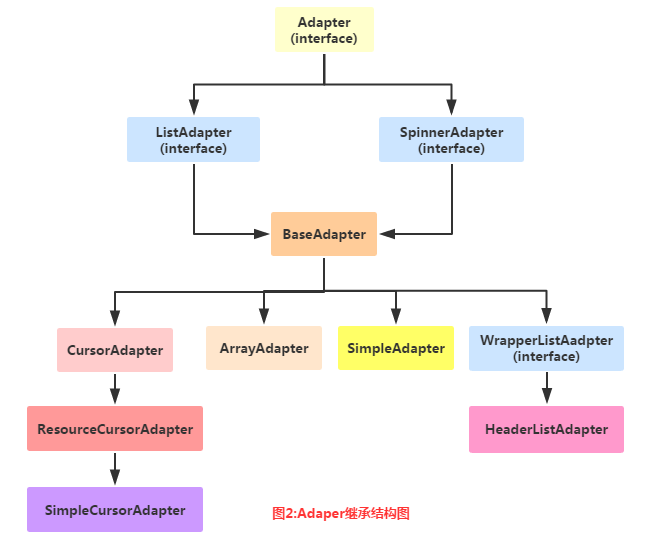
上面就是Adapter以及继承结构图了,接着我们介绍一下实际开发中还用到的几个Adapter吧!
> * **BaseAdapter**:抽象类,实际开发中我们会继承这个类并且重写相关方法,用得最多的一个Adapter!
> * **ArrayAdapter**:支持泛型操作,最简单的一个Adapter,只能展现一行文字~
> * **SimpleAdapter**:同样具有良好扩展性的一个Adapter,可以自定义多种效果!
> * **SimpleCursorAdapter**:用于显示简单文本类型的listView,一般在数据库那里会用到,不过有点过时, 不推荐使用!
其实一个BaseAdapter就够玩的了,至于其他的,实际开发中用得不多,后面用到在讲解~
## 3.代码示例:
好的,多说无益,写代码最实际,接下来我们来用写几个简单的Adapter实例, 帮助我们了解Adapter给我们带来的便利,另外,因为Adapter需要结合ListView, GridView等等控件讲解,一些高级一点的用法我们都放在ListView那里讲! 这里就简单演示下效果,另外这里用到的控件是ListView,下一节就会讲解, 现在看不懂也没关系!
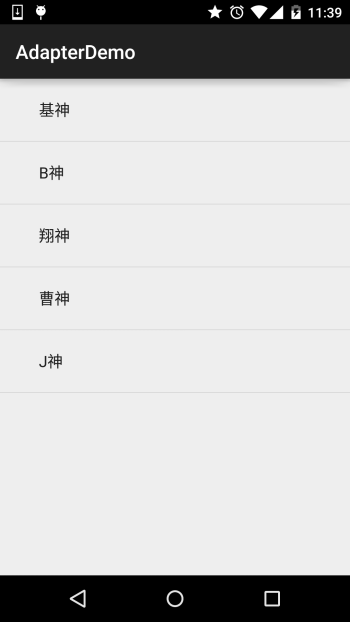
### 1)ArrayAdapter使用示例:
**运行效果图:**
**代码实现:**
```
public class MainActivity extends AppCompatActivity {
@Override
protected void onCreate(Bundle savedInstanceState) {
super.onCreate(savedInstanceState);
setContentView(R.layout.activity_main);
//要显示的数据
String[] strs = {"基神","B神","翔神","曹神","J神"};
//创建ArrayAdapter
ArrayAdapter<String> adapter = new ArrayAdapter<String>
(this,android.R.layout.simple_expandable_list_item_1,strs);
//获取ListView对象,通过调用setAdapter方法为ListView设置Adapter设置适配器
ListView list_test = (ListView) findViewById(R.id.list_test);
list_test.setAdapter(adapter);
}
}
```
**一些相关的东西:**
**1.**除了通过数组外,我们还可以写到一个数组资源文件中:
比如:在res\valuse下创建一个数组资源的xml文件:**arrays.xml**:
```
<?xml version="1.0" encoding="utf-8"?>
<resources>
<string-array name="myarray">
<item>语文</item>
<item>数学</item>
<item>英语</item>
</string-array>
</resources>
```
接着布局的listview属性设置下这个列表项:
```
<ListView
android:id="@id/list_test"
android:layout_height="match_parent"
android:layout_width="match_parent"
android:entries="@array/myarray"/>
```
就可以了~
当然我们也可以在Java代码中这样写:
```
ArrayAdapter<CharSequence> adapter = ArrayAdapter.createFromResource(this,
R.array.myarray,android.R.layout.simple_list_item_multiple_choice );
```
同样也是可以的!
**2.**一开始也说了这个ArrayAdapter支持泛型,那么集合必不可少啦,比如,这样写:
```
List<String> data = new ArrayList<String>();
data.add("基神");
data.add("B神");
ArrayAdapter<String> adapter = new ArrayAdapter<String>
(this,android.R.layout.simple_expandable_list_item_1,data);
```
就可以了~
**3.**我们看到了在实例化ArrayAdapter的第二个参数: **android.R.layout.simple_expandable_list_item_1** 其实这些是系统给我们提供好的一些ListView模板,有下面几种:
> **simple_list_item_1** : 单独一行的文本框  **simple_list_item_2** : 两个文本框组成  **simple_list_item_checked** : 每项都是由一个已选中的列表项  **simple_list_item_multiple_choice** : 都带有一个复选框 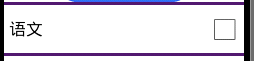 **simple_list_item_single_choice** : 都带有一个单选钮 
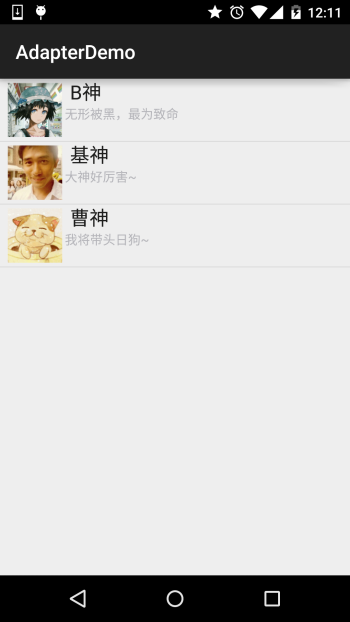
### 2)SimpleAdapter使用示例:
SimpleAdapter:简单的Adapter,看似简单,功能强大,下面我们来写个稍微复杂一点的列表 布局吧!
**运行效果图:**
**代码实现:**
先来编写一个列表项目每一项的布局:
**list_item.xml**
```
<?xml version="1.0" encoding="utf-8"?>
<LinearLayout xmlns:android="http://schemas.android.com/apk/res/android"
android:layout_width="match_parent"
android:layout_height="match_parent"
android:orientation="horizontal">
<!-- 定义一个用于显示头像的ImageView -->
<ImageView
android:id="@+id/imgtou"
android:layout_width="64dp"
android:layout_height="64dp"
android:baselineAlignBottom="true"
android:paddingLeft="8dp" />
<!-- 定义一个竖直方向的LinearLayout,把QQ呢称与说说的文本框设置出来 -->
<LinearLayout
android:layout_width="match_parent"
android:layout_height="wrap_content"
android:orientation="vertical">
<TextView
android:id="@+id/name"
android:layout_width="wrap_content"
android:layout_height="wrap_content"
android:paddingLeft="8dp"
android:textColor="#1D1D1C"
android:textSize="20sp" />
<TextView
android:id="@+id/says"
android:layout_width="wrap_content"
android:layout_height="wrap_content"
android:paddingLeft="8px"
android:textColor="#B4B4B9"
android:textSize="14sp" />
</LinearLayout>
</LinearLayout>
```
接下来是**MainActivity.java**:
```
public class MainActivity extends AppCompatActivity {
private String[] names = new String[]{"B神", "基神", "曹神"};
private String[] says = new String[]{"无形被黑,最为致命", "大神好厉害~", "我将带头日狗~"};
private int[] imgIds = new int[]{R.mipmap.head_icon1, R.mipmap.head_icon2, R.mipmap.head_icon3};
@Override
protected void onCreate(Bundle savedInstanceState) {
super.onCreate(savedInstanceState);
setContentView(R.layout.activity_main);
List<Map<String, Object>> listitem = new ArrayList<Map<String, Object>>();
for (int i = 0; i < names.length; i++) {
Map<String, Object> showitem = new HashMap<String, Object>();
showitem.put("touxiang", imgIds[i]);
showitem.put("name", names[i]);
showitem.put("says", says[i]);
listitem.add(showitem);
}
//创建一个simpleAdapter
SimpleAdapter myAdapter = new SimpleAdapter(getApplicationContext(), listitem, R.layout.list_item, new String[]{"touxiang", "name", "says"}, new int[]{R.id.imgtou, R.id.name, R.id.says});
ListView listView = (ListView) findViewById(R.id.list_test);
listView.setAdapter(myAdapter);
}
}
```
好的,上面就是SimpleAdapter的简单用法了,有点意思~
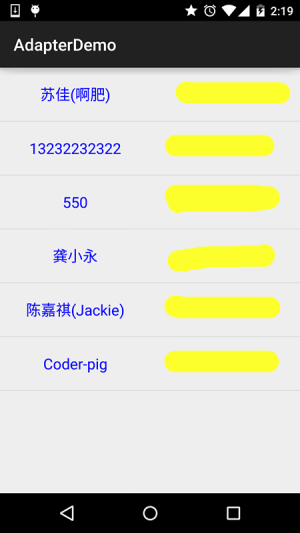
### 3)SimpleCursorAdapter使用示例:
虽然这东西过时了,不过对于不怎么会SQLite的初学者来说,用起来还是蛮方便的! 记得前面我们学ContentProivder写过的读取联系人的例子么?之前是通过打印Log的 方式显示出来,现在我们通过这个SimpleCursorAdapter把它显示到ListView上!
**实现效果图**:
**代码实现**:
先写下listView每个item的布局:
**list_item.xml**:
```
<?xml version="1.0" encoding="utf-8"?>
<LinearLayout xmlns:android="http://schemas.android.com/apk/res/android"
android:layout_width="match_parent"
android:layout_height="match_parent"
android:orientation="horizontal">
<TextView
android:id="@+id/list_name"
android:layout_width="0dp"
android:layout_height="64dp"
android:layout_weight="1"
android:gravity="center"
android:text="小猪"
android:textColor="#0000FF"
android:textSize="18sp" />
<TextView
android:id="@+id/list_phone"
android:layout_width="0dp"
android:layout_height="64dp"
android:layout_weight="1"
android:gravity="center"
android:text="13798989898"
android:textColor="#EA5C4D"
android:textSize="18sp" />
</LinearLayout>
```
接着activity_main布局和前面的一样,就是简单的ListView,然后是
**MainActivity.java**:
```
public class MainActivity extends AppCompatActivity {
@Override
protected void onCreate(Bundle savedInstanceState) {
super.onCreate(savedInstanceState);
setContentView(R.layout.activity_main);
ListView list_test = (ListView) findViewById(R.id.list_test);
//读取联系人
Cursor cursor = getContentResolver()
.query(ContactsContract.CommonDataKinds.Phone.CONTENT_URI, null, null, null, null);
SimpleCursorAdapter spcAdapter = new SimpleCursorAdapter(this,R.layout.list_item,cursor,
new String[]{ContactsContract.CommonDataKinds.Phone.DISPLAY_NAME,ContactsContract.CommonDataKinds.Phone.NUMBER},
new int[]{R.id.list_name,R.id.list_phone});
list_test.setAdapter(spcAdapter);
}
}
```
最后AndroidManifest.xml里加个读联系人的权限就可以了!
```
<uses-permission android:name="android.permission.READ_CONTACTS"/>
```
**一问一答:**
> **问**:就这么简单?
> **——答**:是的,直接获取到Cursor,然后绑定就好了,无需你自己再写什么SQL语句!
> **问**:你说这东西过时了,那拿什么来代替?
> **——答**:一般的做法是自己重写BaseAdapter,获取到数据集合后跟对应的控件进行绑定!
> **问**:这个SimpleCursorAdapter还有没有要注意的地方?
> **——答**:有,使用SimpleCursorAdapter的话,绑定的数据库表中一定要有_id这个字段, 或者as_ id;而且在绑定时取出的数据必须包含这个_id_项,否则的话会报以下错误! **java.lang.IllegalArgumentException: column '**id' does not exist**
## 本节小结:
> 好的,关于Adapter的基础讲解就到这里,当然我们这里讲解的三个Adapter,我们实际开发中... 基本上用不到,哈哈,除了SimpleAdapter偶尔可能会用下,一般我们都是重写BaseAdapter的!
> 另外,关于BaseAdapter的,有很多东西要讲解,就把他丢到ListView那里一起讲,毕竟Adapter 总是和View沾边,而且ListView是我们用得最多的一个空间~嗯,本节就到这里,谢谢~
- 1.0 Android基础入门教程
- 1.0.1 2015年最新Android基础入门教程目录
- 1.1 背景相关与系统架构分析
- 1.2 开发环境搭建
- 1.2.1 使用Eclipse + ADT + SDK开发Android APP
- 1.2.2 使用Android Studio开发Android APP
- 1.3 SDK更新不了问题解决
- 1.4 Genymotion模拟器安装
- 1.5.1 Git使用教程之本地仓库的基本操作
- 1.5.2 Git之使用GitHub搭建远程仓库
- 1.6 .9(九妹)图片怎么玩
- 1.7 界面原型设计
- 1.8 工程相关解析(各种文件,资源访问)
- 1.9 Android程序签名打包
- 1.11 反编译APK获取代码&资源
- 2.1 View与ViewGroup的概念
- 2.2.1 LinearLayout(线性布局)
- 2.2.2 RelativeLayout(相对布局)
- 2.2.3 TableLayout(表格布局)
- 2.2.4 FrameLayout(帧布局)
- 2.2.5 GridLayout(网格布局)
- 2.2.6 AbsoluteLayout(绝对布局)
- 2.3.1 TextView(文本框)详解
- 2.3.2 EditText(输入框)详解
- 2.3.3 Button(按钮)与ImageButton(图像按钮)
- 2.3.4 ImageView(图像视图)
- 2.3.5.RadioButton(单选按钮)&Checkbox(复选框)
- 2.3.6 开关按钮ToggleButton和开关Switch
- 2.3.7 ProgressBar(进度条)
- 2.3.8 SeekBar(拖动条)
- 2.3.9 RatingBar(星级评分条)
- 2.4.1 ScrollView(滚动条)
- 2.4.2 Date & Time组件(上)
- 2.4.3 Date & Time组件(下)
- 2.4.4 Adapter基础讲解
- 2.4.5 ListView简单实用
- 2.4.6 BaseAdapter优化
- 2.4.7ListView的焦点问题
- 2.4.8 ListView之checkbox错位问题解决
- 2.4.9 ListView的数据更新问题
- 2.5.0 构建一个可复用的自定义BaseAdapter
- 2.5.1 ListView Item多布局的实现
- 2.5.2 GridView(网格视图)的基本使用
- 2.5.3 Spinner(列表选项框)的基本使用
- 2.5.4 AutoCompleteTextView(自动完成文本框)的基本使用
- 2.5.5 ExpandableListView(可折叠列表)的基本使用
- 2.5.6 ViewFlipper(翻转视图)的基本使用
- 2.5.7 Toast(吐司)的基本使用
- 2.5.8 Notification(状态栏通知)详解
- 2.5.9 AlertDialog(对话框)详解
- 2.6.0 其他几种常用对话框基本使用
- 2.6.1 PopupWindow(悬浮框)的基本使用
- 2.6.2 菜单(Menu)
- 2.6.3 ViewPager的简单使用
- 2.6.4 DrawerLayout(官方侧滑菜单)的简单使用
- 3.1.1 基于监听的事件处理机制
- 3.2 基于回调的事件处理机制
- 3.3 Handler消息传递机制浅析
- 3.4 TouchListener PK OnTouchEvent + 多点触碰
- 3.5 监听EditText的内容变化
- 3.6 响应系统设置的事件(Configuration类)
- 3.7 AnsyncTask异步任务
- 3.8 Gestures(手势)
- 4.1.1 Activity初学乍练
- 4.1.2 Activity初窥门径
- 4.1.3 Activity登堂入室
- 4.2.1 Service初涉
- 4.2.2 Service进阶
- 4.2.3 Service精通
- 4.3.1 BroadcastReceiver牛刀小试
- 4.3.2 BroadcastReceiver庖丁解牛
- 4.4.2 ContentProvider再探——Document Provider
- 4.5.1 Intent的基本使用
- 4.5.2 Intent之复杂数据的传递
- 5.1 Fragment基本概述
- 5.2.1 Fragment实例精讲——底部导航栏的实现(方法1)
- 5.2.2 Fragment实例精讲——底部导航栏的实现(方法2)
- 5.2.3 Fragment实例精讲——底部导航栏的实现(方法3)
- 5.2.4 Fragment实例精讲——底部导航栏+ViewPager滑动切换页面
- 5.2.5 Fragment实例精讲——新闻(购物)类App列表Fragment的简单实现
- 6.1 数据存储与访问之——文件存储读写
- 6.2 数据存储与访问之——SharedPreferences保存用户偏好参数
- 6.3.1 数据存储与访问之——初见SQLite数据库
- 6.3.2 数据存储与访问之——又见SQLite数据库
- 7.1.1 Android网络编程要学的东西与Http协议学习
- 7.1.2 Android Http请求头与响应头的学习
- 7.1.3 Android HTTP请求方式:HttpURLConnection
- 7.1.4 Android HTTP请求方式:HttpClient
- 7.2.1 Android XML数据解析
- 7.2.2 Android JSON数据解析
- 7.3.1 Android 文件上传
- 7.3.2 Android 文件下载(1)
- 7.3.3 Android 文件下载(2)
- 7.4 Android 调用 WebService
- 7.5.1 WebView(网页视图)基本用法
- 7.5.2 WebView和JavaScrip交互基础
- 7.5.3 Android 4.4后WebView的一些注意事项
- 7.5.4 WebView文件下载
- 7.5.5 WebView缓存问题
- 7.5.6 WebView处理网页返回的错误码信息
- 7.6.1 Socket学习网络基础准备
- 7.6.2 基于TCP协议的Socket通信(1)
- 7.6.3 基于TCP协议的Socket通信(2)
- 7.6.4 基于UDP协议的Socket通信
- 8.1.1 Android中的13种Drawable小结 Part 1
- 8.1.2 Android中的13种Drawable小结 Part 2
- 8.1.3 Android中的13种Drawable小结 Part 3
- 8.2.1 Bitmap(位图)全解析 Part 1
- 8.2.2 Bitmap引起的OOM问题
- 8.3.1 三个绘图工具类详解
- 8.3.2 绘图类实战示例
- 8.3.3 Paint API之—— MaskFilter(面具)
- 8.3.4 Paint API之—— Xfermode与PorterDuff详解(一)
- 8.3.5 Paint API之—— Xfermode与PorterDuff详解(二)
- 8.3.6 Paint API之—— Xfermode与PorterDuff详解(三)
- 8.3.7 Paint API之—— Xfermode与PorterDuff详解(四)
- 8.3.8 Paint API之—— Xfermode与PorterDuff详解(五)
- 8.3.9 Paint API之—— ColorFilter(颜色过滤器)(1/3)
- 8.3.10 Paint API之—— ColorFilter(颜色过滤器)(2-3)
- 8.3.11 Paint API之—— ColorFilter(颜色过滤器)(3-3)
- 8.3.12 Paint API之—— PathEffect(路径效果)
- 8.3.13 Paint API之—— Shader(图像渲染)
- 8.3.14 Paint几个枚举/常量值以及ShadowLayer阴影效果
- 8.3.15 Paint API之——Typeface(字型)
- 8.3.16 Canvas API详解(Part 1)
- 8.3.17 Canvas API详解(Part 2)剪切方法合集
- 8.3.18 Canvas API详解(Part 3)Matrix和drawBitmapMash
- 8.4.1 Android动画合集之帧动画
- 8.4.2 Android动画合集之补间动画
- 8.4.3 Android动画合集之属性动画-初见
- 8.4.4 Android动画合集之属性动画-又见
- 9.1 使用SoundPool播放音效(Duang~)
- 9.2 MediaPlayer播放音频与视频
- 9.3 使用Camera拍照
- 9.4 使用MediaRecord录音
- 10.1 TelephonyManager(电话管理器)
- 10.2 SmsManager(短信管理器)
- 10.3 AudioManager(音频管理器)
- 10.4 Vibrator(振动器)
- 10.5 AlarmManager(闹钟服务)
- 10.6 PowerManager(电源服务)
- 10.7 WindowManager(窗口管理服务)
- 10.8 LayoutInflater(布局服务)
- 10.9 WallpaperManager(壁纸管理器)
- 10.10 传感器专题(1)——相关介绍
- 10.11 传感器专题(2)——方向传感器
- 10.12 传感器专题(3)——加速度/陀螺仪传感器
- 10.12 传感器专题(4)——其他传感器了解
- 10.14 Android GPS初涉
- 11.0《2015最新Android基础入门教程》完结散花~