
## Keyboard and Mouse Control
This example illustrates the use of the Mouse and Keyboard libraries together. Five momentary switches act as directional buttons for your cursor. When a button is pressed, the cursor on your screen will move, and a keypress, corresponding to the letter associated with the direction, will be sent to the computer. Once you have the Leonardo, Micro or Due programmed and wired up, open up your favorite text editor to see the results.
NB: When you use the Mouse and Keyboard library functions, the Arduino takes over your computer's cursor! To insure you don't lose control of your computer while running a sketch with this function, make sure to set up a controller before you call Mouse.move().
### Hardware Required
* Arduino Leonardo, Micro or Arduino Due board
* 5 pushbuttons
* 5 10k ohm resistors
* hook-up wires
* breadboard
### Software Required
* Any text editor
### Circuit
Attach one end of the the pushbuttons to pins 2, 3, 4, 5, and 6 on the board. Attach the other end to +5V. Use the resistors as pull-downs, providing a reference to ground for the switches. Attach them from the pin connecting to the board to ground.
Once you've programmed your board, unplug the USB cable and open a text editor. Connect your board to your computer and press the buttons to write in the document as you move the cursor.
click the images to enlarge
### Schematic
[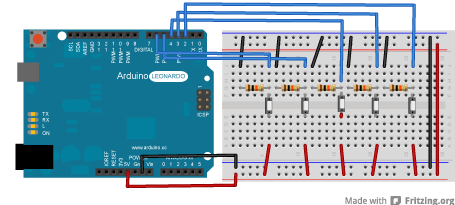](https://www.arduino.cc/en/uploads/Tutorial/KeyboardMouseControl_bb.png)
image developed using [Fritzing](http://www.fritzing.org/). For more circuit examples, see the [Fritzing project page](http://fritzing.org/projects/)
[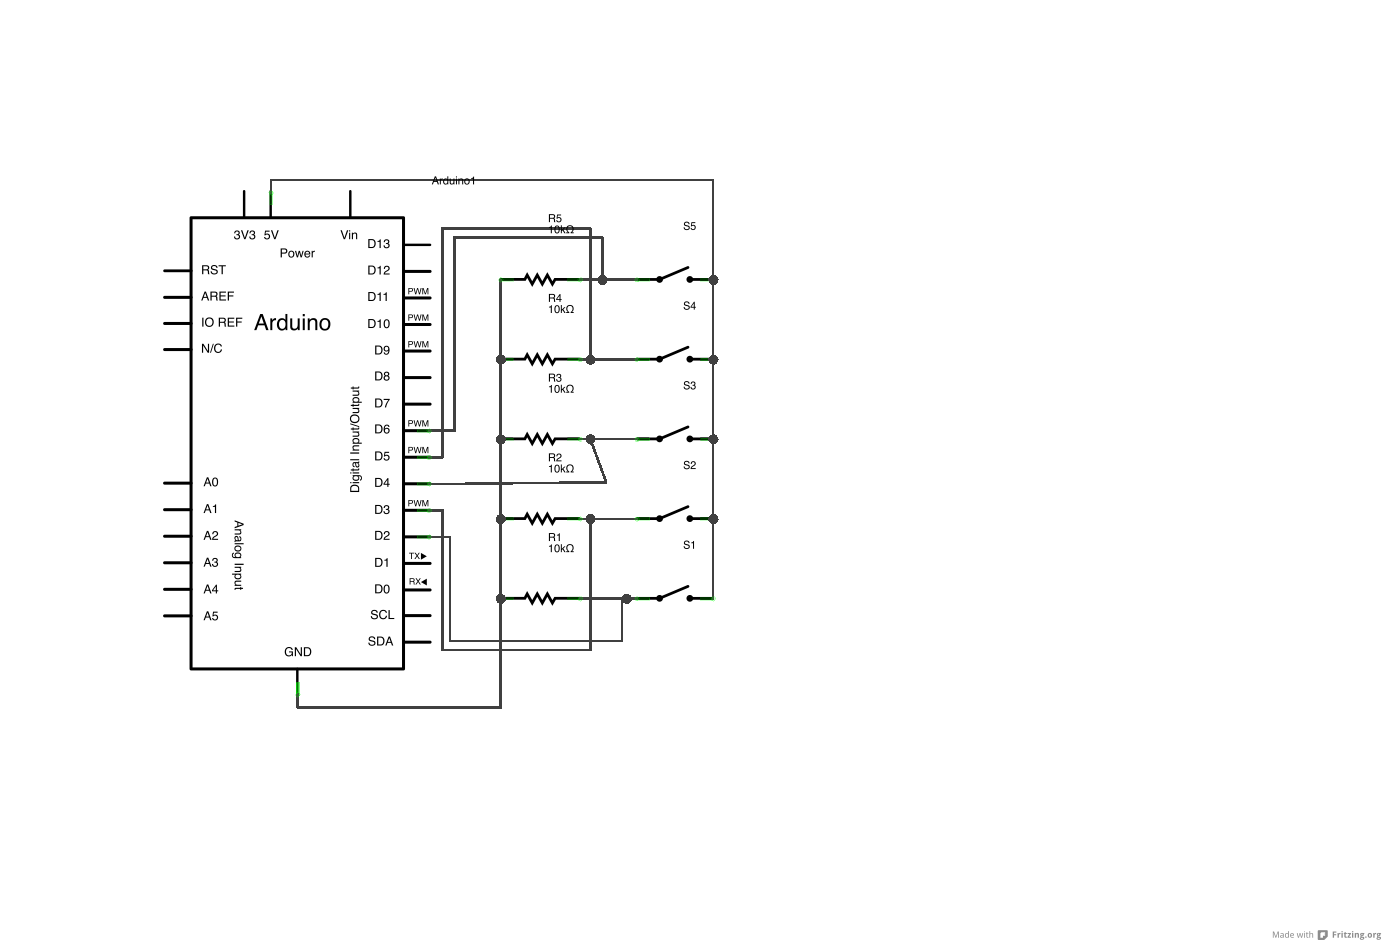](https://www.arduino.cc/en/uploads/Tutorial/KeyboardMouseControl_schem.png)
click the images to enlarge
### Code
/*
KeyboardAndMouseControl
Controls the mouse from five pushbuttons on an Arduino Leonardo, Micro or Due.
Hardware:
- five pushbuttons attached to D2, D3, D4, D5, D6
The mouse movement is always relative. This sketch reads four pushbuttons, and
uses them to set the movement of the mouse.
WARNING: When you use the Mouse.move() command, the Arduino takes over your
mouse! Make sure you have control before you use the mouse commands.
created 15 Mar 2012
modified 27 Mar 2012
by Tom Igoe
This example code is in the public domain.
http://www.arduino.cc/en/Tutorial/KeyboardAndMouseControl
*/
#include "Keyboard.h"
#include "Mouse.h"
// set pin numbers for the five buttons:
const int upButton = 2;
const int downButton = 3;
const int leftButton = 4;
const int rightButton = 5;
const int mouseButton = 6;
void setup() { // initialize the buttons' inputs:
pinMode(upButton, INPUT);
pinMode(downButton, INPUT);
pinMode(leftButton, INPUT);
pinMode(rightButton, INPUT);
pinMode(mouseButton, INPUT);
Serial.begin(9600);
// initialize mouse control:
Mouse.begin();
Keyboard.begin();
}
void loop() {
// use serial input to control the mouse:
if (Serial.available() > 0) {
char inChar = Serial.read();
switch (inChar) {
case 'u':
// move mouse up
Mouse.move(0, -40);
break;
case 'd':
// move mouse down
Mouse.move(0, 40);
break;
case 'l':
// move mouse left
Mouse.move(-40, 0);
break;
case 'r':
// move mouse right
Mouse.move(40, 0);
break;
case 'm':
// perform mouse left click
Mouse.click(MOUSE_LEFT);
break;
}
}
// use the pushbuttons to control the keyboard:
if (digitalRead(upButton) == HIGH) {
Keyboard.write('u');
}
if (digitalRead(downButton) == HIGH) {
Keyboard.write('d');
}
if (digitalRead(leftButton) == HIGH) {
Keyboard.write('l');
}
if (digitalRead(rightButton) == HIGH) {
Keyboard.write('r');
}
if (digitalRead(mouseButton) == HIGH) {
Keyboard.write('m');
}
}
[[Get Code]](https://www.arduino.cc/en/Tutorial/KeyboardAndMouseControl?action=sourceblock&num=1)
### See Also
* [Keyboard.write](https://www.arduino.cc/en/Reference/KeyboardWrite)()
* [Keyboard.print](https://www.arduino.cc/en/Reference/KeyboardPrint)()
* [Keyboard.println](https://www.arduino.cc/en/Reference/KeyboardPrintln)()
* [KeyboardLogout](https://www.arduino.cc/en/Tutorial/KeyboardLogout) - Logs out the current user with key commands.
* [KeyboardMessage](https://www.arduino.cc/en/Tutorial/KeyboardMessage) - Sends a text string when a button is pressed.
* [KeyboardReprogram](https://www.arduino.cc/en/Tutorial/KeyboardReprogram) - Opens a new window in the Arduino IDE and reprograms the Leonardo with a simple blink program.
* [KeyboardSerial](https://www.arduino.cc/en/Tutorial/KeyboardSerial) - Reads a byte from the serial port, and sends back a keystroke.
* [ButtonMouseControl](https://www.arduino.cc/en/Tutorial/ButtonMouseControl) - Control cursor movement with 5 pushbuttons.
* [JoystickMouseControl](https://www.arduino.cc/en/Tutorial/JoystickMouseControl) - Controls a computer's cursor movement with a Joystick when a button is pressed.
- 说明
- 系统示例文件目录结构及说明
- 01.Basics
- AnalogReadSerial
- BareMinimum
- Blink
- DigitalReadSerial
- Fade
- ReadAnalogVoltage
- 02.Digital
- BlinkWithoutDelay
- Button
- Debounce
- DigitalInputPullup
- StateChangeDetection
- toneKeyboard
- toneMelody
- toneMultiple
- tonePitchFollower
- 03.Analog
- AnalogInOutSerial
- AnalogInput
- AnalogWriteMega
- Calibration
- Fading
- Smoothing
- 04.Communication
- ASCIITable
- Dimmer
- Graph
- Midi
- MultiSerial
- PhysicalPixel
- ReadASCIIString
- SerialCallResponse
- SerialCallResponseASCII
- SerialEvent
- SerialPassthrough
- VirtualColorMixer
- 05.Control
- Arrays
- ForLoopIteration
- IfStatementConditional
- switchCase
- switchCase2
- WhileStatementConditional
- 06.Sensors
- ADXL3xx
- Knock
- Memsic2125
- Ping
- 07.Display
- barGraph
- RowColumnScanning
- 08.Strings
- CharacterAnalysis
- StringAdditionOperator
- StringAppendOperator
- StringCaseChanges
- StringCharacters
- StringComparisonOperators
- StringConstructors
- StringIndexOf
- StringLength
- StringLengthTrim
- StringReplace
- StringStartsWithEndsWith
- StringSubstring
- StringToInt
- 09.USB
- Keyboard
- KeyboardLogout
- KeyboardMessage
- KeyboardReprogram
- KeyboardSerial
- KeyboardAndMouseControl
- Mouse
- ButtonMouseControl
- JoystickMouseControl
- 10.StarterKit_BasicKit (与特定硬件相关,暂无)
- p02_SpaceshipInterface
- p03_LoveOMeter
- p04_ColorMixingLamp
- p05_ServoMoodIndicator
- p06_LightTheremin
- p07_Keyboard
- p08_DigitalHourglass
- p09_MotorizedPinwheel
- p10_Zoetrope
- p11_CrystalBall
- p12_KnockLock
- p13_TouchSensorLamp
- p14_TweakTheArduinoLogo
- p15_HackingButtons
- 11.ArduinoISP(暂无)
- ArduinoISP