
## Joystick Mouse Control
Using the Mouse library, you can controls a computer's onscreen cursor with an Arduino Leonardo, Micro, or Due. This particular example uses a pushbutton to turn on and off mouse control with a joystick.
Cursor movement from the Arduino is always relative. So every time the analog input is read, the cursor's position is updated relative to it's current position.
Two analog inputs ranging from 0 to 1023 are translated to ranges of -12 to 12\. The sketch assumes that the joystick resting values are around the middle of the range, but that they vary within a threshold.
The pushbutton allows you to toggle mouse control on and off. As an option you may connect a status LED to pin 5 that lights upwhen the Arduino is controlling the mouse. A second pushbutton may be connected with another 10k ohm pulldown (to GND) resistor to D3 to act as the left click of the mouse.
NB: When you use the Mouse.move() command, the Arduino takes over your computer's cursor! To insure you don't lose control of your computer while running a sketch with this function, make sure to set up a controller before you call Mouse.move(). This sketch includes a pushbutton to toggle the mouse control state, so you can turn on and off mouse control.
### Hardware Required
* Arduino Leonardo, Micro, or Due board
* 2 axis joystick
* momentary pushbutton (possibly integrated in the joystick)
* LED
* 220 ohm resistor
* 10k ohm resistor (if needed as pulldown)
### Circuit
Connect your Leonardo board to your computer with a micro-USB cable. The pushbutton is connected to pin 6\. If you're using a part like the Joystick shield pictured below, you may not need a pulldown resistor. The x-axis on the joystick is connected to analog in 0, the y-axis is on analog in 1.
[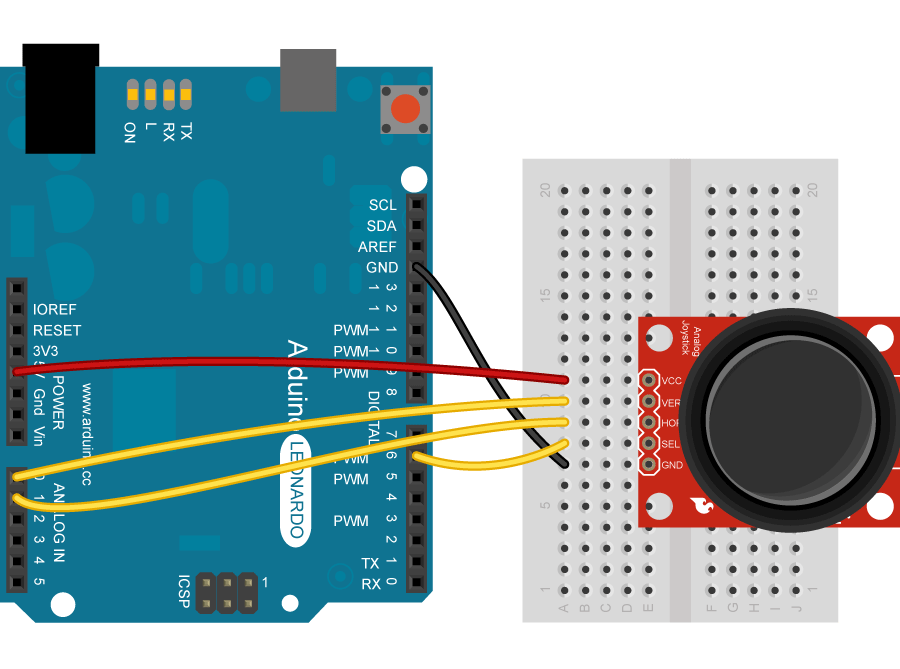](https://www.arduino.cc/en/uploads/Tutorial/JoystickMouse_2_bb.png)
image developed using [Fritzing](http://www.fritzing.org/). For more circuit examples, see the [Fritzing project page](http://fritzing.org/projects/)
click the images to enlarge
### Schematic
[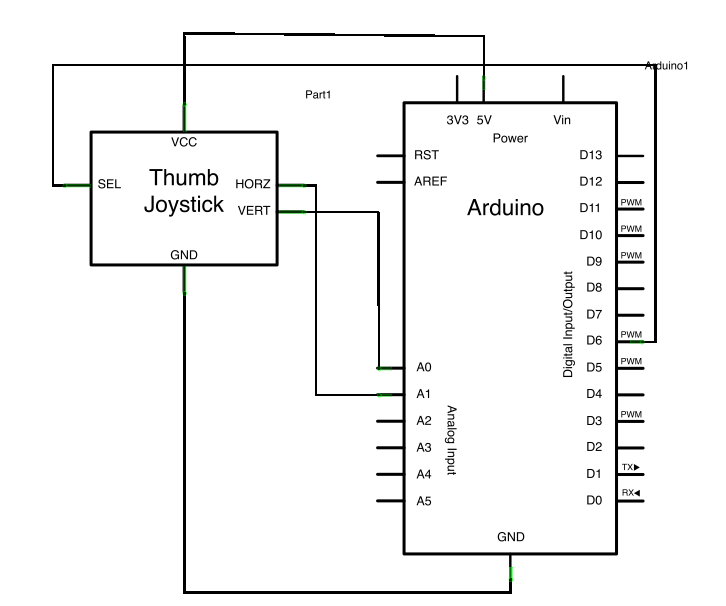](https://www.arduino.cc/en/uploads/Tutorial/joystickMouse_schem.png)
click the images to enlarge
### Code
/*
JoystickMouseControl
Controls the mouse from a joystick on an Arduino Leonardo, Micro or Due.
Uses a pushbutton to turn on and off mouse control, and a second pushbutton
to click the left mouse button.
Hardware:
- 2-axis joystick connected to pins A0 and A1
- pushbuttons connected to pin D2 and D3
The mouse movement is always relative. This sketch reads two analog inputs
that range from 0 to 1023 (or less on either end) and translates them into
ranges of -6 to 6.
The sketch assumes that the joystick resting values are around the middle of
the range, but that they vary within a threshold.
WARNING: When you use the Mouse.move() command, the Arduino takes over your
mouse! Make sure you have control before you use the command. This sketch
includes a pushbutton to toggle the mouse control state, so you can turn on
and off mouse control.
created 15 Sep 2011
updated 28 Mar 2012
by Tom Igoe
This example code is in the public domain.
http://www.arduino.cc/en/Tutorial/JoystickMouseControl
*/
#include "Mouse.h"
// set pin numbers for switch, joystick axes, and LED:
const int switchPin = 2; // switch to turn on and off mouse control
const int mouseButton = 3; // input pin for the mouse pushButton
const int xAxis = A0; // joystick X axis
const int yAxis = A1; // joystick Y axis
const int ledPin = 5; // Mouse control LED
// parameters for reading the joystick:
int range = 12; // output range of X or Y movement
int responseDelay = 5; // response delay of the mouse, in ms
int threshold = range / 4; // resting threshold
int center = range / 2; // resting position value
boolean mouseIsActive = false; // whether or not to control the mouse
int lastSwitchState = LOW; // previous switch state
void setup() {
pinMode(switchPin, INPUT); // the switch pin
pinMode(ledPin, OUTPUT); // the LED pin
// take control of the mouse:
Mouse.begin();
}
void loop() {
// read the switch:
int switchState = digitalRead(switchPin);
// if it's changed and it's high, toggle the mouse state:
if (switchState != lastSwitchState) {
if (switchState == HIGH) {
mouseIsActive = !mouseIsActive;
// turn on LED to indicate mouse state:
digitalWrite(ledPin, mouseIsActive);
}
}
// save switch state for next comparison:
lastSwitchState = switchState;
// read and scale the two axes:
int xReading = readAxis(A0);
int yReading = readAxis(A1);
// if the mouse control state is active, move the mouse:
if (mouseIsActive) {
Mouse.move(xReading, yReading, 0);
}
// read the mouse button and click or not click:
// if the mouse button is pressed:
if (digitalRead(mouseButton) == HIGH) {
// if the mouse is not pressed, press it:
if (!Mouse.isPressed(MOUSE_LEFT)) {
Mouse.press(MOUSE_LEFT);
}
}
// else the mouse button is not pressed:
else {
// if the mouse is pressed, release it:
if (Mouse.isPressed(MOUSE_LEFT)) {
Mouse.release(MOUSE_LEFT);
}
}
delay(responseDelay);
}
/*
reads an axis (0 or 1 for x or y) and scales the analog input range to a range
from 0 to
*/
int readAxis(int thisAxis) {
// read the analog input:
int reading = analogRead(thisAxis);
// map the reading from the analog input range to the output range:
reading = map(reading, 0, 1023, 0, range);
// if the output reading is outside from the rest position threshold, use it:
int distance = reading - center;
if (abs(distance) threshold) {
distance = 0;
}
// return the distance for this axis:
return distance;
}
[[Get Code]](https://www.arduino.cc/en/Tutorial/JoystickMouseControl?action=sourceblock&num=1)
### See Also
* [Mouse.click](https://www.arduino.cc/en/Reference/MouseClick)()
* [Mouse.move](https://www.arduino.cc/en/Reference/MouseMove)()
* [Mouse.press](https://www.arduino.cc/en/Reference/MousePress)()
* [Mouse.release](https://www.arduino.cc/en/Reference/MouseRelease)()
* [Mouse.isPressed](https://www.arduino.cc/en/Reference/MouseIsPressed)()
* [KeyboardLogout](https://www.arduino.cc/en/Tutorial/KeyboardLogout) - Logs out the current user with key commands.
* [KeyboardMessage](https://www.arduino.cc/en/Tutorial/KeyboardMessage) - Sends a text string when a button is pressed.
* [KeyboardReprogram](https://www.arduino.cc/en/Tutorial/KeyboardReprogram) - Opens a new window in the Arduino IDE and reprograms the Leonardo with a simple blink program.
* [KeyboardSerial](https://www.arduino.cc/en/Tutorial/KeyboardSerial) - Reads a byte from the serial port, and sends back a keystroke.
* [KeyboardAndMouseControl](https://www.arduino.cc/en/Tutorial/KeyboardAndMouseControl) - Demonstrates the Mouse and Keyboard commands in one program.
* [ButtonMouseControl](https://www.arduino.cc/en/Tutorial/ButtonMouseControl) - Control cursor movement with 5 pushbuttons.
- 说明
- 系统示例文件目录结构及说明
- 01.Basics
- AnalogReadSerial
- BareMinimum
- Blink
- DigitalReadSerial
- Fade
- ReadAnalogVoltage
- 02.Digital
- BlinkWithoutDelay
- Button
- Debounce
- DigitalInputPullup
- StateChangeDetection
- toneKeyboard
- toneMelody
- toneMultiple
- tonePitchFollower
- 03.Analog
- AnalogInOutSerial
- AnalogInput
- AnalogWriteMega
- Calibration
- Fading
- Smoothing
- 04.Communication
- ASCIITable
- Dimmer
- Graph
- Midi
- MultiSerial
- PhysicalPixel
- ReadASCIIString
- SerialCallResponse
- SerialCallResponseASCII
- SerialEvent
- SerialPassthrough
- VirtualColorMixer
- 05.Control
- Arrays
- ForLoopIteration
- IfStatementConditional
- switchCase
- switchCase2
- WhileStatementConditional
- 06.Sensors
- ADXL3xx
- Knock
- Memsic2125
- Ping
- 07.Display
- barGraph
- RowColumnScanning
- 08.Strings
- CharacterAnalysis
- StringAdditionOperator
- StringAppendOperator
- StringCaseChanges
- StringCharacters
- StringComparisonOperators
- StringConstructors
- StringIndexOf
- StringLength
- StringLengthTrim
- StringReplace
- StringStartsWithEndsWith
- StringSubstring
- StringToInt
- 09.USB
- Keyboard
- KeyboardLogout
- KeyboardMessage
- KeyboardReprogram
- KeyboardSerial
- KeyboardAndMouseControl
- Mouse
- ButtonMouseControl
- JoystickMouseControl
- 10.StarterKit_BasicKit (与特定硬件相关,暂无)
- p02_SpaceshipInterface
- p03_LoveOMeter
- p04_ColorMixingLamp
- p05_ServoMoodIndicator
- p06_LightTheremin
- p07_Keyboard
- p08_DigitalHourglass
- p09_MotorizedPinwheel
- p10_Zoetrope
- p11_CrystalBall
- p12_KnockLock
- p13_TouchSensorLamp
- p14_TweakTheArduinoLogo
- p15_HackingButtons
- 11.ArduinoISP(暂无)
- ArduinoISP