我们打开IDEA后,点击项目的启动按钮,将会触发以下错误:
```
Error starting ApplicationContext. To display the conditions report re-run your application with 'debug' enabled.
启动应用程序上下文时发生错误。开始'debug'模式后重新启动应用来查看健康报告。
2019-09-30 10:11:12.791 ERROR 27334 --- [ main] o.s.b.d.LoggingFailureAnalysisReporter :
时间 日志类型 进程号 -- [线程标记] 包名(错误是由谁发出的):
***************************
APPLICATION FAILED TO START
系统启动失败
***************************
Description:
描述:
Failed to configure a DataSource: 'url' attribute is not specified and no embedded datasource could be configured.
在配置数据源时发生错误:没有定义'url'属性并且也没有配置嵌入式的数据源
Reason: Failed to determine a suitable driver class
原因:在检测一个适用的驱动类型时发生错误
Action:
Action:(直译不太好,也没有特别准备的感觉,就叫Action)
Consider the following:
请考虑下面的建议:
If you want an embedded database (H2, HSQL or Derby), please put it on the classpath.
如果你想使用一个潜入式的数据库(比如:hH2, HSQL或者Derby),请在classpath中添加它。
If you have database settings to be loaded from a particular profile you may need to activate it (no profiles are currently active).
如果你的数据库的配置是由某个特定的文件载后的,那么你可能需要激活这个配置文件(因为当前的活动没有找到任何配置文件)
Process finished with exit code 1
进程返回了退出代码1,结束
```
> 这应该是本教程最后一次如此翻译了。只所以译的这么完全是想告诉大家:报错内容一定要想办法看明白,因为如果某个应用是我们开发的,当用户使用时产生问题时,我们也愿意把用户产生的问题的可能原因用最醒目的方式提醒他。
# 配置数据库连接信息
虽然我们在本地安装了数据库,但`springboot`并不知道我们安装了,当然更不知道我们安装数据的类型、版本及连接数据库需要的用户名、密码及数据库名信息了。
> 计算机和程序是永远不会犯错误的,犯错误的永远是使用它们的人。所以当出现问题时,千万千万不要把这些当成自己无责任的借口:我明明就是安装了呀、我明明就是配置了呀、我明明就是写了呀。因为当其它的同事听到这些话语时,只会在心里默默的鄙视我们,鄙视我们是一只能力差、无担当、不讲求排错方法的菜鸟。
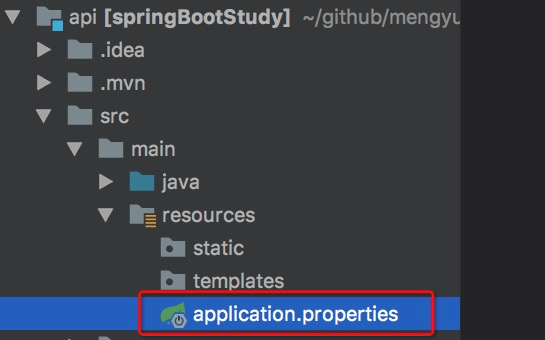
项目的配置文件位置如下:
我们编辑此文件,并参考官方的示例教程[https://spring.io/guides/gs/accessing-data-mysql/](https://spring.io/guides/gs/accessing-data-mysql/)
> 从本质上来讲,我们的当前项目是一个标准的`maven`项目。而所有的`maven`项目的配置的位置都一样,所以以后我们再查看其它的`maven`项目的时候,直接来这个位置找它的配置文件即可。
打开这个链接,我们可以看到Spring的开发文档,文档中写的很具体,从运行环境的要求,到如何建立数据库、如何连接,都说的很清楚,只不过由于教程使用的是英文,读起来有一定的难度。
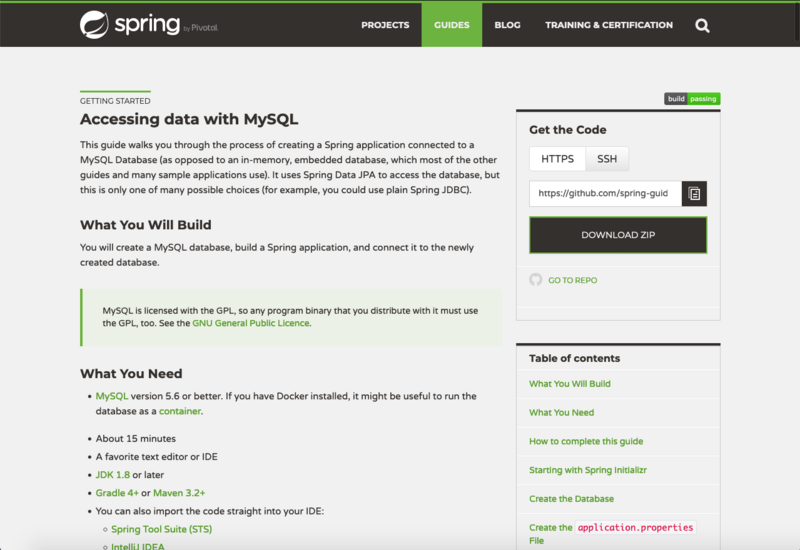
我们需要找到的,是设置数据库的**配置文件**,所以开发文档中许多内容我们并不需要。终于,找到了下面这一段:
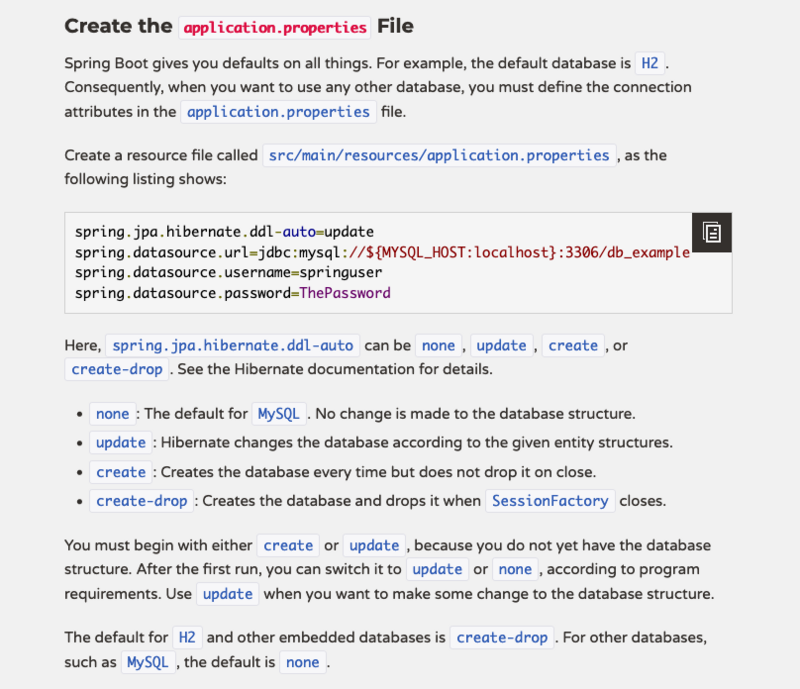
大概的翻译内容是:Spring给你提供了许多的默认设置,然而,对于数据库的配置你需要自己来进行。然后把这一段代码写在配置文件中:
```
spring.jpa.hibernate.ddl-auto=update
spring.datasource.url=jdbc:mysql://${MYSQL_HOST:localhost}:3306/db_example
spring.datasource.username=springuser
spring.datasource.password=ThePassword
```
我们需要把第二行的**localhost**改成自己的地址,**3306**是数据库端口,**db_example**改成要访问的数据库名称。
把第三行的**username**改成数据库的用户名,第四行**password**是数据库的密码,如下:
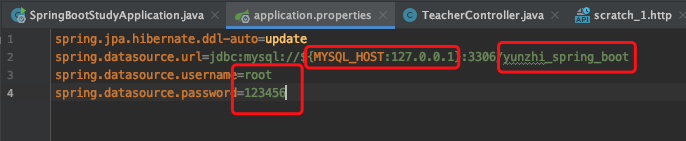
这里的地址,由于我们的数据库跑在本地,所以地址填写127.0.0.1或localhost均可;端口是MySQL的默认端口3306,因此不用更改;数据库名称,本教程中使用yunzhi_spring_boot;用户名和密码按照自己的数据库填写,如果没有密码,password处不填即可。
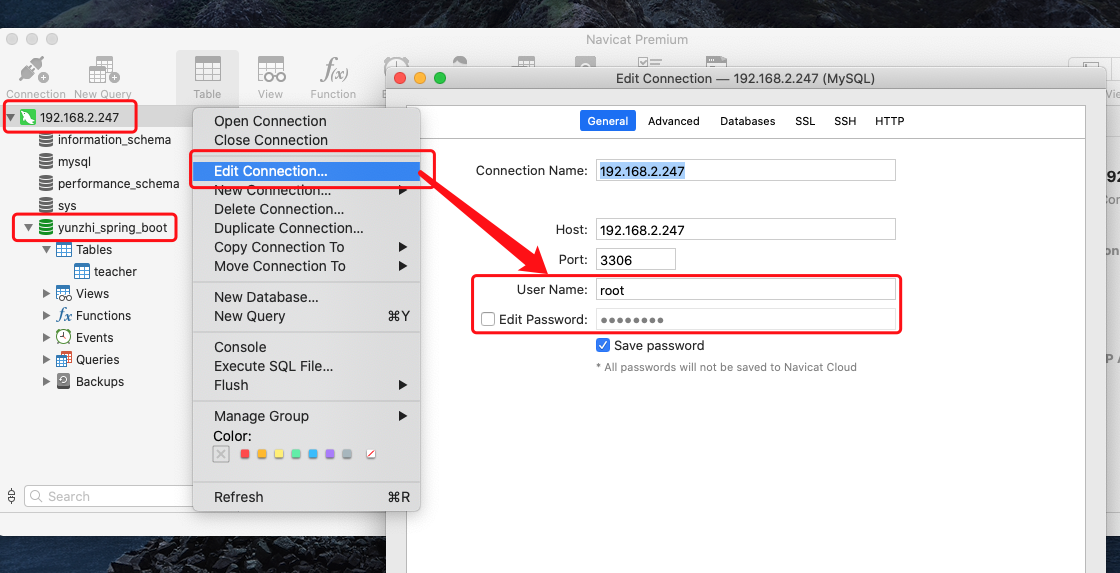
> 如果想查询自己的数据库名称或者验证用户密码等信息,可以从navicat中查看:
> 如图,在数据库上右键-编辑连接,我们可以在页面中看到除了密码以外的绝大多数信息。
然后保存,启动,可以成功通过编译。然后切换到浏览器,如果可以正常显示页面而不是报错,就说明刚刚的数据库配置没问题了。
# 添加请求方法
在`HelloWorld`章节中我们直接将`HelloWorldApplication`做为了控制器来使用,在小的项目中这无可厚非,在稍大一点就不太适用了。本节中,我们为`Teacher`单独建立一个控制器`TeacherController`,并在其中建立一个方法`getAll`。
TeacherController
```java
package com.mengyunzhi.springBootStudy;
import org.springframework.web.bind.annotation.GetMapping;
import org.springframework.web.bind.annotation.RestController;
import org.springframework.web.bind.annotation.RequestMapping;
@RestController// ➊
@RequestMapping("Teacher") // ➋
public class TeacherController {
@GetMapping // ➌
public String getAll() {
return "get all";
}
}
```
* ➊ 声明`TeacherController`是个控制器
* ➋ 声明触发该控制器的URL前缀为`Teacher`
* ➌ 声明`getAll`方法可通过`GET`方法进行请求,请求的地址为:控制器请求地址`Teacher` + 本方法请求地址`` = `Teacher`。
> `@GetMapping` = `@GetMapping()` = `@GetMapping("")`
重新启动项目并测试:
# 新建返回实体
通过前面的学习我们知道Anguar是无法接收返回的字符串的。如果要使Angular成功接收,那么后台应该返回Json字符串给前台。`Spring Boot`很好的处理了这一点:在请求方法中,直接返回对象,则Angular最终接收的便是些对象对应的Json字符串。
比如:
```java
package com.mengyunzhi.springBootStudy;
import org.springframework.web.bind.annotation.GetMapping;
import org.springframework.web.bind.annotation.RestController;
import org.springframework.web.bind.annotation.RequestMapping;
@RestController
@RequestMapping("Teacher")
public class TeacherController {
@GetMapping
public Test getAll() {
return new Test(1, "test"); // ➊
}
class Test{
private int id;
private String name;
public Test(int id, String name) {
this.id = id;
this.name = name;
}
public int getId() {
return id;
}
public void setId(int id) {
this.id = id;
}
public String getName() {
return name;
}
public void setName(String name) {
this.name = name;
}
}
}
```
* ➊ 直接返回基于Test实例化的对象。
测试:
# 本节小测
## 上节答案
1. 为了更清晰的明了该变量存在的作用域及数据源位置。将循环变量定义为`_teacher`的目的是将其与C层中绑定的变量相区分,我们规定:在V层中以`_`打头的变量属于V层自己的变量,并不是由C层数据绑定过来的。而如果在V层中的变量不是以`_`打头,那么这个变量必然可以在C层中找到。
2. 不会产生问题。以前我们在学习`ThinkPHP`框架时,如果不以`_`打头是可能造成变量污染的,但在`angular`中已经完美的规避了此类情况。
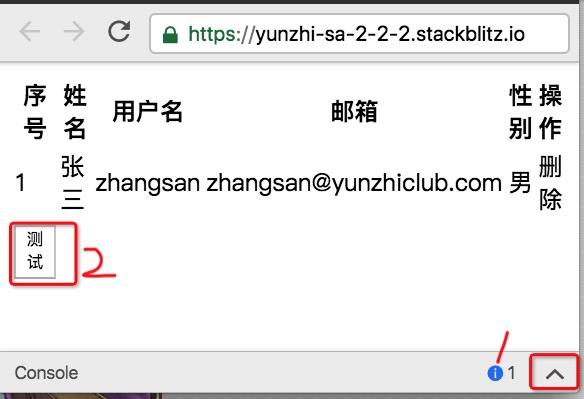
示例代码传送门: [https://stackblitz.com/edit/yunzhi-sa-2-2-2](https://stackblitz.com/edit/yunzhi-sa-2-2-2)
首次使用,给个使用提示:
# 你可能遇到的问题
* [初学Spring——连接MySQL数据库的问题和解决](https://segmentfault.com/a/1190000021069295)
# 参考文档
| 名称 | 链接 | 预计学习时长 |
|---- | ---- | ---- |
| Accessing data with MySQL | [https://spring.io/guides/gs/accessing-data-mysql/](https://spring.io/guides/gs/accessing-data-mysql/) | 15分钟 |
| Building a RESTful Web Service | [https://spring.io/guides/gs/rest-service/](https://spring.io/guides/gs/rest-service/) | 15分钟 |
- 序言
- 第一章:Hello World
- 第一节:Angular准备工作
- 1 Node.js
- 2 npm
- 3 WebStorm
- 第二节:Hello Angular
- 第三节:Spring Boot准备工作
- 1 JDK
- 2 MAVEN
- 3 IDEA
- 第四节:Hello Spring Boot
- 1 Spring Initializr
- 2 Hello Spring Boot!
- 3 maven国内源配置
- 4 package与import
- 第五节:Hello Spring Boot + Angular
- 1 依赖注入【前】
- 2 HttpClient获取数据【前】
- 3 数据绑定【前】
- 4 回调函数【选学】
- 第二章 教师管理
- 第一节 数据库初始化
- 第二节 CRUD之R查数据
- 1 原型初始化【前】
- 2 连接数据库【后】
- 3 使用JDBC读取数据【后】
- 4 前后台对接
- 5 ng-if【前】
- 6 日期管道【前】
- 第三节 CRUD之C增数据
- 1 新建组件并映射路由【前】
- 2 模板驱动表单【前】
- 3 httpClient post请求【前】
- 4 保存数据【后】
- 5 组件间调用【前】
- 第四节 CRUD之U改数据
- 1 路由参数【前】
- 2 请求映射【后】
- 3 前后台对接【前】
- 4 更新数据【前】
- 5 更新某个教师【后】
- 6 路由器链接【前】
- 7 观察者模式【前】
- 第五节 CRUD之D删数据
- 1 绑定到用户输入事件【前】
- 2 删除某个教师【后】
- 第六节 代码重构
- 1 文件夹化【前】
- 2 优化交互体验【前】
- 3 相对与绝对地址【前】
- 第三章 班级管理
- 第一节 JPA初始化数据表
- 第二节 班级列表
- 1 新建模块【前】
- 2 初识单元测试【前】
- 3 初始化原型【前】
- 4 面向对象【前】
- 5 测试HTTP请求【前】
- 6 测试INPUT【前】
- 7 测试BUTTON【前】
- 8 @RequestParam【后】
- 9 Repository【后】
- 10 前后台对接【前】
- 第三节 新增班级
- 1 初始化【前】
- 2 响应式表单【前】
- 3 测试POST请求【前】
- 4 JPA插入数据【后】
- 5 单元测试【后】
- 6 惰性加载【前】
- 7 对接【前】
- 第四节 编辑班级
- 1 FormGroup【前】
- 2 x、[x]、{{x}}与(x)【前】
- 3 模拟路由服务【前】
- 4 测试间谍spy【前】
- 5 使用JPA更新数据【后】
- 6 分层开发【后】
- 7 前后台对接
- 8 深入imports【前】
- 9 深入exports【前】
- 第五节 选择教师组件
- 1 初始化【前】
- 2 动态数据绑定【前】
- 3 初识泛型
- 4 @Output()【前】
- 5 @Input()【前】
- 6 再识单元测试【前】
- 7 其它问题
- 第六节 删除班级
- 1 TDD【前】
- 2 TDD【后】
- 3 前后台对接
- 第四章 学生管理
- 第一节 引入Bootstrap【前】
- 第二节 NAV导航组件【前】
- 1 初始化
- 2 Bootstrap格式化
- 3 RouterLinkActive
- 第三节 footer组件【前】
- 第四节 欢迎界面【前】
- 第五节 新增学生
- 1 初始化【前】
- 2 选择班级组件【前】
- 3 复用选择组件【前】
- 4 完善功能【前】
- 5 MVC【前】
- 6 非NULL校验【后】
- 7 唯一性校验【后】
- 8 @PrePersist【后】
- 9 CM层开发【后】
- 10 集成测试
- 第六节 学生列表
- 1 分页【后】
- 2 HashMap与LinkedHashMap
- 3 初识综合查询【后】
- 4 综合查询进阶【后】
- 5 小试综合查询【后】
- 6 初始化【前】
- 7 M层【前】
- 8 单元测试与分页【前】
- 9 单选与多选【前】
- 10 集成测试
- 第七节 编辑学生
- 1 初始化【前】
- 2 嵌套组件测试【前】
- 3 功能开发【前】
- 4 JsonPath【后】
- 5 spyOn【后】
- 6 集成测试
- 7 @Input 异步传值【前】
- 8 值传递与引入传递
- 9 @PreUpdate【后】
- 10 表单验证【前】
- 第八节 删除学生
- 1 CSS选择器【前】
- 2 confirm【前】
- 3 功能开发与测试【后】
- 4 集成测试
- 5 定制提示框【前】
- 6 引入图标库【前】
- 第九节 集成测试
- 第五章 登录与注销
- 第一节:普通登录
- 1 原型【前】
- 2 功能设计【前】
- 3 功能设计【后】
- 4 应用登录组件【前】
- 5 注销【前】
- 6 保留登录状态【前】
- 第二节:你是谁
- 1 过滤器【后】
- 2 令牌机制【后】
- 3 装饰器模式【后】
- 4 拦截器【前】
- 5 RxJS操作符【前】
- 6 用户登录与注销【后】
- 7 个人中心【前】
- 8 拦截器【后】
- 9 集成测试
- 10 单例模式
- 第六章 课程管理
- 第一节 新增课程
- 1 初始化【前】
- 2 嵌套组件测试【前】
- 3 async管道【前】
- 4 优雅的测试【前】
- 5 功能开发【前】
- 6 实体监听器【后】
- 7 @ManyToMany【后】
- 8 集成测试【前】
- 9 异步验证器【前】
- 10 详解CORS【前】
- 第二节 课程列表
- 第三节 果断
- 1 初始化【前】
- 2 分页组件【前】
- 2 分页组件【前】
- 3 综合查询【前】
- 4 综合查询【后】
- 4 综合查询【后】
- 第节 班级列表
- 第节 教师列表
- 第节 编辑课程
- TODO返回机制【前】
- 4 弹出框组件【前】
- 5 多路由出口【前】
- 第节 删除课程
- 第七章 权限管理
- 第一节 AOP
- 总结
- 开发规范
- 备用