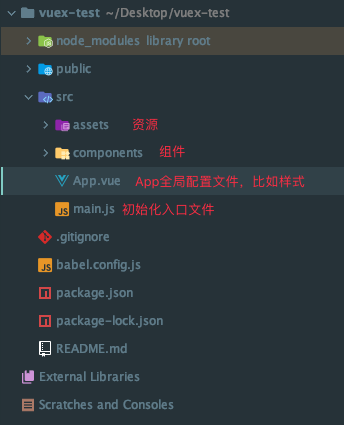
#### 二、简单入手

这里,我们只看 `src` 目录,其他的暂时不管。组件 `components` 不在这一讲的范围内,所以也可以忽视,资源 `assets` 也没什么可说的,就是如果有图片或者视频什么的话,都放在这个文件夹里面就是了。
我们打开 `App.vue` 文件,去掉组件的相关代码,并编写一点简单的 vue 代码。修改如下:
~~~xml
<template>
<div id="app">
<img alt="Vue logo" src="./assets/logo.png" />
<h1>{{name}}</h1>
<button @click="modifyNameAction">修改名字</button>
</div>
</template>
<script>
export default {
data() {
return {
name: 'Lucy'
}
},
methods: {
modifyNameAction() {
this.name = "bighone"
}
}
}
</script>
~~~
现在我们引入 Vuex ,用它来管理状态数据,比如这里的 `name`。首先在 `src` 中新建一个 `store.js` 文件,并写下如下熟悉的代码:
~~~jsx
import Vue from 'vue';
import Vuex from 'vuex';
Vue.use(Vuex);
export default new Vuex.Store({
state: {
name: 'Lucy',
},
mutations: {
setName(state, newName) {
state.name = newName;
}
},
actions: {
modifyName({commit}, newName) {
commit('setName', newName);
}
}
});
~~~
然后,在 `main.js` 中导入 `store`,并全局注入:
~~~jsx
import store from './store';
// ...
new Vue({
store,
render: h => h(App),
}).$mount('#app')
~~~
最后修改 `App.vue` 中的代码如下:
~~~xml
<script>
import {mapState, mapActions} from 'vuex';
export default {
computed: {
...mapState(['name'])
},
methods: {
...mapActions(['modifyName']),
modifyNameAction() {
this.modifyName('bighone');
}
},
}
</script>
~~~
想必弄懂这些代码,应该都是没啥问题的,因为这些都是 Vuex 很基础的知识点,这里实操来简单回顾一下,加深印象。如果看不懂,那证明之前的基础知识还没掌握。
#### 三、引入 Module
在前言里面,我们已经了 Module 的基本职责,那么具体如何使用呢?
Vuex 允许我们将 store 分割成大大小小的对象,每个对象也都拥有自己的 state、getter、mutation、action,这个对象我们把它叫做 module(模块),在模块中还可以继续嵌套子模块、子子模块 ……
现在在 `src` 里面建个文件夹,命名为 `module`,然后再里面新建一个 `moduleA.js` 文件,并编写如下代码:
~~~css
export default {
state: {
text: 'moduleA'
},
getters: {},
mutations: {},
actions: {}
}
~~~
如上,再建一个 `moduleB.js` 文件,这里就不重复了。
然后打开 `store.js` 文件,导入这两个 module :
~~~jsx
import moduleA from './module/moduleA';
import moduleB from './module/moduleB';
export default new Vuex.Store({
modules: {
moduleA, moduleB,
},
// ...
}
~~~
这个时候,store 中已经注入了两个子模块 `moduleA moduleB`,我们可以在 `App.vue` 中通过 `this.$store.state.moduleA.text` 这种方式来直接访问模块中的 state 数据。如下修改:
~~~jsx
// ...
computed: {
...mapState({
name: state => state.moduleA.text
}),
},
// ...
~~~
由此可知,模块内部的 state 是局部的,只属于模块本身所有,所以外部必须通过对应的模块名进行访问。
**但是**注意了:
模块内部的 action、mutation 和 getter 默认可是注册在**全局命名空间**的,这样使得多个模块能够对同一 mutation 或 action 作出响应。
这里以 mutation 的响应为例,给 moduleA 和 moduleB 分别新增一个 mutations,如下:
~~~bash
mutations: {
setText(state) {
state.text = 'A'
}
},
~~~
moduleB 和上面一样,把文本名称修改一下即可,这里就不重复了。然后回到 `App.vue` 中,修改如下:
~~~xml
<script>
import {mapState, mapMutations} from 'vuex';
export default {
computed: {
...mapState({
name: state => (state.moduleA.text + '和' + state.moduleB.text)
}),
},
methods: {
...mapMutations(['setText']),
modifyNameAction() {
this.setText();
}
},
}
</script>
~~~
运行然后点击修改,我们会发现模块 A 和 B 中的 `text` 值都改变了。当然,action 的用法一模一样,大家也可以试试。
如果模块之间的数据有交集的话,那么我们其实就可以通过这种方式,来同步更新模块之间的数据,虽然看起来非常的方便,但是用的时候可一定要谨慎,这种处理方式一旦没用好,遇到错误,排查起来还是比较有难度的。
#### 四、访问根节点
我们已经知晓,模块内部的 state 是局部的,只属于模块本身所有。那么如果我们要想在模块中访问 store 根节点的数据 state,怎么办呢?
很简单,我们可以在模块内部的 getter 和 action 中,通过 rootState 这个参数来获取。接下来,我们给 `modelA.js` 文件添加一点代码。
~~~cpp
export default {
// ...
getters: {
// 注意:rootState必须是第三个参数
detail(state, getters, rootState) {
return state.text + '-' + rootState.name;
}
},
actions: {
callAction({state, rootState}) {
alert(state.text + '-' + rootState.name);
}
}
}
~~~
然后修改 `App.vue` :
~~~xml
<script>
import {mapActions, mapGetters} from 'vuex';
export default {
computed: {
...mapGetters({
name: 'detail'
}),
},
methods: {
...mapActions(['callAction']),
modifyNameAction() {
this.callAction();
}
},
}
</script>
~~~
然后运行你会发现,根节点的数据已经被我们获取到了。这里需要注意的是在 getters 中,rootState 是以第三个参数暴露出来的,另外,还有第四个参数 rootGetters,用来获得根节点的 getters 信息,这里就不演示了,感兴趣自己可以去尝试。唯一要强调的就是千万不要弄错参数的位置了。
当然,action 中也能接收到 rootGetters,但是在 action 中,由于它接收过来的数据都被包在 `context` 对象中的,所以解包出来没有什么顺序的限制。
#### 五、命名空间
前面我们已经知道了,模块内部的 action、mutation 和 getter 默认是注册在全局命名空间的。如果我们只想让他们在当前的模块中生效,应该怎么办呢?
**通过添加 `namespaced: true` 的方式使其成为带命名空间的模块。**当模块被注册后,它的所有 getter、action 及 mutation 都会自动根据模块注册的路径调整命名。
我们在 `moduleA.js` 中添加 `namespaced: true`。
~~~cpp
export default {
namespaced: true,
// ...
}
~~~
这个时候再去运行代码,你会发现如下错误:
> \[vuex\] unknown getter: detail
在全局 getter 中已经找不到 `detail` 的这个方法了,因为它的路劲已经改变了,不再属于全局,仅仅只属于 moduleA 了。所以,这个时候,如果我们想要访问它,必须带上路劲才行。修改 `App.vue` 如下:
~~~xml
<script>
import {mapActions, mapGetters} from 'vuex';
export default {
computed: {
...mapGetters({
name: 'moduleA/detail'
}),
},
methods: {
...mapActions({
call: 'moduleA/callAction'
}),
modifyNameAction() {
this.call();
}
},
}
</script>
~~~
注意,如果一个模块启用了命名空间,那么它里面的 getter 和 action 中收到的 getter,dispatch 和 commit 也都是局部化的,不需要在同一模块内额外添加空间名前缀。也就是说,更改 `namespaced` 属性后不需要修改模块内的任何代码。
那么我们如何**在带命名空间的模块内访问全局内容**呢?
通过前面的学习,我们已经了解到:
> 如果你希望使用全局 state 和 getter,rootState 和 rootGetter 会作为第三和第四参数传入 getter,也会通过 context 对象的属性传入 action。
现在如果想要在全局命名空间内分发 action 或提交 mutation 的话,那么我们只需要将 将 `{ root: true }` 作为第三参数传给 dispatch 或 commit 即可。
~~~dart
export default {
namespaced: true,
// ...
actions: {
callAction({state, commit, rootState}) {
commit('setName', '改变', {root: true});
alert(state.text + '-' + rootState.name);
}
}
}
~~~
接下来看看如何**在带命名空间的模块内注册全局 action**。
> 若需要在带命名空间的模块注册全局 action,你可添加 `root: true`,并将这个 action 的定义放在函数 handler 中。
写法稍微有点变化,我们来看看,修改 `moduleA.js`,如下:
~~~jsx
export default {
namespaced: true,
// ...
actions: {
callAction: {
root: true,
handler (namespacedContext, payload) {
let {state, commit} = namespacedContext;
commit('setText');
alert(state.text);
}
}
}
}
~~~
简单解释下,这里的 `namespacedContext` 就相当于当前模块的上下文对象,`payload` 是调用的时候所传入的参数,当然也叫载荷。
示例就讲到这里,接下来看看**带命名空间的绑定函数**。
关于 `mapState, mapGetters, mapActions` 和 `mapMutations` 这些函数如何来绑定带命名空间的模块,上面示例代码中其实已经都写过了,这里再看看另外几种更简便的写法,先看看之前的写法。
这里就用官方的示例代码举例说明:
~~~ruby
computed: {
...mapState({
a: state => state.some.nested.module.a,
b: state => state.some.nested.module.b
})
},
methods: {
...mapActions([
// -> this['some/nested/module/foo']()
'some/nested/module/foo',
// -> this['some/nested/module/bar']()
'some/nested/module/bar'
])
}
~~~
更优雅的写法:
~~~jsx
computed: {
...mapState('some/nested/module', {
a: state => state.a,
b: state => state.b
})
},
methods: {
...mapActions('some/nested/module', [
'foo', // -> this.foo()
'bar' // -> this.bar()
])
}
~~~
将模块的空间名称字符串作为第一个参数传递给上述函数,这样所有绑定都会自动将该模块作为上下文。
我们还可以通过使用 `createNamespacedHelpers` 创建基于某个命名空间辅助函数。它返回一个对象,对象里有新的绑定在给定命名空间值上的组件绑定辅助函数:
~~~jsx
import { createNamespacedHelpers } from 'vuex'
const { mapState, mapActions } = createNamespacedHelpers('some/nested/module')
export default {
computed: {
// 在 `some/nested/module` 中查找
...mapState({
a: state => state.a,
b: state => state.b
})
},
methods: {
// 在 `some/nested/module` 中查找
...mapActions([
'foo',
'bar'
])
}
}
~~~
#### 六、模块的动态注册
这一章节,官网讲得比较清楚,所以直接搬过来了。
> 在 store 创建之后,可以使用 `store.registerModule` 方法动态的注册模块:
~~~csharp
// 注册模块 `myModule`
store.registerModule('myModule', {
// ...
})
// 注册嵌套模块 `nested/myModule`
store.registerModule(['nested', 'myModule'], {
// ...
})
~~~
> 之后就可以通过 `store.state.myModule` 和 `store.state.nested.myModule` 访问模块的状态。
>
> 模块动态注册功能使得其他 Vue 插件可以通过在 store 中附加新模块的方式来使用 Vuex 管理状态。例如,[`vuex-router-sync`](https://github.com/vuejs/vuex-router-sync) 插件就是通过动态注册模块将 vue-router 和 vuex 结合在一起,实现应用的路由状态管理。
>
> 你也可以使用 `store.unregisterModule(moduleName)` 来动态卸载模块。注意,你不能使用此方法卸载静态模块(即创建 store 时声明的模块)。
>
> 在注册一个新 module 时,你很有可能想保留过去的 state,例如从一个服务端渲染的应用保留 state。你可以通过 `preserveState` 选项将其归档:`store.registerModule('a', module, { preserveState: true })`。
#### 七、模块重用
就一点,重用会导致模块中的数据 state 被污染,所以和 Vue 中的 data 一样,也使用一个函数来申明 state 即可。
~~~kotlin
const MyReusableModule = {
state () {
return {
foo: 'bar'
}
},
//...
}
~~~
