[TOC]
# 简介
测试步骤 **Groovy Script** 被用来在测试中执行 [Groovy](http://book.qadoc.org/groovy) 或 [JavaScript]() 代码。默认的脚本语言是 Groovy ,若要使用 JavaScript ,请修改[项目属性]() **Script Language** 的值。
脚本可以实现复杂的测试行为,比如:
- 复杂的循环和条件判断。
- 在测试用例运行期间,修改测试步骤的断言。
- 复杂的数据驱动场景:动态测试用例(比如从数据库动态生成测试步骤)。
- ReadyAPI 默认断言无法完成的复杂内容校验。
- 与外部系统集成,用于读写数据。
- 触发外部动作或过程,例如发送电子邮件或启动其他程序。
- 通过与用户交互(对话框、提示等)来获得输入信息或控制命令。
要扩展脚本,请使用 [脚本库]() 。
# 编辑 Groovy 脚本

:-: Groovy 编辑器
使用编辑器可以完成以下工作:编写脚本代码、运行代码、查看输出、调试脚本。通过 `CTRL + MOUSE WHEEL` 调整编辑区字体大小。
在 ReadyAPI Groovy Script 步骤的脚本代码中,可以直接使用下列对象:
- [log](https://logging.apache.org/log4j/1.2/apidocs/org/apache/log4j/Logger.html) - 提供了测试日志的接口。
- [context](https://support.smartbear.com/readyapi/apidocs/soapui/com/eviware/soapui/model/testsuite/TestCaseRunContext.html) - 提供了当前测试运行上下文的接口。
- [testRunner](https://support.smartbear.com/readyapi/apidocs/soapui/com/eviware/soapui/model/testsuite/TestCaseRunner.html) - 提供了与执行当前测试用例和测试步骤相关的测试执行对象的接口。
输入对象名称和句号(如:`testRunner.`)将自动调出代码补全窗口,或者按下快捷键 `CTRL+SPACE` 调出代码补全窗口。
>[info]如果按下 `CTRL+SPACE` 无法调出代码补全窗口,请参考: [Windows 10 修改或关闭快捷键 CTRL+SPACE](https://faq.qadoc.org/index.php?solution_id=1040) 。
# 工具栏

# 属性列表
在 **GroovyScript Properties** 和 **Custom Properties** 选项卡编辑测试步骤 Groovy Script 的属性。
**Groovy Script Properties 选项卡**
| 属性名称 | 属性描述 |
|---|---|
|Name | 测试步骤名称。|
|Description | 测试步骤描述。|
**Custom Properties 选项卡**
你可以在项目的其他测试步骤中使用 Groovy Script 步骤 **Custom Properties** 选项卡上的属性。例如,在断言测试步骤中验证这些属性值,或者检查它们然后通过 [Conditional GoTo](ConditionalGoTo.md) 测试步骤来改变执行流。
您可以通过加载文件来添加、修改、删除和更改自定义属性的值,或者将它们保存到文件中。详细信息请参阅 [属性](属性.md) ,以下是自定义属性的介绍:
**result**
只读属性,值为脚本执行结果(`return` 语句返回的值)。
```
...
return myVariable;
...
```
>[success]如果没有 `return` 语句,将返回脚本最后一行的执行结果。
**script**
完整脚本代码的字符串。
# 调试 Groovy 脚本
调试脚本表示在某一行停止执行程序,然后从停止的位置开始逐步执行。每当调试器停止执行程序时,你都可以检查变量的值。 因此对跟踪你的测试脚本正在做什么很有帮助。
调试期间,ReadyAPI 会将所有可用变量的信息展示在 `Debug Info` 选项卡:

## 要求和限制
- Groovy 脚本调试仅在 SoapUI Pro 中可用。
- 脚本调试只能用于 Groovy Script 测试步骤。
- 一次只能调试一个脚本,不支持同时调试多个脚本或测试用例。
- 对于二进制安装包:与 ReadyAPI 安装包不同,二进制包中没有必须的 Java 文件。ReadyAPI 依赖 Java JDK 中的 `tools.jar` 和 `attach.dll` 文件进行调试,然而在 JRE 安装环境中并不包含这些文件。并且如果没有两个文件,你将无法运行调试器。为了在二进制安装中启用 Groovy 调试:
- 在本地或其他电脑上安装 JDK
- 将文件 `%JDK installation folder%\lib\tools.jar` 复制到 `%ReadyAPI installation folder%\lib` 文件夹。
- 将文件 `%JDK installation folder%\jre\bin\attach.dll` 复制到 `%ReadyAPI installation folder%\bin` 文件夹。
## 使用调试器
### 启用调试器
为了降低操作系统开销,默认情况下,调试器是禁用的。当调试器被禁用时,点击 <img class="aqInlineImg" src="https://support.smartbear.com/readyapi/docs/_images/icon/debug.png" /> 将提示重启 ReadyAPI 以启用调试器。
**如果以 shell 脚本启动 ReadyAPI**
当你通过 shell 脚本( .bat 或 .sh 文件)启动 ReadyAPI,为了启用调试器,请添加启动参数:groovy
```
ready-api.bat groovy
```
1、通过命令行启动
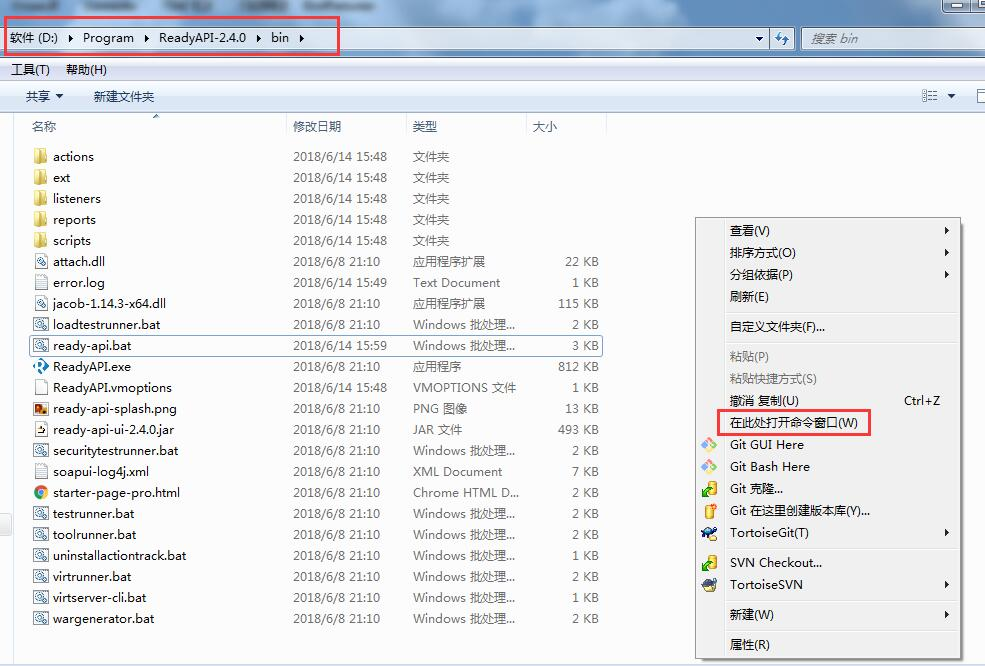
(1)切换到 ReadyAPI 安装目录的 bin 文件夹:`%ReadyAPI_HOME%\bin` 。按住 `Shift` 并右击,选择 `在此处打开命令窗口` 。

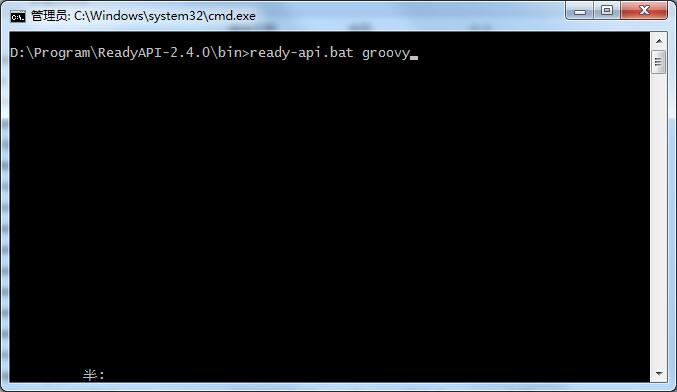
(2)输入命令:`ready-api.bat groovy` ,以 Debug 模式启动 ReadyAPI 。

2、以 shell 启动
(1)在 `%ReadyAPI_HOME%\bin` 下新建一个 `ready-api-debug.bat` 文件,写入以下内容:
```
ready-api.bat groovy
```
(2)将 `ready-api-debug.bat` 的快捷方式发送到桌面。
**永久启用调试器**
按照下面的步骤将调试器改为默认启用:
**Windows 系统**
1、打开 `ReadyAPI.vmoptions` 文件。
>[success]`ReadyAPI.vmoptions` 文件位于 \<ReadyAPI folder\>/bin/ 文件夹,且名字类似于 `ReadyAPI-2.x.x.vmoptions` 。
2、添加如下配置:
```
-agentlib:jdwp=transport=dt_shmem,suspend=n,server=y
```
3、保存文件。
**Linux 系统**
1、在文本编辑器中打开 ReadyAPI 执行文件。
2、取消下面部分的注释:
~~~
# uncomment the following lines to enable Groovy debugger by default
DEBUG_PORT=53677
netstat -an | grep $DEBUG_PORT | grep LISTEN >/dev/null 2>&1
while [ $? = 0 ]
do
DEBUG_PORT=$((DEBUG_PORT+1))
netstat -an | grep $DEBUG_PORT | grep LISTEN >/dev/null 2>&1
done
INSTALL4J_ADD_VM_PARAMS="$INSTALL4J_ADD_VM_PARAMS -agentlib:jdwp=transport=dt_socket,address=$DEBUG_PORT,suspend=n,server=y"
# end of Groovy debugger switching script
~~~
3、保存文件。
### 开始调试
点击 <img class="aqInlineImg" src="https://support.smartbear.com/readyapi/docs/_images/icon/debug.png" > 开始调试。调试有两种方式:
**调试测试步骤 Groovy Script**
调试你的 Groovy 脚本:

**调试测试用例、测试套件或一个项目**
在 Debug 模式下运行整个测试。每遇到一个 Groovy Script (测试步骤)中的断点,测试都将停止。

### 使用断点
断点是脚本中的一个位置,脚本或测试在执行期间将在此位置暂停。执行一旦暂停,ReadyAPI 将打开断点所在行,以便检查测试的状态、输出和变量。
设置断点的两种方式:
- 点击左边的空白处,在该行设置断点

- 在要设置断点的位置右击,选择 **Toggle Line Breakpoint** 。

### 调试
当测试运行到某个断点时,ReadyAPI 将启用以下命令:
- <img class="aqInlineImg" src="https://support.smartbear.com/readyapi/docs/_images/icon/step-over.png" > **Step over** - 单步执行,执行点在当前脚本,不会进入被调用的其他脚本。换句话说,当该行语句有子函数时,不会进入子函数内部,而是将子函数整个执行完。在没有子函数的情况下是和 **Step into** 效果一样。
- <img class="aqInlineImg" src="https://support.smartbear.com/readyapi/docs/_images/icon/step-into.png" > **Step into** - 单步执行,遇到子函数就进入并且继续单步执行。
- <img class="aqInlineImg" src="https://support.smartbear.com/readyapi/docs/_images/icon/resume-debugging.png" > **Resume debugging** - 继续执行,直到遇到下一个断点停止。
- <img class="aqInlineImg" src="https://support.smartbear.com/readyapi/docs/_images/icon/goto-end.png" > **Continue to end** - 继续执行,直到当前脚本的末尾,忽略中间的任何断点。If there are other scripts with breakpoints in the test run, the test will still stop on them.(I can't translate this sentence. Help me.)
# 日志
**Log Output** 面板用来显示运行脚本时输出的各种日志信息。例如,你可以使用 `log.info` 方法来输出一些提示信息:
```
// 运行测试步骤
def tst = testRunner.runTestStepByName("Groovy Script")
// 将测试步骤的运行状态输出到 Log Output 面板
log.info(tst.status)
```
# 断言
参考 [Groovy Script]() 断言。
关于 Groovy 的更多用法请参考 [Groovy 实战指导](Groovy.md) 。
---
:-: --- 贡献者名单(排名不分先后) ---
:-: **材料**
官网英文文档
:-: **编写**
李云
:-: **校验**
:-: **支持**
- 基础知识
- 属性
- 属性分类
- 属性扩展
- Get Data 对话框
- 断言
- 关于断言
- 使用断言
- 断言类型
- Response SLA
- Script
- Property Content Assertions
- Contains
- Equals
- Equals Binary
- JSONPath Count
- JSONPath Existence Match
- JSONPath Match
- JSONPath RegEx Match
- Message Content
- Not Contains
- XPath Match
- XQuery Match
- Compliance Assertions
- Swagger Compliance
- Schema Compliance
- HTTP Header Exists
- HTTP Header Equals
- JDBC Assertions
- 复制断言
- 术语
- 脚本
- 关于脚本
- 脚本编辑器
- JSONPath
- Projects
- SoapUI
- 测试步骤
- Groovy Script
- DataSource
- Conditional GoTo
- REST Request
- ReadyAPI
- 环境
- 关于环境
- 创建环境
- Rest Services
- Custom Properties
- JDBC Connections
- 团队协作
- 集成
- GitLab
- 第三方库
- Groovy 库
- Java 库
- 自定义ReadyAPI
- 首选项
- 全局属性
- ReadyAPI
- Code Templates
- JVM 设置
- 修改
- 实战指导
- 项目属性
- Groovy
- 代码片段
- 开发规范 v0.1
- 属性
- inbox
- FAQ
- 安装配置
- 复合工程
- 修改文件夹或文件名称
