## **Mycat读写分离**
```
数据库读写分离对于大型系统或者访问量很高的互联网应用来说,是必不可少的一个重要功能。
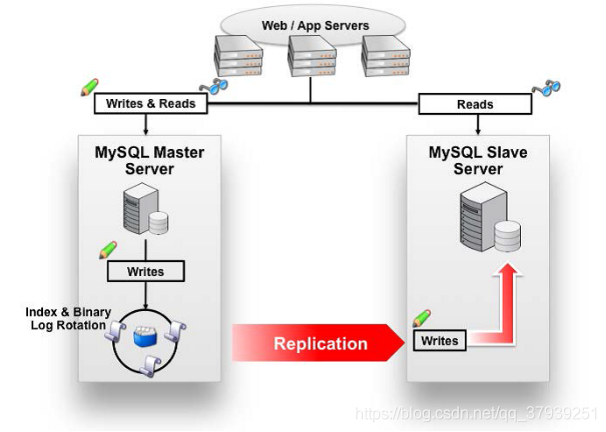
对于MySQL来说,标准的读写分离是主从模式,一个写节点Master后面跟着多个读节点,读节
点的数量取决于系统的压力,通常是1-3个读节点的配置
```

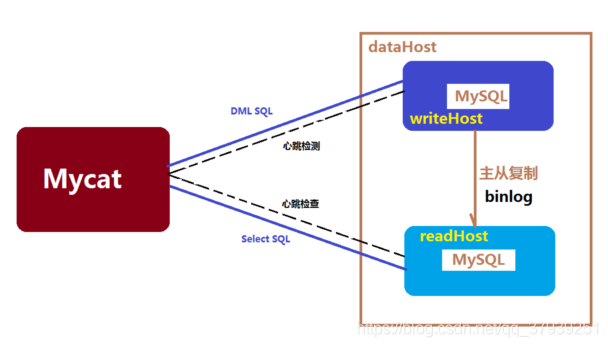
Mycat读写分离和自动切换机制,需要mysql的主从复制机制配合
## **Mysql的主从复制**

### 主从配置需要注意的地方
```
1、主DB server和从DB server数据库的版本一致
2、主DB server和从DB server数据库数据名称一致
3、主DB server开启二进制日志,主DB server和从DB server的server_id都必须唯一
```
## **Mysql主服务器配置**
```
第一步:修改my.conf文件:
在[mysqld]段下添加:
binlog-do-db=db1
binlog-ignore-db=mysql
#启用二进制日志
log-bin=mysql-bin
#服务器唯一ID,一般取IP最后一段
server-id=134
第二步:重启mysql服务
service mysqld restart
第三步:建立帐户并授权slave
mysql>GRANT FILE ON *.* TO 'backup'@'%' IDENTIFIED BY '123456';
mysql>GRANT REPLICATION SLAVE, REPLICATION CLIENT ON *.* to 'backup'@'%' identified by '123456';
#一般不用root帐号,“%”表示所有客户端都可能连,只要帐号,密码正确,此处可用具体客户端IP代替,如192.168.145.226,加强安全。
刷新权限
mysql> FLUSH PRIVILEGES;
查看mysql现在有哪些用户
mysql>select user,host from mysql.user;
第四步:查询master的状态
mysql> show master status;
+------------------+----------+--------------+------------------+-------------------+
| File | Position | Binlog_Do_DB | Binlog_Ignore_DB | Executed_Gtid_Set |
+------------------+----------+--------------+------------------+-------------------+
| mysql-bin.000001 | 120 | db1 | mysql | |
+------------------+----------+--------------+------------------+-------------------+
1 row in set
————————————————
```
## **Mysql从服务器配置**
```
第一步:修改my.conf文件
[mysqld]
server-id=166
第二步:配置从服务器
mysql>change master to master_host='192.168.25.134',master_port=3306,master_user='backup',master_password='123456',master_log_file='mysql-bin.000001',master_log_pos=120
注意语句中间不要断开,master_port为mysql服务器端口号(无引号),master_user为执行同步操作的数据库账户,“120”无单引号(此处的120就是show master status 中看到的position的值,这里的mysql-bin.000001就是file对应的值)。
第二步:启动从服务器复制功能
Mysql>start slave;
第三步:检查从服务器复制功能状态:
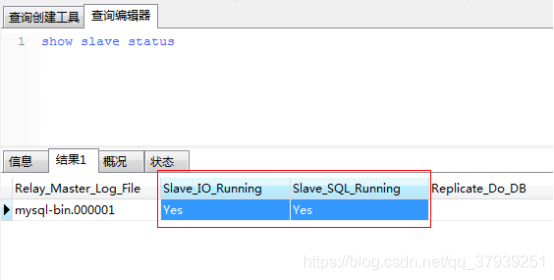
mysql> show slave status \G;
Slave_IO_State: Waiting for master to send event
Master_Host: 192.168.254.128
Master_User: myslave
Master_Port: 3306
Connect_Retry: 60
Master_Log_File: master_log.000002
Read_Master_Log_Pos: 635
Relay_Log_File: mysqld-relay-bin.000002
Relay_Log_Pos: 799
Relay_Master_Log_File: master_log.000002
Slave_IO_Running: Yes
Slave_SQL_Running: Yes
Replicate_Do_DB:
Replicate_Ignore_DB:
Replicate_Do_Table:
Replicate_Ignore_Table:
Replicate_Wild_Do_Table:
Replicate_Wild_Ignore_Table:
Last_Errno: 0
Last_Error:
Skip_Counter: 0
Exec_Master_Log_Pos: 635
Relay_Log_Space: 973
Until_Condition: None
Until_Log_File:
Until_Log_Pos: 0
Master_SSL_Allowed: No
Master_SSL_CA_File:
Master_SSL_CA_Path:
Master_SSL_Cert:
Master_SSL_Cipher:
Master_SSL_Key:
Seconds_Behind_Master: 0
Master_SSL_Verify_Server_Cert: No
Last_IO_Errno: 0
Last_IO_Error:
Last_SQL_Errno: 0
Last_SQL_Error:
Replicate_Ignore_Server_Ids:
Master_Server_Id: 1
Master_UUID: 36cebd9f-7c98-11e9-8f51-000c29a9c235
Master_Info_File: /var/lib/mysql/master.info
SQL_Delay: 0
SQL_Remaining_Delay: NULL
Slave_SQL_Running_State: Slave has read all relay log; waiting for the slave I/O thread to update it
Master_Retry_Count: 86400
Master_Bind:
Last_IO_Error_Timestamp:
Last_SQL_Error_Timestamp:
Master_SSL_Crl:
Master_SSL_Crlpath:
Retrieved_Gtid_Set:
Executed_Gtid_Set:
Auto_Position: 0
1 row in set (0.00 sec)
---------------------------------------------------------
Slave_IO_Running: Yes //此状态必须YES
Slave_SQL_Running: Yes //此状态必须YES
---------------------------------------------------------
```
**注:Slave\_IO及Slave\_SQL进程必须正常运行,即YES状态,否则都是错误的状态(如:其中一个NO均属错误)。**
```
错误处理:如果出现此错误:Fatal error: The slave I/O thread stops because master
and slave have equal MySQL server UUIDs; these UUIDs must be different for
replication to work.因为是mysql是克隆的系统所以mysql的uuid是一样的,所以
需要修改。
解决方法:删除/var/lib/mysql/auto.cnf文件,重新启动服务。
```

```
以上操作过程,从服务器配置完成。
```
## **Mycat配置**
Mycat 1.4 支持MySQL主从复制状态绑定的读写分离机制,让读更加安全可靠,配置如下:
```
<dataNode name="dn1" dataHost="localhost1" database="db1" />
<dataNode name="dn2" dataHost="localhost1" database="db2" />
<dataNode name="dn3" dataHost="localhost1" database="db3" />
<dataHost name="localhost1" maxCon="1000" minCon="10" balance="1"
writeType="0" dbType="mysql" dbDriver="native" switchType="2" slaveThreshold="100">
<heartbeat>show slave status</heartbeat>
<writeHost host="hostM" url="192.168.25.134:3306" user="root"
password="root">
<readHost host="hostS" url="192.168.25.166:3306" user="root"
password="root" />
</writeHost>
</dataHost>
```
### **属性讲解**
```
设置 balance="1"与writeType="0"
Balance参数设置:
1. balance="0", 所有读操作都发送到当前可用的writeHost上。
2. balance="1",所有读操作都随机的发送到readHost。
3. balance="2",所有读操作都随机的在writeHost、readhost上分发
4. balance=”3”, 所有读请求随机的分发到 writeHost 对应的 readhost 执行,writerHost不负担读压力
WriteType参数设置:
1. writeType="0", 所有写操作都发送到可用的writeHost上。
2. writeType="1",所有写操作都随机的发送到readHost。
3. writeType="2",所有写操作都随机的在writeHost、readhost分上发。
“readHost是从属于writeHost的,即意味着它从那个writeHost获取同步数据,因此,
当它所属的writeHost宕机了,则它也不会再参与到读写分离中来,即“不工作了”
,这是因为此时,它的数据已经“不可靠”了。基于这个考虑,目前mycat 1.3和
1.4版本中,若想支持MySQL一主一从的标准配置,并且在主节点宕机的情况
下,从节点还能读取数据,则需要在Mycat里配置为两个writeHost并设置banlance=1。”
设置 switchType="2" 与slaveThreshold="100"
switchType 目前有三种选择:
-1:表示不自动切换
1 :默认值,自动切换
2 :基于MySQL主从同步的状态决定是否切换
“Mycat心跳检查语句配置为 show slave status ,dataHost 上定义两个新属性:
switchType="2" 与slaveThreshold="100",此时意味着开启MySQL主从复制状态绑定的读写分
离与切换机制。Mycat心跳机制通过检测 show slave status 中的 "Seconds_Behind_Master",
"Slave_IO_Running", "Slave_SQL_Running" 三个字段来确定当前主从同步的状态以及
Seconds_Behind_Master主从复制时延。“
```
- 序言
- 系统要求
- 版本更新日志
- 远丰商城技术对接说明
- 开发指导
- 系统架构
- 负载集群
- 云存储
- 框架内容
- 基础
- 开发规范
- 目录结构
- 架构
- 架构总览
- 数据库
- 数据库连接
- 基本使用
- 缓存
- 配置
- 路由
- 数据字典
- ucenter
- shop
- paycenter
- ucenter_admin
- shop_admin
- paycenter_admin
- shop1
- shop2
- shop3
- 通讯内容
- 商家中心
- 顶部导航栏
- 店铺信息栏
- 店铺及商品提示栏
- 交易提示栏
- 销售情况统计栏
- 集群架构图
- 单品销量排行栏
- 店铺运营推广栏
- 平台联系方式栏
- 订单物流
- 商品
- 商品列表
- 商品详情
- 商品发布与编辑
- 分销商品
- 关联版式
- 商品规格
- 图片空间
- 淘宝导入
- 订单流程
- 交易订单
- 订单退款/退货
- 促销
- 团购管理
- 加价购
- 限时折扣
- 满即送
- 代金券管理
- 分销
- 店铺
- 店铺设置
- 自销产品供应商
- 实体店铺
- 品牌申请
- 店铺信息
- 消费者保障服务
- 门店账号
- 分销商--产品供应商
- 分销明细
- 批发市场
- 商家微信公众号
- 售后服务
- 咨询管理
- 投诉管理
- 退款管理
- 退货管理
- 杂项
- 远程上传图片
- 接口(废弃,参考最外层接口项)
- 接口说明
- 品牌
- 商品规格
- 商品类型
- 商品分类
- 商品
- 订单
- 商品/店铺收藏
- 足迹
- 退款及退货
- 商家店铺
- 会员
- 入驻协议
- 订单接口
- 商品接口
- 订单物流接口
- 商家中心接口
- 促销接口
- 快递鸟物流接口
- 代金券接口
- 首页版块
- 团购
- 平台红包
- 限时折扣接口
- 拼团接口
- wap首页模板
- JS
- 银联支付
- 多语言
- 商品评分
- 图片加载
- 买家申请退款退货
- 商家退款退货
- 平台退款退货
- 添加发票
- 提交订单
- 确认订单
- 运费销售区域
- 获取会员地址
- 充值
- 导出XLS
- 商城系统集成
- 多语言实现
- 三级分销推广链接发展推广员
- app.ini.php
- 去分销
- 版本更新
- 物流支持
- 运营人员建议
- 业务逻辑
- 统计结算
- 客服消息
- 账号
- 三级分销
- IM
- 配置
- 平台帐号
- 活动数据表说明
- 接口
- 数据库中间键
- MyCat的优势
- 概念说明
- Mycat的下载及安装
- 参数配置案列
- Mycat读写分离
- 基本命令
- 常见错误
