
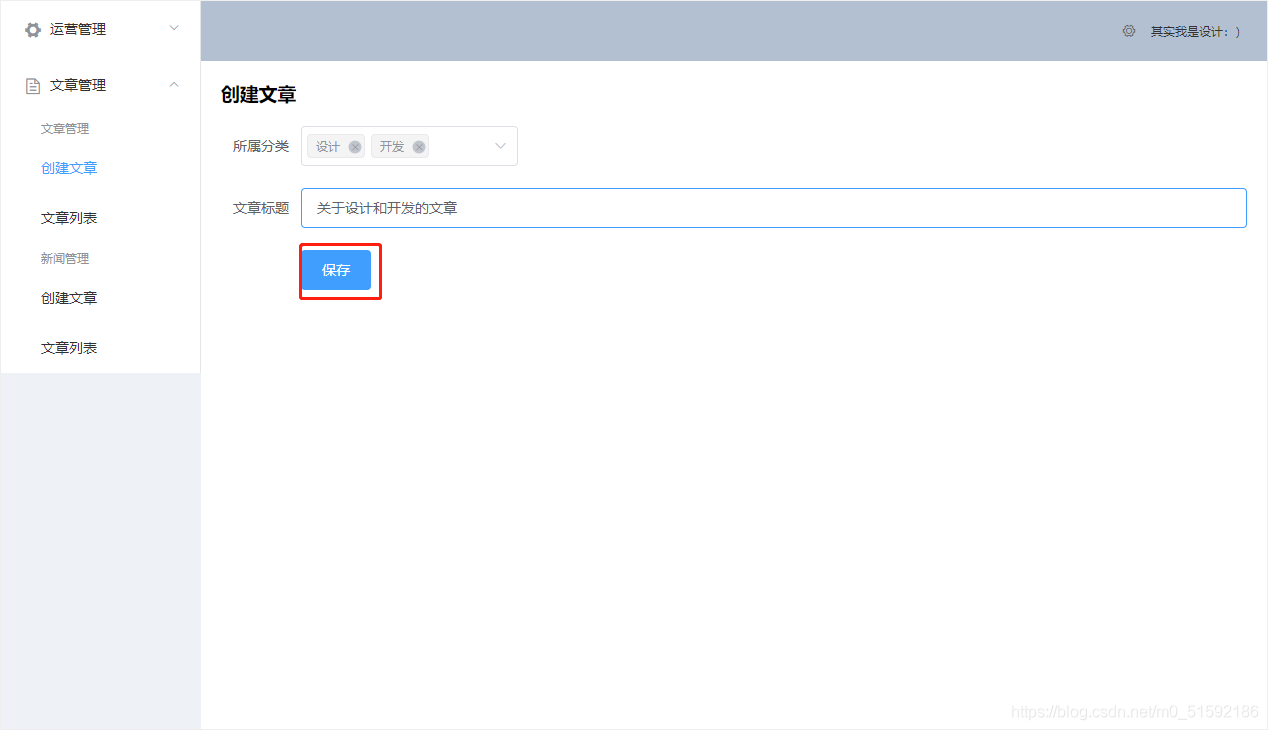
我们新建一个文章的添加与列表功能,当新建一篇文章时,让它所属设计和开发两个分类。大家可以根据此方法的制作过程,应用到其他功能模块中。
1.文章功能的所有页面创建
按照之前分类功能页面创建文章功能的所有页面。
(1)设置文章页面的路由
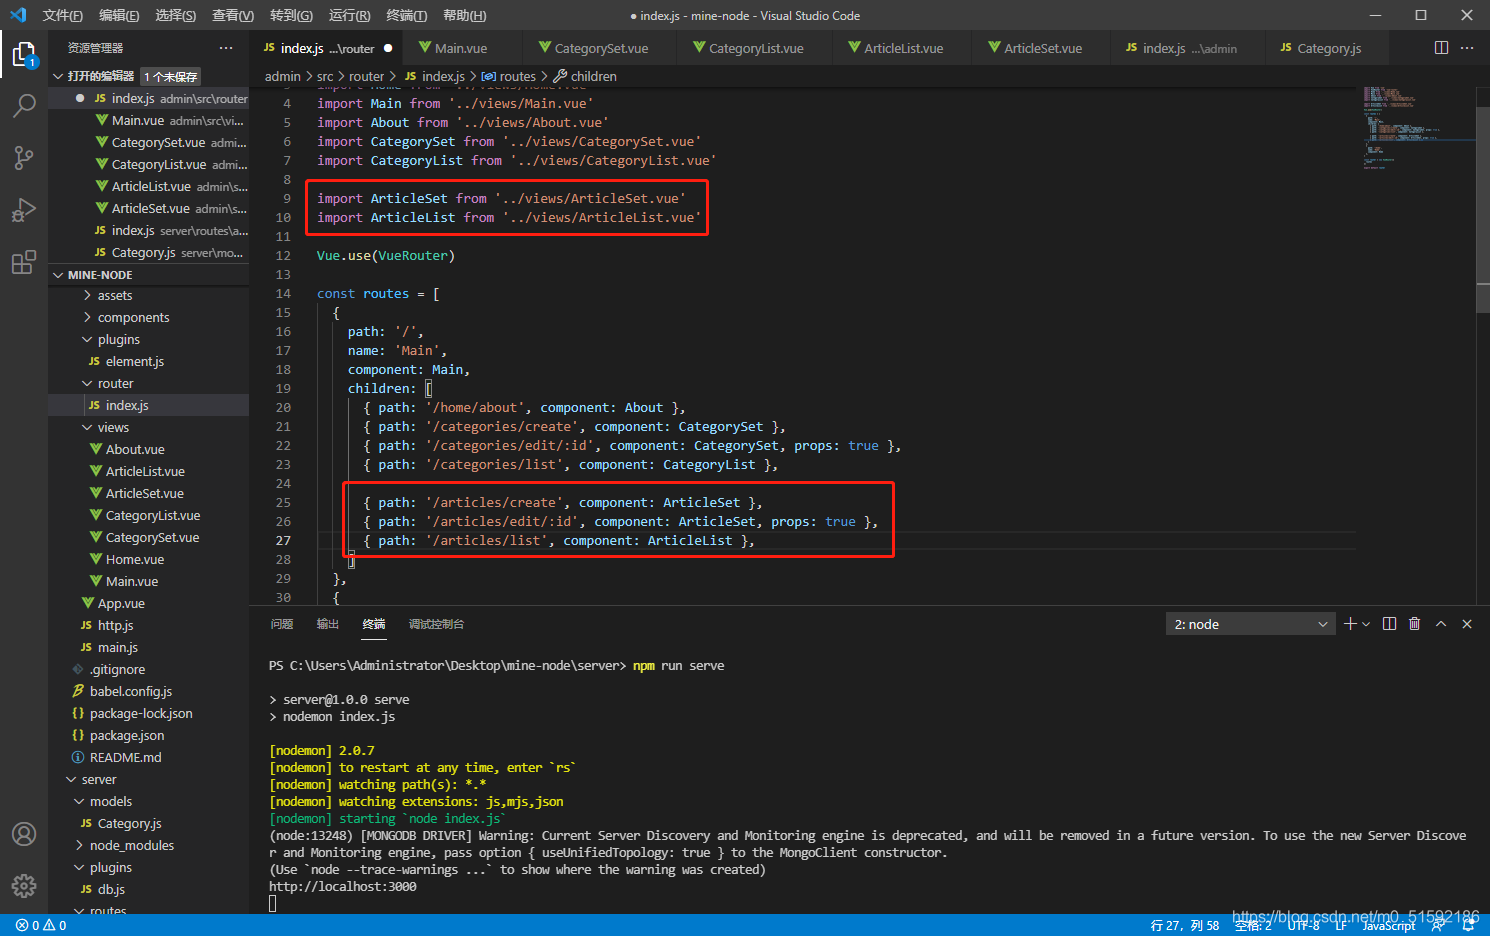
(2)在主页面Main.vue组件的导航中加入文章页面的跳转按钮
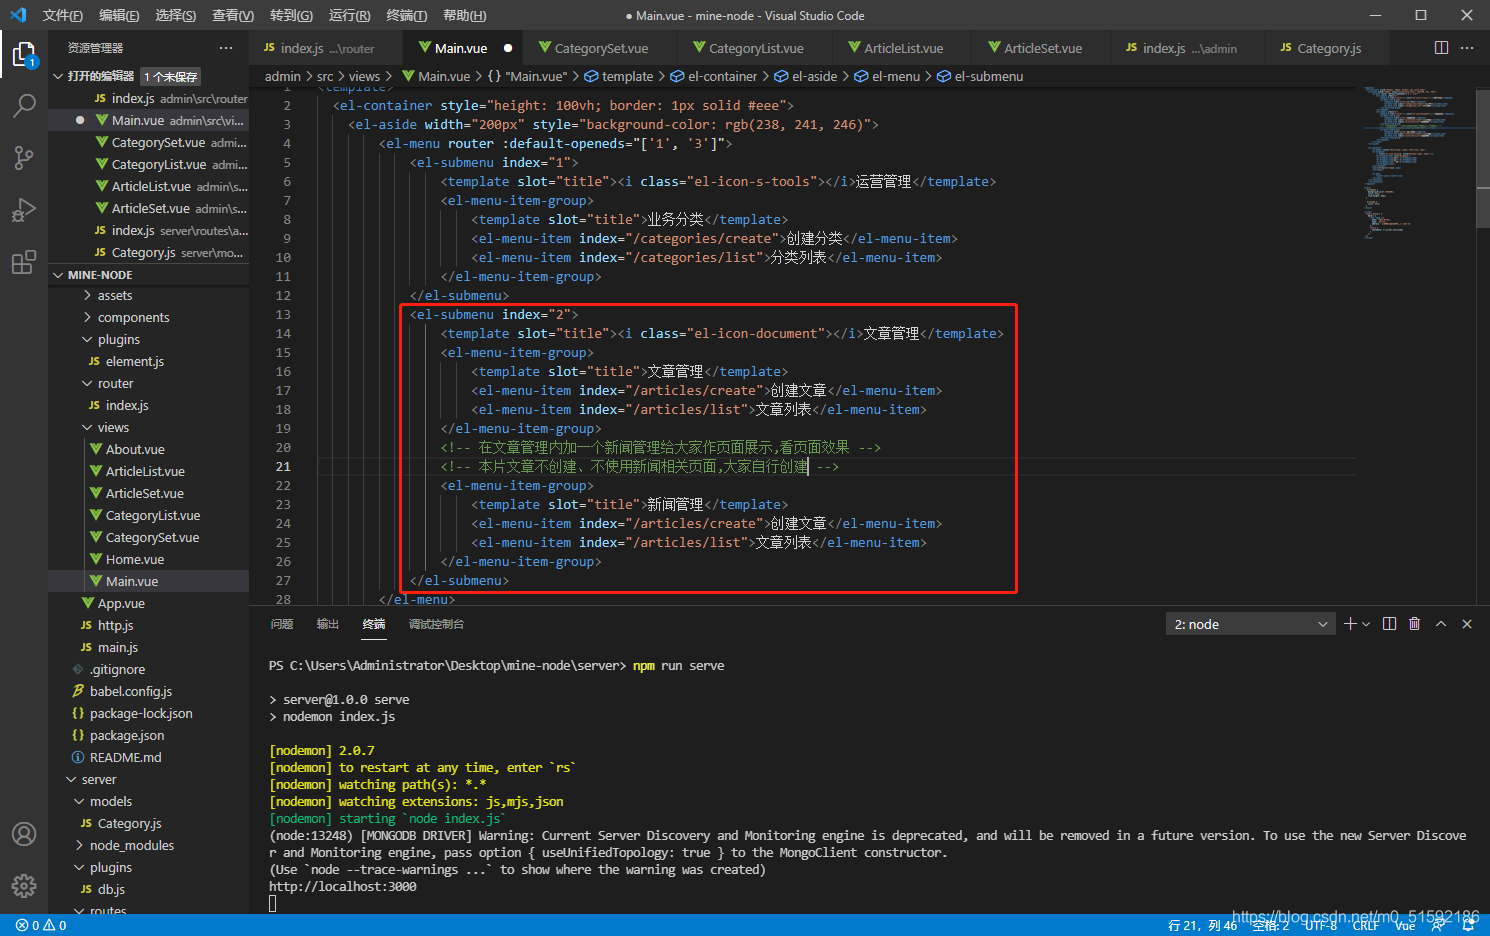
此时点击导航按钮就可以跳转了。
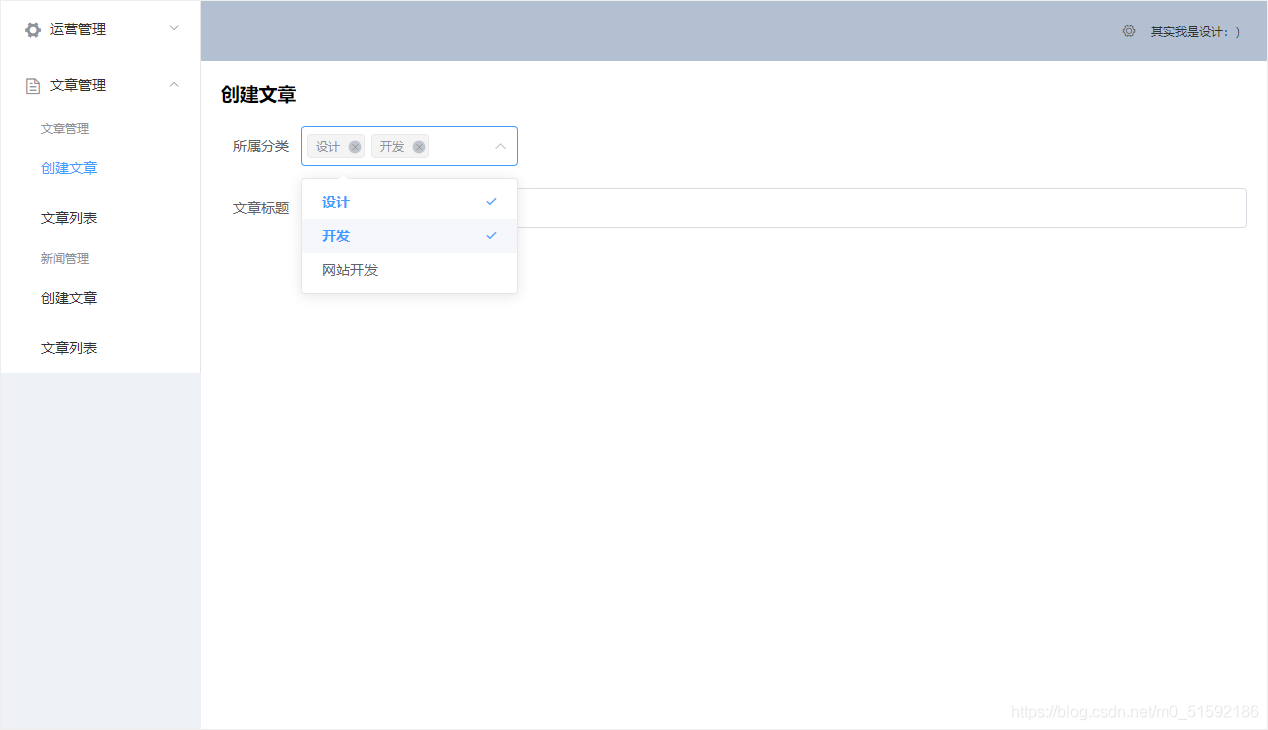
(3)创建文章页面-ArticleSet.vue组件
整体框架不变与CategorySet.vue相同,将除查询上级分类以外的接口名categories改为articles,上级分类parentOptions改成所属分类categories。
```
<template>
<div>
<h1>{{id ? '编辑' : '创建'}}文章</h1>
<el-form label-width="80px" style="margin-top:20px;" @submit.native.prevent="save">
<el-form-item label="所属分类">
<!-- 寻找上级分类categories -->
<!-- 为了添加多个上级分类,需要在后边加一个multiple,就可以进行多选了。传输数据为数组格式 -->
<el-select v-model="model.categories" multiple>
<el-option v-for="item in categories" :key="item._id" :label="item.name" :value="item._id"></el-option>
</el-select>
</el-form-item>
<el-form-item label="文章标题">
<el-input v-model="model.name"></el-input>
</el-form-item>
<el-form-item>
<el-button type="primary" native-type="submit">保存</el-button>
</el-form-item>
</el-form>
</div>
</template>
<script>
export default {
props: {
id: {}
},
data(){
return {
model: {},
categories: [],
}
},
methods: {
async save(){
let res
if(this.id){
res = await this.$http.put('articles/' + this.id, this.model)
}else{
res = await this.$http.post('articles', this.model)
}
console.log("en?",res)
this.$router.push('/articles/list')
this.$message({
type: 'success',
message: '保存成功'
})
},
async fetch(){
const res = await this.$http.get('articles/' + this.id)
this.model = res.data
},
async fetchCategories(){
const res = await this.$http.get('categories')
this.categories = res.data
}
},
created(){
this.id && this.fetch()
this.fetchCategories()
}
}
</script>
```
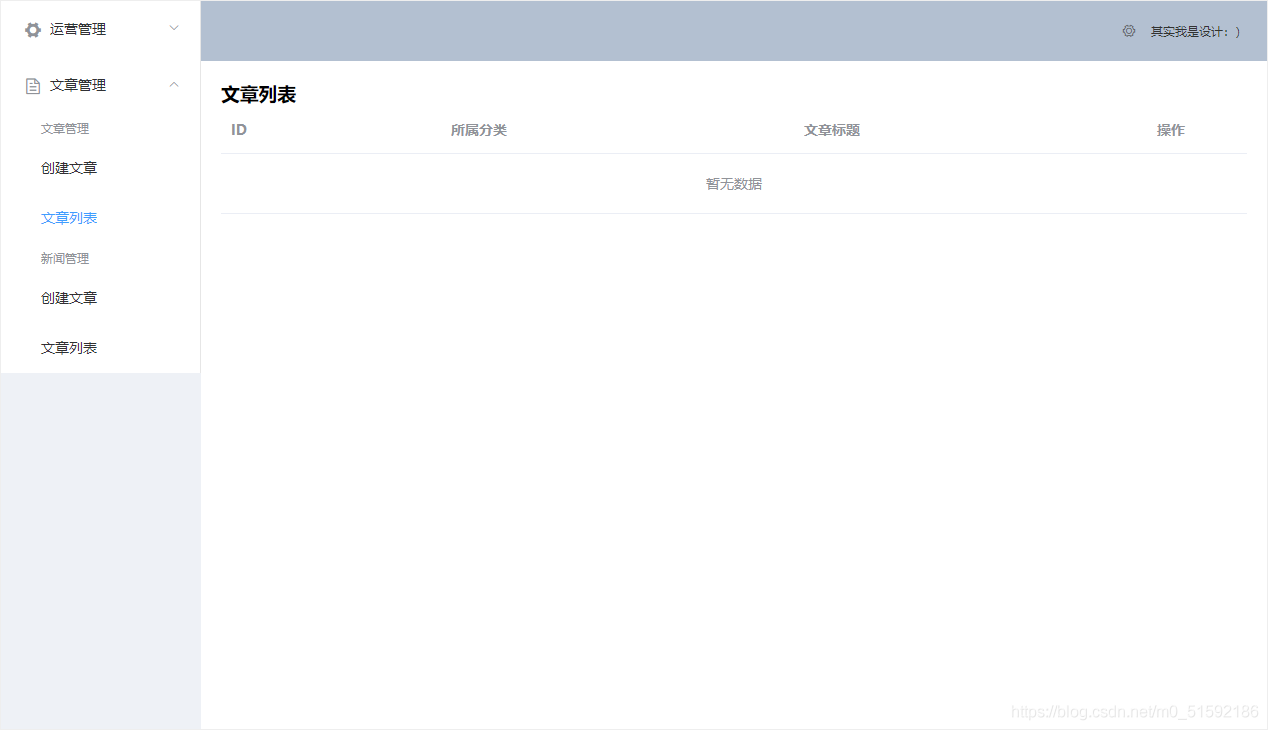
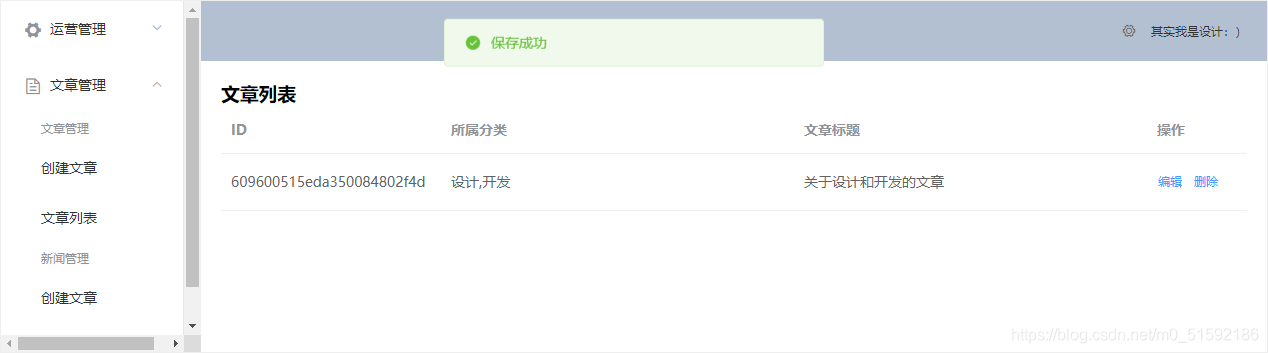
(4)文章列表页面-ArticleList.vue组件
```
<template>
<div>
<h1>分类列表</h1>
<el-table :data="items">
<el-table-column prop="_id" label="ID" width="220">
</el-table-column>
<el-table-column prop="categories.name" label="所属分类">
</el-table-column>
<el-table-column prop="categories[0].name,categories[1].name" label="所属分类">
<template slot-scope="scope"> {{scope.row.categories[0].name}},{{scope.row.categories[1].name}} </template>
</el-table-column>
<el-table-column prop="name" label="文章标题">
</el-table-column>
<el-table-column
fixed="right"
label="操作"
width="100">
<template slot-scope="scope">
<el-button type="text" size="small" @click="$router.push('/articles/edit/' + scope.row._id)">编辑</el-button>
<el-button @click="remove(scope.row)" type="text" size="small">删除</el-button>
</template>
</el-table-column>
</el-table>
</div>
</template>
<script>
export default {
data() {
return {
items: []
}
},
methods: {
async fetch(){
const res = await this.$http.get('articles')
this.items = res.data
},
remove(row){
this.$confirm('是否确定要删除文章"' + row.name + '"?', '提示', {
confirmButtonText: '确定',
cancelButtonText: '取消',
type: 'warning'
}).then(async () => {
// 要想使用await,函数必须使用async
// await异步执行,待调用接口获取数据完成后再将值传给res,进行下一步操作
const res = await this.$http.delete('articles/' + row._id)
this.$message({
type: 'success',
message: '删除成功!'
});
if(res.status == 200){
// 接口调用成功后,刷新页面
this.fetch()
}
}).catch(() => {
this.$message({
type: 'info',
message: '已取消删除'
});
});
}
},
created() {
this.fetch()
}
}
</script>
```
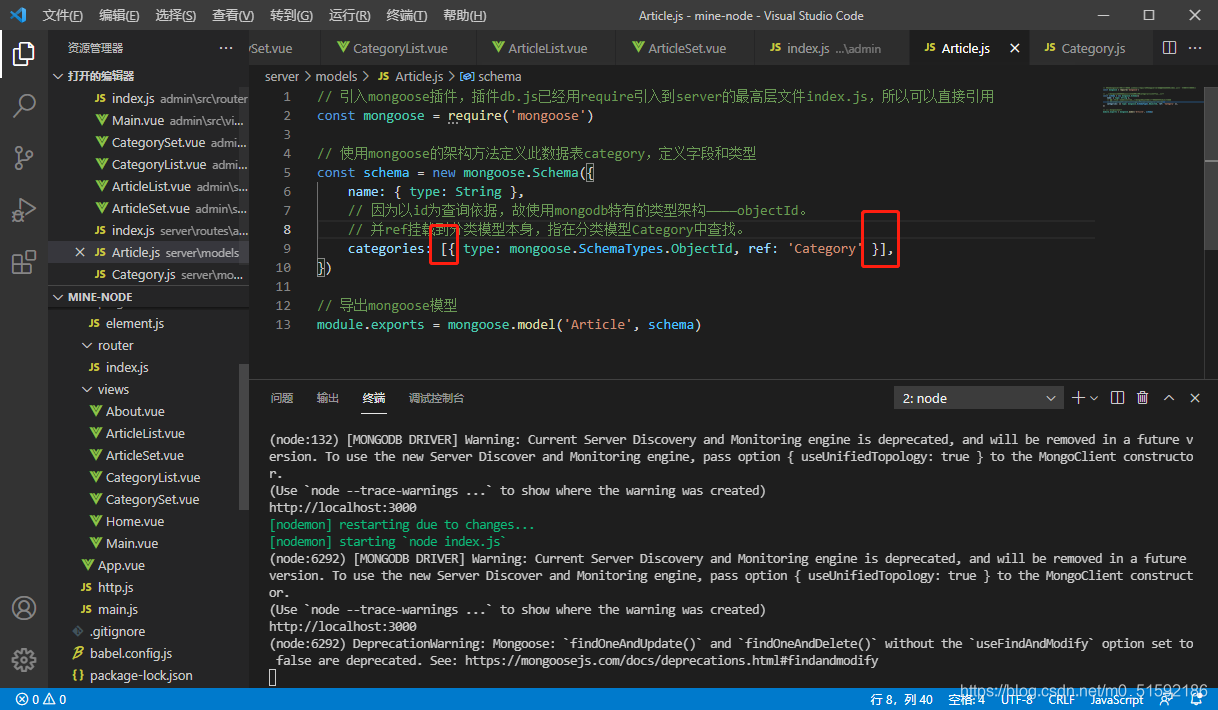
(5)创建文章数据库模型Article.js
server/models/Article.js:
```
// 引入mongoose插件,插件db.js已经用require引入到server的最高层文件index.js,所以可以直接引用
const mongoose = require('mongoose')
// 使用mongoose的架构方法定义此数据表category,定义字段和类型
const schema = new mongoose.Schema({
name: { type: String },
// 因为以id为查询依据,故使用mongodb特有的类型架构————objectId。
// 并ref挂载到分类模型本身,指在分类模型Category中查找。
categories: [{ type: mongoose.SchemaTypes.ObjectId, ref: 'Category' }],
})
// 导出mongoose模型
module.exports = mongoose.model('Article', schema)
```
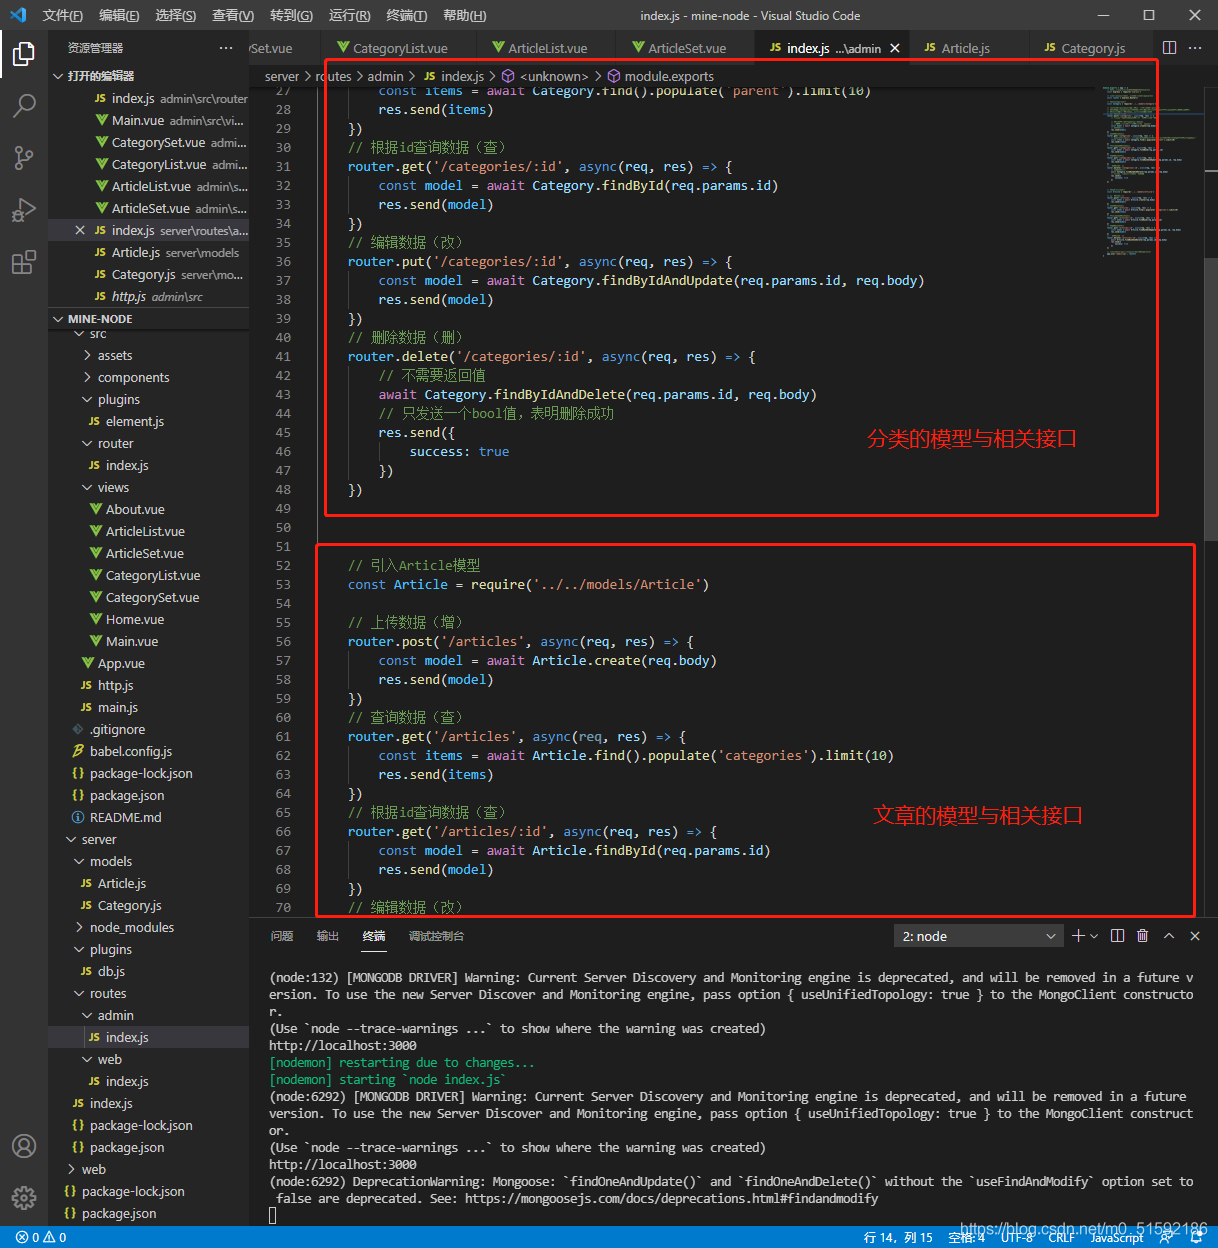
(6)文章功能接口
server/router/admin/index.js复制categories接口,改接口地址和接口名,引入Article模型
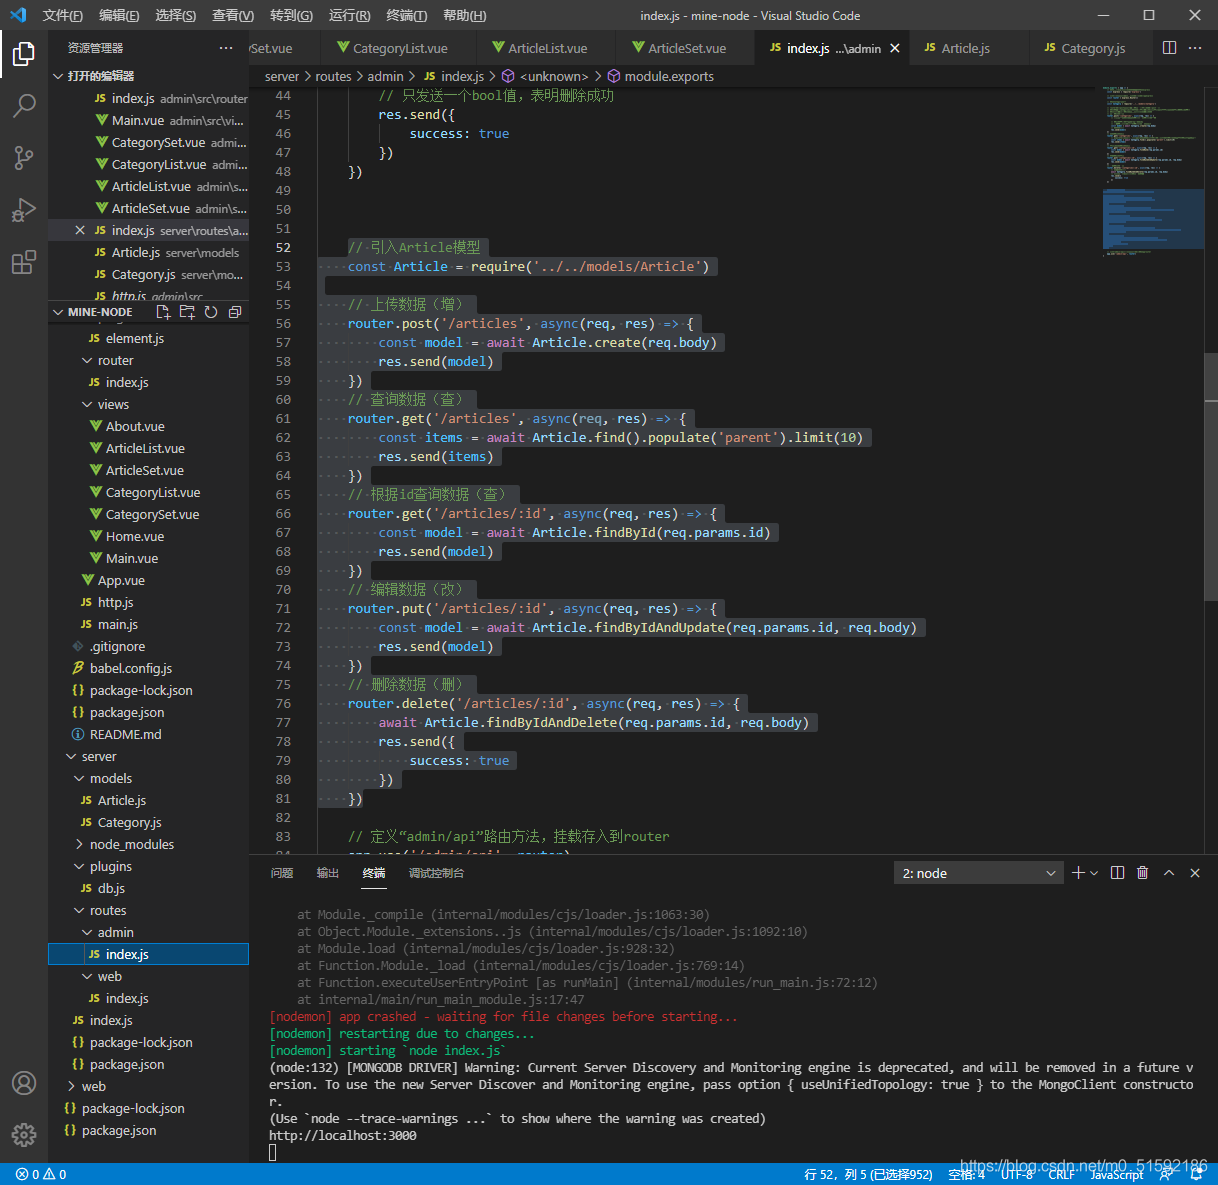
此时测试文章功能:
没问题。
2.总结
(1)上传多个上级分类
multiple标签方法。以数组方式上传到数据库模型,模型中定义的字段和类型要用数组形式包括:
(2)显示多个上级分类
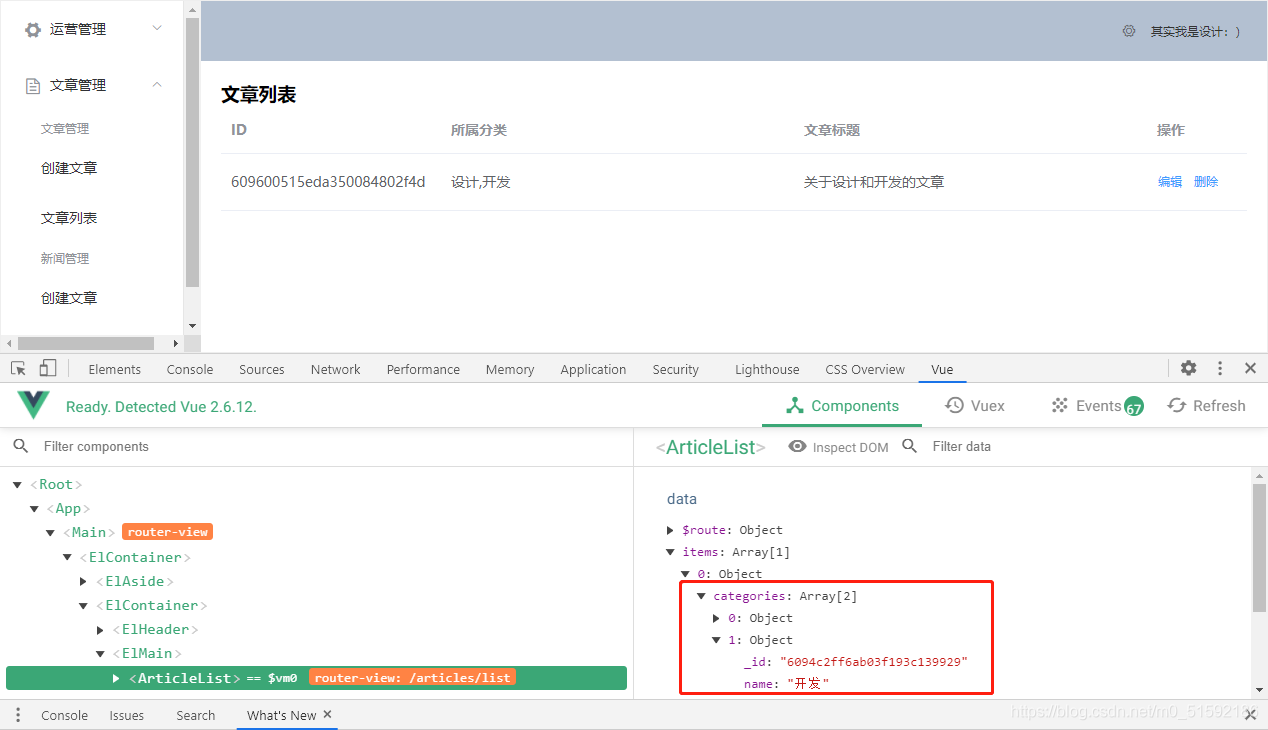
el-table-column不能以数组方式显示在页面中,但可以使用prop将多个数据放在标签中,然后用vue的v-model双向绑定显示该行内包含的数据。
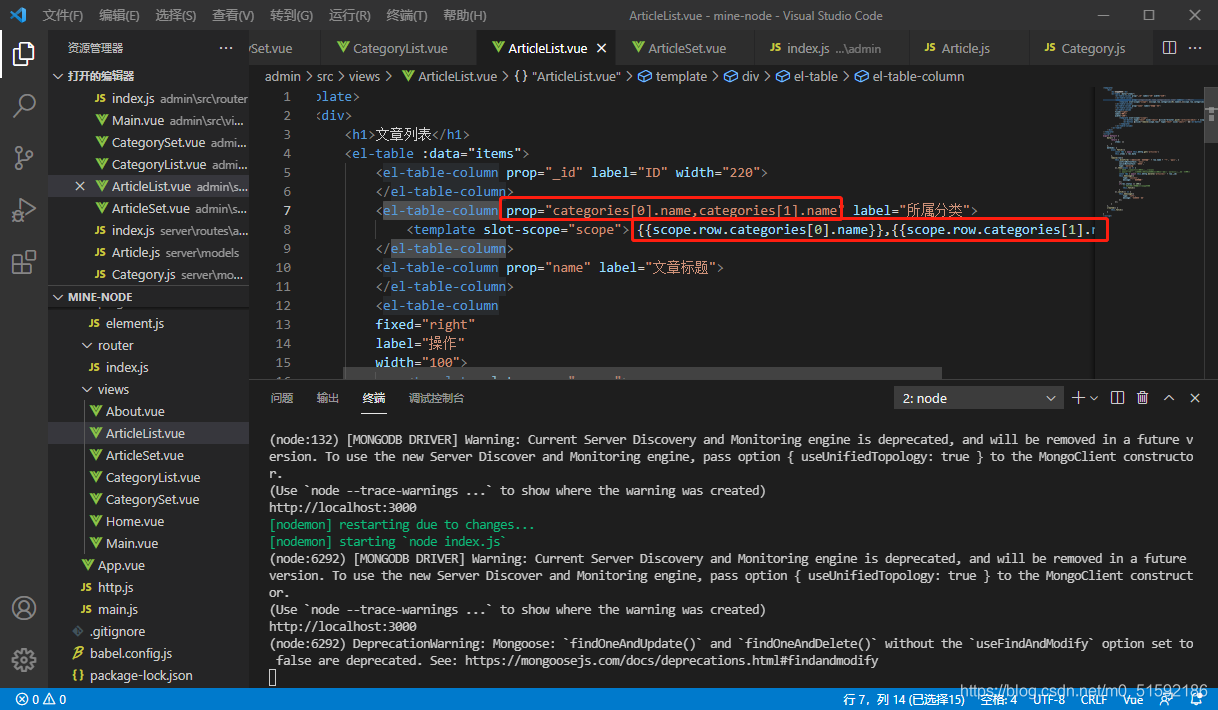
数据来源在vue.js devtools中层层查找。
(3)关于服务端接口的整合
目前服务器接口中,每增加一个模块功能就需要新添加一系列相似接口。
所以下篇文章我们学习一下接口的整合:通用CRUD接口。将接口地址和接口名写成变量,服务端接收admin端传入的接口名赋值到接口变量中,以实现接口的复用,减轻服务端接口频繁杂乱的压力。
- tp6+vue
- 1.工具和本地环境
- 2.启动项目
- 3.路由、模型与数据库操作
- 4.优化后端接口,前端使用axios实现接口功能
- 5.用户登录,bcrypt(hash)加密与验证
- 6.用户登录(二),token验证
- 7.分类的模型关联和通用CRUD接口
- 8.使用vue的markdown编辑器并批量上传图片
- Node.js + Vue.js
- 工具,本地环境
- 2.1启动项目
- 3.element-ui和vue-router路由的安装和使用
- 4.使用axios,并创建接口上传数据到mongodb数据库
- 5.mongoodb数据库的“删、改、查”操作
- 6.mongodb数据库无限层级的数据关联(子分类)
- 7.使用mongodb数据库关联多个分类(关联多个数据)
- 8.server端使用通用CRUD接口
- 9.图片上传
- 10.vue的富文本编辑器(vue2-editor)
- 11.动态添加分栏上传多组数据
- 12-1.管理员模块
- 13-1.搭建前台web端页面
- 1.使用sass工具搭建前台web端页面
- 2.sass工具的变量
- 3.使用flex布局并开始搭建web端
- 4.vue广告轮播图,并使用接口引入数据
- 5.使用字体图标(iconfont)
- 6.卡片组件的封装
- 14-1.生产环境编译
- 1.环境编译
- 2.购买域名服务器并解析域名到服务器
- 3.nginx配置web服务器并安装网站环境
- 4.git拉取代码到服务器
- 5.配置Nginx反向代理
- 6.迁移本地数据到服务器(mongodump)
- uni
- 1.工具&本地环境
- 2.页面制作
- 3.页面制作、组件与轮播
- 4.页面跳转与横向滑动
- 5.用户授权登录和用户信息获取
- 6.用户注册和数据存储
- 7.用户填写表单信息