# HoloCubic移植LVGL8
## 一、开发环境
- 操作系统:Windows 11 专业版
- 开发工具:VS Code + Platform IO
- 硬件资源:HoloCubic(ESP32)
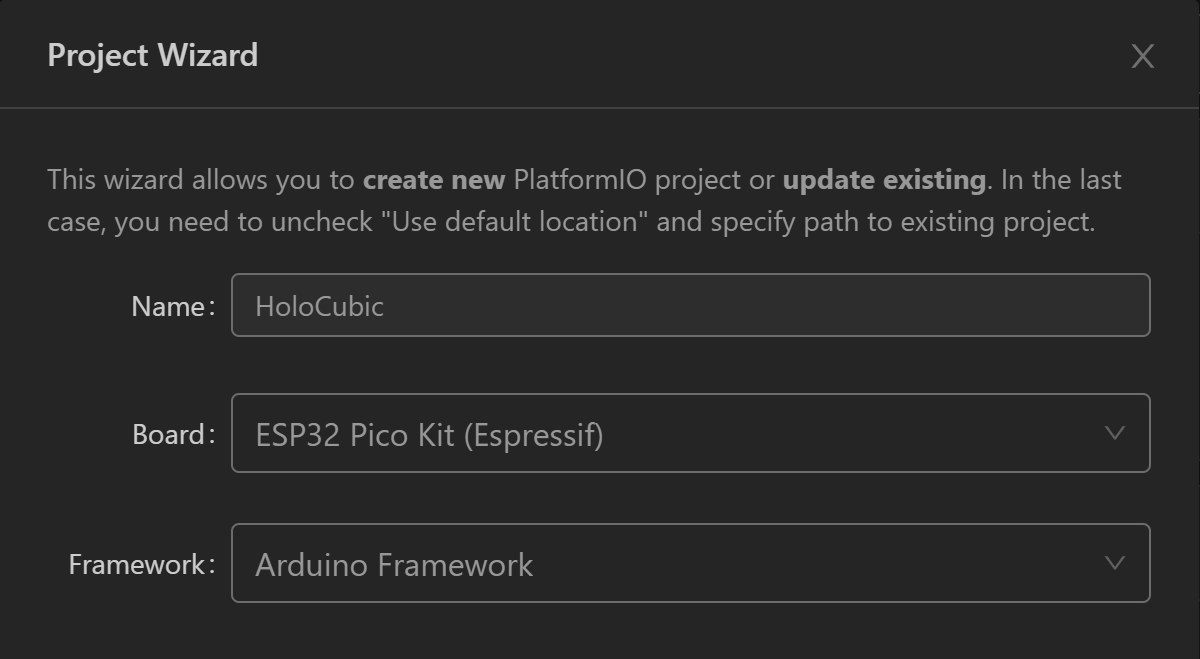
## 二、新建项目
选择主板“ESP32 Pico Kit(Espressif)”
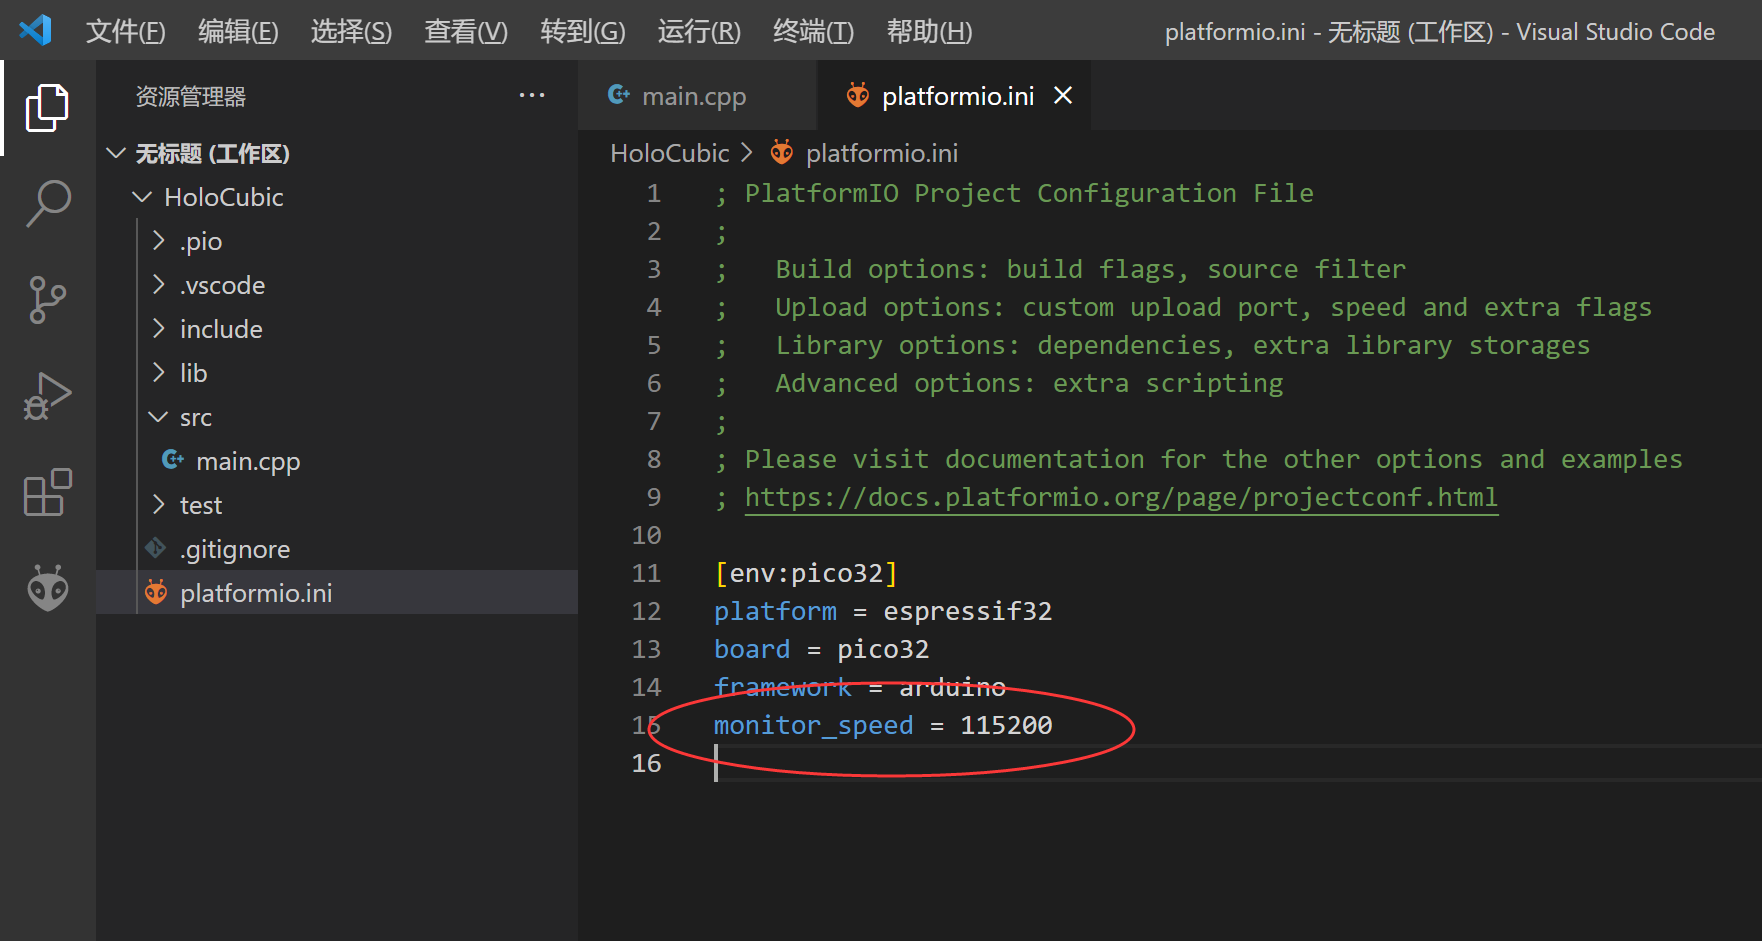
设置波特率为“115200”

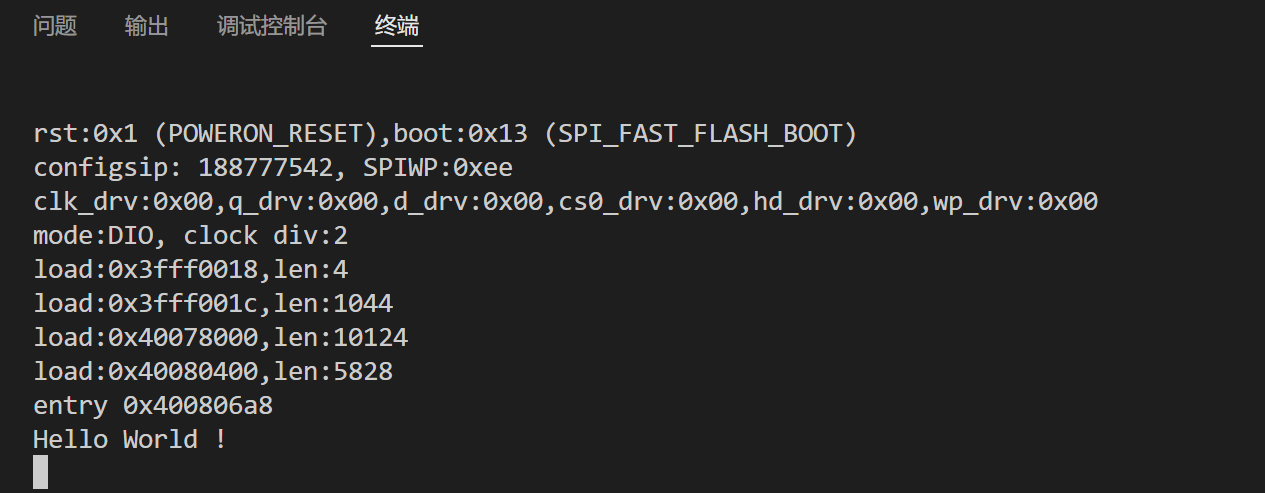
成功输出“Hello World !”
## 二、下载驱动
克隆以下工程到`lib`文件夹中
```
git clone https://github.com/Bodmer/TFT_eSPI.git
```
```
git clone https://github.com/lvgl/lvgl.git
```
```
git clone https://github.com/lvgl/lv_drivers.git
```
```
git clone https://github.com/lvgl/lv_demos.git
```
## 三、修改配置
### 1、修改`lib\TFT_eSPI\User_Setup.h`文件
```
// #define ILI9341_DRIVER
```
```
#define ST7789_DRIVER
```
```
#define TFT_WIDTH 240
```
```
#define TFT_HEIGHT 240
```
```
// #define SPI_FREQUENCY 27000000
```
```
#define SPI_FREQUENCY 80000000
```
### 2、修改`lib\TFT_eSPI\User_Setup_Select.h`文件
```
#include <User_Setups/Setup24_ST7789.h>
```
### 3、修改`lib\TFT_eSPI\Setup24_ST7789.h`文件
```
#define TFT_MISO 19
#define TFT_MOSI 23
#define TFT_SCLK 18
#define TFT_CS -1 // Not connected
#define TFT_DC 2
#define TFT_RST 4 // Connect reset to ensure display initialises
```
```
// #define TFT_CS -1 // Define as not used
// #define TFT_DC PIN_D1 // Data Command control pin
// #define TFT_RST PIN_D4 // TFT reset pin (could connect to NodeMCU RST, see next line)
```
```
#define SPI_FREQUENCY 60000000
```
### 4、修改`lib\TFT_eSPI\TFT_Drivers\ST7789_Rotation.h`文件
```
rotation = m & 0x0F;
```
```
case 4: // Inverter portrait & Mirror Y
#ifdef CGRAM_OFFSET
if (_init_width == 135)
{
colstart = 53;
rowstart = 40;
}
else
{
colstart = 0;
rowstart = 0;
}
#endif
writedata(TFT_MAD_MX | TFT_MAD_COLOR_ORDER);
_width = _init_width;
_height = _init_height;
break;
case 5:
#ifdef CGRAM_OFFSET
if (_init_width == 135)
{
colstart = 40;
rowstart = 53;
}
else
{
colstart = 80;
rowstart = 0;
}
#endif
writedata(TFT_MAD_MX | TFT_MAD_MY | TFT_MAD_MV | TFT_MAD_COLOR_ORDER);
_width = _init_height;
_height = _init_width;
break;
```
### 5、将`lib\lv_demos\lv_demo_conf_template.h`改名为`lv_demo_conf.h`
```
#if 1
```
```
#define LV_USE_DEMO_MUSIC 0
```
```
#define LV_USE_DEMO_WIDGETS 1
#if LV_USE_DEMO_WIDGETS
#define LV_DEMO_WIDGETS_SLIDESHOW 1
#endif
```
### 6、将`lib\lv_drivers\lv_drv_conf_template.h`改名为`lv_drv_conf.h`
```
#if 1
```
### 7、将`lib\lvgl\lv_conf_template.h`改名为`lv_conf.h`
```
#if 1
```
```
#define LV_MEM_CUSTOM 0
```
```
#define LV_TICK_CUSTOM 1
```
```
#define LV_USE_LOG 1
```
### 8、将`lib\lv_demos\src\lv_demo_widgets\lv_demo_widgets.c`文件中的所有`dsc->clip_area`改为`dsc->draw_area`
## 四、测试工程(main.cpp)
```
#include <lvgl.h>
#include <TFT_eSPI.h>
#include <lv_demo.h>
static lv_disp_draw_buf_t draw_buf;
static lv_color_t buf[TFT_WIDTH * 10];
TFT_eSPI tft = TFT_eSPI(TFT_WIDTH, TFT_HEIGHT); /* TFT instance */
#if LV_USE_LOG != 0
/* Serial debugging */
void my_print(const char *buf)
{
Serial.printf("%s\r\n", buf);
Serial.flush();
}
#endif
/* Display flushing */
void my_disp_flush(lv_disp_drv_t *disp, const lv_area_t *area, lv_color_t *color_p)
{
uint32_t w = (area->x2 - area->x1 + 1);
uint32_t h = (area->y2 - area->y1 + 1);
tft.startWrite();
tft.setAddrWindow(area->x1, area->y1, w, h);
tft.pushColors((uint16_t *)&color_p->full, w * h, true);
tft.endWrite();
lv_disp_flush_ready(disp);
}
#define LCD_BL_PWM_CHANNEL 0
#define LCD_BL_PIN 5
void setup()
{
Serial.begin(115200); /* prepare for possible serial debug */
String LVGL_Arduino = "Hello LVGL ";
LVGL_Arduino += String('V') + lv_version_major() + "." + lv_version_minor() + "." + lv_version_patch();
Serial.println(LVGL_Arduino);
Serial.println("I am LVGL_Arduino");
ledcSetup(LCD_BL_PWM_CHANNEL, 5000, 8);
ledcAttachPin(LCD_BL_PIN, LCD_BL_PWM_CHANNEL);
lv_init();
#if LV_USE_LOG != 0
lv_log_register_print_cb(my_print); /* register print function for debugging */
#endif
tft.begin(); /* TFT init */
tft.fillScreen(TFT_BLUE);
tft.writecommand(ST7789_DISPON);
tft.setRotation(4); /* Landscape orientation, flipped */
lv_disp_draw_buf_init(&draw_buf, buf, NULL, TFT_WIDTH * 10);
/*Initialize the display*/
static lv_disp_drv_t disp_drv;
lv_disp_drv_init(&disp_drv);
/*Change the following line to your display resolution*/
disp_drv.hor_res = TFT_WIDTH;
disp_drv.ver_res = TFT_HEIGHT;
disp_drv.flush_cb = my_disp_flush;
disp_drv.draw_buf = &draw_buf;
lv_disp_drv_register(&disp_drv);
/*Initialize the (dummy) input device driver*/
static lv_indev_drv_t indev_drv;
lv_indev_drv_init(&indev_drv);
indev_drv.type = LV_INDEV_TYPE_POINTER;
// indev_drv.read_cb = my_touchpad_read;
lv_indev_drv_register(&indev_drv);
/* Create simple label */
lv_obj_t *label = lv_label_create(lv_scr_act());
lv_label_set_text(label, LVGL_Arduino.c_str());
lv_obj_align(label, LV_ALIGN_CENTER, 0, 0);
Serial.println("Setup done");
}
void loop()
{
lv_timer_handler(); /* let the GUI do its work */
delay(5);
}
```
