[TOC]
## 一、安装JDK和maven
我用的是jdk1.8.0_191和apache-maven-3.8.1,解压到`/usr/local`目录之后配置环境变量即可。
~~~
export JAVA_HOME=/usr/local/jdk1.8.0_191;
export CLASSPATH=.:${JAVA_HOME}/lib:$CLASSPATH;
export PATH=${JAVA_HOME}/bin:$PATH;
export MAVEN_HOME=/usr/local/apache-maven-3.8.1
export PATH=$MAVEN_HOME/bin:$PATH
~~~
使用下面的命令验证安装结果,能够正常输出版本信息即安装正确
~~~
java -version;
mvn -v;
~~~
## 二、安装nexus私有maven仓库
首先解压文件至一个目录,我是用的非root用户,就解压到当前用户的根目录。
~~~
tar -zxvf nexus-3.55.0-01-unix.tar.gz
~~~
解压之后有两个文件夹,一个是nexus的安装文件夹,另一个spnatype-work是工作文件夹(日志、数据、临时文件都会存在这里)。

可以修改默认的端口号
~~~
$ vim ./nexus-3.55.0-01/etc/nexus-default.properties
application-port= //修改文件中该属性为你的端口号,默认不改为8081
~~~
因为nexus存储的数据量比较大,所以有些生产环境会单独挂载一个盘符,比如:`/data`。如果我们需要将工作目录放到这个目录下,做如下操作
~~~
# cd /data/
# mkdir nexusrepertory
# chown -R xxxxx:xxxxxx nexusrepertory #这里xxxxx换成你自己的用户和用户组
# mv /home/xxxxx/sonatype-work /data/nexusrepertory
~~~
目录规划好之后,我们还需要修改配置,告知nexus数据文件、日志文件的存放位置
~~~
# cd /home/xxxxxx/nexus3/nexus-3.55.0-01/bin
# vim nexus.vmoptions
-XX:LogFile=/data/nexusrepertory/sonatype-work/nexus3/log/jvm.log
-Dkaraf.data=/data/nexusrepertory/sonatype-work/nexus3
-Dkaraf.log=/data/nexusrepertory/sonatype-work/nexus3/log
-Djava.io.tmpdir=/data/nexusrepertory/sonatype-work/nexus3/tmp
~~~
完成以上操作我们就可以启动nexus了。
~~~
./nexus-3.55.0-01/bin/nexus start
~~~
全都配置完成之后访问`http://ip:8081/`第一次访问的时候速度非常慢,需要等一段时间,这个过程有可能你会认为没有请求响应。初始化admin密码在`$data-dir/sonatype-work/nexus3/admin.password`文件中。
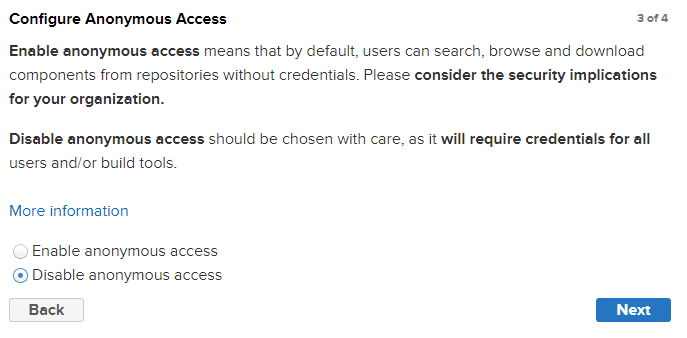
第一次登陆之后会让你修改admin密码,修改完成之后会让你选择该库是否允许匿名访问。我们选择不允许,如果内网比较安全可以设置为允许。
## 三、新建一个proxy代理仓库
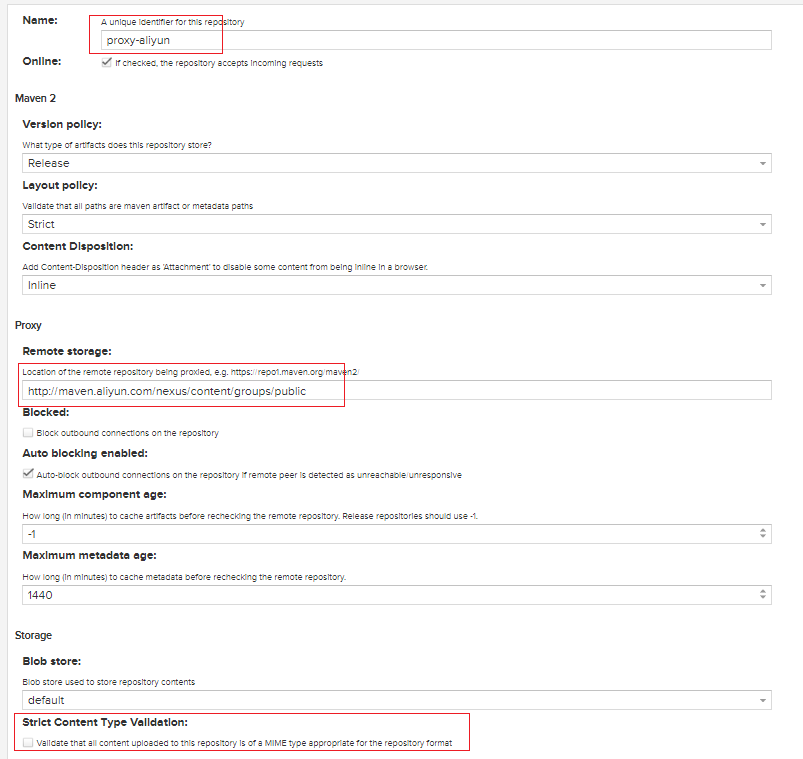
代理仓库(Proxy Repository)是远程仓库的代理,当用户向这个代理仓库请求一个依赖包时,这个代理仓库会先在本地查找,如果存在,会直接提供给用户进行下载;如果在代理仓库本地查找不到,就会从配置的远程中央仓库中进行下载,下载到私服上之后再提供给用户下载。所以一般我们把私服架设在内网之中,这样可以节省外网带宽,并且大大提高了用户下载依赖的速度。
点击"Repository"–>“Repositories”–>“Create repository”,选择maven2(proxy)。
## 四、创建一个私有仓库
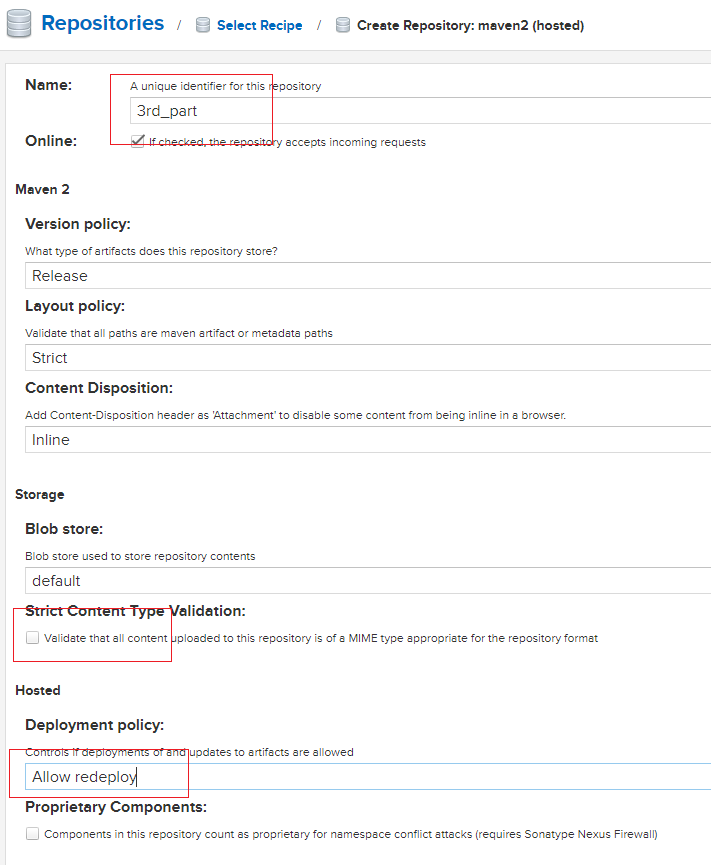
点击"Repository"–>“Repositories”–>“Create repository”,选择maven2(hosted)。用户可以把一些自己的构件上传至宿主仓库(Hosted Repository)中,比如自己封装的一些工具类,在中央仓库是找不到的。
## 五、归于maven-public
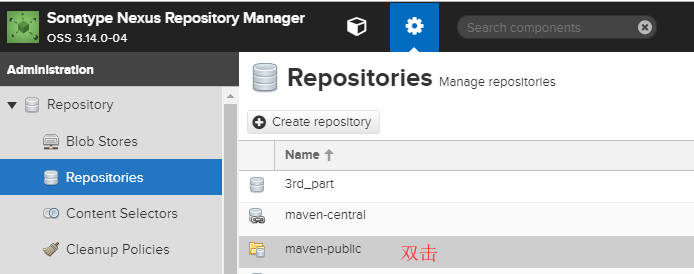
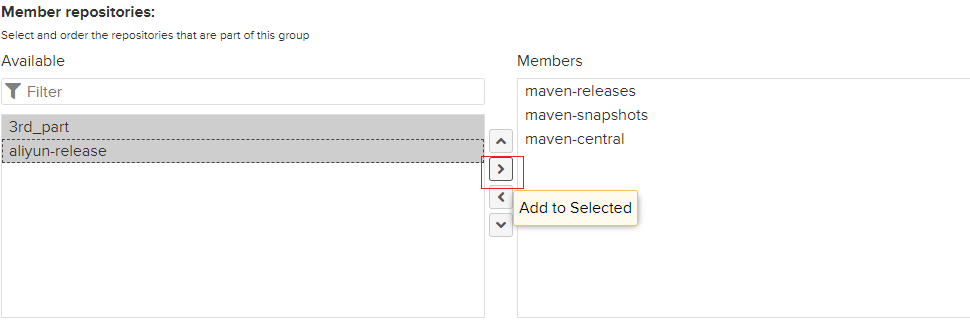
当我们自己的新库创建完毕时,要把新库归纳到我们的版本库中心:maven-public,这个库是所有其他库的中央库,包含了其余所有库的包,归纳操作步骤:
## 六、配置maven的settings.xml
打包部署的时候需要这个配置
~~~
<server>
<id>3rd_part</id> <!-- 注意这里的id一定要和你项目中的私服地址id一模一样,如果这里的用户名密码写错了,会报错:会报错401, ReasonPhrase: Unauthorized. -->
<username>admin</username>
<password>Yhblsqt%21</password>
</server>
~~~
~~~
<mirror>
<!--此处配置所有的构建均从私有仓库中下载 *代表所有,也可以写central -->
<id>nexus3</id>
<mirrorOf>*</mirrorOf>
<url>http://10.60.100.26:55059/repository/maven-public/</url>
</mirror>
~~~
~~~
<profile>
<id>nexus3</id>
<repositories>
<repository>
<id>maven-public</id> <!-- 1111, 这里的id需和2222那里的一样,在同一个profile里 -->
<url>http://10.60.100.26:55059/repository/maven-public/</url>
<releases><enabled>true</enabled></releases>
<snapshots><enabled>true</enabled></snapshots>
</repository>
</repositories>
<pluginRepositories> <!-- 这里是插件仓库地址 -->
<pluginRepository>
<id>maven-public</id> <!-- 2222, 这里的id需和1111那里的一样,在同一个profile里 -->
<url>http://10.60.100.26:55059/repository/maven-public/</url>
<releases><enabled>true</enabled></releases>
<snapshots><enabled>true</enabled></snapshots>
</pluginRepository>
</pluginRepositories>
</profile>
~~~
https://www.cnblogs.com/zhuwenjoyce/p/10050922.html
https://blog.csdn.net/Chen673328/article/details/122238786
https://blog.csdn.net/wc1695040842/category_9429349.html
- DevOps介绍
- 持续集成流程
- git工作流实践
- 新人准备git环境
- git工作流最佳实践
- jenkins基础入门
- jenkins简介
- jenkins安装(docker)
- 源码拉取
- maven构建
- 应用发布
- 结合gitlab版本管理
- jenkins-docker部署
- harbor镜像发布
- jenkins集成SonarQube
- SonarQube代码检测
- 集成SonarQube
- jenkins-pipeline
- 构建pipeline任务
- pipeline基础结构
- pipeline核心语法
- jenkinsfile构建
- 完整案例
- 整合钉钉发送通知
- 脚本使用凭证信息
- jenkins结合k8s使用
- k8s架构及基础概念
- k8s操作命令
- jenkins部署k8s
- 附录(其他未完成)
- jenkins高可用服务搭建
- gitlab-docker环境搭建
- 开发人员安装git
- JDK与maven
- docker安装gitlab
- docker安装
- docker-compose安装
- harbor安装
- SonarQube安装
- 2.暂时没写的内容
- 构建结果邮件发送
- 已有项目上传gitlab
