SpringBoot 默认不是 Web 项目,而且使用的是嵌入式的 Tomcat,所以默认是不支持 jsp 视图的。
<br/>
但是有替代方案,比如使用 Velocity.、Freemarker.、Thymeleaf 等这些模板引擎。所有的模板引擎的思想都是大同小异,就是将数据与模板结合,然后通过引擎渲染出最终结果。
:-: 
模板引擎原理
<br/>
>[info]SpringBoot 官方推荐使用 Thymeleaf 模板引擎。
[TOC]
# 1. 引入Thymeleaf模板
引入 Thymeleaf 模板的步骤如下:
**1. 引入thymeleaf**
```xml
<dependency>
<groupId>org.springframework.boot</groupId>
<artifactId>spring-boot-starter-thymeleaf</artifactId>
</dependency>
<dependency>
<groupId>org.springframework.boot</groupId>
<artifactId>spring-boot-starter-web</artifactId>
</dependency>
<!-- 引入热重载组件,对于静态资源的访问尤为重要 -->
<dependency>
<groupId>org.springframework.boot</groupId>
<artifactId>spring-boot-devtools</artifactId>
<optional>true</optional>
</dependency>
```
**2. `application.yml`**
```yml
spring:
thymeleaf:
cache: false #关闭页面缓存,否则开发时看不到页面变化
````
**3. Thymeleaf模板文件位置:`resources/templates/index.html`**
```html
<!DOCTYPE html>
<!-- xmlns:th引入thymeleaf模板,可以用于IDEA的语法提示,不引入也可以用,不过无语法提示 -->
<html xmlns:th="http://www.thymeleaf.org">
<head>
<meta charset="UTF-8">
<title>Title</title>
</head>
<body>
<h1>欢迎来到Thymeleaf!</h1>
</body>
</html>
```
**4. controller层**
```java
@Controller
public class DemoController {
@GetMapping("/v1/index")
public String index() {
//会自动找到templates/index.html文件
return "index";
}
}
```
**5. 测试,访问 http://localhost:8080/v1/index ,将看到如下页面**

****
Thymeleaf官网:https://www.thymeleaf.org/index.html
Thymeleaf语法文档地址:[10 Attribute Precedence](https://www.thymeleaf.org/doc/tutorials/3.0/usingthymeleaf.html#attribute-precedence)
Thymeleaf表达式文档地址:[4 Standard Expression Syntax](https://www.thymeleaf.org/doc/tutorials/3.0/usingthymeleaf.html#standard-expression-syntax)
案例代码:https://gitee.com/flymini/codes03/tree/master/learn-boot-thymeleaf
<br/>
# 2. 引入Freemarker模板
引入 Freemarker 模板的步骤如下:
**1. 引入Freemarker**
```xml
<dependency>
<groupId>org.springframework.boot</groupId>
<artifactId>spring-boot-starter-freemarker</artifactId>
</dependency>
<dependency>
<groupId>org.springframework.boot</groupId>
<artifactId>spring-boot-starter-web</artifactId>
</dependency>
<!-- 引入热重载组件,对于静态资源的访问尤为重要 -->
<dependency>
<groupId>org.springframework.boot</groupId>
<artifactId>spring-boot-devtools</artifactId>
<optional>true</optional>
</dependency>
```
**2. `application.yml`**
```properties
spring:
freemarker:
#指定freemarker模板的后缀名,freemarker默认的文件后缀为 .ftl,但是也可以指定为 .html
suffix: .html
#关闭页面缓存,否则开发时看不到页面变化
cache: false
```
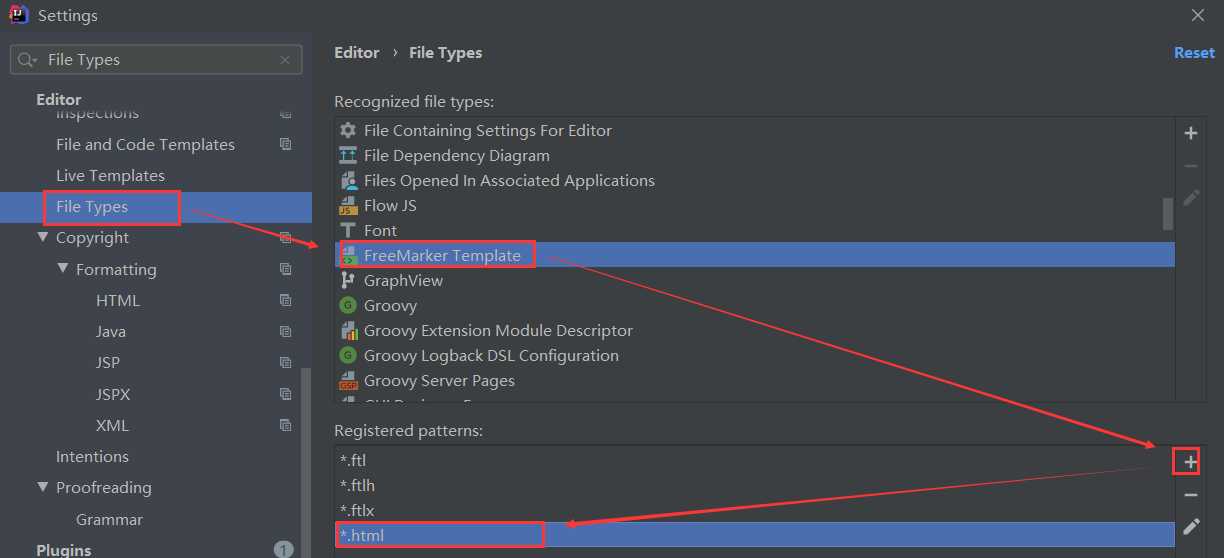
**3. 添加`.html`为后缀的freemarker模板**
如果你在`application.yml`中指定了 Freemarker 模板的后缀名为`.html`,为了支持 Freemarker 的语法,在 IDEA 添加`*.html`。
File -> Settings ->

**4. Freemarker模板文件位置:`resources/templates/index.html`**
```html
<!DOCTYPE html>
<html xmlns="http://www.w3.org/1999/xhtml"
xmlns:th="http://www.thymeleaf.org"
xmlns:sec="http://www.thymeleaf.org/thymeleaf-extras-springsecurity3">
<head>
<meta charset="UTF-8">
<title>Index</title>
</head>
<body>
<h1>欢迎来到Freemarker!</h1>
</body>
</html>
```
**5. controller层**
```java
@Controller
public class DemoController {
@GetMapping("/v1/index")
public String index() {
//会自动找到templates/index.html文件
return "index";
}
}
```
**6. 测试,访问 http://localhost:8080/v1/index ,将看到如下页面**

****
案例代码:https://gitee.com/flymini/codes03/tree/master/learn-boot-freemarker
- Spring
- Spring是什么
- Spring与EJB对比
- Spring的组成
- 首个Spring程序
- IoC控制反转
- 什么是IoC
- IoC编程
- 依赖注入方式
- 不同变量注入
- AOP面向切面编程
- AOP思想
- AOP实现原理
- AOP关键术语
- AOP编程
- 5种增强方式
- 切入点规则
- 自动装配
- Spring注解开发
- Bean注解
- AOP注解
- 完全注解
- 配置文件拆分
- SpringBean
- Bean常用属性
- Bean作用域
- Bean生命周期
- SpringBoot
- SpringBoot是什么
- 项目创建
- 配置文件
- 配置类型
- 读取配置
- 占位符
- 多环境配置
- 配置优先级
- 更改配置文件
- 自定义IoC容器
- 常用组件
- ApplicationContextAware
- CommandLineRunner
- Boot[Web]
- 引入模板引擎
- 静态资源访问
- 指定首页
- JSP支持
- 注册拦截器
- 注册Servlet组件
- 注册Servlet
- 注册过滤器
- 注册监听器
- 拦截器与过滤器区别
- 文件上传
- 文件下载
- 变更服务器
- Controller层封装
- HttpServletRequest
- 获取请求行
- 获取请求头
- 获取请求体
- Boot[自动配置]
- 自动配置是什么
- 自动配置报告
- 关闭自动配置
- 条件注解
- Boot[场景启动器]
- 场景启动器是什么
- 自定义场景启动器
- Boot[日志]
- 日志框架
- 日志级别
- 日志配置
- 配置文件
- 切换日志
- Boot[邮件任务]
- Boot[定时任务]
- cron表达式
- 起步
- 任务并行
- 注解Scheduled参数
- Boot[异步任务]
- 起步
- 注意事项与原理
- 自定义线程池
- Boot[缓存]
- JSR107缓存技术
- Spring缓存抽象
- 缓存注解
- SpEL表达式
- 起步
- 自定义key生成器
- 工作原理
- Boot[Redis]
- 起步
- 序列化机制
- Boot[Jdbc]
- 起步
- 两个模板类
- JdbcTemplate
- 增删改
- 查询
- NamedParameterJdbcTemplate
- 增删改
- 查询
- 自定义JdbcTemplate
- Boot[JPA]
- SpringDataJPA是什么
- 与JPA、Hibernate的关系
- 起步
- SpringDataJPA原理
- 查询方式
- 方法命名规则查询
- 限制查询结果查询
- 注解Query查询
- 命名参数查询
- SpEL表达式查询
- 原生查询
- 更新与删除
- 查询指定字段
- Specification动态查询
- 分页查询与排序
- 多表查询
- 一对一查询
- 一对多查询
- 多对多查询
- Specification查询
- Query注解查询
- 主键策略
- 单独主键
- 联合主键
- 级联操作
- 加载规则
- 审计功能
- 常用注解
- 避坑指南
- Boot[JSR303]
- JSR303是什么
- 常用约束
- 起步
- 简单校验
- 嵌套校验
- 分组校验
- 自定义约束注解
- 自定义校验工具
- Spring事务
- 事务的作用
- 起步
- 事务参数
- SpringDoc文档
- SpringDoc是什么
- 起步
- 自定义配置
- 常用Doc注解
- JSR303文档
- knife4j文档
- 常用配置
- Boot[RabbitMQ]
- 起步
- Fanout交换机类型
- Direct交换机类型
- Topic交换机类型
- 延迟队列插件
- RabbitListener监听方法
- JWT认证
- 认证流程
- 起步
- 密码加密
- JWT认证实现
