
## 8.4尺寸标注
使用尺寸标注工具,可对模型的相关尺寸进行标注。如图 8.4-1所示:
:-: 
图 8.4-1
**操作步骤:**
1)点击尺寸标注命令;
2)鼠标左键点选需要标注尺寸的起点;如图 8.4-2所示:
:-: 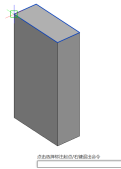
图 8.4-2
3)鼠标左键点选需要标注尺寸的终点;如图 8.4-3所示:
:-: 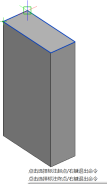
图 8.4-3
4)拖拽确定放置尺寸标注的位置;(按Shift键,可切换标注移动方向)
① 当标注对象与坐标轴平行时,可直接选择起点和终点进行标注。如图 8.4-4所示:
:-: 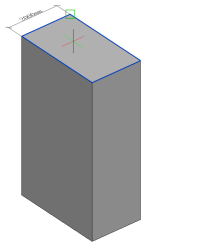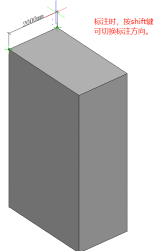
图 8.4-4
② 当标注对象与坐标轴不平行时,需左键单击指定与标注对象平行或共面的平面作为标注放置的平面方向,才能继续标注。如图 8.4-5所示:
:-: 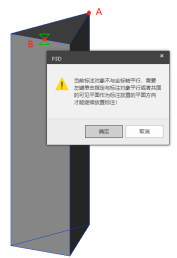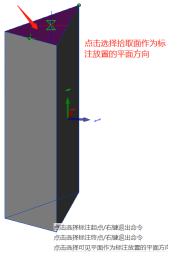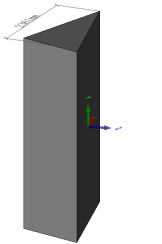
图 8.4-5
5)在属性面板中调整尺寸标注的相关属性内容。如图 8.4-6所示:
:-: 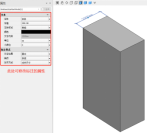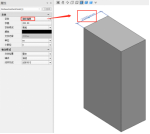
图 8.4-6
- 封面
- 版权与商标说明
- 免责声明
- 更新功能介绍
- 功能更新2022-R1.0
- 功能更新2022-R1.2
- 功能更新2022-R2.0
- BIMBase建模软件简介
- BIMBase建模软件的建模过程
- BIMBase建模软件的建模能力
- BIMBase通用建模软件的渲染特点
- BIMBase建模软件的专业设计
- BIMBase建模软件的前景
- 安装和授权
- BIMBase建模软件2022版本安装包
- 常规安装流程及说明
- 不能联网机器的离线激活操作流程
- 网络授权服务器端安装操作流程
- 授权模块说明
- 第一章 界面布局及功能特点
- 1.1 界面布局
- 1.2 功能特点
- 1.2.1 快速访问工具栏
- 1.2.2 视图浏览器
- 1.2.3 属性栏
- 1.2.4 绘图区
- 显示控制
- 视图盒
- 命令栏
- 状态栏
- 1.2.5 捕捉和动态UCS
- 1.2.6 视窗控制
- 1.2.7 环境光照强度
- 1.3 右键菜单
- 第二章 模型集成
- 2.1 导入模型
- 2.1.1 导入SKP
- 2.1.2 导入IFC
- 2.1.3 导入PMODEL
- 2.1.4 导入DWG
- 2.1.5 导入PM
- 2.1.6 导入GIM(电力版)
- 2.2链接参照
- 2.2.1链接P3D
- 2.2.2链接管理
- 2.2.3参照PMODEL
- 2.2.4底图参照
- 第三章 协同设计
- 第四章 图元建模
- 4.1 图形
- 4.1.1 点
- 4.1.2 多段线
- 4.1.3 矩形线
- 4.1.4 多边形线
- 4.1.5 圆弧
- 4.1.6 圆形线
- 4.1.7 拾取线
- 4.2 平面
- 4.2.1 矩形
- 4.2.2 多边形
- 4.2.3 圆形
- 4.2.4 椭圆
- 4.2.5 线生成面
- 4.3 实体
- 4.3.1 球
- 4.3.2 立方体
- 4.3.3 圆锥
- 4.3.4 圆柱
- 4.3.5 推拉
- 4.4 造型
- 4.4.1 放样体
- 4.4.2旋转体
- 4.4.3拉伸体
- 4.5 布尔运算
- 4.5.1 交集
- 4.5.2 并集
- 4.5.3 差集
- 第五章 组件建模
- 5.1 组件库
- 5.1.1 组件编辑器
- 5.1.2 工程组件库
- 5.2 参数化组件库
- 5.2.1 载入参数化组件
- 5.2.2 参数化组件库
- 5.2.3 设置Python路径
- 5.3 素材库
- 第六章 编辑
- 6.1 工作平面
- 6.1.1 创建工作平面
- 6.1.2 工作平面管理器
- 6.2 测量
- 6.2.1 长度
- 6.2.2角度
- 6.3 修改
- 6.3.1 移动
- 6.3.2 复制
- 6.3.3 旋转
- 6.3.4 镜像
- 6.3.5 删除
- 6.3.6 阵列
- 6.3.7 面对齐
- 6.3.8 缩放
- 6.4 组合
- 6.4.1 组合
- 6.4.2 解组
- 6.4.3 暂停组
- 6.4.4 开始组
- 6.5 显示
- 6.5.1 剖面框
- 6.5.2 隐藏
- 6.5.3 取消隐藏
- 第七章 项目管理
- 7.1 属性挂载
- 7.1.1 类型属性管理器
- 7.1.2 构件挂载属性
- 7.2 GIM工程管理(电力版)
- 7.2.1 工程列表
- 7.2.2 项目层级
- 7.2.3 工程层级属性查看
- 7.2.4工程层级属性再编辑
- 第八章 模型应用
- 8.1筛选
- 8.1.1增强过滤器
- 8.2 碰撞检查
- 8.2.1 碰撞检查
- 8.2.2 流程
- 8.2.3 界面
- 8.2.4 检测规则
- 8.3 剖切视图
- 8.3.1 剖切成图
- 8.3.2 剖切视图管理器
- 8.4尺寸标注
- 8.5文字标注
- 8.5.1 按属性标注
- 8.5.2 自定义标注
- 8.6GIM校验(GIM)
- 8.6.1 GIM校验
- 8.6.2 校验结果
- 8.6.3 二维报告导出
- 8.7 资源
- 8.7.1 材质库
- 第九章 数据导出
- 9.1 导出
- 9.1.1 导出IFC
- 9.1.2 导出FBX
- 9.1.3 导出PMODEL
- 9.1.4 导出DWG
- 9.1.5 导出GIM设备(电力版)
- 9.1.6 导出GIM工程(电力版)
- 第十章 场地建模
- 10.1初始地形数据
- 10.1.1导入地形DWG
- 10.1.2导入TXT
- 10.1.3地形点赋值
- 10.1.4转换等高线
- 10.2生成三维地形
- 10.2.1生成TIN地形
- 10.3场地平整
- 10.3.1场地平整
- 10.4 道路
- 10.4.1 创建道路
- 10.5 大门
- 10.5.1 大门
- 10.6围墙
- 10.6.1围墙