在现代前端项目的交付工作流中,部署前最关键的环节就是构建,构建环节要完成的事情通常包括:
* 源代码预编译:比如 less、sass、typescript;
* 图片优化、雪碧图生成;
* JS、CSS 合并、压缩;
* 静态资源加版本号和引用替换;
* 静态资源传 CDN 等。
现在大多数同学所接触的项目构建过程可能都是别人配置好的,但是对于构建过程中的某些考量可能并不是很清楚。
接下来,我们将组合 npm script 和简单的命令行工具为实际项目添加构建过程,以加深对构建过程的理解,同时也会用到前面很多章节的知识点。
## 项目目录结构
对之前的示例项目做简单改造,让目录结构包括典型的前端项目资源引用情况:
```
client
├── images
│ └── schedule.png
├── index.html
├── scripts
│ └── main.js
└── styles
└── main.css
```
可能的资源依赖关系如下:
* css、html 文件中引用了图片;
* html 文件中引用了 css、js;
显而易见,我们的构建过程必须遵循下面的步骤才能不出错:
1. 压缩图片;
2. 编译 less、压缩 css;
3. 编译、压缩 js;
4. 给图片加版本号并替换 js、css 中的引用;
5. 给 js、css 加版本号并替换 html 中的引用;
## 添加构建过程
下面介绍如何结合 npm script 正确的给这样的项目结构加上构建过程。
### 1\. 准备构建目录
我们约定构建产生的结果代码,放在 dist 目录下,与 client 的结构完全相同,每次构建前,清空之前的构建目录,利用 npm 的钩子机制添加 prebuild 命令如下:
```
- "client:static-server": "http-server client/"
+ "client:static-server": "http-server client/",
+ "prebuild": "rm -rf dist && mkdir -p dist/{images,styles,scripts}",
```
### 2\. 准备脚本目录
构建过程需要的命令稍长,我们可以使用 scripty 来把这些脚本剥离到单独的文件中,为此需要准备单独的目录,并且我们的构建过程分为:images、styles、scripts、hash 四个步骤,每个步骤准备单独的文件。
```
mkdir scripts/build
touch scripts/build.sh
touch scripts/build/{images,styles,scripts}.sh
chmod -R a+x scripts
```
**脚本文件的可执行权限必须添加正确,否则 scripty 会直接报错**,上面命令执行完之后,scripts 目录包含如下内容:
```
scripts
├── build
│ ├── hash.sh
│ ├── images.sh
│ ├── scripts.sh
│ └── styles.sh
├── build.sh
```
### 3\. 图片构建过程
图片构建的经典工具是 [imagemin](https://github.com/imagemin/imagemin),它也提供了命令行版本 [imagemin-cli](https://github.com/imagemin/imagemin-cli),首先安装依赖:
```
npm i imagemin-cli -D
# npm install imagemin-cli --save-dev
# yarn add imagemin-cli -D
```
然后在 scripts/build/images.sh 中添加如下内容:
```
imagemin client/images/* --out-dir=dist/images
```
然后在 package.json 中添加 build:images 命令:
```
+ "build:images": "scripty",
```
尝试运行 npm run prebuild && npm run build:images,然后观察 dist 目录的变化。
### 4\. 样式构建过程
我们使用 [less](http://lesscss.org/usage/) 编写样式,所以需要预编译样式代码,可以使用 less 官方库自带的命令行工具 lessc,使用 sass 的同学可以直接使用 [node-sass](https://github.com/sass/node-sass)。此外,样式预编译完成之后,我们需要使用 [cssmin](https://www.npmjs.com/package/cssmin) 来完成代码预压缩。首先安装依赖:
```
npm i cssmin -D
# npm install cssmin --save-dev
# yarn add cssmin -D
```
然后在 scripts/build/styles.sh 中添加如下内容,这里我们使用到了 shell 里面的管道操作符 `|` 和输出重定向 `>`:
```
for file in client/styles/*.css
do
lessc $file | cssmin > dist/styles/$(basename $file)
done
```
然后在 package.json 中添加 build:styles 命令:
```
+ "build:styles": "scripty",
```
尝试运行 npm run prebuild && npm run build:styles,然后观察 dist 目录的变化,应该能看到 less 编译之后再被压缩的 css 代码。
### 4\. JS 构建过程
我们使用 ES6 编写 JS 代码,所以需要 [uglify-es](https://github.com/mishoo/UglifyJS2/tree/harmony) 来进行代码压缩,如果你不使用 ES6,可以直接使用 [uglify-js](https://github.com/mishoo/UglifyJS2) 来压缩代码,首先安装依赖:
```
npm i uglify-es -D
# npm install uglify-es --save-dev
# yarn add uglify-es -D
```
然后在 scripts/build/scripts.sh 中添加如下内容,**需要额外注意的是,这里我们需要手动指定 uglify-es 目录下的 bin 文件,否则识别不了 ES6 语法**,因为 uglify-es 在 npm install 过程自动创建的软链是错误的。
```
for file in client/scripts/*.js
do
./node_modules/uglify-es/bin/uglifyjs $file --mangle > dist/scripts/$(basename $file)
done
```
然后在 package.json 中添加 build:scripts 命令:
```
+ "build:scripts": "scripty",
```
尝试运行 npm run prebuild && npm run build:scripts,然后观察 dist 目录的变化,应该能看到被 uglify-es 压缩后的代码。
> **TIP#19**:uglify-es 支持很多其他的选项,以及 sourcemap,对 JS 代码做极致的优化,详细[参考](https://github.com/mishoo/UglifyJS2/tree/harmony#command-line-options)
### 4\. 资源版本号和引用替换
给静态资源加版本号的原因是线上环境的静态资源通常都放在 CDN 上,或者设置了很长时间的缓存,或者两者兼有,如果资源更新了但没有更新版本号,浏览器端是拿不到最新内容的,手动加版本号的过程很繁琐并且容易出错,为此自动化这个过程就显得非常有价值,通常的做法是利用文件内容做哈希,比如 md5,然后以这个哈希值作为版本号,版本号附着在文件名里面,线上环境的资源引用全部是带版本号的。
为了实现这个过程,我们需要引入两个小工具:
* [hashmark](https://github.com/keithamus/hashmark),自动添加版本号;
* [replaceinfiles](https://github.com/songkick/replaceinfiles),自动完成引用替换,它需要将版本号过程的输出作为输入;
首先安装依赖:
```
npm i hashmark replaceinfiles -D
# npm install hashmark replaceinfiles --save-dev
# yarn add hashmark replaceinfiles -D
```
然后在 scripts/build/hash.sh 中添加如下内容:
```
# 给图片资源加上版本号,并且替换引用
hashmark -c dist -r -l 8 '**/*.{png,jpg}' '{dir}/{name}.{hash}{ext}' | replaceinfiles -S -s 'dist/**/*.css' -d '{dir}/{base}'
# 给 js、css 资源加上版本号,并且替换引用
hashmark -c dist -r -l 8 '**/*.{css,js}' '{dir}/{name}.{hash}{ext}' | replaceinfiles -S -s 'client/index.html' -d 'dist/index.html'
```
然后在 package.json 中添加 build:hash 命令:
```
+ "build:hash": "scripty",
```
这个步骤需要依赖前几个步骤,不能单独运行,接下来我们需要增加完整的 build 命令把上面几个步骤串起来。
### 5\. 完整的构建步骤
最后我们在 package.json 中添加 build 命令把所有的步骤串起来,完整的 diff 如下:
```
- "client:static-server": "http-server client/"
+ "client:static-server": "http-server client/",
+ "prebuild": "rm -rf dist && mkdir -p dist/{images,styles,scripts}",
+ "build": "scripty",
+ "build:images": "scripty",
+ "build:scripts": "scripty",
+ "build:styles": "scripty",
+ "build:hash": "scripty"
```
其中 scripts/build.sh 的内容如下:
```
for step in 'images' 'scripts' 'styles' 'hash'
do
npm run build:$step
done
```
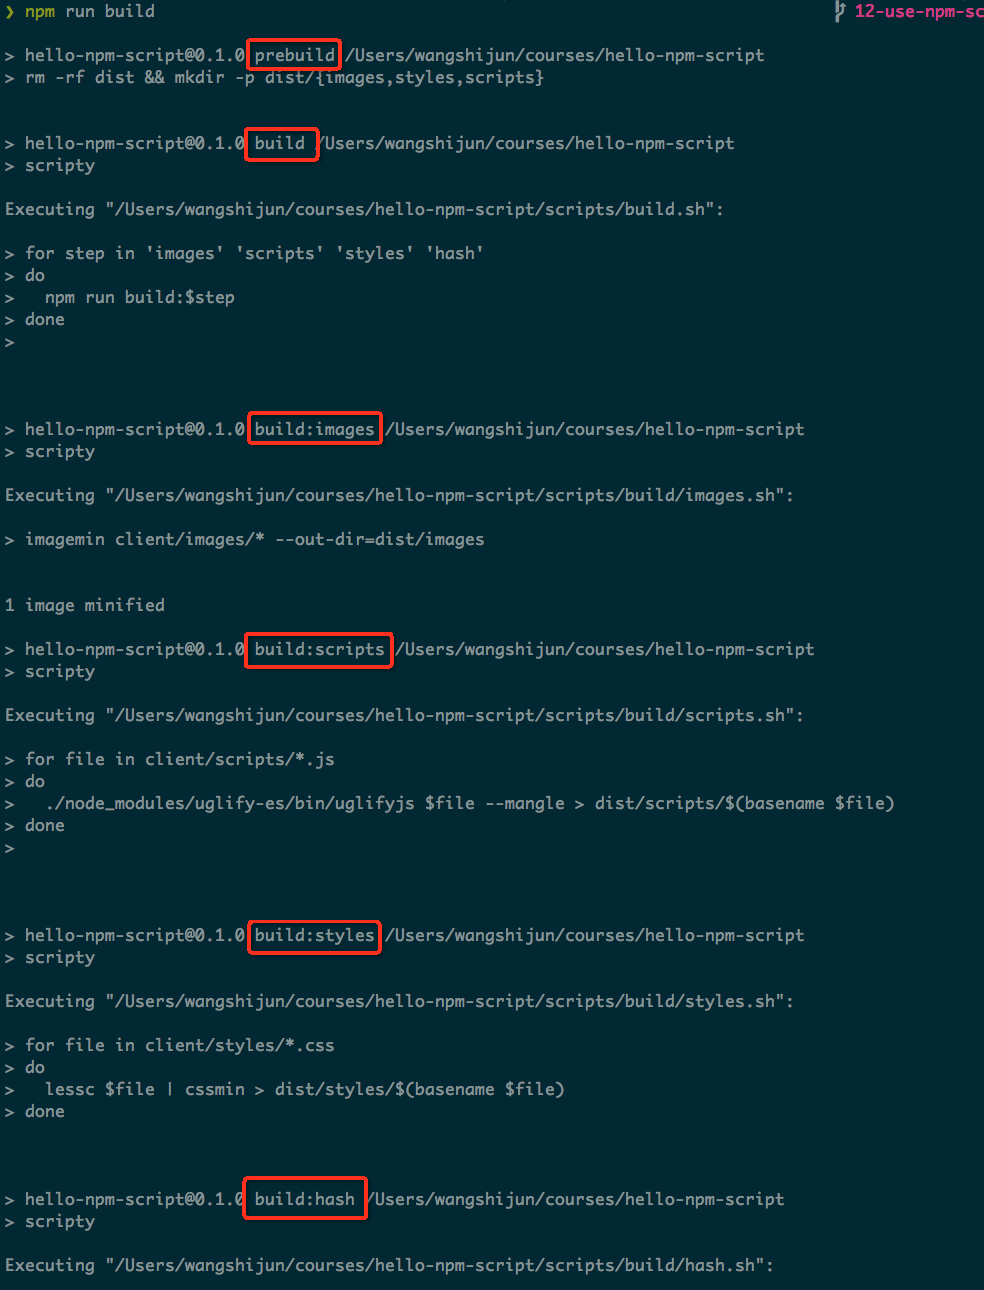
然后我们尝试运行 npm run build,完整的过程输出如下:

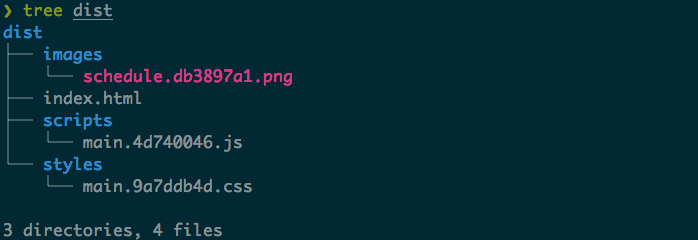
构建完成的 dist 目录内容如下:

可以看到,所有的静态资源都加上了版本号。
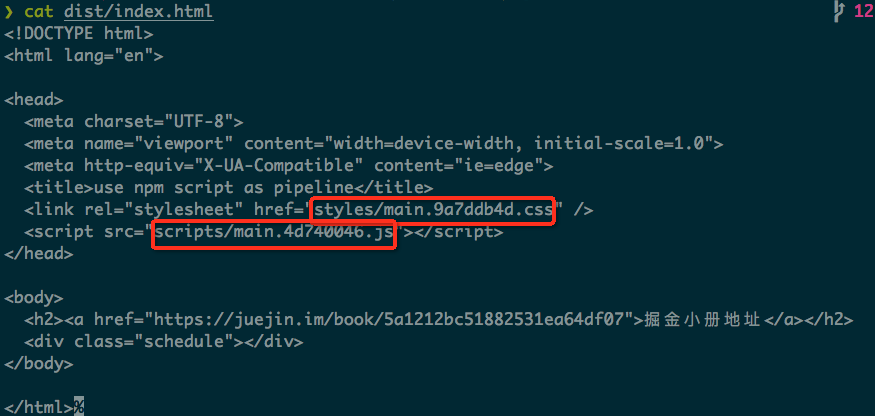
构建完成的 dist/index.html 内容如下:

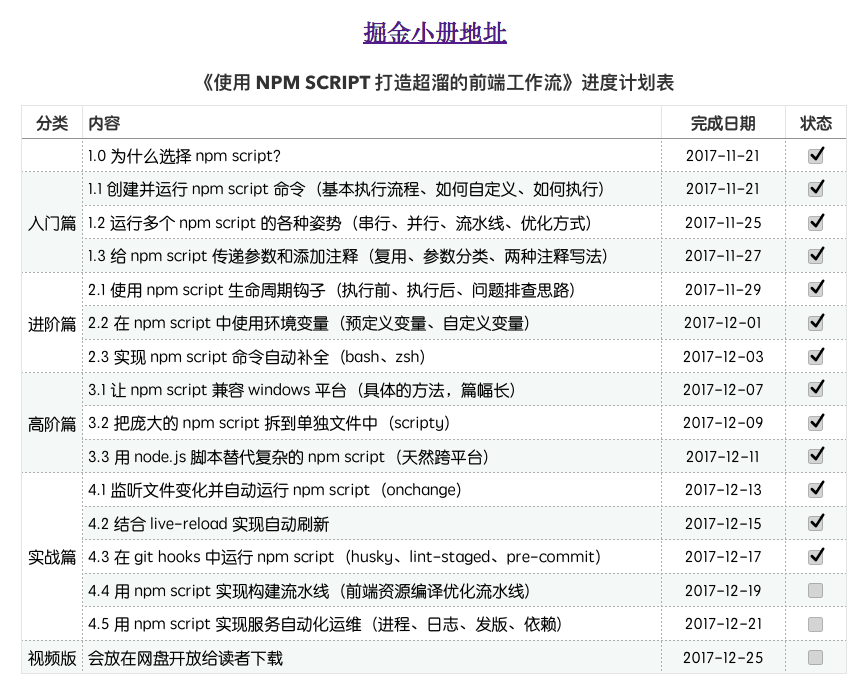
可以看到,静态资源的版本号被正确替换了,为了验证构建出来的页面是否正常运行,可以运行 `./node_modules/.bin/http-server dist`,然后浏览器打开:`http://127.0.0.1:8080`,不出意外的话,浏览器显示如下:

> **好了,到这里,我们给简单但是五脏俱全的前端项目加上了构建过程,这些环节你是否都清楚?你觉得还缺失些什么环节?欢迎留言交流**
* * *
> 本节用到的代码见 [GitHub](https://github.com/wangshijun/automated-workflow-with-npm-script/tree/12-use-npm-script-as-build-pipeline),想边看边动手练习的同学可以拉下来自己改,注意切换到正确的分支 `12-use-npm-script-as-build-pipeline`。
* * *
- 为什么选择 npm script
- 入门篇 01:创建并运行 npm script 命令
- 入门篇 02:运行多个 npm script 的各种姿势
- 入门篇 03:给 npm script 传递参数和添加注释
- 进阶篇 01:使用 npm script 的钩子
- 进阶篇 02:在 npm script 中使用环境变量
- 进阶篇 03:实现 npm script 命令自动补全
- 高阶篇 01:实现 npm script 跨平台兼容
- 高阶篇 02:把庞大的 npm script 拆到单独文件中
- 高阶篇 03:用 node.js 脚本替代复杂的 npm script
- 实战篇 01:监听文件变化并自动运行 npm script
- 实战篇 02:结合 live-reload 实现自动刷新
- 实战篇 03:在 git hooks 中运行 npm script
- 实战篇 04:用 npm script 实现构建流水线
- 实战篇 05:用 npm script 实现服务自动化运维
