[TOC]
>[success] # APP端多页面打包
该项目结合**VUE**和**HTML5+PLUS**进行**APP**开发中用到的技术如下:
1. **vue-cli4**
2. **webpack4**
3. **支持TypeScript**
4. **支持h5+plus**
5. **指定模块进行打包**
6. **可配置cdn引用模式**
>[success] ## 安装vue-cli
1. **卸载旧版本vue cli**
~~~
npm uninstall -g vue-cli
~~~
2. **安装新版本vue-cli**
~~~
npm i -g @vue/cli
~~~

上图警告**request2.8.2版本已被弃用**,需要安装【[淘宝镜像](https://developer.aliyun.com/mirror/NPM?from=tnpm)】,安装完成后用**cnpm安装cli**
~~~
cnpm i -g @vue/cli
~~~
3. **安装成功查看版本号**
~~~
vue --version
或者
vue -V
~~~
4. **查看webpack版本号**
~~~
npm info webpack
~~~
<br/>
>[warning] ### 旧版本
**Vue CLI** 的包名称由 **vue-cli** 改成了 **@vue/cli**。 如果你已经**全局安装了旧版本的 vue-cli (1.x 或 2.x)**,你需要先通过 **npm uninstall vue-cli -g** 或 **yarn global remove vue-cli** 卸载它。
>[success] ### Node 版本要求
**Vue CLI** 需要 **Node.js 8.9 或更高版本** (推荐 8.11.0+),目前项目中用刀的是 **10+** 版本
>[success] ## 创建项目
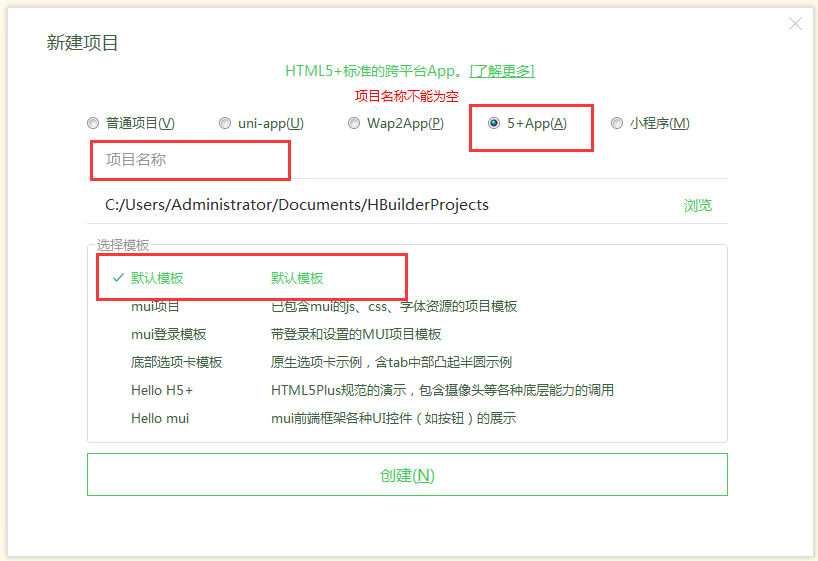
1. 首先使用**HbuiderX**创建一个html5+项目,可以创建一个**基础模板**的项目,也可以创建一个带有**H5+模板**的项目,如下图:
2. 创建成功后将无用文件删除掉,只留下**manifest.json**文件,如下图:
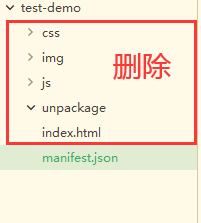
**manifest.json**中可以设置**APP版本号**、**应用名称**、**文件下载管理**、**访问摄像头**、**地图**、以及**第三方的SDK**配置等等,也是写APP时一个**极为重要**的文件

如果遇到**manifest.json**显示不出**可视化界面**,在**HbuiderX中鼠标指向项目文件夹单机右键点击**【重新识别项目类型】即可。
3. 在上面刚刚创建好的**H5+项目**文件夹中**创建vue项目**,在**cmd**中执行以下指令:
~~~
vue ui
~~~
这里使用到的是[vue ui](https://www.kancloud.cn/wangjiachong/vue_notes/1175732)可视化界面创建项目具体步骤看[链接](https://www.kancloud.cn/wangjiachong/vue_notes/1175732),在项目创建时勾选上**TypeScript**即可安装成功**TypeScript**。
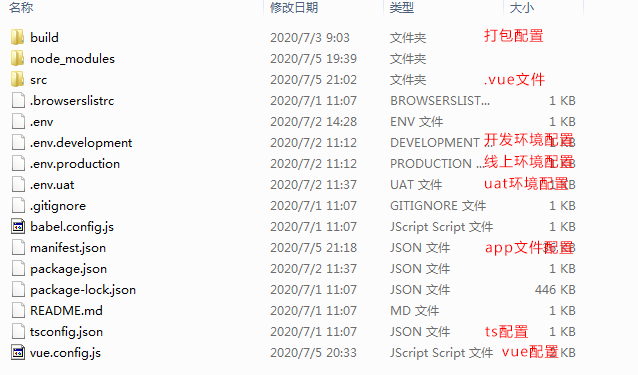
4. 【**项目根目录结构**】
**src下目录结构**,写页面都写在**pages文件夹**中即可。
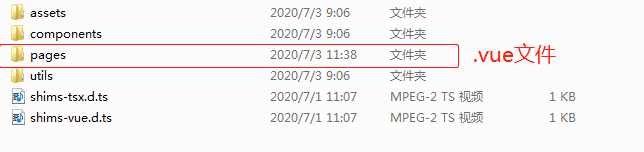
每个页面必须要包括**3个文件(.html模板文件、.ts文件、.vue页面文件)**。
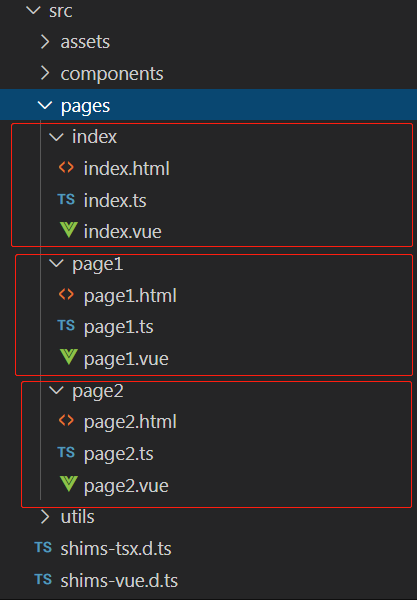
而且**必须要创建一个index的文件夹模块**,因为**Hbuider会为根目录下的index.html设为入口(首页)页面**,这就是为什么打包后**指定dist下的index.html**的原因了。

5. **.vue、.ts、.html文件内容**,下面拿**index文件夹模块**来说,其他模块同理,**3个文件的id都为app**。
5.1 **index.vue**,需要**注意class类名称需要改成对应模块名称**。
~~~
<template>
<div id="app">
index页面内容
</div>
</template>
<script lang="ts">
import { Vue } from 'vue-property-decorator';
export default class Index extends Vue {
}
</script>
<style lang="scss">
</style>
~~~
5.2 **index.ts**,**这里需要指定自己的模块vue文件,然后挂载到vue实例上**。
~~~
import Vue from 'vue'
import index from './index.vue'
Vue.config.productionTip = false
new Vue({
render: h => h(index)
}).$mount('#app')
~~~
5.3 **index.html文件**,只需要把**title**修改成对应文件的**title**即可,还有
~~~
<!DOCTYPE html>
<html lang="en">
<head>
<meta charset="utf-8">
<meta http-equiv="X-UA-Compatible" content="IE=edge">
<meta name="viewport" content="width=device-width,initial-scale=1.0">
<link rel="icon" href="<%= BASE_URL %>favicon.ico">
<title>index.html</title>
</head>
<body>
<noscript>
<strong>We're sorry but test-my-ui doesn't work properly without JavaScript enabled. Please enable it to continue.</strong>
</noscript>
<div id="app"></div>
<!-- built files will be auto injected -->
</body>
</html>
~~~
<br>
>[success] ## 使用h5+plus
**index.vue**
~~~
<template>
<div id="app">
<button @click="clickBtn">点击跳转page1页面</button>
</div>
</template>
<script lang="ts">
import { Vue } from 'vue-property-decorator';
import { openWebview } from '@/utils/webview'
export default class Index extends Vue {
clickBtn(){
openWebview({
url: './page1.html',
id: 'page1',
style: {
top: 0,
bottom: 50
}
})
}
}
</script>
<style lang="scss">
</style>
~~~
**webview.ts跳转页面文件**,这里大致看一下就好,就是项目中的封装好的**h5+plus方法**
~~~
/**
* 打开一个webview窗口
*/
let openID = ''
declare let plus:any
export function openWebview(config:any, style = {}, extras = {}) {
openID = config.id
// 如果之前创建过就显示
const v = plus.webview.getWebviewById(openID)
if (v) {
plus.webview.show(openID)
return
}
let wv = plus.webview.create(
config.url,
config.id,
{
top: 0, // 新页面顶部位置
bottom: 0, // 新页面底部位置
render: 'always',
popGesture: 'close',
bounce: 'vertical',
bounceBackground: '#efeff4',
...style
},
extras
)
let w = plus.nativeUI.showWaiting()
// 监听窗口加载成功
wv.addEventListener(
'loaded',
function() {
w.close()
w = null
setTimeout(() => {
wv.show('pop-in', 300) // 显示窗口
}, 10)
},
false
)
}
// webview.open 打开得很快 但是不能传参
export function openWebviewFast(url:any, id:any, title:any) {
plus.nativeUI.showWaiting('加载中')
plus.webview.open(
url,
id,
{
// titleNView: {
// backgroundColor: "#f7f7f7", // 导航栏背景色
// titleText: title, // 导航栏标题
// titleColor: "#666", // 文字颜色
// // type: "transparent", // 透明渐变样式
// autoBackButton: false, // 自动绘制返回箭头
// splitLine: {
// // 底部分割线
// color: "#cccccc"
// }
// },
},
'pop-in',
420,
function() {
plus.nativeUI.closeWaiting()
}
)
}
// 预加载页面 速度很快,但是不要加载超过10个
export function preLoad(webviews:any[] = []) {
webviews.map(webview => {
const fullExtras = {
webviewPreload: true,
...webview.extras
}
plus.webview.create(
webview.url,
webview.id,
{
top: 0, // 新页面顶部位置
bottom: 0, // 新页面底部位置
// render: "always",
// popGesture: "hide",
// bounce: "vertical",
// bounceBackground: "#efeff4",
// titleNView: {
// // 详情页原生导航配置
// backgroundColor: "#f7f7f7", // 导航栏背景色
// titleText: webview.title, // 导航栏标题
// titleColor: "#000000", // 文字颜色
// type: "transparent", // 透明渐变样式
// autoBackButton: false, // 自动绘制返回箭头
// splitLine: {
// // 底部分割线
// color: "#cccccc"
// }
// },
...webview.style
},
fullExtras
)
})
}
export function showWebviewById(id:any) {
plus.webview.show(id, 'pop-in', 200)
}
// 回到登录页
export function backToLogin() {
const views:any[] = plus.webview.all()
if (views && views.length) {
views.forEach(view => {
if (view.id !== 'login') {
plus.webview.close(view.id)
} else {
// 解决登录页 loading 问题
plus.nativeUI.closeWaiting()
}
})
}
}
~~~
<br>
>[success] ## 配置多环境
1. 在根目录下创建 **.env.development、.env.production、.env.uat3个文件**,内容为对应**环境地址**如下:
~~~
'.env.development文件内容':
VUE_APP_DEV = 'www.dev.com'
'.env.production文件内容':
VUE_APP_PROD = 'www.prod.com'
'.env.uat文件内容':
VUE_APP_UAT = 'www.uat.com'
~~~
2. 配置**package.json**
因为默认会有2个环境,所以像下面的**uat环境**就需要手动在后面**添加--mode uat**,加新的环境也是同样做法,注意是--mode 指令名称,**.env.环境名以及package.json中的指令配置这3个需要一致**。
~~~
{
"name": "cli4.0-project",
"version": "0.1.0",
"private": true,
"scripts": {
"serve": "vue-cli-service serve",
"build": "vue-cli-service build",
"uat": "vue-cli-service build -- mode uat"
},
"dependencies": {
"core-js": "^3.6.5",
"vue": "^2.6.11",
"vue-class-component": "^7.2.3",
"vue-property-decorator": "^8.4.2"
},
"devDependencies": {
"@vue/cli-plugin-babel": "~4.4.0",
"@vue/cli-plugin-typescript": "~4.4.0",
"@vue/cli-service": "~4.4.0",
"node-sass": "^4.12.0",
"sass-loader": "^8.0.2",
"typescript": "~3.9.3",
"vue-template-compiler": "^2.6.11"
}
}
~~~
<br>
>[success] ## 打包配置
**这里主要是打包的脚本作用比较大,最终返回要打包的文件模块信息(对象结构)**
1. **vue.config.js**
~~~
const path = require('path') // 引入nodejs的path模块
const resolve = dir => path.join(__dirname, dir) // resolve方法用来加载路径
const utils = require(resolve('build/utils.js')) // 多页面打包脚本
const isPro = process.env.NODE_ENV === 'production'
const BASE_URL = process.env.NODE_ENV === 'production' ? './' : '/' // 判断当前为开发环境还是打包环境, '/'意思是代表指定在域名的根目录下,如果要指定到iview-admin下就这样写'/iview-admin/', production为生产坏境,development为开发环境
module.exports = {
lintOnSave: false, // 取消每次保存时都进行一次' ESLint '检测
publicPath: BASE_URL, // 项目的基本路径,vuecli2.0时打包经常静态文件找不到,就是需要配置这个属性为'./'
chainWebpack: config => { // 配置Webpack
config.resolve.alias
.set('@', resolve('src')) // 引入文件时候“ @ ”符号就代表src
.set('_c', resolve('src/components')) // 引入组件文件夹中的文件就可以用“ _c ”代替src/components
},
productionSourceMap: false, // 打包时不生成.map文件,会减少打包体积,同时加快打包速度
// devServer: { // 跨域有2种解决方案: 1. 在后端的header中配置, 2. 使用devServer来配置代理解决跨域
// proxy: 'http://localhost:4000' // 这里写需要代理的URL,这里会告诉开发服务器,将任何未知请求匹配不到静态文件的请求,都代理到这个URL来满足跨域
// },
pages: utils.setPages({ // 多页面打包配置方法
addScript() {
if (isPro) {
return `
<script src="https://s95.cnzz.com/z_stat.php?id=xxx&web_id=xxx" language="JavaScript"></script>
`
}
return ''
}
})
}
~~~
2 **utils.js**打包脚本文件
~~~
const path = require('path')
const chalk = require("chalk");
// glob是webpack安装时依赖的一个第三方模块,还模块允许你使用 *等符号,
// 例如lib/*.js就是获取lib文件夹下的所有js后缀名的文件
const glob = require('glob')
// 取得相应的页面路径,因为之前的配置,所以是src文件夹下的pages文件夹
const PAGE_PATH = path.resolve(__dirname, '../src/pages')
// 用于做相应的merge处理
const merge = require('webpack-merge')
const HtmlWebpackPlugin = require('html-webpack-plugin')
// 多入口配置
// 通过glob模块读取page文件夹下的所有对应文件夹下的ts后缀文件,如果该文件存在
// 那么就作为入口处理
exports.getEntries = () => {
let entryFiles = glob.sync(PAGE_PATH + '/*/*.ts')
let map = {}
entryFiles.forEach(filePath => {
let filename = filePath.substring(filePath.lastIndexOf('\/') + 1, filePath.lastIndexOf('.'))
map[filename] = filePath
})
return map
}
// 多页面输出配置
// 与上面的多页面入口配置相同,读取page文件夹下的对应的html后缀文件,然后放入数组中
exports.htmlPlugin = configs => {
let entryHtml = glob.sync(PAGE_PATH + '/*/*.html')
let arr = []
entryHtml.forEach(filePath => {
let filename = filePath.substring(filePath.lastIndexOf('\/') + 1, filePath.lastIndexOf('.'))
let conf = {
multihtmlCache: true,
// 模板来源
template: filePath,
// 文件名称
filename: filename + '.html',
// 页面模板需要加对应的js脚本,如果不加这行则每个页面都会引入所有的js脚本
// chunks: ['manifest', 'vendor', filename],
// inject: false,
}
if (configs) {
conf = merge(conf, configs)
}
if (process.env.NODE_ENV === 'production') {
conf = merge(conf, {
minify: {
removeComments: true, // 删除html中的注释代码
collapseWhitespace: true, // 删除html中的空白符
},
chunksSortMode: 'manual'// 按manual的顺序引入
})
}
arr.push(new HtmlWebpackPlugin(conf))
})
return arr
}
// pages 多入口配置
exports.setPages = configs => {
// 最终要打包的文件列表
let entryFiles = []
let flag = true
// 指定模块打包列表
let moduleListDefaul = process.env.VUE_APP_MODULE_moduleListDefaul ? JSON.parse(process.env.VUE_APP_MODULE_moduleListDefaul) : []
let map = {};
if(moduleListDefaul && moduleListDefaul.length > 0){ // 指定模块打包列表中有值,查找指定的模块文件
flag = false
entryFiles = moduleListDefaul.map(i => {
return glob.sync(PAGE_PATH + `/${ i }/${ i }.ts`)[0]
}).filter(item => item)
}
if(entryFiles.length === 0){ // 指定打包文件,未找到要打包的文件
if(!flag) {
console.log(chalk.bgMagenta.black(`>>>>>>>>>>> 自定义打包文件未找到,默认打包全部文件 >>>>>>>>>>>`))
}
entryFiles = glob.sync(PAGE_PATH + '/*/*.ts');
}
console.log(chalk.bgMagenta.black(`已打包文件:\n${ entryFiles.join('\n') }`))
entryFiles.forEach(filePath => {
let filename = filePath.substring(filePath.lastIndexOf('\/') + 1, filePath.lastIndexOf('.'));
let tmp = filePath.substring(0, filePath.lastIndexOf('.'));
let conf = {
// page 的入口
entry: filePath,
// 模板来源
template: tmp + '.html', // 每个页面单独一个模板,动态读取模板
// 在 dist/index.html 的输出
filename: filename + '.html',
// 页面模板需要加对应的js脚本,如果不加这行则每个页面都会引入所有的js脚本
// chunks: ['manifest', 'vendor', filename],
// inject: false,
};
if (configs) {
conf = merge(conf, configs)
}
if (process.env.NODE_ENV === 'production') {
conf = merge(conf, {
minify: {
removeComments: true, // 删除html中的注释代码
collapseWhitespace: true, // 删除html中的空白符
},
chunksSortMode: 'manual'// 按manual的顺序引入
})
}
map[filename] = conf;
})
return map
}
~~~
<br>
>[success] ### 指定打包模块
只需要到根目录下修改 **.env** 文件中的**VUE_APP_MODULE_moduleListDefaul**数组即可,**不写默认打包全部模块**。例如我要打包**src/pages/page1模块**,我只需要向下面这样修改:
~~~
VUE_APP_MODULE_moduleListDefaul = ["page1"]
~~~
需要注意,**VUE_APP_MODULE_moduleListDefaul**变量的值一定要是【**双引号**】。
>[success] ## 配置cdn引用模式
暂时没有弄好...
