# Vue基础2.0X 详细解毒
[淘宝镜像安装](https://github.com/cnpm/cnpm)
~~~
$ npm install cnpm -g --registry = https://registry.npm.taobao.org
//npm有的它都有加速安装,只要在原有命令加上c就可以了
~~~
安装CDN学习版本:
使用包管理器全局安装
~~~
$ npm install vue
$ cnpm install vue
~~~
安装vue-cli
~~~
npm install -g @vue/cli
cnpm install -g @vue/cli
~~~
创建项目(创建并且进入)
~~~
vue create <project-name> && cd <project-name>
~~~
刚开始上手之间选择第一项default(默认)就👌了然后静静地等待生产目录
创建好后使用👇启动项目
~~~
vue serve
~~~
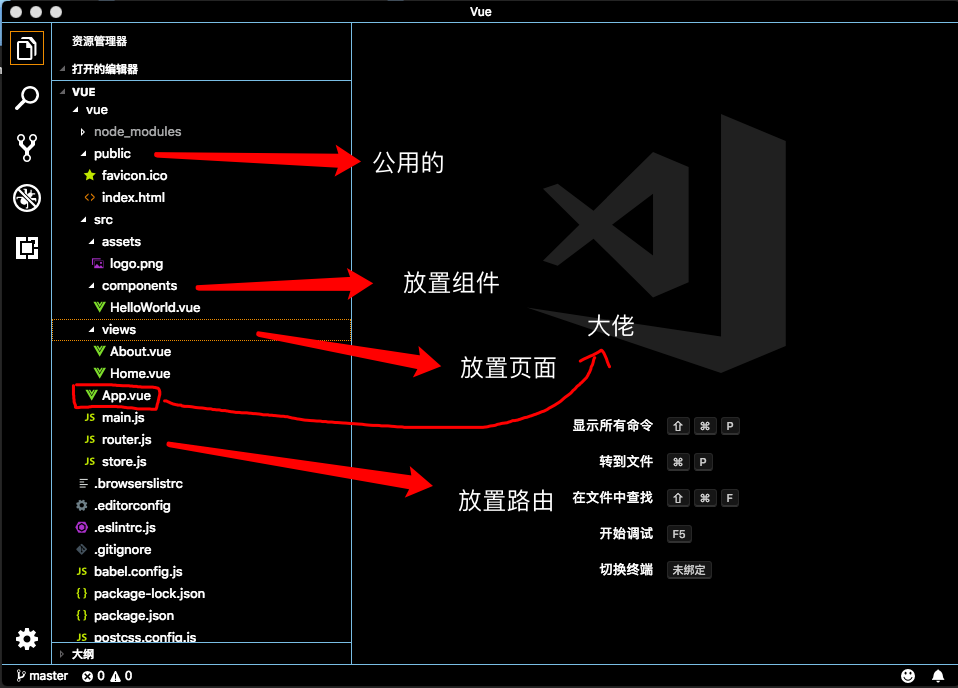
#### 目录结构

##### 下一步删除掉多余我们不需要的东西保持干净的结构
~~~
<template>
<div class="home">
<h1>This is an homne page</h1>
</div>
</template>
<script>
export default {
name:"home",
data() {
return {
}
},
}
</script>
~~~
页面显示如下

我们点击Home 或者About的时候This is an homne page 会进行一个改变这里涉及到一个知识点`router`
打开我们的主文件`App.vue`可以看见
~~~
<div id="nav">
<router-link to="/">Home</router-link> |
<router-link to="/about">About</router-link>
</div>
<router-view/>
~~~
`<router-link>` 组件支持用户在具有路由功能的应用中 (点击) 导航。 通过 `to`属性指定目标地址,默认渲染成带有正确链接的 `<a>` 标签,可以通过配置 `tag`属性生成别的标签.。另外,当目标路由成功激活时,链接元素自动设置一个表示激活的 CSS 类名
[传送门](https://router.vuejs.org/zh/api/)
`<router-view>` 组件是一个 functional 组件,渲染路径匹配到的视图组件。`<router-view>` 渲染的组件还可以内嵌自己的 `<router-view>`,根据嵌套路径,渲染嵌套组件。
扩展内容
`<transition>`过度特效可以为`<router-view>`添加过渡效果 [传送门](https://router.vuejs.org/zh/guide/advanced/transitions.html#%E8%BF%87%E6%B8%A1%E5%8A%A8%E6%95%88)
`<keep-alive>` 用作缓存当用你不想重新刷新页面获取内容时可以使用它包裹这`router-view`标签
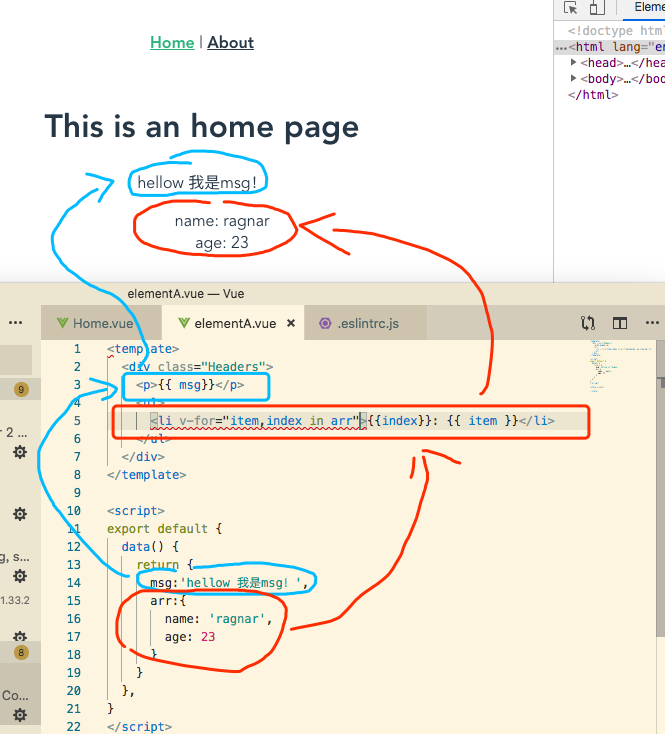
#### 列表渲染 [传送门](https://cn.vuejs.org/v2/guide/list.html)

我们使用了模版语法把data🀄️的字符串传送到了html中在网页上正常显示出来
我们还使用了列表渲染使用`v-for`成功的把arr中的数值传送了上去
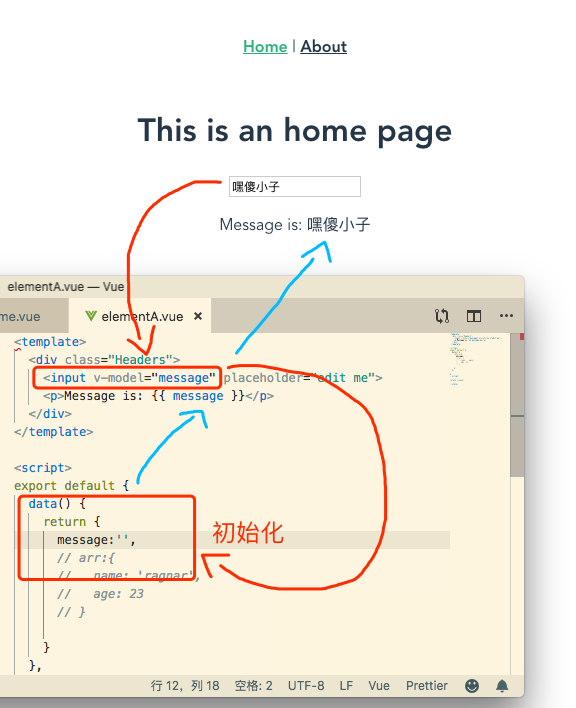
### `v-model` [传送门](https://cn.vuejs.org/v2/api/#v-model)
双向绑定,`v-model` 本质上不过是语法糖。它负责监听用户的输入事件以更新数据,并对一些极端场景进行一些特殊处理。

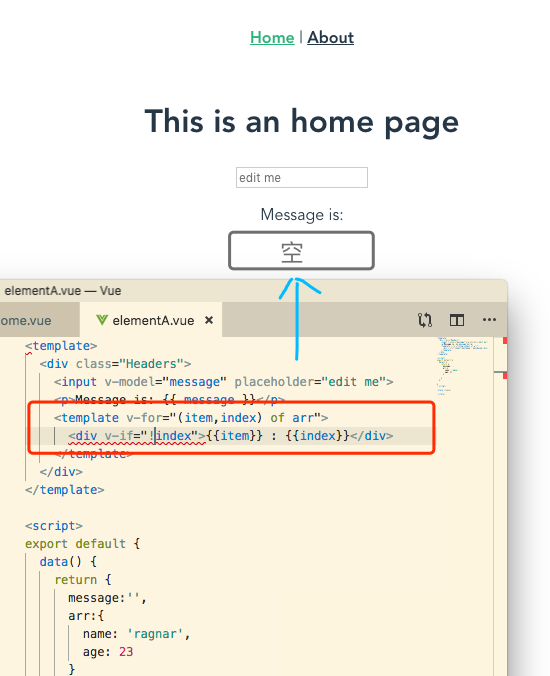
#### `v-for/v-if/<tempalate> 的综合使用`
当它们处于同一节点,`v-for` 的优先级比 `v-if` 更高,这意味着 `v-if` 将分别重复运行于每个 `v-for` 循环中。当你想为仅有的*一些*项渲染节点时,这种优先级的机制会十分有用,
⚠️警告:[**永远不要把 v-if 和 v-for 同时用在同一个元素上。**](https://cn.vuejs.org/v2/style-guide/#%E9%81%BF%E5%85%8D-v-if-%E5%92%8C-v-for-%E7%94%A8%E5%9C%A8%E4%B8%80%E8%B5%B7-%E5%BF%85%E8%A6%81)

使用`v-model`和`@key.enter`回车事件配合使用制作一个简易todo

- 前言
- 你真的懂This吗?
- 对象和对象构造函数
- 工厂功能和模块模式
- API的使用
- async and await
- 关于async的很棒的一篇文章
- 掘金:关于forEach,map,fiter循环操作
- Node.js 实例与基础
- 原创: Express 学习使用笔记
- 零碎知识点方法
- 关于滚动吸顶的方法
- Vue学习笔记
- Vue向导
- vuex是啥?
- vue代码风格指南
- 关于vue的初体验
- 超详细解毒Vue
- Vue实例
- 模版语言
- 组件基础
- 条件渲染、列表渲染、Class与style绑定
- Todolist的制作超详细
- vue-router
- Vue基础2.0x 笔记
- 搭建vuepress
- JavaScript之ES6
- 箭头函数
- 这就是This
