[TOC]
# 偏移量offset
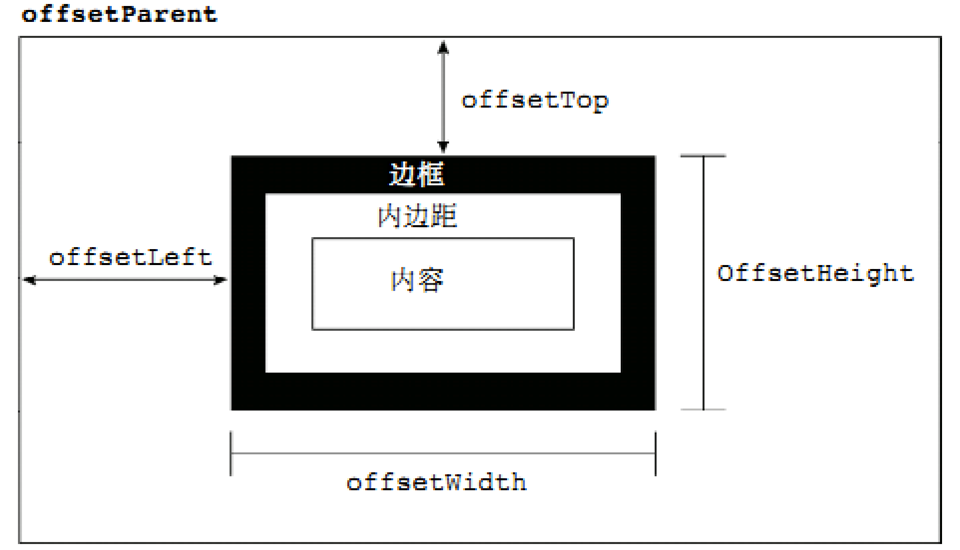
offset是偏移、位移、补偿的意思,offset家族由 offsetWidth、offsetHeight、offsetLeft、offsetTop、offsetParent 等组成,使用这些属性可以获取元素的实际宽高和元素到父元素(**父元素必须是定位**)的距离。具体关系如下
html和css代码
```
<style>
body {
margin: 0;
}
#box {
position: absolute;
width: 300px;
height: 300px;
background-color: purple;
overflow: hidden;
margin: 50px;
}
#child {
width: 100px;
height: 100px;
background-color: lightskyblue;
margin: 50px;
border: 10px solid yellow;
padding: 10px;
}
</style>
<div id="box1">
<div id="box2">
</div>
</div>
```
JavaScript代码
```
//获取元素
var box1 = my$('box1');
var box2 = my$('box2');
console.log(box2.offsetWidth);
// offsetWidth = width + border + padding
console.log(box2.offsetHeight);
// offsetHeight = height + border + padding
console.log(box2.offsetLeft);
console.log(box2.offsetTop);
// 元素外边距到父元素的边框内侧,其实就是 元素的margin + 父元素的padding,不包含边框
// offsetLeft = margin-left + 定位父元素的padding-left
// offsetTop = margin-top + 定位父元素的padding-top
```
offset偏移量的图示:

offsetParent:是一个只读属性,用于获取最近一个定位父元素; parentNode:混合了所有(拥有子元素的) Node对象包含的共有方法和属性。通俗的讲,只要一个元素节点拥有子节点,这个元素节点就是 parentNode 类型;
offsetParent 和 parentNode的区别:offsetParent 获取的是设置了 position 样式的父元素,没有设置position 则获取到 body 元素;而 parentNode 则是直接获取最近的父元素;
```
console.log(box2.offsetParent);
// offsetParent:获取最近一个定位父元素,如果没有定位父元素,则获取到body元素
console.log(box2.parentNode);
//parentNode:获取父元素(节点)
```
注意
>[info]1、获取到的值是一个 number 类型,不带单位;
2、获取的宽高包含 border 和 padding;
3、只能读取,不能设置;
# 客户区client
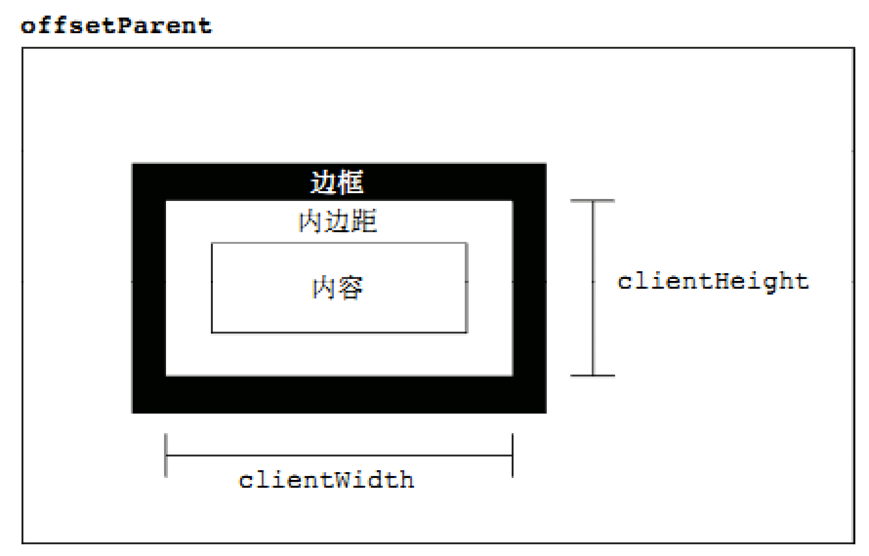
client家族中较常用的四个属性,clientLeft、clientTop、clientWidth、clientHeight,其中最常用的是 clientWidth、clientHeight。
html和css代码
```
<style>
body {
margin: 0;
}
#box {
width: 100px;
height: 100px;
margin: 50px;
border: 30px solid red;
padding: 10px;
background-color: green;
}
</style>
<div id="box">
</div>
```
JavaScript代码
```
var box = my$('box');
console.log(box.clientLeft);
// clientLeft = borderleft
console.log(box.clientTop);
// clientTop = bordertop
console.log(box.clientWidth);
// clientWidth = witdh + padding
console.log(box.clientHeight);
// clientHeight = hetight + padding
```
客户区client的图示:

# 滚动scroll
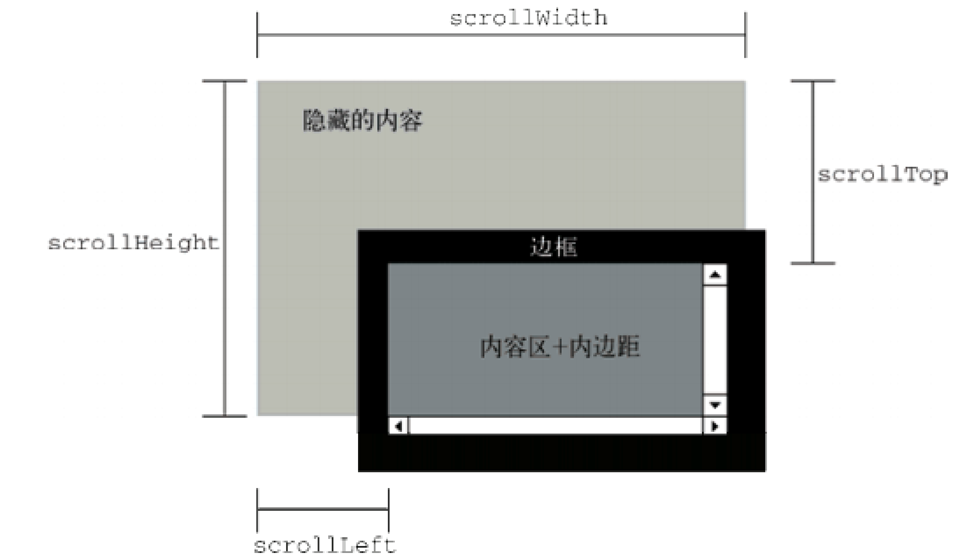
scroll家族中常用的几个属性有 scrollWidth、scrollHeight、scrollLeft、scrollTop 等,其中 scrollWidth、scrollHeight 获取元素的宽和高,scrollLeft、scrollTop 获取滚动出元素可视区域的距离。
html和css代码
```
<style>
body {
margin: 0;
}
#box {
width: 100px;
height: 100px;
margin: 50px;
border: 30px solid red;
padding: 10px;
background-color: green;
overflow: auto;
}
</style>
<div id="box">
客户:“这个图下班之前必须发给我!” 设计师:“好的!” 第二天清早。 客户:“图怎么还没发过来?” 设计师:“我还没下班呢…”
</div>
```
JavaScript代码
```
var box = my$('box');
console.log(box.scrollWidth); // scrollWidth代表可以滚动的总宽
console.log(box.scrollHeight); // scrollHeight代表可以滚动的总高
//获取box滚动出去的区域的长度
console.log(box.scrollLeft); // scrollLeft代表横向已滚动的长度
console.log(box.scrollTop); // scrollTop代表纵向已滚动的长度
// 注册box的滚动条滚动事件,当滚动条滚动的时候执行事件处理函数
box.onscroll = function () {
// console.log('你滚');
//获取box滚动出去的区域的长度
console.log(box.scrollLeft);
console.log(box.scrollTop);
}
```
滚动scroll的图示:

*****
# 案例
## 拖拽窗口案例(了解)
>[success]====================06_鼠标拖拽盒子的案例>01.html====================
>思路:
>1、当鼠标按下时,求出鼠标在盒子中的位置;
> 鼠标在盒子中的位置 = 鼠标在页面中的位置 - 盒子在页面中的位置
>2、当鼠标移动时,保持鼠标在盒子中的位置不变(即盒子跟随鼠标移动)
> 盒子的坐标 = 鼠标当前在页面中的位置 - 鼠标在盒子中的位置
>使用到的属性有:offsetLeft、offsetTop、pageX、pageY
>注意:盒子要脱离文档流,即设置 position:absolute
>====================07_鼠标拖拽盒子的案例02.html====================
>问题:鼠标弹起了,盒子还黏在鼠标上。
>解决:当鼠标弹起时,移除鼠标移动事件。
>关闭按钮:当鼠标点击关闭按钮时,隐藏盒子
>注意:使用getPage(e)解决pageX和pageY的浏览器兼容性问题
html和css代码
```
~~~
<style>
* {
margin: 0;
height: 0;
border: 0;
list-style: none;
}
header {
width: 100%;
height: 40px;
line-height: 40px;
position: absolute;
top: 0;
left: 0;
background: green;
color: white;
text-indent: 2em;
}
#box {
width: 500px;
height: 300px;
border: 2px solid #ccc;
position: absolute;
top: 30%;
left: 30%;
/*left: 50%;
margin-left: -250px;*/
padding: 1px;
box-sizing: border-box;
}
.top {
/*width: 100%;*/
height: 40px;
line-height: 40px;
color: #fff;
background: #ccc;
display: flex;
justify-content: space-between;
padding: 0 10px;
cursor: move; /*改变鼠标指针为十字形*/
}
.top a {
color: white;
text-decoration: none;
}
</style>
<body>
<header>注册信息</header>
<div id="box">
<div class="top" id="top">
<span> 注册信息(可以关闭)</span>
<a href="javascript:void(0);">【关闭】</a>
</div>
</div>
</body>
```
JavaScript代码
```
~~~
<script>
console.log(box);
//鼠标按下去
getId('top').onmousedown = function (e) {
// console.log(e.pageX, e.pageY);
// console.log(box.offsetLeft, box.offsetTop);
var x = e.pageX - getId('box').offsetLeft;
var y = e.pageY - getId('box').offsetTop;
getId('top').onmousemove =function(event){
console.log(event.pageX, event.pageY);
var xx =event.pageX-x;
var yy =event.pageY-y;
getId('box').style.left=xx+'px';
getId('box').style.top=yy+'px';
};
};
//鼠标松开
getId('top').onmouseup =function () {
getId('top').onmousemove=null;
}
</script>
```
## 登录窗口案例
>[success] ===============08_弹出登录窗口01.html===============
> 思路:
> 1、点击“登录”连接,显示登录框和遮盖层
> 遮盖层作用:
> 1)突出显示登录窗口;
> 2)遮挡窗口后面的内容,使页面不能再点击。
>
> 2、点击关闭按钮,隐藏登录框和遮盖层
> 3、拖拽:当鼠标移动时,让登录框与鼠标保持静止位置;
> 参考页面 09_弹出登录窗口02.html
>
> ===============09_弹出登录窗口02.html===============
> 3、拖拽:当鼠标移动时,让登录框保持与鼠标静止位置;
> 注意:鼠标弹起时,移除鼠标移动事件
html和css代码
```
~~~
<style>
* {
margin: 0;
padding: 0;
border: 0;
list-style: none;
}
header {
height: 100px;
line-height: 100px;
text-align: right;
padding-right: 200px;
}
a {
text-decoration: none;
color: #333;
font-size: 20px;
}
.modal {
width: 100%;
height: 100%;
position: absolute;
left: 0;
top: 0;
}
.modal-bg {
width: 100%;
height: 100%;
position: absolute;
left: 0;
top: 0;
background: rgba(0, 0, 0, 0.3);
}
.modal-box {
background: #fff;
width: 500px;
height: 300px;
position: absolute;
left: 50%;
top: 50%;
margin-left: -250px;
margin-top: -150px;
}
.top {
height: 50px;
line-height: 50px;
text-align: center;
font-size: 18px;
cursor: move
}
.down {
padding: 10px;
}
label {
display: block;
height: 40px;
line-height: 40px;
margin-bottom: 20px;
}
input {
border: 1px solid #ccc;
border-radius: 3px;
height: 38px;
float: right;
width: 90%;
}
.btn {
width: 100px;
height: 30px;
line-height: 30px;
text-align: center;
cursor: pointer;
border: 1px solid #ccc;
border-radius: 3px;
margin: auto;
}
.close {
position: absolute;
top: -15px;
right: -15px;
border-radius: 50%;
width: 30px;
height: 30px;
line-height: 30px;
background: #fff;
font-size: 12px;
text-align: center;
cursor: pointer;
}
</style>
~~~
~~~
<body>
<header>
<a href="javascript:void(0);">会员登录</a>
</header>
<div class="modal" id="modal">
<div class="modal-bg"></div>
<div class="modal-box" id="modal-box">
<div class="top" id="top">会员登录</div>
<div class="down">
<label for="">
账号:
<input type="text" placeholder="请输入账号">
</label>
<label for="">
密码:<input type="password" placeholder="请输入密码">
</label>
</div>
<div class="btn">登录</div>
<span class="close" onclick="getId('modal').style.display='none'">关闭</span>
</div>
</div>
</body>
~~~
```
JavaScript代码
```
~~~
<script>
getId('top').onmousedown = function (e) {
var x = e.pageX - getId('modal-box').offsetLeft;
var y = e.pageY - getId('modal-box').offsetTop;
getId('top').onmousemove = function (event) {
// console.log(event.pageX, event.pageY);
var aa = event.pageX - x;
var bb = event.pageY - y;
getId('modal-box').style.left = aa + 'px';
getId('modal-box').style.top = bb + 'px';
getId('modal-box').style.marginLeft = 0; // 使marginLeft和marginTop归零,从而使盒子不跑偏
getId('modal-box').style.marginTop = 0;
};
};
//鼠标松开
getId('top').onmouseup = function () {
getId('top').onmousemove = null;
};
document.onmouseup = function () {
getId('top').onmousemove = null;
}
</script>
~~~
```
## 放大镜
>[success] ===============10_放大镜效果-案例01===============
> 思路:
> 1、鼠标经过的时候,显示mask和big,当鼠标离开box的时候隐藏mask和big
> 2、当鼠标在盒子中移动的时候,让mask和鼠标一起移动(相对静止)
> 3、当mask移动的时候,让大图片移动
>
> 把以上问题拆开,一个一个解决,如下
>
> (1)鼠标经过的时候,显示mask和big,当鼠标离开box的时候隐藏mask和big
> a、获取6个元素
> b、绑定鼠标移入、移出事件,完成显示和隐藏mask和bigImg功能
>
>
> ===============11_放大镜效果-案例02===============
>
> (2)当鼠标在盒子中移动的时候,让mask和鼠标一起移动
> a、获取鼠标在盒子中的位置
> b、让鼠标出现在遮盖层的中心的
> c、设置遮盖层位置
> 问题:鼠标移动到box外面了,但遮盖层没有消失。因为事件冒泡
> 解决:把mask限制到box中,设置mask可以在box中移动的最大值、最小值即可。
>
> ===============12_放大镜效果-案例03===============
>
> (3)当mask移动的时候,让大图片移动
> 求 大图片将要移动的距离,根据比例公式:
> mask移动的距离/mask最大能够移动的距离 = 大图片移动的距离/大图片最大能够移动的距离
>
> 求未知数:
> mask最大能够移动的距离
> 大图片最大能够移动的距离
> 最后求出 大图片移动的距离
>
> 设置大图片移动的位置:注意位置正负数和移动方向的关系
>
> ===============13_放大镜的兼容性处理-案例04===============
> 注意:IE中兼容性问题
> 只有谷歌支持.webp, 所以将 .webp 改成 .jpg
>
> 以下事件在不触发事件冒泡的时候,效果一样,但是在事件冒泡后,就有浏览器兼容性问题
> mouseenter mouseleave 不会触发事件冒泡
> mouseover mouseout 会触发事件冒泡
>
> IE7、8中不支持rgba()
> 使用
> filter:alpha(opacity=40)progid:DXImageTransform.Microsoft.gradient(startColorstr=#FFFF00,endColorstr=#FFFF00);
html和css代码
```
~~~
<style>
*{
margin: 0;
padding: 0;
border: 0;
list-style: none;
}
#box{
width: 350px;
height: 350px;
background: url("images/small.jpg")no-repeat;
background-size: 100%;
margin: 100px;
position:relative;
}
span{
width: 150px;
height: 150px;
background: rgba(255,255,0,0.7);
position: absolute;
left: 0;
top: 0;
cursor: move;
display: none;
}
#bigImg{
width: 400px;
height: 400px;
background: url("images/big.jpg") no-repeat;
position: absolute;
left: 360px;
top: 0;
display: none;
}
</style>
<script src="common.js"></script>
~~~~~~
<body>
<div id="box">
<span id="sp"></span>
<div id="bigImg"></div>
</div>
</body>
~~~
```
JavaScript代码
```
~~~
<script>
/*
* 鼠标移入移出某个物体,可以使用onmouseover和onmouseout
* 但这两个事件会产生事件冒泡,
* 所以我们有另外两个代替他们的事件: onmouseenter和onmouseleave
* */
// 鼠标移入box
getId('box').onmouseenter=function () {
// 黄色盒子出现
getId('sp').style.display='block';
getId('bigImg').style.display='block';
// 鼠标移动事件
getId('box').onmousemove=function (e) {
// 获取鼠标在盒子中的坐标点
var x= e.pageX-getId('box').offsetLeft;
var y= e.pageY-getId('box').offsetTop;
/* 以下两个判断是用来检测span的最大移动范围 */
if (x<=75){
x=75;
} else if (x>=275) {
x=275;
}
if (y<=75){
y=75;
} else if (y>=275) {
y=275;
}
// 给span赋值left和top
var spanx=x-75;
var spany=y-75;
getId('sp').style.left=spanx+'px';
getId('sp').style.top=spany+'px';
//设置bigImg的 backgroundPositionX 和 backgroundPositionY
getId('bigImg').style.backgroundPositionX=-2*spanx+'px';
getId('bigImg').style.backgroundPositionY=-2*spany+'px';
};
};
// 鼠标移出box
getId('box').onmouseleave=function () {
// 黄色盒子消失
getId('sp').style.display='none';
//大图消失
getId('bigImg').style.display='none';
// 鼠标移动事件清空
getId('box').onmousemove = null;
};
~~~
```
## 模拟滚动条(熟悉)
>[success] =================15_模拟滚动条01=================
> 方式一:当内容超出父容器时,直接设置父容器的样式为 overflow:auto,缺点是难看,有浏览器兼容性问题
>
> 思路:
> 1、根据内容大小,计算滚动条的高度
> 滚动条的高度/scroll的高度 = box的高度 / 内容的高度
> 利用以下几个关于高度的属性:
> offsetHeight 元素的大小 + padding + border
> clientHeight 元素的大小 + padding
> scrollHeight 内容的大小 + padding
>
> 问题:没有内容或内容不超出div时,不应该显示滚动条,但此时却显示出来了。
> 解决:当内容的高度大于box的高度,则计算滚动条的高度,否则滚动条的高度为0。
>
> =================16_模拟滚动条02=================
> 2、让滚动条能拖动
> 2.1 当鼠标按下的时候,求鼠标在滚动条中的位置
> 2.2 当鼠标在页面上移动的时候,求滚动条的位置
>
> 问题:bar滚动到滚动区域scroll外面了。
> 解决:控制bar不能移出滚动区域scroll。
>
>
>
> =================17_模拟滚动条03=================
> 3、当拖拽滚动条时,改变内容位置
> 公式:
> 内容滚动的距离/内容最大能滚动的距离 = 滚动条滚动的距离/滚动条最大能滚动的距离
>
> 注意:滚动条的滚动方向与内容的滚动方向是相反的,所以滚动的位置大小是负数。
html和css代码
```
~~~
<style>
* {
margin: 0;
padding: 0;
border: 0;
list-style: none;
}
#box{
width: 300px;
height: 400px;
border: 1px solid #f00;
overflow: hidden;
margin: 100px;
padding-right: 24px;
box-sizing: border-box;
position: relative;
}
#content{
user-select:none;
padding-bottom: 3px;
}
.scrollbar {
width: 24px;
height: 100%;
background: #ccc;
position: absolute;
right: 0;
top: 0;
}
span {
width: 24px;
border-radius: 24px;
background: #f00;
position: absolute;
left: 0;
top: 0;
/*display: block;*/
cursor: pointer;
}
</style>
<script src="common.js"></script>
~~~~~~
<body>
<div id="box">
<div id="content">
从前有座山,山里有座庙,庙里有俩和尚,一老一小,老和尚给小和尚讲了一个故事:
从前有座山,山里有座庙,庙里有俩和尚,一老一小,老和尚给小和尚讲了一个故事:
……
…(n)…
……
从前有座山,山里有座庙,庙里有俩和尚,一老一小,老和尚给小和尚讲了一个故事:
从前有座山,山里有座庙,庙里有俩和尚,一老一小,老和尚给小和尚讲了一个故事。
</div>
<div class="scrollbar" id="scb">
<span id="sp"></span>
</div>
</div>
</body>
~~~
```
jiavascript代码
```
~~~
<script>
//获取 scrollbar 的高度
var scrollbarHeight = getId('scb').clientHeight;
//获取 box 的高度
var boxHeight = getId('box').clientHeight;
//获取 content 的高度
var contentHeight = getId('content').scrollHeight;
//根据比例获取 span 的高度
var spanHeight = boxHeight / contentHeight * scrollbarHeight;
getId('sp').style.height = spanHeight + 'px';
// span的mousedown事件
getId('sp').onmousedown = function(){
//span的mousemove事件
document.onmousemove = function(e){
var y = e.pageY - getId('box').offsetTop;
//计算y的可移动范围
var halfSpanHeight = spanHeight/2;//sp的几何中心距离顶部的距离
if (y >= halfSpanHeight && y <= (scrollbarHeight - halfSpanHeight)) {
var hasMoveLen = y - halfSpanHeight;//求取已经移动的距离
getId('sp').style.top = hasMoveLen + 'px';
// 求mt,mt就是content向上滚动的距离
mt = hasMoveLen / scrollbarHeight * contentHeight;
getId('content').style.marginTop = -mt + 'px';
} else {
return;
}
}
};
getId('sp').onmouseup = function () {
document.onmousemove = null;
};
document.onmouseup = function () {
document.onmousemove = null;
};
~~~
```
