## 软件安装
安装NGINX,PHP和MySQL。推荐安装PHP8.0,MySQL5.7

<br>
## 上传代码
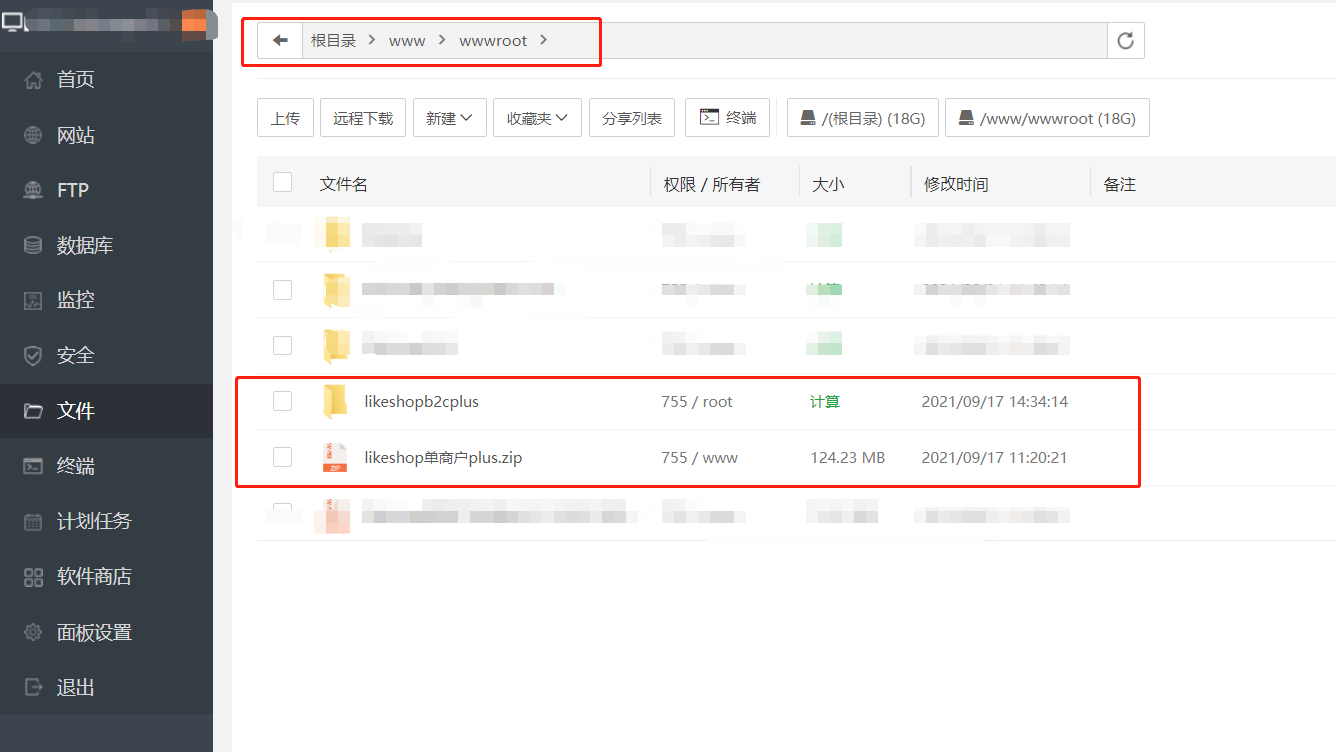
1.上传压缩包并解压。
<br>
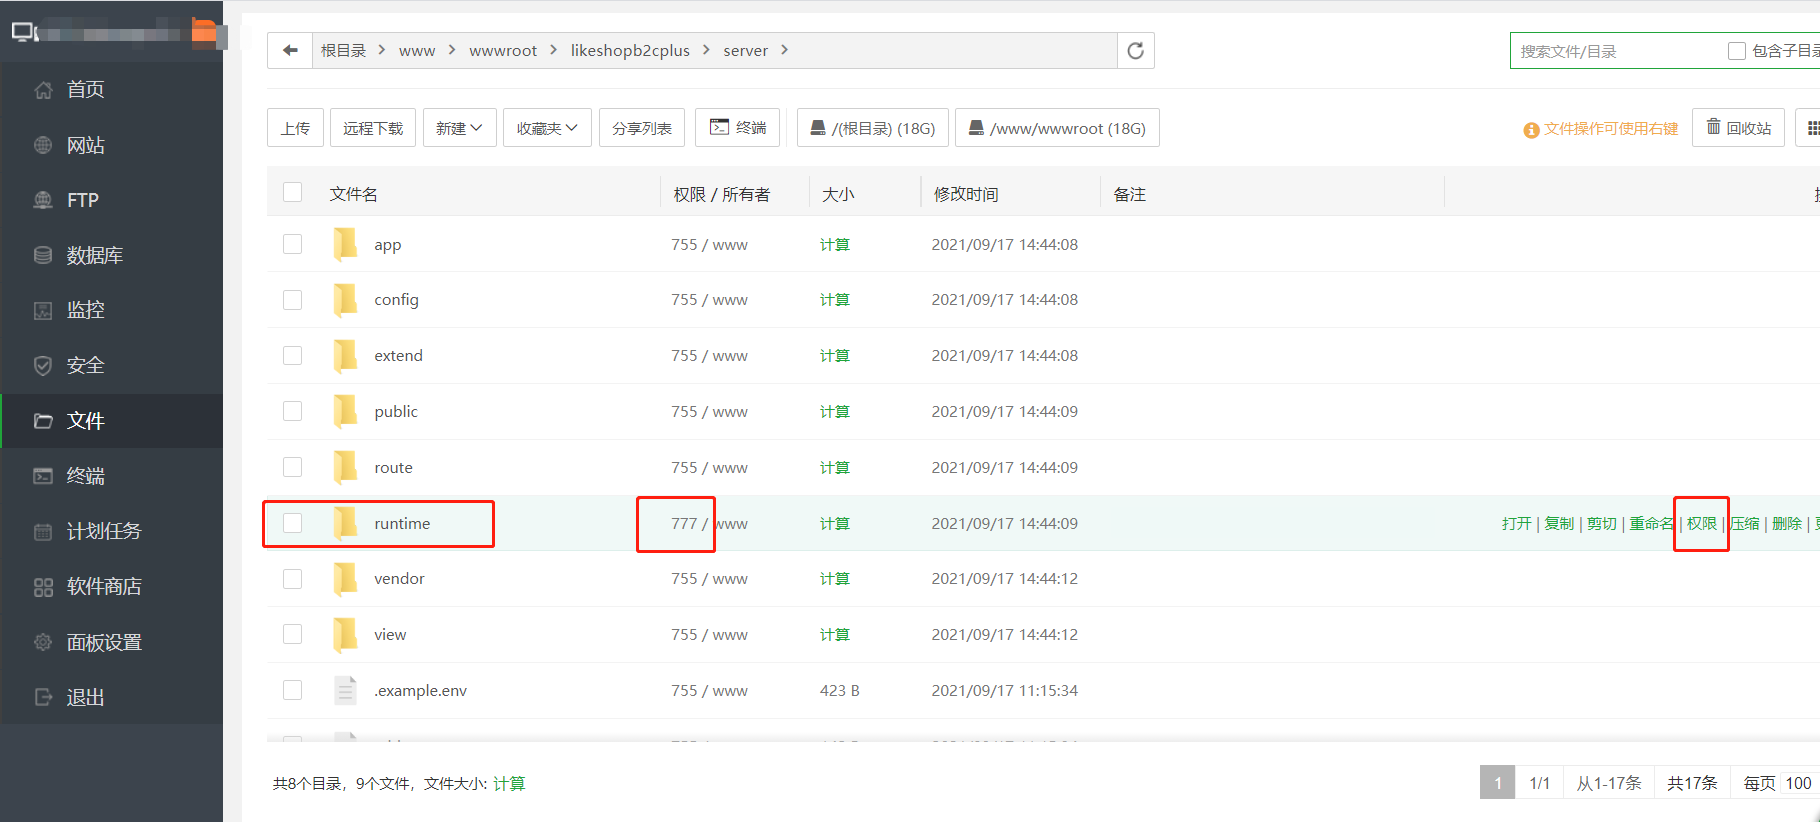
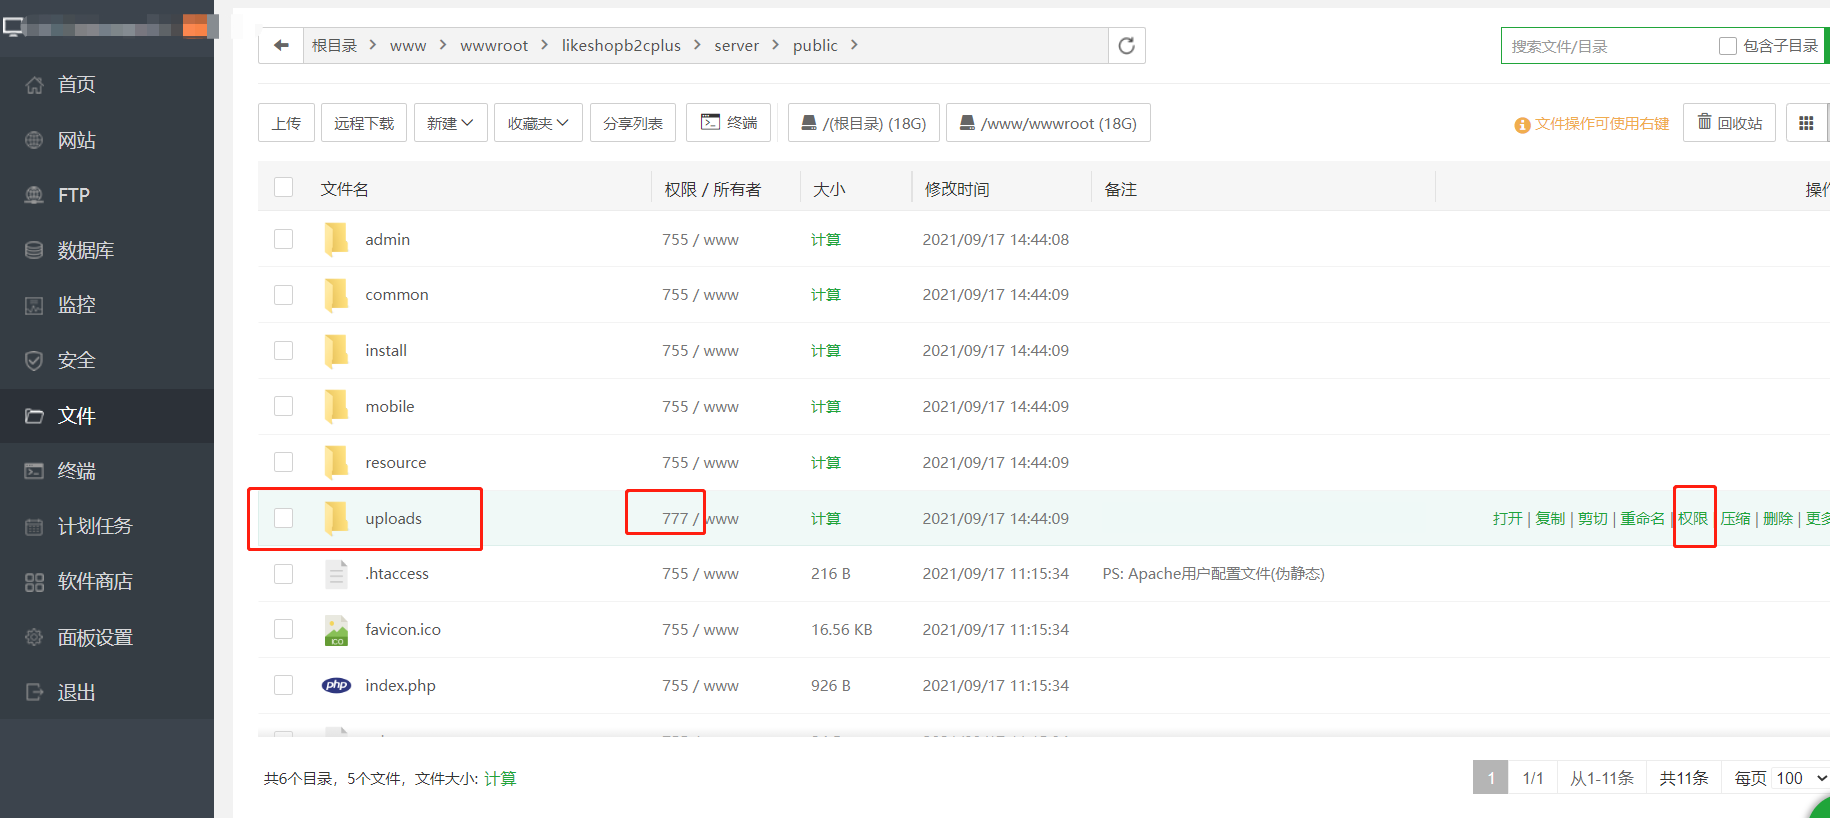
2.注意/www/wwwroot/likeshopb2cplus目录权限为755,所有者为www,**给server/runtime和server/public/uploads目录777权限!!!**
<br>
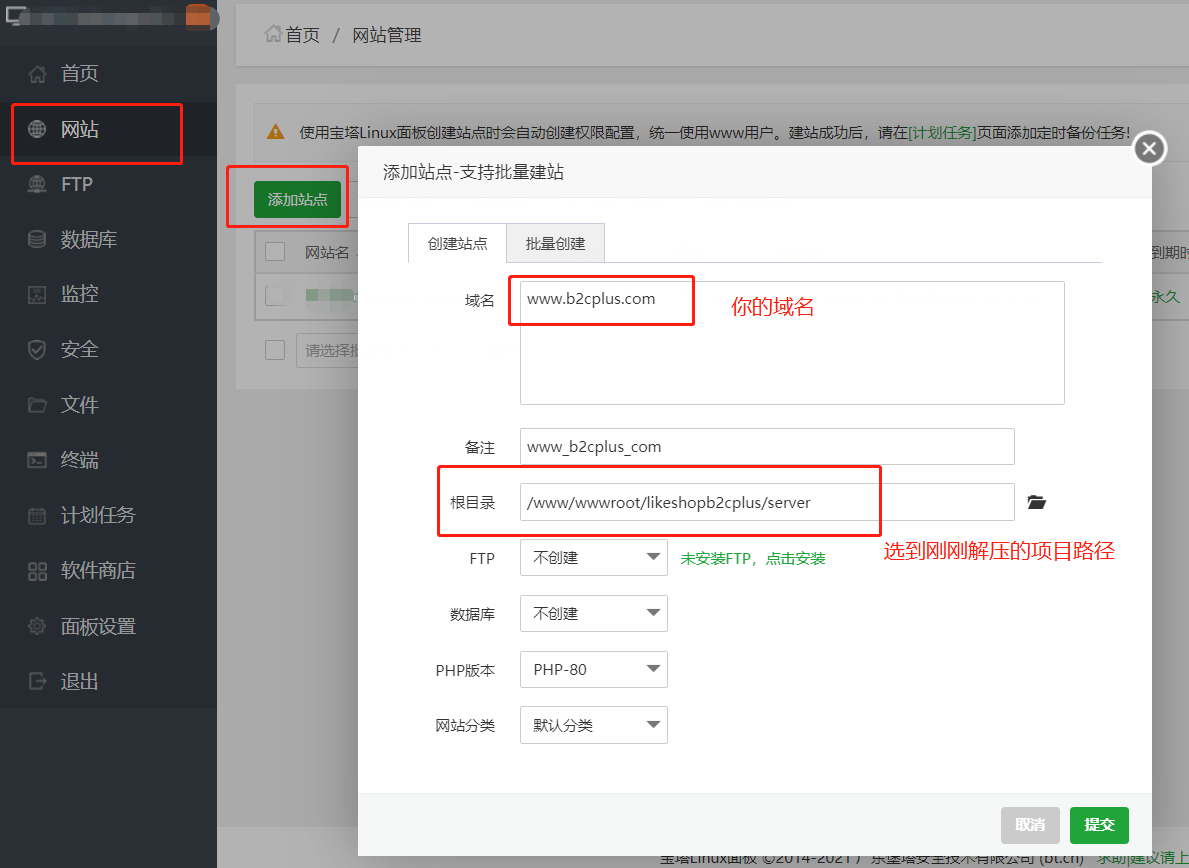
3.添加站点
<br>
4.设置站点信息
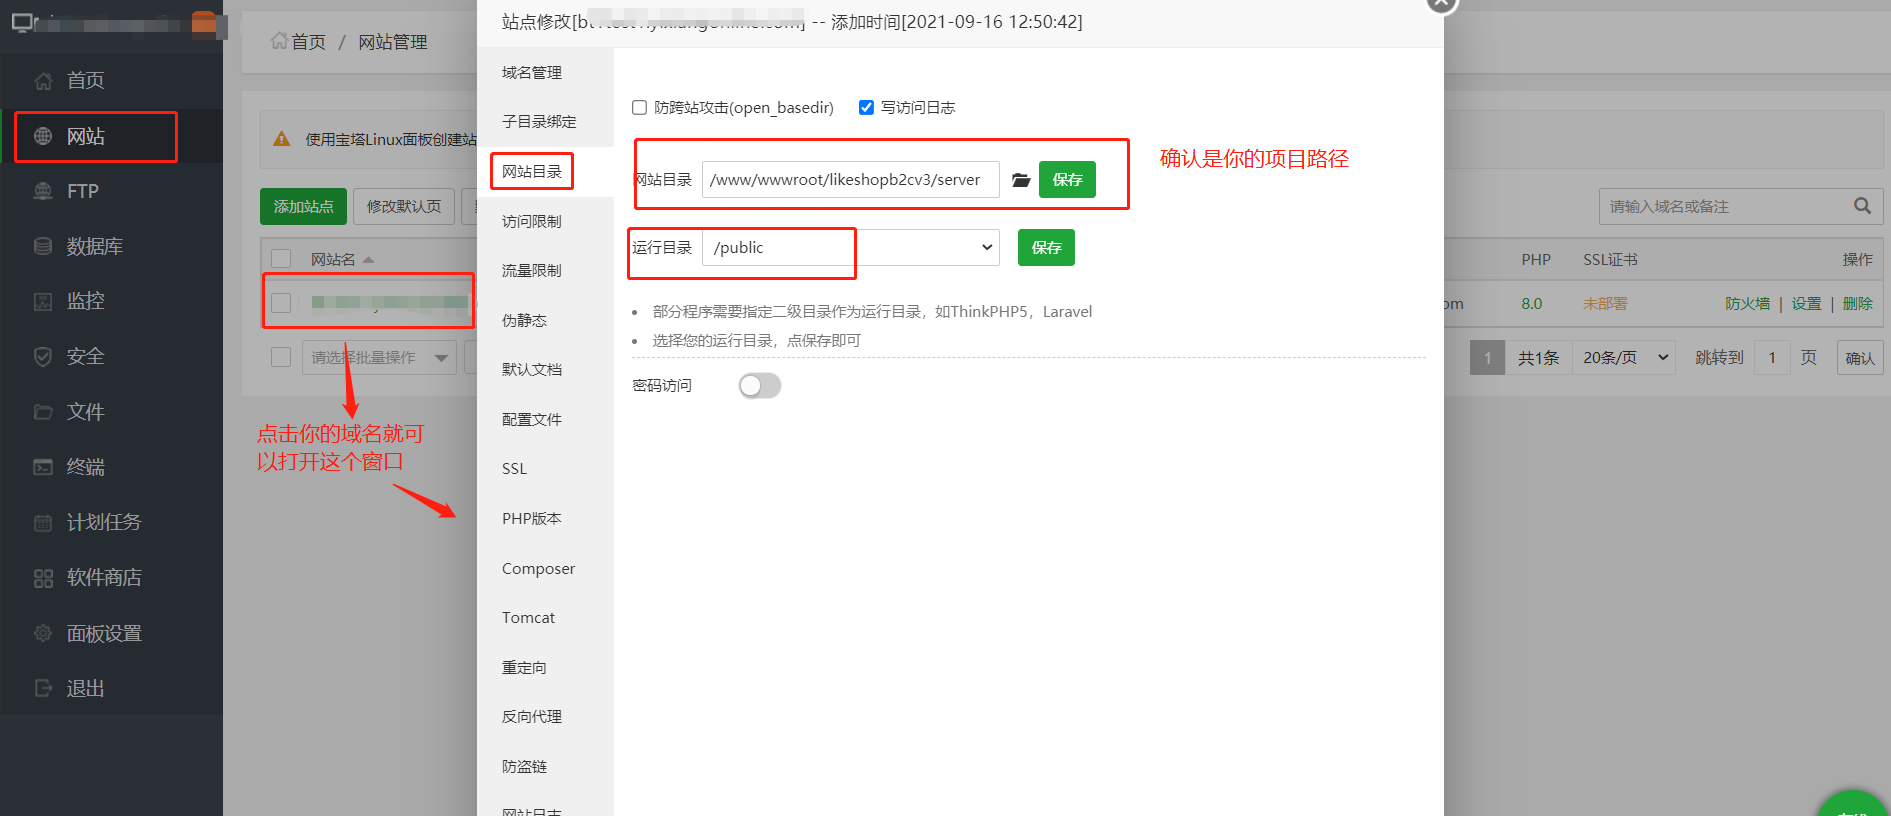
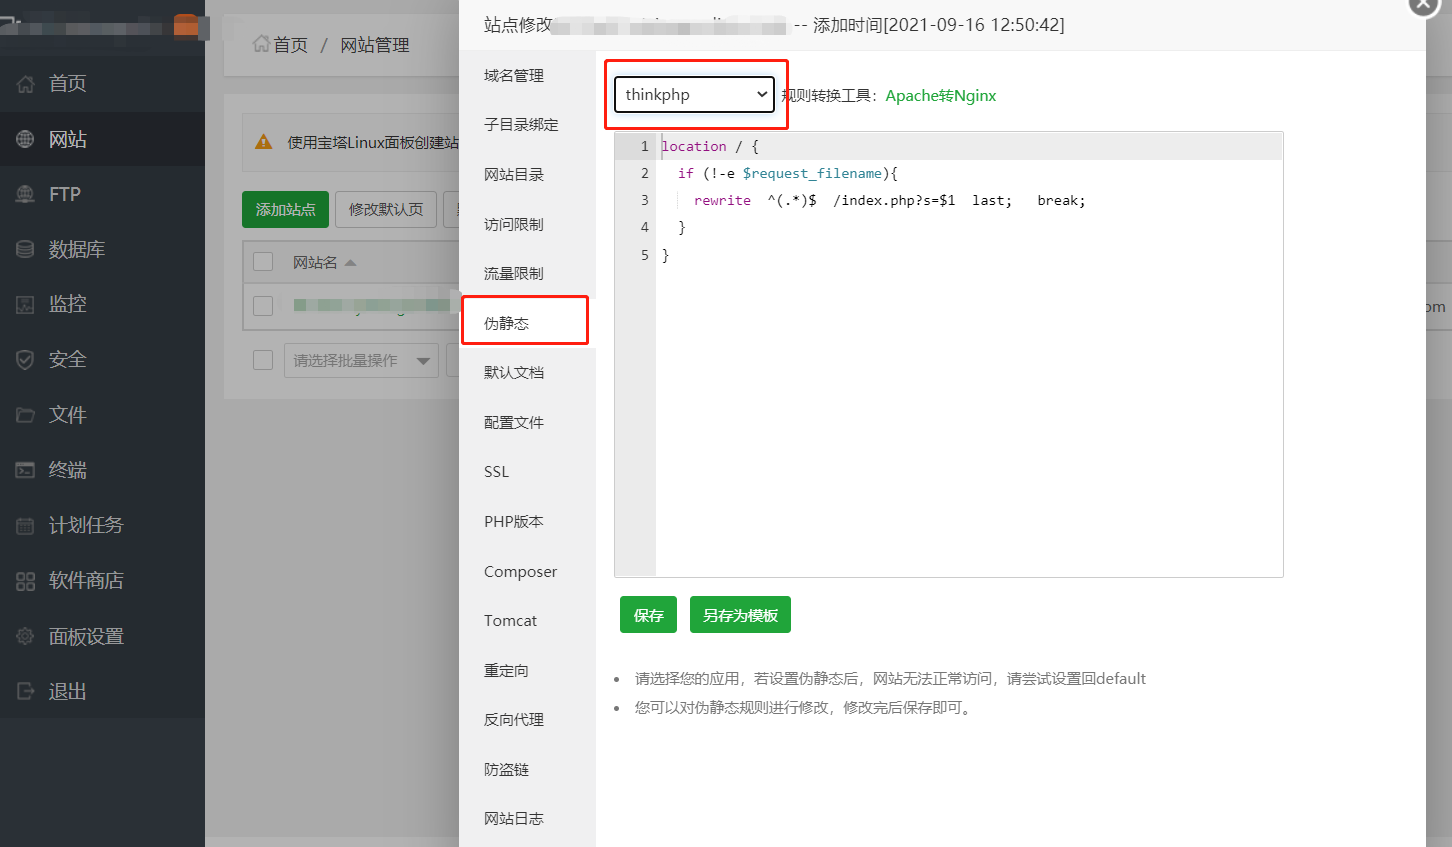
<br>
5.防跨站攻击设置
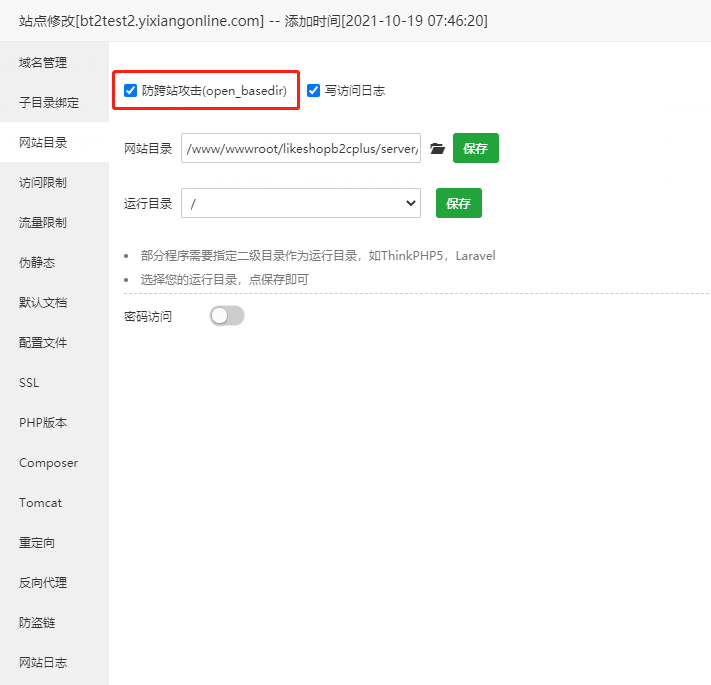
同时修改public目录下的.user.ini (这步的作用是为了在线升级时可以操作项目下的所有文件夹)

6、新建一个空的数据库
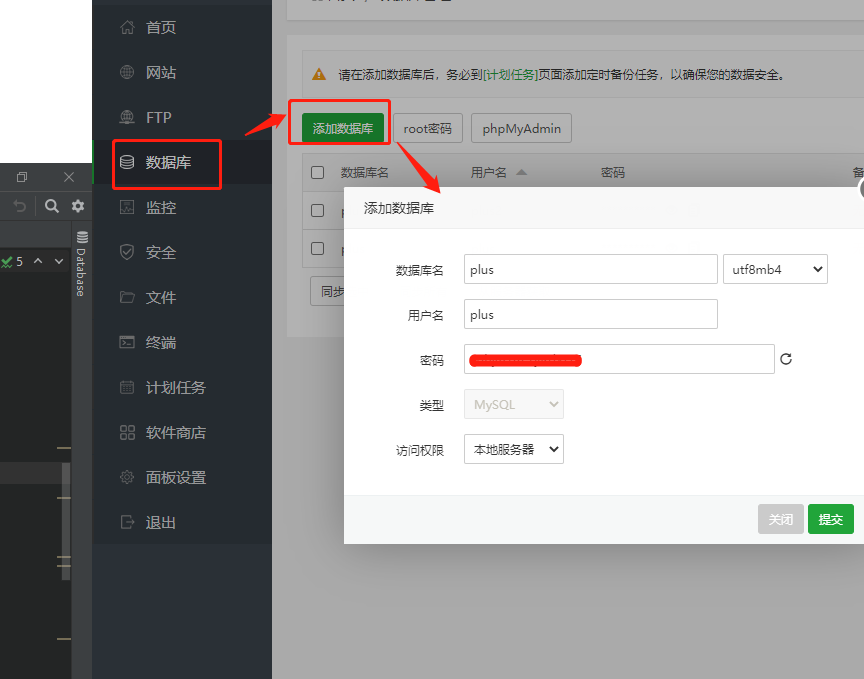
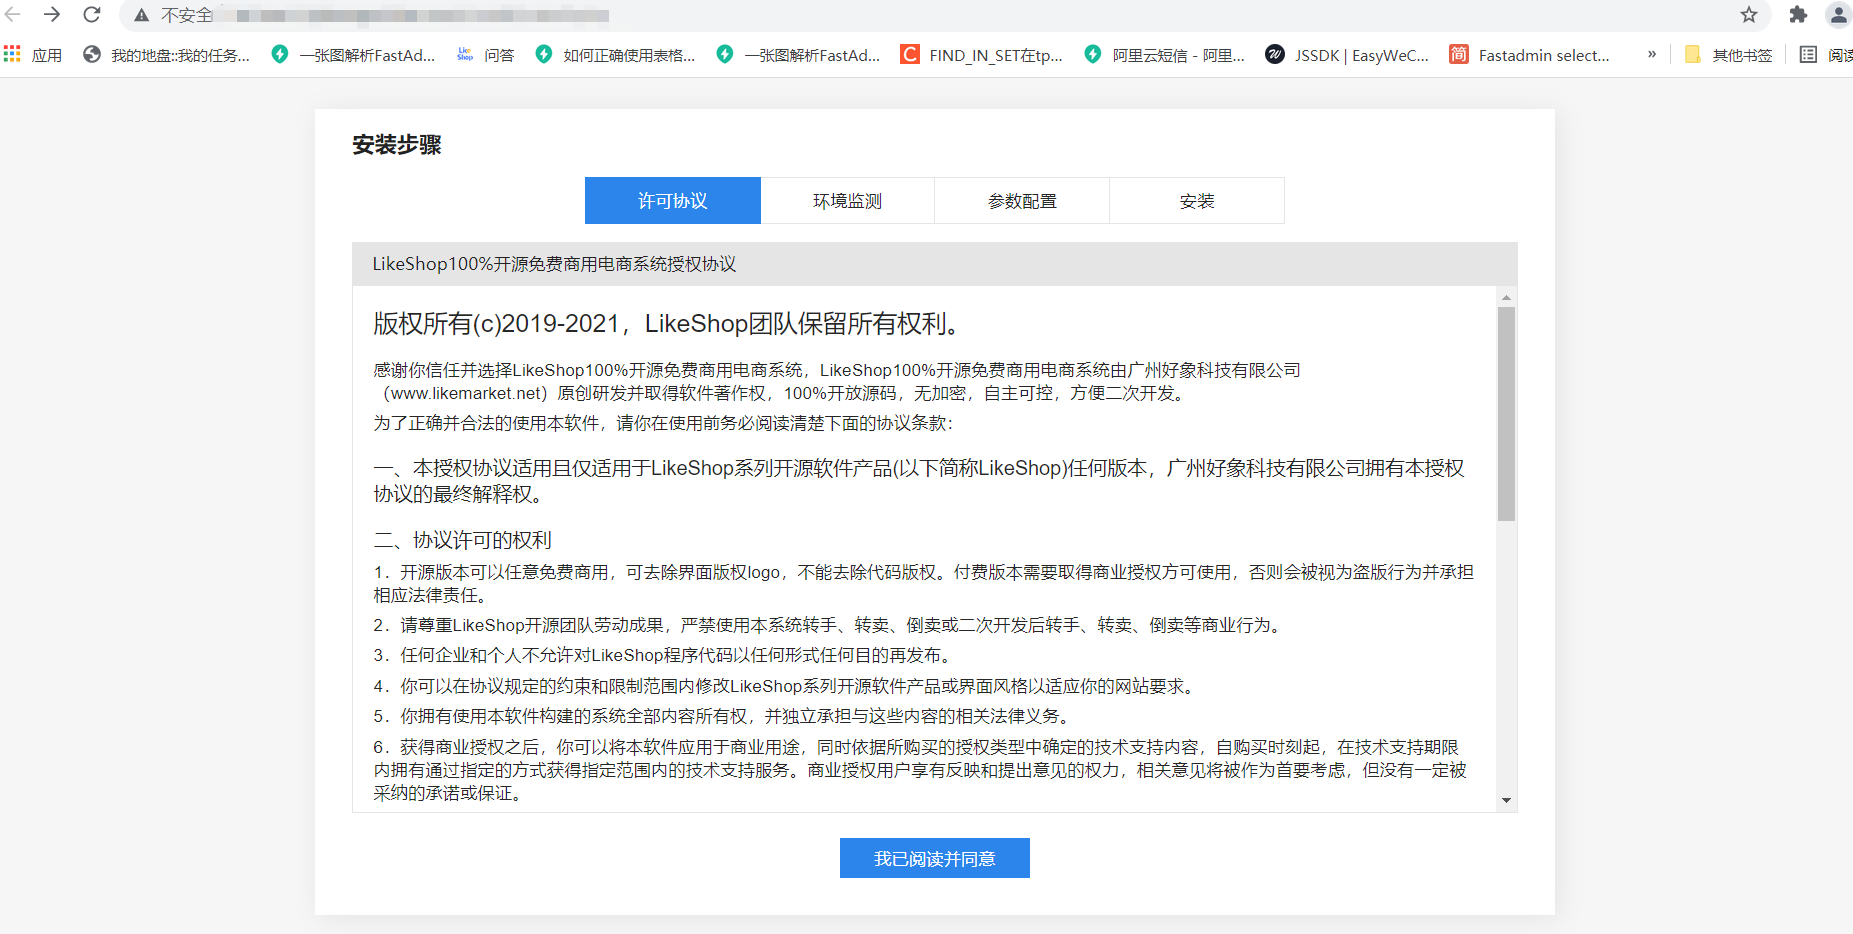
7.访问域名进行系统安装
<br>
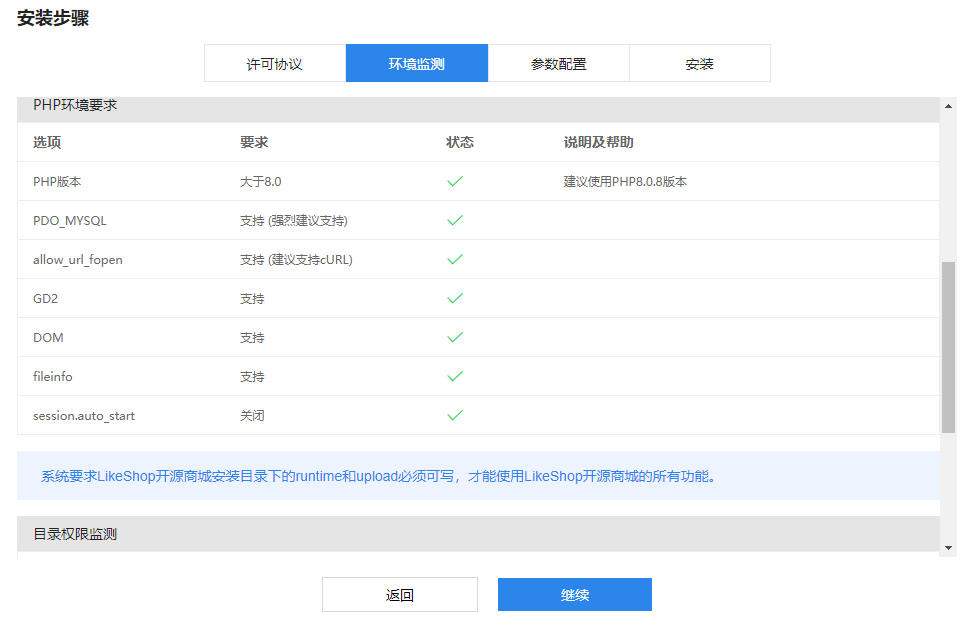
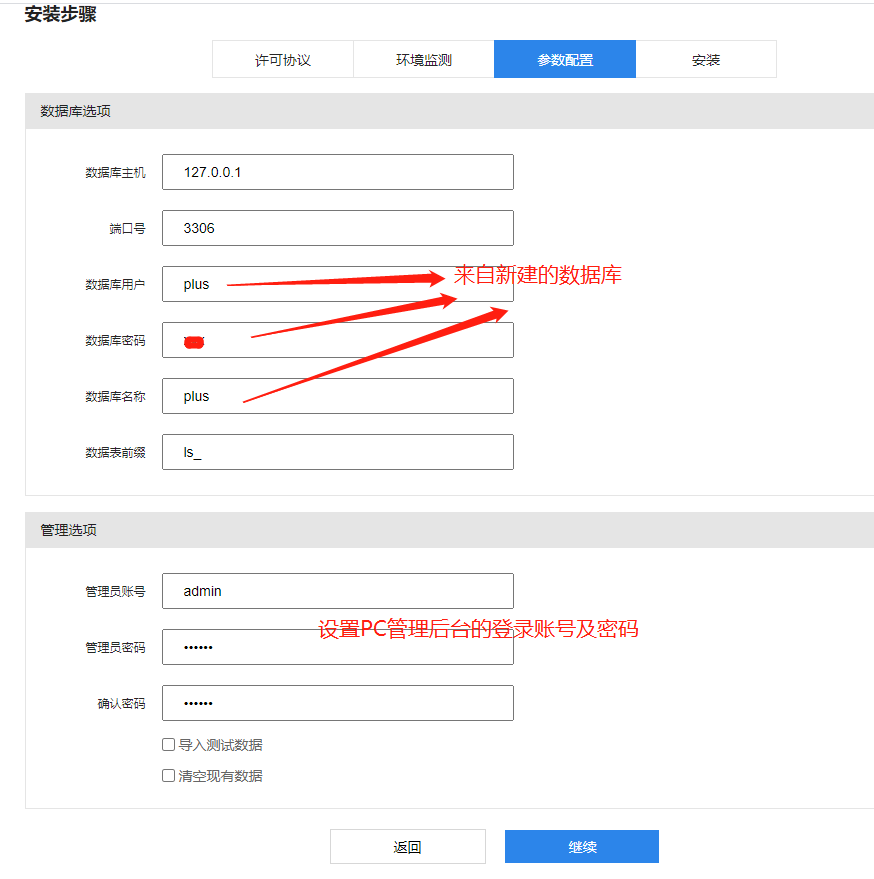
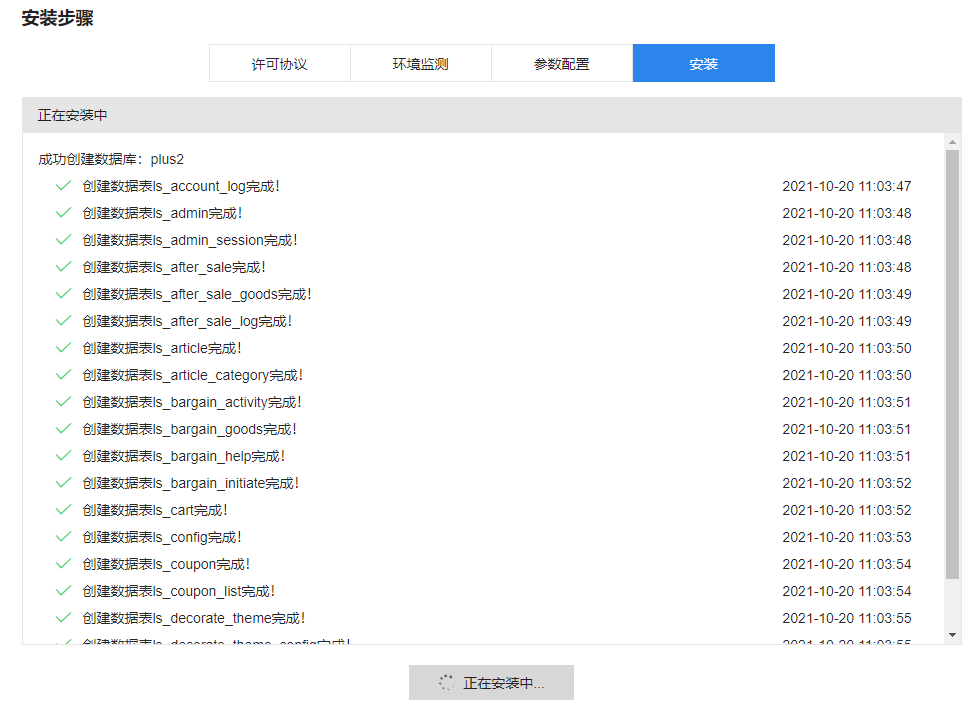
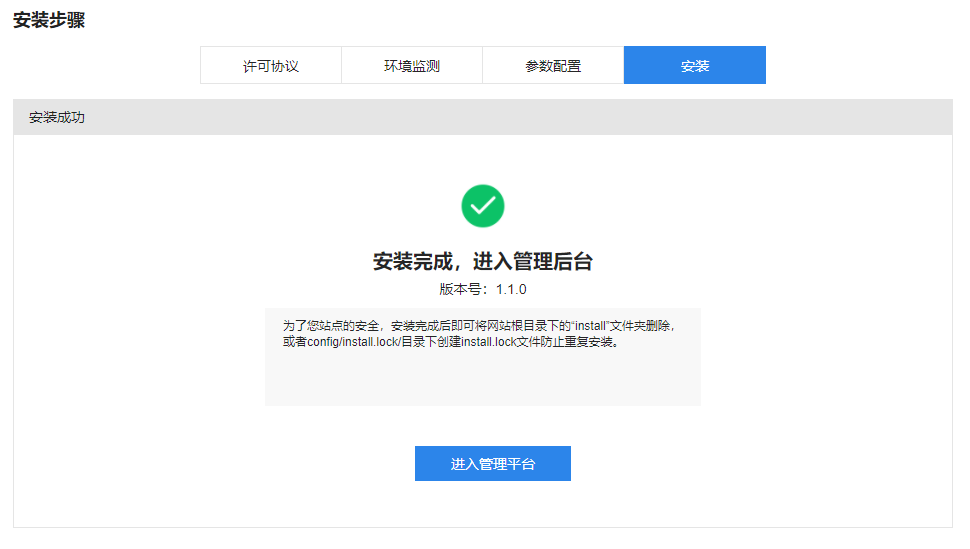
8、安装完成后
H5地址:你的域名/mobile
管理后台地址:你的域名/admin
## 配置定时任务
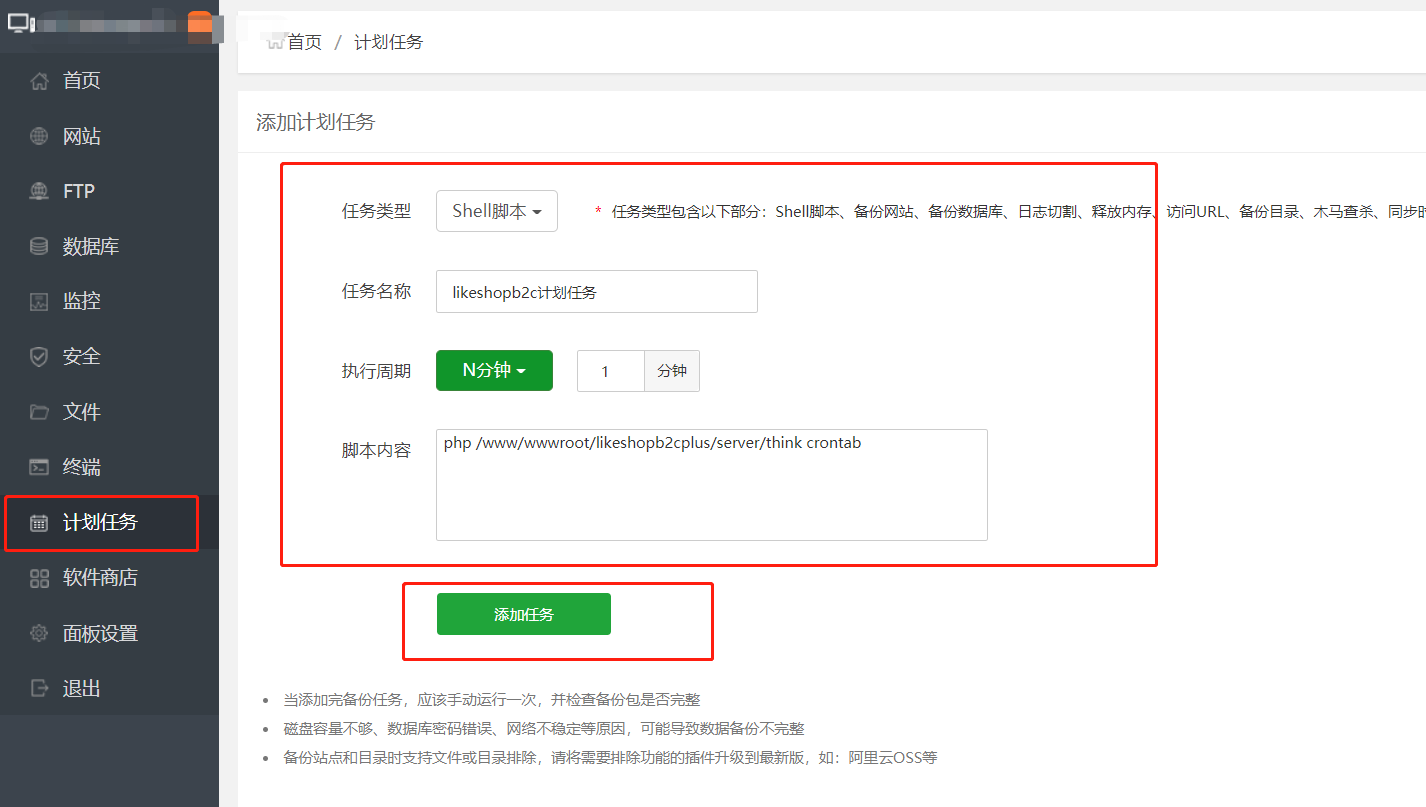
脚本内容: ` php /www/wwwroot/likeshopb2cplus/server/think crontab` www/wwwroot/likeshopb2cplus/server为项目服务端所在的绝对路径。(注意:这里的likeshopb2cplus为项目名,非固定,此处只是作为例子)
<br>
- 文档说明(必看!!!!)
- 部署配置
- 各种账号准备工作
- 项目部署
- 线上服务器宝塔面板环境下部署①(推荐)
- 宝塔面板下安装
- 阿里云①
- 腾讯云②
- 宝塔环境下项目部署①
- 宝塔环境下一键部署②
- windows下docker环境下部署②
- macos下docker环境下部署③
- windows下PhpStudy环境下部署④
- macos下PhpStudy环境下部署⑤
- 其他环境下部署⑥
- 程序安装
- 二开必看
- 接口文档
- PC管理后台
- 工作台
- 登录页
- 获取配置
- 登录
- 退出登录
- 商品
- 商品品牌
- 添加
- 编辑
- 删除
- 列表
- 修改显示状态
- 详情
- 商品管理
- 添加商品
- 获取商品详情
- 获取商品列表
- 编辑商品
- 设置商品状态
- 删除商品
- 商品其他列表
- 设置商品排序
- 修改商品名称
- 供应商
- 添加供应商分类
- 供应商分类列表
- 删除供应商分类
- 编辑供应商分类
- 供应商分类详情
- 添加供应商
- 供应商列表
- 删除供应商
- 编辑供应商
- 供应商详情
- 商品分类
- 添加商品分类
- 商品分类列表
- 修改商品分类状态
- 删除商品分类
- 编辑商品分类
- 商品分类详情
- 商品单位
- 添加商品单位
- 商品单位列表
- 删除商品单位
- 编辑商品单位
- 商品单位详情
- 商品评价
- 商品评价列表
- 商品回复
- 删除商品评价
- 评价审核
- 订单管理
- 订单其他列表
- 订单列表
- 订单详情
- 订单确认收货
- 物流查询
- 发货信息
- 取消订单
- 修改价格-订单详情
- 修改运费-订单详情
- 订单发货
- 修改地址
- 商家备注
- 售后
- 售后列表
- 卖家同意售后
- 卖家拒绝售后
- 卖家确认收货
- 卖家拒绝收货
- 卖家同意退款
- 卖家拒绝退款
- 卖家确认退款
- 售后详情
- 用户
- 用户等级
- 用户等级列表
- 添加用户等级
- 用户等级详情
- 编辑用户等级
- 删除用户等级
- 用户标签
- 用户标签列表
- 添加用户标签
- 用户标签详情
- 编辑用户标签
- 删除用户标签
- 用户列表
- 用户搜索条件列表
- 批量设置用户标签
- 用户概况
- 用户详情
- 更新用户基本信息
- 更新用户标签
- 调整用户钱包
- 用户粉丝
- 用户信息-用于邀请人列表
- 我的邀请人列表
- 选择用户列表
- 调整上级分销商
- 营销玩法
- 优惠券
- 新增优惠券
- 编辑优惠券
- 删除优惠券
- 优惠券详情
- 优惠券列表
- 优惠券信息
- 开始领取
- 结束领取
- 卖家发放
- 优惠券概况
- 领取记录
- 作废优惠券
- 秒杀
- 新建秒杀
- 编辑秒杀
- 秒杀详情
- 秒杀数据
- 秒杀列表
- 秒杀概况
- 删除秒杀
- 开始秒杀
- 关闭秒杀
- 拼团
- 拼团概况
- 新建拼团
- 编辑拼团
- 拼团列表
- 拼团详情
- 拼团数据
- 开启拼团
- 关闭拼团
- 拼团记录
- 结束拼团
- 砍价
- 选择商品
- 添加砍价活动
- 砍价活动详情
- 编辑砍价活动
- 确认砍价活动
- 结束砍价活动
- 删除砍价活动
- 砍价活动列表
- 砍价数据
- 活动记录
- 结束砍价
- 砍价概览
- 获取营销模块
- 幸运抽奖
- 获取奖品类型
- 添加活动
- 活动详情
- 编辑活动
- 开始活动
- 结束活动
- 删除活动
- 活动列表
- 活动抽奖记录
- 应用中心
- 分销
- 分销设置
- 获取分销设置
- 设置分销
- 分销商
- 分销商申请列表
- 分销申请详情
- 审核通过
- 审核拒绝
- 分销商列表
- 开通分销
- 冻结/恢复分销资格
- 分销商详情
- 调整分销商界面
- 调整分销商等级
- 查看下级
- 下级列表
- 分销会员等级
- 分销会员等级列表
- 添加分销会员等级
- 分销会员等级详情
- 编辑分销会员等级
- 删除分销会员等级
- 分销商品
- 分销商品列表
- 分销商品详情
- 设置商品佣金
- 参与/取消分销
- 分销订单
- 分销订单列表
- 分销概览
- 充值
- 获取充值设置
- 充值设置
- 充值记录列表
- 充值数据中心
- 签到
- 获取签到设置
- 设置签到规则
- 添加连续签到规则
- 查看连续签到规则详情
- 编辑连续签到规则
- 删除连续签到规则
- 重置说明
- 签到记录
- 数据概览
- 门店自提
- 自提门店
- 添加自提门店
- 编辑自提门店
- 自提门店详情
- 自提门店列表
- 修改自提门店状态
- 删除自提门店
- 腾讯地图区域搜索
- 核销员
- 添加核销员
- 编辑核销员
- 核销员详情
- 核销员列表
- 修改核销员状态
- 删除核销员
- 提货核销
- 提货核销列表
- 提货核销1
- 核销查询
- 核销详情
- 商城公告
- 公告管理
- 添加公告
- 公告列表
- 编辑公告
- 公告详情
- 修改商城公告状态
- 删除公告
- 在线客服
- 获取客服设置
- 客服设置
- 消息通知
- 通知设置列表
- 通知设置详情
- 通知设置
- 获取短信设置列表
- 短信设置详情
- 短信设置
- 获取应用模块
- 快递助手
- 获取面单类型
- 获取面单配置
- 面单设置
- 面单运费支付方式
- 添加电子面单模板
- 电子面单模板详情
- 编辑电子面单模板
- 删除电子面单模板
- 电子面单模板列表
- 添加发件人
- 发件人详情
- 编辑发件人
- 删除发件人
- 发件人列表
- 电子面单打印
- 直播
- 直播间列表(同步直播间)
- 创建直播间
- 上传素材
- 直播商品列表(同步直播间)
- 添加直播商品
- 删除直播商品
- 删除直播间
- 小票打印
- 获取打印机类型
- 添加打印机
- 编辑打印机
- 删除打印机
- 打印机列表
- 添加模板
- 编辑模板
- 删除模板
- 模板列表
- 打印机详情
- 模板详情
- 测试打印
- 订单小票打印
- 自动打印状态切换
- 渠道
- 微信公众号
- 获取微信公众号设置
- 公众号设置
- 获取菜单详情
- 保存/保存并发布
- 新增回复(关注/关词词/默认)
- 编辑回复(关注/关键词/默认)
- 获取回复详情
- 删除回复
- 更新排序
- 回复列表
- 更新状态
- 微信小程序
- 获取小程序配置
- 小程序设置
- H5商城
- 获取H5设置
- H5设置
- APP商城
- 获取APP设置
- APP设置
- 设置
- 商品设置
- 获取商品设置
- 获取交易设置
- 交易设置
- 支付配置
- 获取支付配置
- 支付配置列表
- 获取支付方式
- 设置支付方式
- 获取存储配置信息
- 修改存储参数
- 切换默认存储引擎
- 存储引擎列表
- 获取店铺信息
- 设置店铺信息
- 获取备案信息
- 设置备案信息
- 获取分享设置
- 分享设置
- 获取政策协议
- 添加快递公司
- 快递公司列表
- 编辑快递公司
- 删除快递公司
- 快递公司详情
- 获取物流配置
- 设置物流配置
- 添加运费模版
- 运费模版列表
- 编辑运费模版
- 运费模版详情
- 删除运费模版
- 获取配送方式配置
- 设置配送方式配置
- 获取用户设置
- 设置用户配置
- 获取登录注册配置
- 设置登录注册配置
- 获取提现配置
- 设置提现配置
- 系统日志列表
- 清除系统缓存
- 获取系统更新列表
- 下载更新包
- 一键更新
- 定时任务列表
- 添加定时任务
- 查看定时任务详情
- 编辑定时任务
- 删除定时任务
- 获取规则执行时间
- 操作定时任务
- 添加角色
- 编辑角色
- 删除角色
- 角色列表
- 获取角色详情
- 管理员列表
- 添加管理员
- 编辑管理员
- 删除管理员
- 获取管理员详情
- 店铺DIY
- 移动端
- 获取装修配置
- 设置装修配置
- 装修页面列表
- 新增装修页面
- 编辑装修页面
- 设置装修主页
- 获取装修页面
- 删除装修页面
- 系统主题页列表
- 获取商城页面
- 主题首页
- pc端
- 获取首页装修
- 获取页面
- 设置页面
- 获取pc端页面
- 财务
- 财务概览
- 提现记录
- 提现列表
- 提现详情
- 提现审核拒绝
- 提现审核通过
- 查询结果
- 转账成功
- 转账失败
- 账户流水记录(余额/积分/成长值)
- 获取所有变动类型
- 获取不可提现余额变动类型
- 获取积分类型
- 文件
- 添加文件分类
- 编辑文件分类
- 删除文件分类
- 文件列表
- 移动文件
- 删除文件
- 上传图片
- 获取文件分类列表
- 重命名文件
- 公共接口
- 商品列表
- 公共商品分类列表
- 优惠券列表接口
- 权限
- 获取菜单
- 角色列表1
- 添加权限
- 编辑角色1
- 删除角色1
- 获取角色
- 获取权限
- 数据
- 流量分析
- 用户分析
- 交易分析
- 商品分析
- 商品排行榜
- 小程序
- 登录注册
- 手机号密码/手机号验证码登录
- 退出登录1
- 小程序-静默登录
- 小程序-授权登录
- 公众号-获取授权url
- 公众号-授权登录
- 手机号注册
- 发送验证码-手机号注册
- 发送验证码-手机号登录
- 发送验证码 - 重置登录密码
- 重置登录密码
- 首页
- 商城公告-
- 公告列表-
- 公告详情-
- 访客记录
- 购物车
- 购物车列表
- 添加购物车
- 删除购物车
- 修改购物车商品数量
- 选中购物车
- 购物车数量
- 个人中心
- 优惠券-
- 领券中心
- 领取优惠券
- 我的优惠券
- 结算页优惠券
- 收货地址
- 收货地址列表
- 收货地址详情
- 获取默认地址
- 设置默认地址
- 添加收货地址
- 编辑收货地址
- 删除收货地址
- 省市区名称转id
- 售后-
- 子订单商品信息
- 申请商品售后
- 买家取消售后
- 买家确认退货
- 售后列表-
- 售后详情-
- 分销-
- 填写邀请码
- 申请分销
- 申请详情
- 分销推广主页
- 分销订单列表-
- 月度账单
- 月度账单明细
- 我的粉丝
- 佣金明细
- 收藏
- 收藏列表
- 收藏商品、取消收藏商品
- 提现
- 获取提现配置-
- 提现申请
- 提现申请列表
- 提现申请详情
- 个人设置
- 获取用户信息
- 设置用户信息
- 获取微信手机号
- 设置/修改支付密码
- 发送验证码-找回支付密码
- 重置支付密码
- 获取服务协议
- 获取隐私政策
- 获取版本号
- 发送验证码-绑定手机号
- 绑定手机号
- 个人中心首页
- 会员等级
- 钱包
- 余额转账
- 最近转账记录
- 收款用户信息
- 转账记录
- 账户明细
- 钱包首页
- 判断用户是否有支付密码
- 评价
- 添加商品评价
- 商品评价分类
- 商品评价列表-
- 评价商品列表
- 评价商品信息
- 订单
- 提交订单
- 订单列表-
- 订单详情-
- 取消订单-
- 确认收货
- 物流查询-
- 获取配送方式
- 删除订单
- 充值-
- 充值模板列表
- 充值--
- 充值记录列表-
- 核销
- 核销订单列表
- 订单核销
- 确认提货
- 签到-
- 签到列表
- 签到--
- 获取签到说明
- 积分明细
- 获取客服设置-
- 获取分销海报
- 商品-
- 商品列表-
- 商品详情-
- 搜索记录
- 商品分类列表-
- 商品营销接口
- 清空搜索记录
- 商品品牌列表
- 秒杀-
- 秒杀列表-
- 秒杀详情-
- 拼团-
- 拼团商品列表
- 拼团商品详细情
- 拼团记录-
- 砍价-
- 砍价商品列表
- 砍价商品详情
- 发起砍价
- 帮助砍价
- 砍价记录
- 砍价进度
- 分享帮砍详情
- 店铺DIY-
- 获取主页
- 获取个人中心或商品分类页面
- 获取配置-
- 获取微页面
- 支付
- 支付方式列表
- 预支付
- 公共配置
- 直播间
- 直播间列表
- 小程序码
- 获取字节跳动小程序码
- 获取小程序码
- 幸运抽奖
- 抽奖
- 抽奖记录
- 获取抽奖活动信息
- 中奖名单
- PC端接口
- 装修页面
- 接口说明
- 列表类使用
- 导出功能
