
Spring 和 Spring Boot 的区别很多新手容易搞混,从这道简单的面试题也可以很轻易试探出你的 Java 基础功底,如果连这个问题都答不上来的话,通常就没有什么下文了,因为这已经是用人单位对面试者的最低要求了,所以本课时我们就来看一下二者的区别,以及 Spring Boot 的特性。
我们本课时的面试题是,Spring 和 Spring Boot 有什么区别?Spring Boot 的优点有哪些?
#### 典型回答
作为 Java 开发人员对 Spring 框架都很熟悉,Spring 为 Java 程序提供了全面的基础架构支持,包含了很多非常实用的功能,如 Spring JDBC、Spring AOP、Spring ORM、Spring Test 等,这些模块的出现,大大的缩短了应用程序的开发时间,同时提高了应用开发的效率。
Spring Boot 本质上是 Spring 框架的延伸和扩展,它的诞生是为了简化 Spring 框架初始搭建以及开发的过程,使用它可以不再依赖 Spring 应用程序中的 XML 配置,为更快、更高效的开发 Spring 提供更加有力的支持。Spring Boot 具体的特性如下。
* [ ] Spring Boot 特性一:更快速的构建能力
Spring Boot 提供了更多的 Starters 用于快速构建业务框架,Starters 可以理解为启动器,它包含了一系列可以集成到应用里面的依赖包,你可以一站式集成 Spring 及其他技术,而不需要到处找依赖包。
例如在 Spring 中如果要创建 Web 应用程序的最小依赖项为:
```
<dependency>
<groupId>org.springframework</groupId>
<artifactId>spring-web</artifactId>
<version>xxx</version>
</dependency>
<dependency>
<groupId>org.springframework</groupId>
<artifactId>spring-webmvc</artifactId>
<version>xxx</version>
</dependency>
```
而 Spring Boot 只需要一个依赖项就可以来启动和运行 Web 应用程序,如下所示:
```
<dependency>
<groupId>org.springframework.boot</groupId>
<artifactId>spring-boot-starter-web</artifactId>
</dependency>
```
当我们添加了 Starter 模块支持之后,在项目的构建期,它就会把所有其他依赖项将自动添加到项目中。
这样的例子还有很多,比如测试库,如果是 Spring 项目我们通常要添加 Spring Test、JUnit、Hamcrest 和 Mockito 库;而如果是 Spring Boot 项目的话,只需要添加 spring-boot-starter-test 即可,它会自动帮我们把其他的依赖项添加到项目中。
常见的 Starters 有以下几个:
```
spring-boot-starter-test
spring-boot-starter-web
spring-boot-starter-data-jpa
spring-boot-starter-thymeleaf
```
[点击这里](https://docs.spring.io/spring-boot/docs/current/reference/htmlsingle/#using-boot-starter)访问文档,查看完整的 Starters 列表。
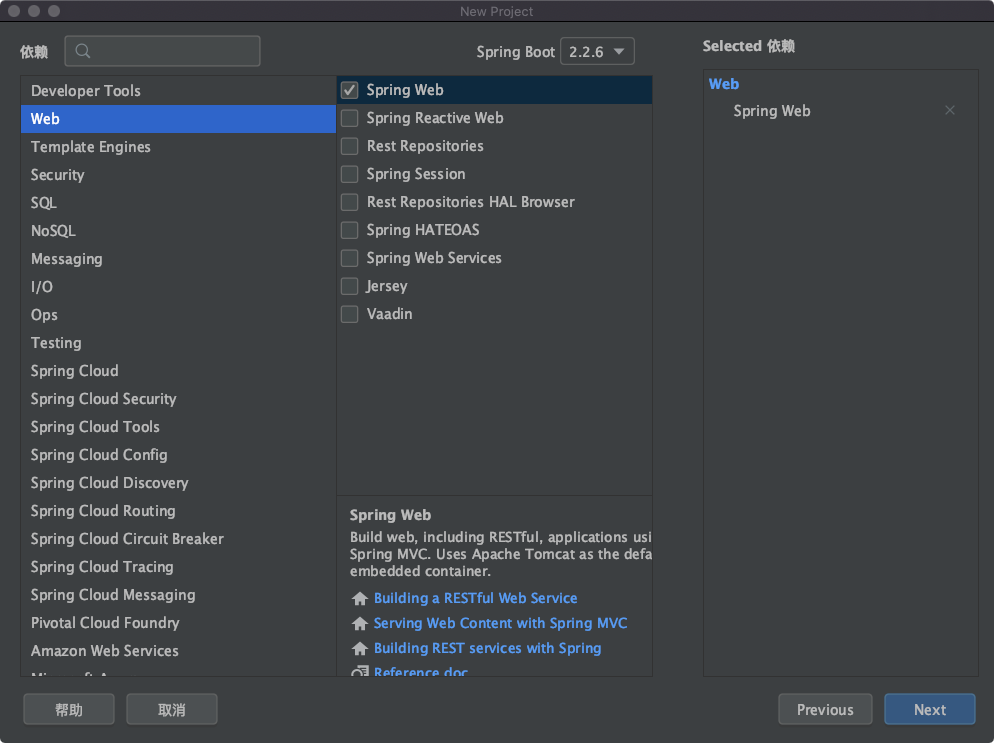
* [ ] Spring Boot 特性二:起步依赖
Spring Boot 提供了起步依赖,也就是在创建 Spring Boot 时可以直接勾选依赖模块,这样在项目初始化时就会把相关依赖直接添加到项目中,大大缩短了查询并添加依赖的时间,如下图所示:
* [ ] Spring Boot 特性三:内嵌容器支持
Spring Boot 内嵌了 Tomcat、Jetty、Undertow 三种容器,其默认嵌入的容器是 Tomcat,这个在我们启动 Spring Boot 项目的时候,在控制台上就能看到,具体信息如下:
```
o.s.b.w.embedded.tomcat.TomcatWebServer :Tomcat started on port(s): 8080 (http) with context path ''
```
可以看出 Spring Boot 默认使用的是 Tomcat 容器启动的。
我们可以通过修改 pom.xml 来移除内嵌的 Tomcat 更换为其他的容器,比如更换为 Jetty 容器,配置如下:
```
<dependency>
<groupId>org.springframework.boot</groupId>
<artifactId>spring-boot-starter-web</artifactId>
<!-- 移处 Tomcat -->
<exclusions>
<exclusion>
<groupId>org.springframework.boot</groupId>
<artifactId>spring-boot-starter-tomcat</artifactId>
</exclusion>
</exclusions>
</dependency>
<!-- 移处 jetty 容器 -->
<dependency>
<groupId>org.springframework.boot</groupId>
<artifactId>spring-boot-starter-jetty</artifactId>
</dependency>
```
当我们添加完成之后,再重新生成 pom.xml 文件,然后再启动 Spring Boot 项目容器信息就变了,如下所示:
```
o.e.jetty.server.AbstractConnector: Started ServerConnector@53f9009d{HTTP/1.1, (http/1.1)}{0.0.0.0:8080}
o.s.b.web.embedded.jetty.JettyWebServer
```
可以看出 Spring Boot 使用了我们指定的 Jetty 容器启动了。
* [ ] Spring Boot 特性四:Actuator 监控
Spring Boot 自带了 Actuator 监控功能,主要用于提供对应用程序监控,以及控制的能力,比如监控应用程序的运行状况,或者内存、线程池、Http 请求统计等,同时还提供了关闭应用程序等功能。
Actuator 提供了 19 个接口,接口请求地址和代表含义如下表所示:

#### 考点分析
很多人都知道 Spring Boot 是基于 Spring 的,使用它可以更加快速高效的构建 Spring,然而当面试官问到 Spring Boot 是如何高效构建 Spring 时,可能大部分人回答不上来了,上面讲解的 Spring Boot 四大特性基本涵盖了此问题的答案。如果面试官继续追问更深的细节的话,可能会问到关于 Spring Boot 执行的源码细节,比如 Spring Boot 的启动流程是怎么样的?
#### 知识扩展
* [ ] Spring Boot 启动源码分析
我们知道 Spring Boot 程序的入口是 SpringApplication.run(Application.class, args) 方法,那么就从 run() 方法开始分析吧,它的源码如下:
```
public ConfigurableApplicationContext run(String... args) {
// 1.创建并启动计时监控类
StopWatch stopWatch = new StopWatch();
stopWatch.start();
// 2.声明应用上下文对象和异常报告集合
ConfigurableApplicationContext context = null;
Collection<SpringBootExceptionReporter> exceptionReporters = new ArrayList();
// 3.设置系统属性 headless 的值
this.configureHeadlessProperty();
// 4.创建所有 Spring 运行监听器并发布应用启动事件
SpringApplicationRunListeners listeners = this.getRunListeners(args);
listeners.starting();
Collection exceptionReporters;
try {
// 5.处理 args 参数
ApplicationArguments applicationArguments = new DefaultApplicationArguments(args);
// 6.准备环境
ConfigurableEnvironment environment = this.prepareEnvironment(listeners, applicationArguments);
this.configureIgnoreBeanInfo(environment);
// 7.创建 Banner 的打印类
Banner printedBanner = this.printBanner(environment);
// 8.创建应用上下文
context = this.createApplicationContext();
// 9.实例化异常报告器
exceptionReporters = this.getSpringFactoriesInstances(SpringBootExceptionReporter.class, new Class[]{ConfigurableApplicationContext.class}, context);
// 10.准备应用上下文
this.prepareContext(context, environment, listeners, applicationArguments, printedBanner);
// 11.刷新应用上下文
this.refreshContext(context);
// 12.应用上下文刷新之后的事件的处理
this.afterRefresh(context, applicationArguments);
// 13.停止计时监控类
stopWatch.stop();
// 14.输出日志记录执行主类名、时间信息
if (this.logStartupInfo) {
(new StartupInfoLogger(this.mainApplicationClass)).logStarted(this.getApplicationLog(), stopWatch);
}
// 15.发布应用上下文启动完成事件
listeners.started(context);
// 16.执行所有 Runner 运行器
this.callRunners(context, applicationArguments);
} catch (Throwable var10) {
this.handleRunFailure(context, var10, exceptionReporters, listeners);
throw new IllegalStateException(var10);
}
try {
// 17.发布应用上下文就绪事件
listeners.running(context);
// 18.返回应用上下文对象
return context;
} catch (Throwable var9) {
this.handleRunFailure(context, var9, exceptionReporters, (SpringApplicationRunListeners)null);
throw new IllegalStateException(var9);
}
}
```
从以上源码可以看出 Spring Boot 的启动总共分为以下 18 个步骤。
* [ ] Spring Boot 的启动流程
* 1.创建并启动计时监控类
此计时器是为了监控并记录 Spring Boot 应用启动的时间的,它会记录当前任务的名称,然后开启计时器。
* 2.声明应用上下文对象和异常报告集合
此过程声明了应用上下文对象和一个异常报告的 ArrayList 集合。
* 3.设置系统属性 headless 的值
设置 Java.awt.headless = true,其中 awt(Abstract Window Toolkit)的含义是抽象窗口工具集。设置为 true 表示运行一个 headless 服务器,可以用它来作一些简单的图像处理。
* 4.创建所有 Spring 运行监听器并发布应用启动事件
此过程用于获取配置的监听器名称并实例化所有的类。
* 5.初始化默认应用的参数类
也就是说声明并创建一个应用参数对象。
* 6.准备环境
创建配置并且绑定环境(通过 property sources 和 profiles 等配置文件)。
* 7.创建 Banner 的打印类
Spring Boot 启动时会打印 Banner 图片,如下图所示:
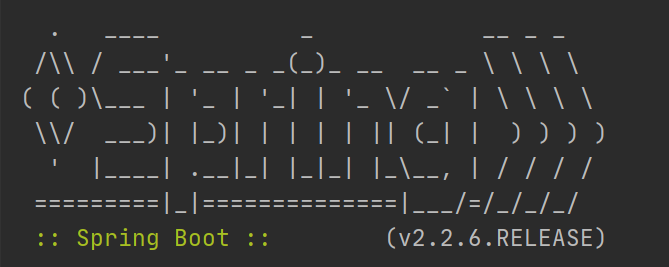
此 banner 信息是在 SpringBootBanner 类中定义的,我们可以通过实现 Banner 接口来自定义 banner 信息,然后通过代码 setBanner() 方法设置 Spring Boot 项目使用自己自定义 Banner 信息,或者是在 resources 下添加一个 banner.txt,把 banner 信息添加到此文件中,就可以实现自定义 banner 的功能了。
* 8.创建应用上下文
根据不同的应用类型来创建不同的 ApplicationContext 上下文对象。
* 9.实例化异常报告器
它调用的是 getSpringFactoriesInstances() 方法来获取配置异常类的名称,并实例化所有的异常处理类。
* 10.准备应用上下文
此方法的主要作用是把上面已经创建好的对象,传递给 prepareContext 来准备上下文,例如将环境变量 environment 对象绑定到上下文中、配置 bean 生成器以及资源加载器、记录启动日志等操作。
* 11.刷新应用上下文
此方法用于解析配置文件,加载 bean 对象,并且启动内置的 web 容器等操作。
* 12.应用上下文刷新之后的事件处理
这个方法的源码是空的,可以做一些自定义的后置处理操作。
* 13.停止计时监控类
停止此过程第一步中的程序计时器,并统计任务的执行信息。
* 14.输出日志信息
把相关的记录信息,如类名、时间等信息进行控制台输出。
* 15.发布应用上下文启动完成事件
触发所有 SpringApplicationRunListener 监听器的 started 事件方法。
* 16.执行所有 Runner 运行器
执行所有的 ApplicationRunner 和 CommandLineRunner 运行器。
* 17.发布应用上下文就绪事件
触发所有的 SpringApplicationRunListener 监听器的 running 事件。
* 18.返回应用上下文对象
到此为止 Spring Boot 的启动程序就结束了,我们就可以正常来使用 Spring Boot 框架了。
#### 小结
本课时首先讲了 Spring 和 Spring Boot 的区别,Spring Boot 本质上是 Spring 的延伸,它是基于 Spring 的,它为快速构建和开发 Spring 提供了有力的支撑;接着介绍了 Spring Boot 的四大特性:更快速的构建能力、起步依赖、内嵌容器支持、Actuator 监控支持等,最后 还介绍了 Spring Boot 启动的 18 个步骤。
#### 课后问答
* 1、磊哥,springBoot 启动的时候比Spring多出来的,有哪些是可以扩展的接口?
讲师回复: springboot 本质上还是 spring,所以他们基本是相同的,只是使用 springboot 有入门依赖和内置容器,使用更方便了。
- 前言
- 开篇词
- 开篇词:大厂技术面试“潜规则”
- 模块一:Java 基础
- 第01讲:String 的特点是什么?它有哪些重要的方法?
- 第02讲:HashMap 底层实现原理是什么?JDK8 做了哪些优化?
- 第03讲:线程的状态有哪些?它是如何工作的?
- 第04讲:详解 ThreadPoolExecutor 的参数含义及源码执行流程?
- 第05讲:synchronized 和 ReentrantLock 的实现原理是什么?它们有什么区别?
- 第06讲:谈谈你对锁的理解?如何手动模拟一个死锁?
- 第07讲:深克隆和浅克隆有什么区别?它的实现方式有哪些?
- 第08讲:动态代理是如何实现的?JDK Proxy 和 CGLib 有什么区别?
- 第09讲:如何实现本地缓存和分布式缓存?
- 第10讲:如何手写一个消息队列和延迟消息队列?
- 模块二:热门框架
- 第11讲:底层源码分析 Spring 的核心功能和执行流程?(上)
- 第12讲:底层源码分析 Spring 的核心功能和执行流程?(下)
- 第13讲:MyBatis 使用了哪些设计模式?在源码中是如何体现的?
- 第14讲:SpringBoot 有哪些优点?它和 Spring 有什么区别?
- 第15讲:MQ 有什么作用?你都用过哪些 MQ 中间件?
- 模块三:数据库相关
- 第16讲:MySQL 的运行机制是什么?它有哪些引擎?
- 第17讲:MySQL 的优化方案有哪些?
- 第18讲:关系型数据和文档型数据库有什么区别?
- 第19讲:Redis 的过期策略和内存淘汰机制有什么区别?
- 第20讲:Redis 怎样实现的分布式锁?
- 第21讲:Redis 中如何实现的消息队列?实现的方式有几种?
- 第22讲:Redis 是如何实现高可用的?
- 模块四:Java 进阶
- 第23讲:说一下 JVM 的内存布局和运行原理?
- 第24讲:垃圾回收算法有哪些?
- 第25讲:你用过哪些垃圾回收器?它们有什么区别?
- 第26讲:生产环境如何排除和优化 JVM?
- 第27讲:单例的实现方式有几种?它们有什么优缺点?
- 第28讲:你知道哪些设计模式?分别对应的应用场景有哪些?
- 第29讲:红黑树和平衡二叉树有什么区别?
- 第30讲:你知道哪些算法?讲一下它的内部实现过程?
- 模块五:加分项
- 第31讲:如何保证接口的幂等性?常见的实现方案有哪些?
- 第32讲:TCP 为什么需要三次握手?
- 第33讲:Nginx 的负载均衡模式有哪些?它的实现原理是什么?
- 第34讲:Docker 有什么优点?使用时需要注意什么问题?
- 彩蛋
- 彩蛋:如何提高面试成功率?