# Consul 服务注册和发现示例
> [https://howtodoinjava.com/spring-cloud/consul-service-registration-discovery/](https://howtodoinjava.com/spring-cloud/consul-service-registration-discovery/)
学习基于 Spring cloud 创建[微服务](https://howtodoinjava.com/microservices/microservices-definition-principles-benefits/),在 [HashiCorp Consul](https://www.consul.io/) 注册表服务器上注册以及其他微服务(发现客户端)如何使用它来注册和发现服务以调用其 API。
我们将使用基于 Spring Boot 的 Spring Cloud API。 我们将使用 Consul 注册表服务器来构建服务注册表服务器和通用发现客户端,后者将自行注册并发现其他服务以调用 REST API。
## 总览
Consul 提供服务发现,配置管理,运行状况检查和键值存储等多种功能。今天,我们将专注于服务注册和发现部分。 我们将开发以下组件来构建分布式生态系统,其中每个组件都相互依赖,但是它们之间的耦合非常松散,当然还有容错能力。
* **Consul 代理** – 在充当发现/注册服务器功能的`localhost`上运行。
* **学生微服务** – 将基于学生实体提供一些功能。 这将是一个基于 REST 的服务,最重要的是它将是一个发现服务客户端,该客户端将与 Consul 服务器/代理对话以在服务注册表中注册自己。
* **学校微服务** – 与学生服务的类型相同 – 唯一增加的功能是它将通过服务查找机制调用学生服务。 我们不会使用学生服务的绝对 URL 与该服务进行交互。 我们将使用 Consul 发现功能,并在调用该功能之前先使用它查找学生服务实例。
这是相同组件的整体组件交互图。
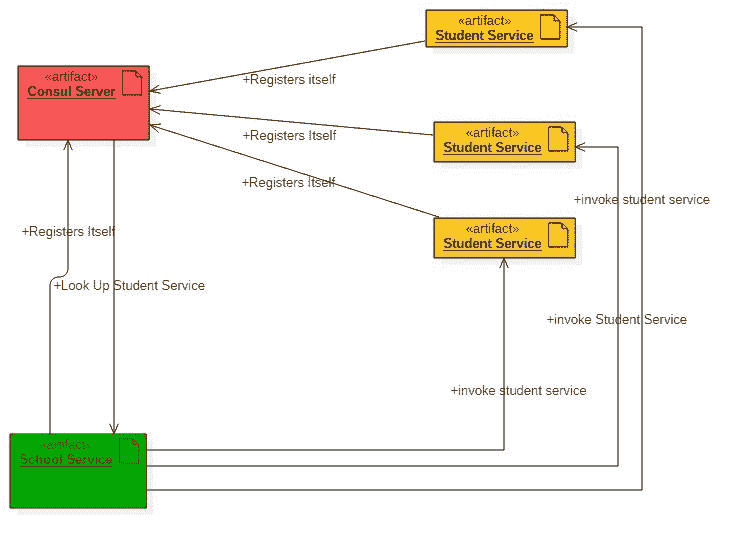
组件图
#### 技术栈和运行时
* Java 1.8
* Eclipse IDE
* Consul 即服务注册服务器
* SpringCloud
* SpringBoot
* SpringRest
* Maven
## 在本地工作站中配置 Consul
在开始练习之前,我们需要首先在`localhost`中下载,配置和运行 consul 代理。
* 从[ Consul 页面网站](https://www.consul.io/downloads.html)下载。 根据操作系统选择特定的程序包。 下载压缩文件后,我们需要将其解压缩到所需位置。
* **在本地工作站上启动 Consul 代理** – 我们已解压缩的 Zip 文件只有一个名为`consul.exe`的 exe 文件。 我们将在此处启动命令提示符,并使用以下命令启动代理。
```java
consul agent -server -bootstrap-expect=1 -data-dir=consul-data -ui -bind=192.168.6.1
```
确保输入正确的绑定地址,根据局域网设置的不同,绑定地址会有所不同。 在命令提示符下执行`ipconfig`以了解您的 **IpV4 地址**,并在此处使用它。

`ipconfig`命令
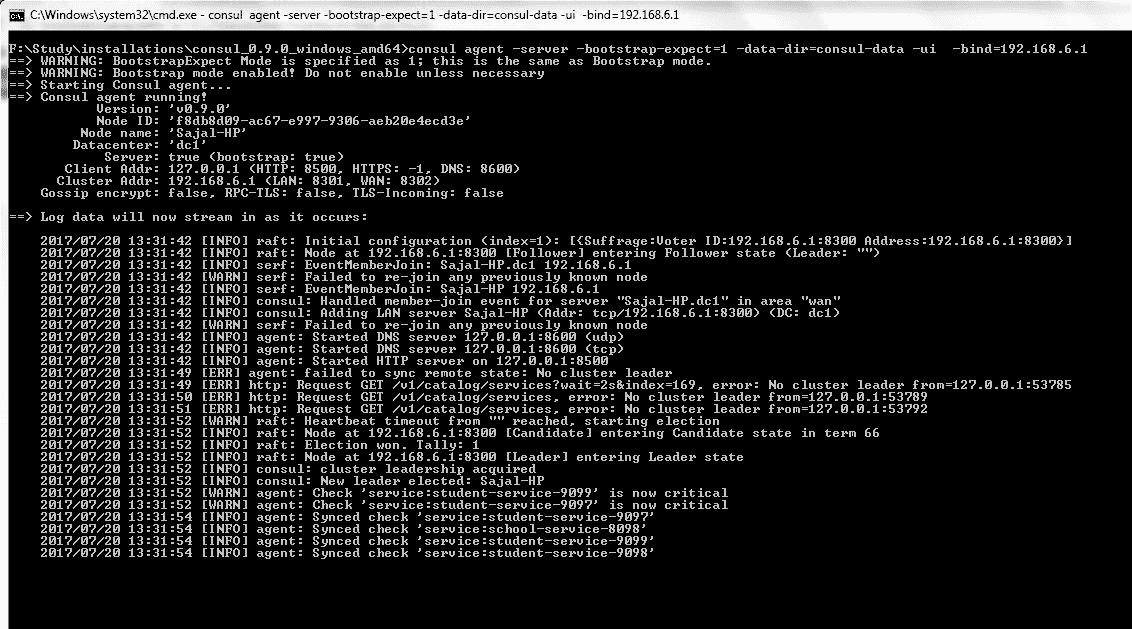
代理启动命令日志
* **测试 Consul 服务器是否正在运行** – Consul 在默认端口上运行,并且代理成功启动后,浏览`http://localhost:8500/ui`,您应该会看到一个 控制台屏幕如:

Consul 控制台 – 没有注册服务
因此,我们已经在本地计算机中配置了 consul,并且 consul 代理已成功运行。 现在,我们需要创建客户端并测试服务注册表和发现部分。
## 学生服务
请按照以下步骤创建和运行学生服务。 这将是一个发现客户端,将其注册到现在已经在我们的计算机中运行的 Consul 服务。
#### 创建学生项目
从具有四个依赖项的[初始化器页面](https://start.spring.io/)创建一个 Spring Boot 项目。
* 执行器
* 网页
* REST 存储库
* Consul 发现
给出其他 Maven GAV 坐标并下载项目。
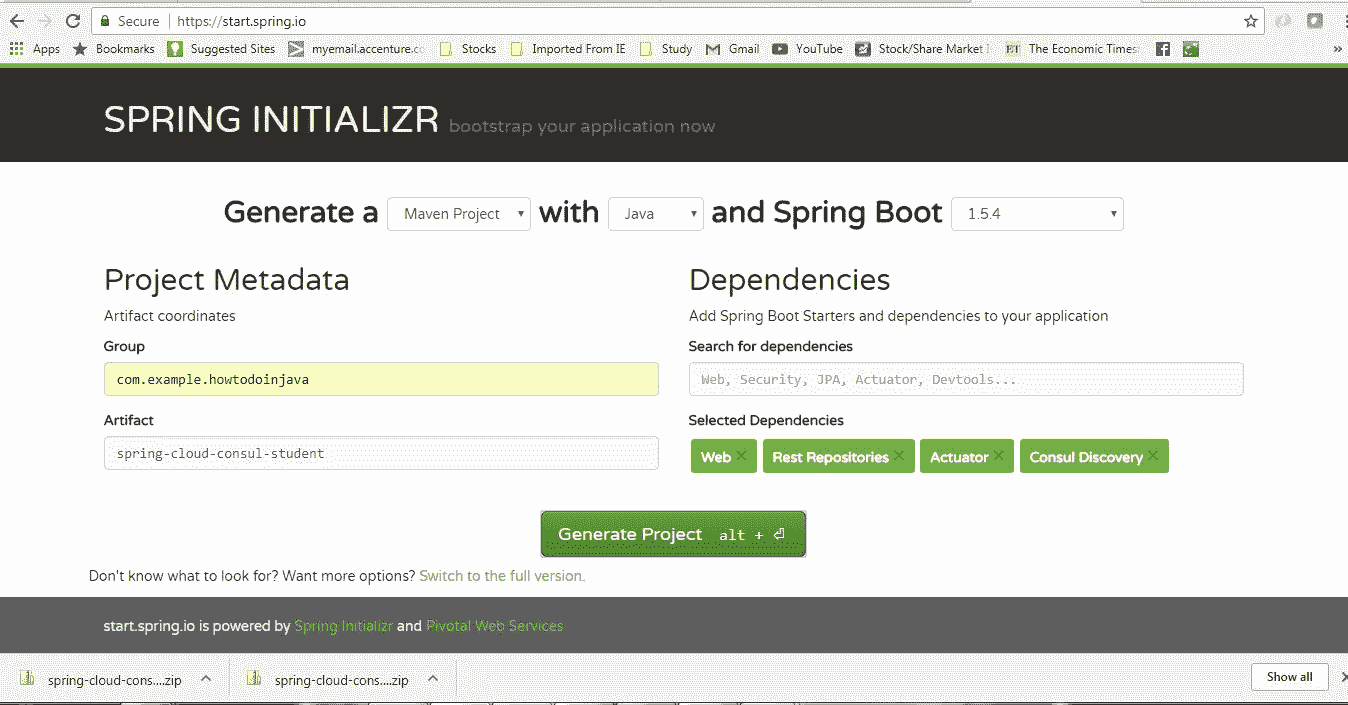
学生服务项目生成
将项目解压缩并将其作为现有的 maven 项目导入 Eclipse。
现在,在`src`文件夹中的 Spring 运行应用程序类上添加`@org.springframework.cloud.client.discovery.EnableDiscoveryClient`注解。 有了此注解,此工件将像 Spring 发现客户端一样发挥作用,并在连接到此服务的 Consul 服务器中注册自己。
```java
package com.example.howtodoinjava.springcloudconsulstudent;
import org.springframework.boot.SpringApplication;
import org.springframework.boot.autoconfigure.SpringBootApplication;
import org.springframework.cloud.client.discovery.EnableDiscoveryClient;
@SpringBootApplication
@EnableDiscoveryClient
public class SpringCloudConsulStudentApplication {
public static void main(String[] args) {
SpringApplication.run(SpringCloudConsulStudentApplication.class, args);
}
}
```
#### 服务配置
打开`application.properties`并添加以下属性
```java
server.port=9098
spring.application.name: student-service
management.security.enabled=false
```
这是每个属性的详细信息:
* `server.port=9098` – 将在默认的 **9098** 端口中启动服务。
* `spring.application.name: student-service` – 将使用`student-service`标签在 Consul 服务器中注册自己,其他服务也将使用此名称本身查找该服务。
* `management.security.enabled=false` – 此练习实际上不是必需的,但是它将在执行器模块提供的管理端点中禁用 SpringSecurity。
#### 添加 REST API
现在添加一个`RestController`并公开一个剩余端点,以获取特定学校的所有学生详细信息。 在这里,我们公开`/getStudentDetailsForSchool/{schoolname}`端点来满足业务目的。 为简单起见,我们正在对学生详细信息进行硬编码。
```java
package com.example.howtodoinjava.springcloudconsulstudent.controller;
import java.util.ArrayList;
import java.util.HashMap;
import java.util.List;
import java.util.Map;
import org.springframework.web.bind.annotation.PathVariable;
import org.springframework.web.bind.annotation.RequestMapping;
import org.springframework.web.bind.annotation.RequestMethod;
import org.springframework.web.bind.annotation.RestController;
import com.example.howtodoinjava.springcloudconsulstudent.domain.Student;
@RestController
public class StudentServiceController {
private static Map<String, List<Student>> schooDB = new HashMap<String, List<Student>>();
static {
schooDB = new HashMap<String, List<Student>>();
List<Student> lst = new ArrayList<Student>();
Student std = new Student("Sajal", "Class IV");
lst.add(std);
std = new Student("Lokesh", "Class V");
lst.add(std);
schooDB.put("abcschool", lst);
lst = new ArrayList<Student>();
std = new Student("Kajal", "Class III");
lst.add(std);
std = new Student("Sukesh", "Class VI");
lst.add(std);
schooDB.put("xyzschool", lst);
}
@RequestMapping(value = "/getStudentDetailsForSchool/{schoolname}", method = RequestMethod.GET)
public List<Student> getStudents(@PathVariable String schoolname) {
System.out.println("Getting Student details for " + schoolname);
List<Student> studentList = schooDB.get(schoolname);
if (studentList == null) {
studentList = new ArrayList<Student>();
Student std = new Student("Not Found", "N/A");
studentList.add(std);
}
return studentList;
}
}
```
**`Student.java`模型**
```java
package com.example.howtodoinjava.springcloudconsulstudent.domain;
public class Student {
private String name;
private String className;
public Student(String name, String className) {
super();
this.name = name;
this.className = className;
}
public String getName() {
return name;
}
public void setName(String name) {
this.name = name;
}
public String getClassName() {
return className;
}
public void setClassName(String className) {
this.className = className;
}
}
```
#### 验证学生服务
作为 spring boot 应用程序启动该项目。 现在,确认此服务已在 Consul 服务器中自动注册。 转到 Consul 代理控制台并刷新页面。 现在,如果一切顺利,我们将在 Consul 代理控制台中看到`student-service`的一项。
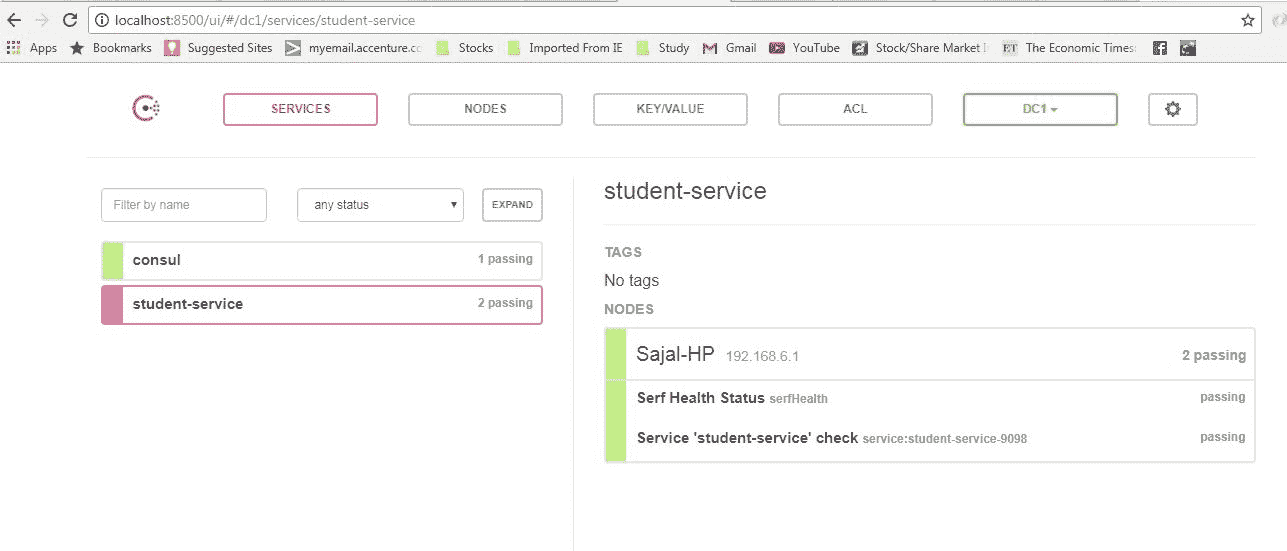
Consul 控制台的学生服务注册
这表明 Consul 服务器和客户端都相互了解,这是 Consul 服务器和学生服务之间发生的一种自动注册和发现。
现在,我们将验证`/getStudentDetailsForSchool/{schoolname}`端点是否已启动并正在运行。 转到浏览器并转到`http://localhost:9098/getStudentDetailsForSchool/abcschool`,它将为特定学校`abcschool`提供学生详细信息。
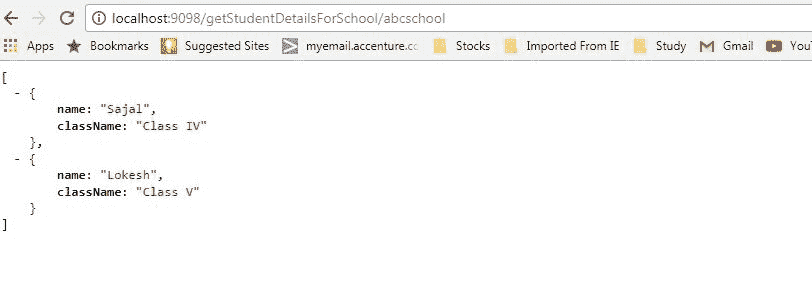
学生服务响应
## 学校服务 – 发现客户端
现在,我们将创建学校服务,该服务将在 Consul 服务器中进行注册-它将发现并调用没有硬编码 URL 路径的学生服务。
请按照相同的步骤创建和运行学校服务。 这将是一个发现客户端,将其注册到现在已经在我们的计算机中运行的 Consul 服务。
它将内部调用已开发的学生服务,并将使用 Consul 服务发现功能来发现学生实例。
#### 创建学校项目
从具有四个依赖项的[初始化器页面](https://start.spring.io/)创建一个 Spring Boot 项目。
* 执行器
* 网页
* REST 存储库
* Consul 发现
给出其他 Maven GAV 坐标并下载项目。
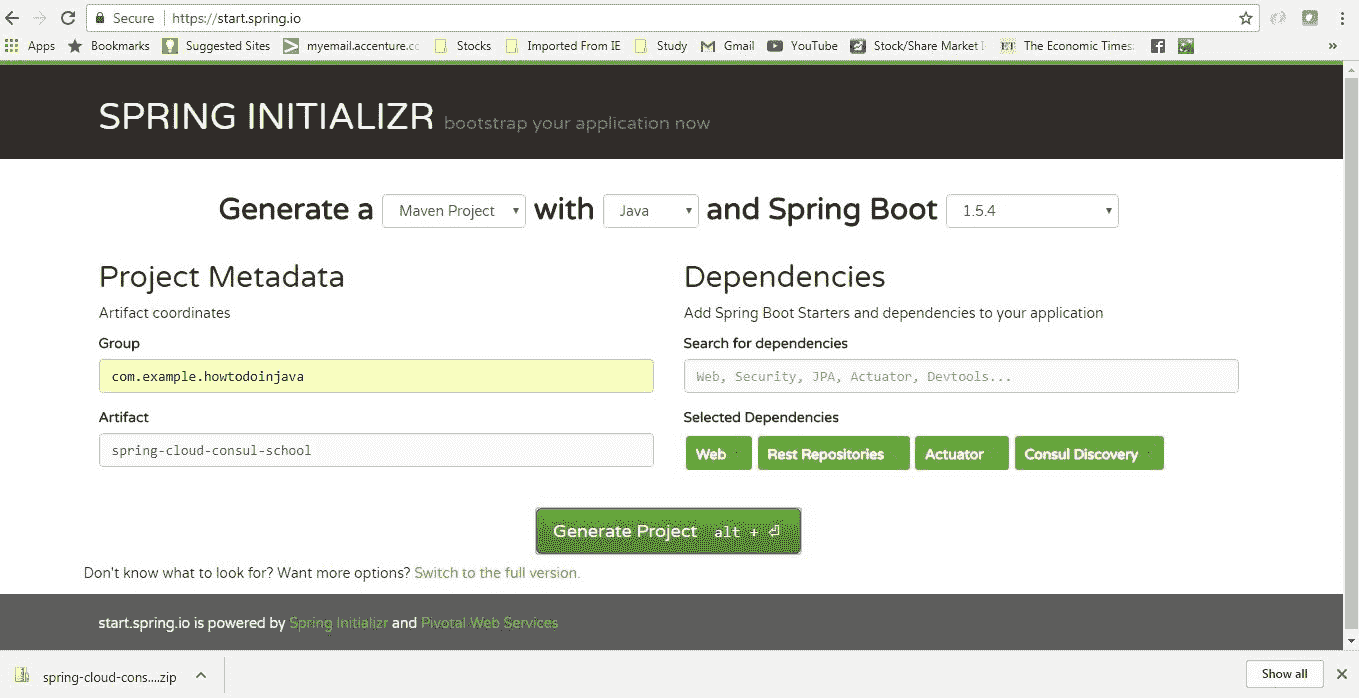
学校生成
将项目解压缩并将其作为现有的 maven 项目导入 Eclipse。
现在,在`src`文件夹中的 Spring 运行应用程序类上添加`@org.springframework.cloud.client.discovery.EnableDiscoveryClient`注解。 有了此注解,此工件将像 Spring 发现客户端一样发挥作用,并在连接到此服务的 Consul 服务器中注册自己。
```java
package com.example.howtodoinjava.springcloudconsulschool;
import org.springframework.boot.SpringApplication;
import org.springframework.boot.autoconfigure.SpringBootApplication;
import org.springframework.cloud.client.discovery.EnableDiscoveryClient;
@EnableDiscoveryClient
@SpringBootApplication
public class SpringCloudConsulSchoolApplication {
public static void main(String[] args) {
SpringApplication.run(SpringCloudConsulSchoolApplication.class, args);
}
}
```
#### 服务配置
打开`application.properties`并添加以下属性
```java
server.port=8098
spring.application.name: school-service
management.security.enabled=false
```
这是每个属性的详细信息:
* `server.port=8098` – 将在默认的 **8098** 端口中启动服务
* `spring.application.name: school-service` – 将使用`school-service`标签在 Consul 服务器中注册自己。
* `management.security.enabled=false` – 将在执行器模块提供的管理端点中禁用 SpringSecurity。
#### 添加使用学生服务的 REST API 的 REST API
现在添加一个`RestController`,并公开一个 REST 点以获取学校详细信息。 该端点将使用带有应用程序名称的服务发现样式 URL,而不是带有`host:port`的完整 URL 约定。
`SchoolServiceController.java`
```java
package com.example.howtodoinjava.springcloudconsulschool.controller;
import org.springframework.beans.factory.annotation.Autowired;
import org.springframework.web.bind.annotation.PathVariable;
import org.springframework.web.bind.annotation.RequestMapping;
import org.springframework.web.bind.annotation.RequestMethod;
import org.springframework.web.bind.annotation.RestController;
import com.example.howtodoinjava.springcloudconsulschool.delegate.StudentServiceDelegate;
@RestController
public class SchoolServiceController {
@Autowired
StudentServiceDelegate studentServiceDelegate;
@RequestMapping(value = "/getSchoolDetails/{schoolname}", method = RequestMethod.GET)
public String getStudents(@PathVariable String schoolname)
{
System.out.println("Going to call student service to get data!");
return studentServiceDelegate.callStudentServiceAndGetData(schoolname);
}
}
```
`StudentServiceDelegate.java`
```java
package com.example.howtodoinjava.springcloudconsulschool.delegate;
import java.util.Date;
import org.springframework.beans.factory.annotation.Autowired;
import org.springframework.cloud.client.loadbalancer.LoadBalanced;
import org.springframework.context.annotation.Bean;
import org.springframework.core.ParameterizedTypeReference;
import org.springframework.http.HttpMethod;
import org.springframework.stereotype.Service;
import org.springframework.web.client.RestTemplate;
@Service
public class StudentServiceDelegate
{
@Autowired
RestTemplate restTemplate;
public String callStudentServiceAndGetData(String schoolname)
{
System.out.println("Consul Demo - Getting School details for " + schoolname);
String response = restTemplate.exchange("http://student-service/getStudentDetailsForSchool/{schoolname}", HttpMethod.GET, null, new ParameterizedTypeReference<String>() {}, schoolname).getBody();
System.out.println("Response Received as " + response + " - " + new Date());
return "School Name - " + schoolname + " ::: Student Details " + response + " - " + new Date();
}
@Bean
@LoadBalanced
public RestTemplate restTemplate() {
return new RestTemplate();
}
}
```
看上面的代码。 在`StudentServiceDelegate`中,我们使用`RestTemplate`调用学生服务,并将学生服务的 URL 用作`http://<font color="RED">student-service/getStudentDetailsForSchool/{schoolname}`。
这样,我们就可以摆脱特定的服务配置,并且可以将服务查找职责赋予`consul`服务器和此处提供的其余模板。 如果多个实例正在为同一服务运行,我们也可以在此处应用负载平衡(请参阅`@LoadBalanced`注解)。
## 示例
逐步执行以下步骤以了解整个过程:
* **检查 Consul Agent 是否仍在运行** – 打开浏览器,然后浏览`http://localhost:8500/ui`。 它应该显示如上所述的 Consul 控制台。
* **检查学生服务是否已运行** – 从 Consul 管理页面和浏览器中检查学生服务是否已启动并正在运行。 如果没有启动该服务,并验证它已在 Consul 服务器中注册。
* **启动并检查学校服务** – 从命令提示符启动学校服务,并检查它是否已在 Consul 服务器中注册。
* 打开浏览器并使用 URL `http://localhost:8098//getSchoolDetails/abcschool`测试学校 REST 服务。 它将给出以下响应,并将使用 Consul 服务在内部调用学生服务。

学校服务响应
* 还可以尝试通过`java -jar "-Dserver.port=9099 target\spring-cloud-consul-student-0.0.1-SNAPSHOT.jar`更改端口来启动多实例学生服务。这些服务也将在consul 中注册,并且因为我们在`RestTemplate`中使用`@LoadBalanced`注解,负载平衡也将在内部完成,请检查相应的学生服务控制台以确认在多实例场景中调用了哪个实例。
一旦我们注册了多个服务和多个实例,Consul 服务器的外观将如此。
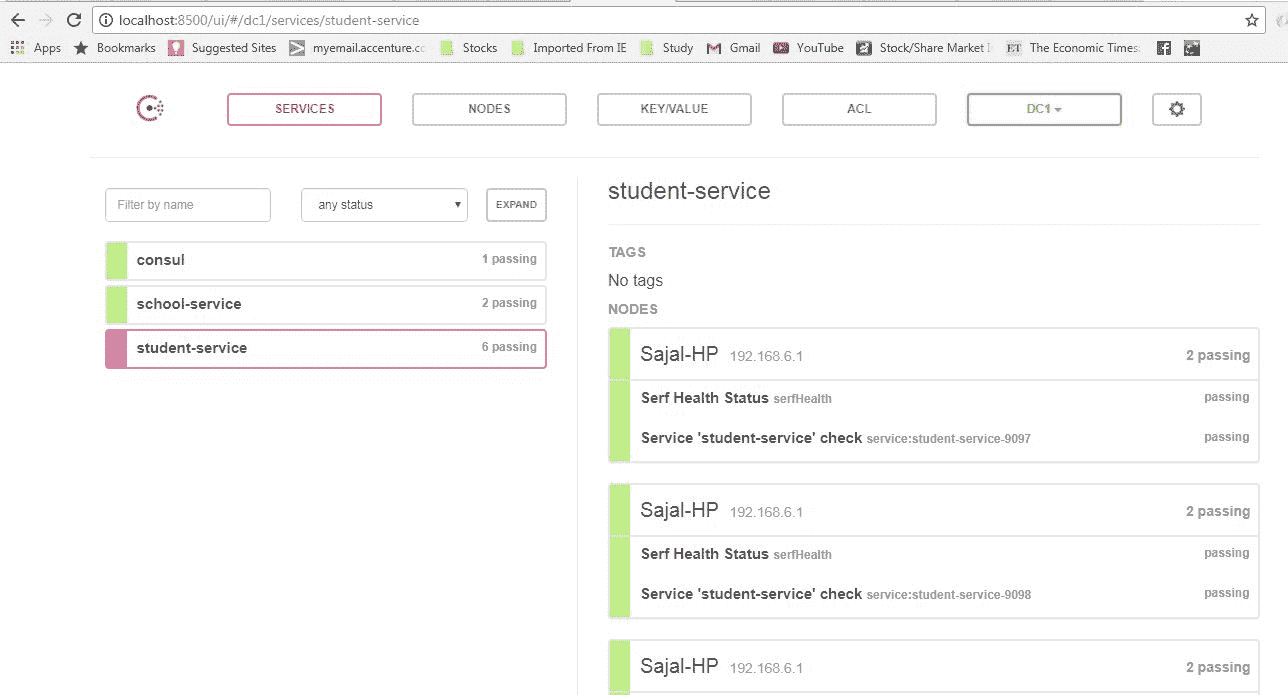
Consul 所有服务正在运行
## 检查是否遇到任何错误的内容
* 注解[`@EnableDiscoveryClient`](https://github.com/spring-cloud/spring-cloud-commons/blob/master/spring-cloud-commons/src/main/java/org/springframework/cloud/client/discovery/EnableDiscoveryClient.java)和 Consul 代理运行是应用程序生态系统的核心。 没有这两个东西将根本无法工作。
* 确保在启动学校服务,学生服务,Consul 服务器时,代理已在运行,否则可能要花一些时间进行注册,并且在测试时可能会造成混淆。
## 总结
我们看到了如何高效地部署 Consul 服务注册表和发现服务器以及客户端。 Spring 框架在内部维护着很多东西。 在这里,我们仅使用几个注解和非常少的配置即可快速完成所有操作。
这就是为 spring 服务创建微服务的服务。
如果您在执行本文时遇到任何困难,请添加注解。 我们将很乐意调查这个问题。
[下载源码](https://howtodoinjava.com/wp-content/uploads/2017/07/Consoul.zip)
祝您学习愉快!
- HowToDoInJava Spring 教程
- Spring 5
- Spring 5 教程
- Spring 5 的新功能和增强功能
- Spring 使用注解配置 Bean
- Spring bean – XML 配置
- Spring – @Lazy加载
- Spring DispatcherServlet – 它是如何工作的?
- Spring @PostMapping示例 – @GetMapping示例
- Spring 5 MVC + Hibernate 5 示例
- Spring 和 CORS
- Spring Security 5 – Java 配置
- Spring Security 5 登录表单示例
- Spring
- Spring 教程
- Spring – IoC 容器
- Spring – 控制反转与依赖注入
- Spring 5 – Bean 范围
- Spring – Bean 生命周期
- Spring BeanPostProcessor示例
- SpringBean 自动装配 – @Autowired
- Spring 注解
- Spring – 原型注解
- Spring @Scheduled – 安排任务的 4 种方法
- Spring 定时器任务
- Spring – 应用事件
- Spring i18n – ResourceBundleMessageSource
- Spring ResourceLoaderAware - 在 Spring 中读取文件
- Spring 属性编辑器 – CustomEditorConfigurer示例
- Spring – 使用JavaMailSender发送电子邮件
- Spring 的无版本模式(最新版本)
- Spring 面试问答
- 编写配置文件的 13 个 Spring 最佳实践
- SpringBoot 2
- SpringBoot 教程
- spring-boot-starter-parent示例
- spring-boot-starter Maven 模板
- Spring Boot 多模块 Maven 项目示例
- Spring Boot 注解
- Spring Boot2 @SpringBootApplication自动配置
- Spring Boot 和 AOP
- Spring Boot 日志指南
- Spring Boot Devtools 教程
- Spring Boot WAR 包示例
- Spring Boot 2 REST API 示例
- Spring Boot Crud 操作示例与 Hibernate
- Spring Boot 2 – OAuth2 Auth 和资源服务器
- 在 Spring Boot 2 中进行测试
- Spring RestTemplate – Spring REST 客户端示例
- Spring Boot – CRUD 应用程序
- Spring Boot Hibernate 配置示例
- Spring Boot – 数据源配置
- Spring Boot 异常处理 – @ExceptionHandler示例
- Spring Boot 缓存示例教程
- 使用 Spring Boot 的 SpringRetry 模块示例
- Spring Boot Security Rest 基本身份验证示例
- Spring Boot 和 H2 数据库
- Spring Boot 2 和 ehcache 3 示例
- Spring Boot 2 与 Gson
- Spring Boot Remoting – Spring RMI 注解示例
- SpringBoot – 发送带有附件的电子邮件
- Spring Boot 面试问题
- SpringBoot
- SpringBoot – CommandLineRunner接口示例
- Spring Boot – 配置 Jetty 服务器
- Spring Boot 更改嵌入式服务器的默认端口
- Spring Boot – 更改上下文路径
- Spring Boot SSL(HTTPS)示例
- Spring Boot – 获取所有已加载的带有类类型信息的 bean
- Spring Boot – 自定义PropertyEditor配置示例
- Spring Boot @Scheduled注解示例
- Spring Boot Jersey 示例
- Spring Boot SOAP Web 服务示例
- Spring Boot SOAP 客户端 – WebServiceTemplate示例
- 带有嵌入式 ActiveMQ 的 Spring Boot JMSTemplate
- Spring Boot Hello World 示例 – Spring Boot REST 示例
- Spring Boot JSP 视图解析器示例
- SpringBoot – 执行器
- Spring Boot – 带有 JAX-RS 注解的基于角色的安全性
- Spring Boot RSS feed 和 ROAM
- Spring Boot ehcache 2 示例
- SpringBatch
- Spring Batch + Spring Boot Java 配置示例
- Spring Batch 事件监听器
- Spring Batch ItemProcessor示例
- 使用 Spring TaskScheduler进行 Spring Batch 作业调度
- Spring Batch Quartz Java 配置示例
- Spring Batch + Quartz + H2 Jdbcjobstore 示例
- 在 Quartz 作业中注入 Spring 依赖项
- Spring Batch FlatFileItemReader – 读取 CSV 示例
- Spring Batch FlatFileItemWriter – 写入 CSV 文件
- Spring Batch MultiResourceItemReader – 读取多个 CSV 文件示例
- Spring Batch 读取后删除或存档文件
- Spring Batch 已处理记录的计数示例
- Spring Batch CSV 到数据库 – Java 注解配置示例
- Spring Cloud
- 微服务 – 定义,原理和优势
- 服务监控 – Hystrix,Eureka 管理员和 Spring Boot 管理员
- Hoverfly – 微服务虚拟化示例
- ELK 堆栈示例教程
- Docker 的 Hello World 示例
- 集成 Git 的 Spring Cloud Config Server
- 使用 Netflix Eureka 进行 Spring Cloud 服务发现
- Consul 服务注册和发现示例
- Hystrix 断路器模式 – SpringCloud
- 如何将 Spring Boot 应用程序部署到 Cloud Foundry 平台
- Netflix Zuul 示例 – Zuul API 网关模式 – Spring Cloud 教程
- Spring Cloud Zipkin 和 Sleuth 示例
- Spring cloud ribbon 和 Eureka – 客户端负载均衡器示例
- Spring AOP
- Spring AOP 教程示例
- Spring AOP – AspectJ 注解配置示例
- Spring AOP + AspectJ XML 配置示例
- Spring AOP AspectJ @Before注解示例
- Spring AOP AspectJ @After注解示例
- Spring AOP AspectJ @Around注解示例
- Spring AOP AspectJ @AfterReturning注解示例
- Spring AOP AspectJ @AfterThrowing示例
- Spring AOP 事前建议示例
- Spring AOP 事后建议示例
- Spring AOP 围绕建议示例
- Spring AOP 返回后建议示例
- Spring AOP 抛出后建议示例
- Spring AOP AspectJ 切入点表达式示例
- Spring AOP – 切面顺序
- 带有加载时织入的非公开方法上的 Spring 事务
- Spring 热门 AOP 面试问题及答案
- Spring MVC
- Spring MVC 教程
- Spring MVC Hello World 示例
- 使用 Maven 和 JSTL 的 Spring MVC Hello World 示例
- Spring @RequestMapping注解示例
- Spring MVC 自定义验证器示例
- Spring Bean 验证 – JSR-303 注解
- Spring MVC 填充和验证下拉列表示例
- Spring MVC 示例 – 显示,验证和提交表单
- Spring MessageSourceAware Java Bean 示例
- Spring MVC XmlViewResolver配置示例
- Spring MVC 国际化(i18n)和本地化(i10n)示例
- Spring MVC 拦截器示例 – XML 和 Java 注解配置
- Spring HandlerInterceptor示例
- Spring MVC 在 ajax 和 jquery 中使用进度条上传多个文件
- Spring MVC 多文件上传示例
- Spring MVC 下载文件控制器示例
- Spring MVC 面试问题与答案
- Spring MVC InternalResourceViewResolver配置示例
- Spring MVC ResourceBundleViewResolver配置示例
- Spring MVC SimpleMappingExceptionResolver示例
- Spring MVC:<context:annotation-config>与<context:component-scan>
- ContextLoaderListener与DispatcherServlet
- SpringSecurity
- SpringSecurity 教程
- 具有保护切入点的 Spring 方法安全性
- Spring Security Siteminder 预身份验证示例
- Spring Security 登录表单示例
- 使用 JSP Taglibs 的 Spring 视图层安全
- Spring Security – JDBC 用户服务示例
- Spring Security UserDetailsService示例
- Spring Security 基本身份验证示例
- 使用 JUnit 测试 Spring Security Auth
- 使用@PreAuthorize和@Secured的 Spring 方法安全性
- Spring ORM
- Spring 3.2.5 AbstractRoutingDataSource示例
- Spring 3 和 Hibernate 4 集成示例教程
- Spring Hibernate 集成示例
- Spring REST
- Spring REST JSON 响应示例
- Spring REST XML 响应示例
- Spring REST 控制器示例
- 使用 JPA 配置的 Spring REST CRUD 示例
- Spring REST 异常处理示例
- Spring REST 请求主体和参数验证示例
- Spring REST 自定义令牌认证示例
- Spring REST – 多部分上传和下载示例
- Spring REST Multipart – 多部分上传示例
- Spring REST – HTTP OPTIONS 请求处理器示例
- Spring REST – 访问被拒绝请求的 JSON 响应
- Spring RestTemplate – Spring REST 客户端示例
- Spring WebFlux
- Spring WebFlux 教程
- Spring Boot WebFlux WebSocket 示例
- 使用@WebFluxTest和WebTestClient进行 Spring Boot Webflux 测试
- HowToDoInJava Java 教程
- 核心 Java 教程
- 什么是 Java 编程语言?
- 什么是 Java JDK,JRE 和 JVM – 深入分析
- Java 命名约定
- Java 类路径
- Java 变量
- Java 运算符指南
- Java 关键字
- Java 中的数据类型
- Java 中的原始数据类型
- Java 包装器类 – 自动装箱,拆箱和转换示例
- Java 中的语句类型
- Java 控制流语句
- Java 中的标签语句
- Java 字符串类指南
- Java 创建类 – 如何创建对象?
- 如何在 Java 中创建不可变的类
- Java main()方法
- Java 注释
- Java 按值传递与按引用传递
- Java 系统属性
- Java 静态 – 变量,方法,块,类和导入语句
- Java 中的静态导入语句
- Java hashCode()和equals() – 契约,规则和最佳实践
- Java this和super之间的区别
- 32 位 Java 与 64 位 Java 之间的区别
- java.exe和javaw.exe之间的区别
- Java 查看/生成类文件的字节码
- Java 中的小端和大端
- Java 命令行参数
- 在 Java 中比较浮点数或双精度数的正确方法
- Java 递归指南
- Java 偶对
- Java 元组 – 使用 Java 中的元组
- sun.misc.Unsafe类的用法
- Java UUID 生成器示例
- Java 12 教程
- Java 12 – 新特性和增强特性
- 收集器teeing()方法示例
- 字符串indent(count) – Java 中的行左缩进
- 精简数字格式
- Java 11 教程
- Java 11 的新特性和增强特性
- String.isBlank() – 在 Java 中检查空白或空字符串
- String.lines() – 获取行流 – Java 11
- String.repeat() – 在 Java 中重复字符串 N 次
- String.strip() – 删除开头和结尾的空格
- 文件readString() API – 将文件读取为 Java 中的字符串
- 文件writeString() API – 用 Java 将字符串写入文件
- Java 10 教程
- Java 10 特性和增强特性
- Java 版本 – 基于时间的发行版本控制
- Java var – 局部变量类型推断
- Java 9 教程
- Java 9 特性和增强特性
- Java 9 – 精简字符串改进 [JEP 254]
- Java 模块教程
- Java 9 – JShell
- Java – 日期流
- Java 9 Stream API 的改进
- Java 9 中的不可变集合和工厂方法
- 接口中的私有方法 – Java 9
- Java 8 教程
- Java 8 教程
- Java 8 forEach
- Java 8 流 API
- Java 流装箱示例
- Lambda 表达式
- Java 8 – 函数式接口
- Java 8 方法引用示例
- Java 默认方法教程
- Java 8 Optional:完整参考
- Java 谓词示例 – 谓词过滤器
- Java 8 – 日期和时间示例
- Java 8 列出目录中的所有文件 – 六个示例
- Java 8 – 逐行读取文件
- Java 8 写入文件示例
- Java WatchService API 教程
- Java 8 解析字符串为日期
- Java 8 – 连接字符串数组 – 将数组转换为字符串
- Java Base64 编码和解码示例
- Math 类中的 Java 精确算术运算支持
- Java 8 带有 lambda 的Comparator示例
- 使用Pattern.compile()方法将 Java 正则表达式作为谓词
- Java 字符串连接(CSV)示例
- Java 8 两个日期之间的差异
- Java – 内部与外部迭代
- Java 中的安全随机数生成
- Java 7 教程
- Java 7 的更改,特性和增强
- Java 菱形运算符 – Java 中的<>运算符
- 带字符串的 Java switch case
- Java 7 中的try-with-resources
- Java 7 中数字字面值的下划线
- Java 抑制异常示例
- Java 7 – 异常处理增强
- Fork/Join 框架教程:ForkJoinPool示例
- 自动重新加载属性的 Java WatchService示例
- 面向对象原则
- Java OOP 概念 – 面向对象的原则
- Java 访问修饰符
- Java 构造器
- Java 实例初始化器块
- Java 中的抽象示例
- Java 封装与抽象
- Java 继承
- Java 多态示例
- Java 方法重载与方法重载
- 接口与 Java 中的抽象类
- Java extends与implements关键字
- Java instanceof运算符
- Java 中的多重继承
- 关联,聚合和组合
- Java 并发指南
- Java 并发教程
- Java 多线程的发展和主题
- Java 并发性 – 线程安全性?
- 并发与并行
- Java 比较和交换示例 – CAS 算法
- Java synchronized关键字
- Java 中的对象级别锁与类级别锁
- Java 中Runnable与Thread之间的区别
- 如何在 Java 中使用wait(),notify()和notifyAll()?
- Java 并发性 – yield()和join()之间的区别
- Java 中 sleep()和wait()之间的区别
- 锁和监视器之间的区别 – Java 并发
- Java Callable Future示例
- 如何使用UncaughtExceptionHandler重新启动线程
- 使用ThreadPoolExecutor和Semaphore限制任务提交率
- Java 执行器框架教程和最佳实践
- Java 线程间通信 – PipedReader和PipedWriter
- Java 死锁示例和解决方案
- Java 集合
- Java 中的集合
- Java 中的数组
- Java ArrayList指南
- Java LinkedList类
- Java HashMap指南
- Java Hashtable类
- Java LinkedHashMap类
- Java TreeMap类
- Java HashSet类
- Java LinkedHashSet类
- Java TreeSet类
- Java Comparable接口示例
- Java Comparator接口示例
- Java Iterator接口示例
- Java ListIterator接口
- Java Spliterator接口
- Java PriorityQueue类
- Java PriorityBlockingQueue类
- Java ArrayBlockingQueue类
- Java TransferQueue – Java LinkedTransferQueue类
- Java CopyOnWriteArrayList类
- Java CopyOnWriteArraySet类
- 如何在 Java 中对数组,列表,映射和集合进行排序
- Java 面试的 40 个热门问答集
- Java IO 教程
- Java IO 教程和示例
- Java I/O 如何在较低级别上内部工作?
- Java 标准 IO 与 Java NIO
- 如何在 Java 中复制目录
- 用 Java 递归删除目录
- Java – 创建新文件
- Java – 写入文件
- Java – 附加到文件
- Java 创建只读文件示例
- Java 将文件读取为字符串(已针对 Java 8 更新)
- Java 将文件读取到byte[]数组
- Java – 逐行读取文件 – LineNumberReader
- Java BufferedReader示例
- Java – BufferedWriter
- Java 读写属性文件示例
- 从资源文件夹读取文件 – Spring 示例
- Java – 读写 UTF-8 编码数据
- Java 中如何检查文件是否存在
- Java 文件复制 – 用 Java 复制文件的 4 种方法
- Java FilenameFilter示例 – 查找/删除某些扩展名的文件
- Java FileFilter示例
- Java – 创建临时文件
- Java – 写入临时文件
- Java – 删除临时文件
- Java – 读取控制台输入
- Java – 使用Scanner类读取类型安全输入
- 在 Java 中将字符串转换为InputStream
- 在 Java 中将InputStream转换为字符串
- Java – 创建受密码保护的 Zip 文件
- Java – 解压缩带有子目录的文件
- 使用 Java 在 Linux 中管理不超过 N GB 的系统日志文件
- 在 Java 中生成 SHA 或 MD5 文件校验和哈希
- Java 日期时间教程
- Java – 日期和时间 API
- Java – 日期验证
- Java – 日期格式
- Java LocalDate类
- Java LocalTime类
- Java LocalDateTime类
- Java ZonedDateTime类
- Java 8 – Period
- Java 8 DateTimeFormatter
- Java 8 – TemporalAdjusters
- Java 8 – TemporalQuery
- Java 8 – DayOfWeek
- Java 日期 – 解析,格式和转换
- Java 语言环境 – 创建和设置默认语言环境
- Java 枚举教程
- Java 枚举
- 带有字符串值的 Java 枚举
- 枚举真的是最好的单例吗?
- 枚举器和迭代器之间的区别?
- Java 异常
- Java try-finally块
- Java throw关键字
- Java 受检与非受检的异常
- Java 同步和异步异常
- Java NullPointerException - 如何在 Java 中有效处理空指针
- Java 自定义异常 – 最佳实践
- 构造器可以声明初始化器块中引发的受检异常
- Java 泛型教程
- 完整的 Java 泛型教程
- Java 泛型 PECS - 生产者extends消费者super
- Java 垃圾回收
- Java 垃圾收集算法(直到 Java 9)
- JVM 内存模型/结构和组件
- Java 内存管理 – 垃圾回收算法
- Java 序列化教程
- Java 序列化 – 执行正确的序列化
- Java serialVersionUID – 如何生成serialVersionUID
- Java 外部化示例 – 更有效的序列化
- Java 中Externalizable与Serializable之间的区别
- 将 Java 对象序列化为 XML – XMLEncoder和XMLDecoder示例
- Java 中反序列化过程如何发生?
- 使用readObject和writeObject的 Java 自定义序列化
- 使用内存序列化的 Java 深层复制
- 字符串方法
- Java String.concat()方法示例
- Java String.hashCode()方法示例
- Java String.contains()方法示例
- Java String.compareTo()方法示例
- Java String.compareToIgnoreCase()方法示例
- Java String.equals()方法 – 字符串比较
- Java String.equalsIgnoreCase()方法 – 不区分大小写的比较
- Java String.charAt()方法示例
- Java String.indexOf()方法示例
- Java String.lastIndexOf()方法示例
- Java String.intern()方法示例
- Java String.split()方法示例
- Java String.replace()方法示例
- Java String.replaceFirst()方法示例
- Java String.replaceAll()方法示例
- Java String.substring()方法示例
- Java String.startsWith()示例
- Java String.endsWith()方法示例
- Java String.toUpperCase()方法示例
- Java String.toLowerCase()方法示例
- Java 正则表达式教程
- Java 正则表达式教程
- Java 仅允许字母数字字符的正则表达式
- Java 正则表达式 – 信用卡号验证
- Java 正则表达式 – 加拿大邮政编码验证
- 货币符号的 Java 正则表达式
- 使用 Java 正则表达式进行日期验证
- 使用 Java 正则表达式进行电子邮件验证
- Java 正则表达式密码验证示例
- 适用于希腊语扩展或希腊语脚本的 Java 正则表达式
- 验证 ISBN(国际标准书号)的 Java 正则表达式
- 检查输入文本的最小/最大长度的 Java 正则表达式
- 限制文本中的行数的 Java 正则表达式
- 限制输入中的单词数的 Java 正则表达式
- 验证 SSN(社会安全号码)的 Java 正则表达式
- Java 正则表达式 – 英国邮政编码验证
- Java 正则表达式 – 美国邮政编码验证
- 验证商标符号的 Java 正则表达式
- 验证国际电话号码的 Java 正则表达式
- 北美电话号码的 Java 正则表达式
- Java NIO 教程
- NIO 教程
- 如何创建路径 – Java NIO
- 使用缓冲区 – Java NIO 2.0
- Java 通道教程 – NIO 2.0
- 3 种读取文件的方法 – Java NIO
- Java 8 – 逐行读取文件
- Java 内存映射文件 – Java MappedByteBuffer
- Java NIO – 分散/聚集或向量 IO
- 通道之间的数据传输 – Java NIO
- HowToDoInJava 其它教程
- Maven 教程
- 如何在 Windows 上安装 Maven
- Maven – 设置文件
- Maven – 依赖管理
- Maven 依赖范围
- Maven - POM 文件
- Maven – 父子 POM 示例
- Maven – 本地,远程和中央仓库
- Maven 本地仓库位置以及如何更改?
- M2_REPO – 在 Eclipse 中更改 Maven 仓库的位置
- Maven 代理设置 – Eclipse,命令行和全局设置
- Maven 强制最低 Java 版本
- Maven 创建 Java 项目 – 交互式与非交互式模式
- 在 Eclipse 中逐步创建 Maven Web 项目
- 多模块 Maven 项目 – 控制台
- Eclipse 中的 Maven 多模块项目
- Maven – 创建 Java 源文件夹
- Maven BOM – 物料清单依赖项
- 在 Eclipse 中导入 Maven 远程原型目录
- Eclipse 项目中的 Maven 自定义原型
- 已解决:Java 编译器级别与已安装的 Java 项目方面的版本不匹配
- Maven ant 插件 – 从pom.xml生成build.xml
- Maven IntelliJ IDEA 项目
- Spring MVC JSTL 配置示例
- Tomcat Maven 插件示例
- Maven – Spring Boot 胖/Uber Jar
- Maven Shade 插件 – UberJar/胖 Jar 示例
- Maven – 删除所有损坏的 jar/依赖项
- Gradle 教程 – 安装和 HelloWorld 示例
- Log4j2 教程
- Log4j2 JSON 配置示例
- Log4j2 属性文件示例
- Log4j2 xml 配置示例
- Log4j2 RollingFileAppender示例
- Log4j2 多个附加器示例
- Log4j2 LevelRangeFilter示例
- Log4j2 HTMLLayout配置示例
- Log4j2 ThreadContext – 相同事务的鱼标日志
- Log4j2 – 有用的转换模式示例
- 为 JUnit 测试用例配置 Log4j2
- Log4j 教程
- log4j.properties示例 – Log4j 属性文件示例
- log4j.xml示例 – Log4j xml 配置示例
- Log4j Maven 配置示例
- Log4j 日志级别 – Log4j2 日志级别示例
- Log4j ConsoleAppender配置示例
- Log4jRollingFileAppender配置示例
- Log4j SocketAppender和套接字服务器示例
- Log4j JDBCAppender – 在数据库中创建日志
- Log4j XMLLayout – 以 XML 格式创建日志
- Log4j HTMLLayout – 以 HTML 格式创建日志
- Log4j – 在运行时重新加载日志记录级别
- SLF4j 与 Log4j – 哪个更好?
- RESTEasy + Tomcat 7 + Log4j 日志记录示例
- Dropwizard 教程
- Dropwizard 教程
- Dropwizard 教程 – HelloWorld 示例
- Dropwizard – BasicAuth 安全示例
- Dropwizard 运行状况检查配置示例
- Dropwizard 客户端 – Jersey/HTTP 配置和示例
- [已解决] Dropwizard – 无法解析配置(无法将类型 ID “http”解析为子类型)
- RESTEasy 教程
- JAX-RS 2.0 教程
- RESTEasy + JBOSS 7 HelloWorld 应用
- 面向初学者的 RESTEasy 示例教程
- JAX-RS @Path URI 匹配 – 静态和正则 URI
- Java REST HATEOAS 示例
- RESTEasy + Tomcat 7 + SLF4J 日志示例
- RESTEasy + Tomcat 7 + Log4j 记录示例
- RESTEasy - 文件下载示例
- RESTEasy 文件上传 - HTML 表单示例
- RESTEasy 文件上传 - HttpClient示例
- 使用 Ajax 的 JAX-RS 自定义验证示例
- 使用 Hibernate 验证器供应器进行 RESTEasy Bean 验证
- RESTEasy ContainerRequestFilter - RESTEasy 安全过滤器示例
- RESTEasy 基本认证和授权教程
- RESTEasy JAXB XML 示例
- RESTEasy Jettison JSON 示例
- Jackson 的 RESTEasy JSON 示例
- RESTEasy ExceptionMapper – 异常处理示例
- RESTEasy 客户端 API
- 使用java.net包的 RESTful 客户端
- 使用 RESTful API 的 RESTEasy 客户端
- Apache HttpClient GET 和 POST 示例
- RESTEasy Javascript/Ajax 客户端演示
- JAX-RS 2.0 RESTEasy 3.0.2.Final 客户端 API 示例
- RESTEasy 最佳实践
- RESTEasy - 与ResteasyProviderFactory共享上下文数据
- RESTEasy ExceptionMapper – 异常处理示例
- 使用 ETag 的 RESTEasy 缓存控制示例
- RESTEasy – 启用 Gzip 压缩内容编码
- 比较 SOAP 与 RESTful Web 服务
- Jersey 教程
- Jersey HelloWorld 例子
- Jersey2 HelloWorld 示例 – Jersey2 教程
- jersey-quickstart-webapp HelloWorld 示例
- Jersey 使用过滤器记录请求和响应实体
- Jersey - 如何在 REST API 响应中设置 Cookie
- Jersey 文件下载示例 – StreamingOutput
- Jersey 文件上传示例 – Jersey2 MultiPartFeature
- Jersey - Ajax 多文件上传示例
- Jersey 异常处理 – Jersey ExceptionMapper示例
- Jersey + MOXy JSON 示例
- Jersey + JSONP 示例
- Jersey + Google Gson 示例
- Jersey REST API 安全示例
- Jersey 客户端
- Jersey 客户端示例 – Jersey2 客户端 API
- Jersey REST 客户端认证示例
- Jersey 客户端 - 设置 Cookie 示例
- JDBC 教程
- Java JDBC 教程
- Java – JDBC 连接示例(MySQL)
- Java – JDBC 驱动类型
- JDBC SELECT查询示例
- JDBC SQL INSERT查询示例
- JDBC SQL DELETE查询示例
- Java JDBC PreparedStatement示例
- JDBC 性能优化技巧
- Hiberate 教程
- Hiberate 教程
- Hibernate 示例 – HelloWorld 示例逐步简介
- Hibernate 获取实体示例 – get与load方法
- Hibernate 插入查询教程
- Hiberate 合并和刷新实体
- Hibernate 4 – 获取延迟加载的实体引用
- 从数据库中插入/选择 Blob 的 Hiberate 示例
- Hiberate save()和saveOrUpdate()方法
- Hiberate 实体/持久化生命周期状态
- Hibernate 4:如何构建SessionFactory
- Hiberate 实体等价和等同
- Hibernate JPA 级联类型
- Hibernate 延迟加载教程
- Hiberate 条件查询示例
- Hibernate HQL(Hiberate 查询语言)示例
- Hibernate @NamedQuery教程
- Hibernate – 如何定义实体之间的关联映射
- 通过示例了解 Hibernate 一级缓存
- Hiberate 二级缓存如何工作?
- Hibernate EhCache 配置教程
- Hibernate OSCache 配置示例教程
- Hibernate C3P0 连接池配置教程
- Hiberate 内存数据库
- Hibernate 验证器 – Java Bean 验证示例
- Hibernate 验证器 CDI – @HibernateValidator示例
- [已解决] UnexpectedTypeException - 找不到约束验证器
- Hiberate 注解
- Hibernate / JPA2 持久化注解教程
- Hiberate 注解与映射 – 优缺点
- @Immutable和@NaturalId – 特定于 Hiberate 的注解
- Hibernate @NaturalId示例教程
- Hiberate 一对多映射注解示例
- Hiberate 多对多映射注解示例
- Hiberate 一对一映射注解示例
- JUnit5 教程
- JUnit5 教程
- JUnit5 测试生命周期
- JUnit5 @BeforeAll注解示例
- JUnit5 @BeforeEach注解示例
- JUnit5 @AfterEach注解示例
- JUnit5 @AfterAll注解示例
- JUnit5 @RepeatedTest注解示例
- JUnit5 @Disabled测试示例
- JUnit5 @Tag注解示例
- JUnit5 预期的异常 – assertThrows()示例
- JUnit5 断言示例
- JUnit5 假设示例
- JUnit5 测试套件示例
- JUnit5 和 Gradle
- JUnit5 Maven 依赖项
- JUnit5 – 在 Eclipse 中执行测试
- Eclipse 的 JUnit5 测试模板
- JUnit5 与 JUnit4
- JUnit4 教程
- JUnit 教程
- JUnit 测试套件示例
- JUnit JUnitCore示例
- 使用 Maven 执行 JUnit 测试用例
- JUnit4 – 基于假设的测试用例
- Junit 预期异常测试用例示例
- JUnit 测试监听器– JUnit RunListener示例
- JUnit 测试超时 – JUnit5 超时示例
- JUnit 有序测试执行示例
- JUnit 参数化测试示例
- Junit 参数化测试 – @Theory和@DataPoints
- JUnit – 使用TemporaryFolder和@Rule创建临时文件/文件夹
- TestNG 教程
- TestNG 教程
- TestNG 教程(使用 Eclipse)
- 如何从 Maven 运行testng.xml
- TestNG 注解教程
- TestNG – 预期异常和预期消息教程
- TestNG – 如何禁用/忽略测试方法
- TestNG 并行执行测试,类和套件
- TestNG – 依赖测试示例
- TestNG – 超时测试教程
- TestNG @Parameters – 测试参数示例
- TestNG @DataProvider – 测试参数示例
- TestNG @Factory注解教程
- TestNG – @Factory和@DataProvider之间的区别
- TestNG 的前后注解
- TestNG – 测试组,元组,默认组示例
- Mockito 教程
- Mockito2 教程 – JUnit Mockito 示例
- Mockito 注解– @Mock,@Spy,@Captor,@InjectMock
- Mockito – @Mock和@InjectMock注解之间的区别
- Mockito – 验证具有不同参数的多个方法调用
- Spring Boot,Mockito 和 Junit – 单元测试服务层
- [已解决] IllegalStateException:无法初始化插件MockMaker
- 使用 PowerMock 进行模拟测试(带有 JUnit 和 Mockito)
- TypeScript 教程
- TypeScript 教程
- TypeScript 类型
- TypeScript 联合类型
- 字符串字面值类型
- TypeScript 变量 – var,let和const
- TypeScript 模板字符串
- TypeScript 算术运算符
- TypeScript 逻辑运算符
- TypeScript 比较运算符
- TypeScript for…of循环
- TypeScript 中的展开运算符
- TypeScript 中的数组
- TypeScript 中的枚举
- TypeScript 映射
- TypeScript 集合
- TypeScript 函数 – 剩余,可选和默认参数
- TypeScript 函数或方法重载
- 转译器(Transpiler)与编译器
- JavaScript 中的真值和假值
- 相等运算符(==)与严格相等运算符(===)
- JavaScript 中的undefined vs null
- JavaScript 变量提升
- tsconfig.json – TypeScript 编译器配置
- Angular(2.x)教程
- Angular 开发工作区设置
- [已解决] Npm 安装挂起或时间过长
- 模拟 REST 服务器来伪造在线 API
- Angular 插值
- Angular 组件
- Angular 模板和视图
- Angular 服务示例
- 带有 RxJS Observable的 Angular HttpClient示例
- AngularJS(1.x)教程
- AngularJS 教程 – HelloWorld 示例
- AngularJS – jQueryLite(jqLite)教程
- AngularJS 服务(内置和自定义)
- AngularJS Spring MVC Rest 示例
- JavaScript / jQuery 教程
- Ajax 教程 – 面向初学者的 Ajax 指南
- 完整的 jQuery Ajax($.ajax)教程
- jQuery 深度克隆示例
- jQuery 选择器 – 完整列表
- jQuery – 所有选择器(“*”) – 通用选择器
- jQuery – 检测剪切,复制或粘贴事件
- jQuery 检测ENTER键按下事件
- jQuery – Keypress和Keydown事件之间的区别
- 关于 StackOverflow 的最佳 jQuery 讨论
- JavaScript – 相等(==)与身份(===)运算符
- 您必须知道的 JavaScript 变量范围规则
- JavaScript:定义全局变量的正确方法
- 在 JavaScript 中实现 MVC 和 PubSub
- JavaScript DOM 对象与 jQuery 对象
- Jasmine 单元测试教程及示例
- JavaScript 日志 – 在 JSON 中屏蔽敏感信息
- Android 教程
- Android 教程:关键概念
- Android 教程:在 Windows 上安装 Android
- Android 教程:如何创建 Android 应用/项目
- Android 教程:Android 项目结构,文件和资源
- Android 清单:指定 Android 应用和 SDK 版本
- 如何加快缓慢的 Android AVD / 模拟器
- Hadoop 教程
- Hadoop – 大数据教程
- Hadoop MapReduce 初学者教程
- HDFS – Hadoop 分布式文件系统架构教程
- Brewer 的 CAP 定理简述
- Java 云开发简介和工具
- MongoDB 教程
- MongoDB 简介:为什么选择 MongoDB?
- 如何在 Windows 上安装 MongoDB
- Java MongoDB:使用 GridFS API 获取/保存图像
- Java MongoDB:在集合中插入文档的示例
- MongoDB 查找文档示例
- 微服务 – 定义,原理和好处
- Apache Kafka 教程
- Apache Kafka – 简介
- Apache Kafka – Windows 10 入门
- Kafka 的 Spring Boot – HelloWorld 示例
- Spring Boot Kafka JsonSerializer示例
- JMS 教程
- JMS 教程 – Java 消息服务教程
- JMS 点对点消息示例
- JMS 发布/订阅消息示例
- HornetQ 教程
- HornetQ 单体 – 基本的 JMS 消息传递示例
- 使用 Maven 的 HornetQ 独立服务器示例
- Spring3 Hornetq 独立集成示例
- Gson 教程
- Gson 教程
- Gson 安装
- GSON – 序列化和反序列化 JSON
- Gson – JSON 输出的精美打印
- GSON – 将 JSON 数组解析为 Java 数组或列表
- GSON – 序列化和反序列化 JSON 为集
- Gson – 序列化和反序列化包含自定义对象的HashMap
- Gson – GsonBuilder配置示例
- Gson - 序列化NULL值
- Gson @Since – 版本支持
- Gson @SerializedName
- Gson – 排除或忽略字段
- Gson - JsonReader
- Gson - JsonParser
- Gson – 自定义序列化和反序列化
- Gson – 快速指南
- JAXB 教程
- JAXB 注解
- JAXB @XmlRootElement注解示例
- JAXB @XmlElementWrapper注解示例
- JAXB Marshaller(编组器)示例
- JAXB Unmarshaller(解组器)示例
- JAXB 读取 XML 到 Java 对象的示例
- 使用 Moxy 和 Jaxb 将 JSON 转换为 Java 对象的示例
- JAXB 将 Java 对象写入 XML 的示例
- JAXB 将对象转换为 JSON 的示例
- JAXB – 在 Java 中编组和解组HashMap
- JAXB – 编组和解组对象列表或集合
- 使用 Eclipse 从 JAXB Java 类生成 XSD
- JAXB 模式验证
- [已解决]:javax.xml.bind.JAXBException:java.util.ArrayList或其任何超类不是此上下文的已知类
- [已解决]:线程“main”com.sun.xml.internal.bind.v2.runtime.IllegalAnnotationsException中的异常:3 个IllegalAnnotationExceptions计数
- 没有@XmlRootElement的 JAXB 编组 – 缺少@XmlRootElement错误
- 不带 jaxb 注解的解组
- Jackson 教程
- Jackson2 – 将 Java 对象转换为 JSON,并将 JSON 字符串转换为对象
- Jackson 将对象转换为 json 并将 json 转换为对象
- Jackson – 将 JSON 转换为Map并将Map转换为 JSON
- Java XML 教程
- Java 读取 XML – Java DOM 解析器示例
- Java SAX 解析器 – XML 读取示例
- Java JDOM2 – XML 读取示例
- 使用 Java StAX 解析器读取 XML – 游标和迭代器 API
- DOM 与 Java 中的 SAX 解析器
- Java 将 XML 转换为属性 – 从 XML 文件读取属性
- Java 将属性文件转换为 XML 文件
- Java 字符串到 XML – 将字符串解析为 XML DOM 的示例
- Java XML 转换为字符串 – 将 XML 对象写入文件的示例
- Java XPath 示例 – XPath 教程
- Java xpath 示例 – 在 xml 文件上求值 xpath
- Java8 xpath 示例 – 在字符串上求值 xpath
- Java XPath 表达式示例
- Java XPath NamespaceContext – 命名空间解析示例
- Java XPath 从 XML 获取属性值
- 在 Java 中使用 xpath 查找具有属性值的 xml 元素
- Java XPath – 检查节点或属性是否存在?
- Eclipse 教程
- 在 Eclipse 中导入 Maven 远程原型目录
- 使用 Eclipse 快速搜索插件进行更快的文本搜索
- 如何在 Eclipse 中显示非英文 unicode(例如中文)字符
- 如何在 Eclipse 中增加控制台输出限制
- 创建 Eclipse 模板以加快 Java 编程
- 在 5 分钟内使 Eclipse 更快
- 如何在印地语中编译和运行 Java 程序
- Java 覆盖最终静态方法 – 方法是覆盖还是隐藏?
- [已解决] 在 Eclipse 的 Java 构建路径中找不到超类“javax.servlet.http.HttpServlet”
- 版本控制系统教程
- 分布式版本控制系统如何工作?
- 版本控制系统(VCS)如何工作?
- 如何从 Google Code 项目中签出源代码
- Tomcat 教程
- Tomcat – 架构和server.xml配置
- 如何在默认的 HTTP 端口 80 中运行 tomcat
- Tomcat – 启用/禁用目录列表
- Tomcat SSL 或 HTTPS 配置示例
- 通过单个服务器安装运行 Tomcat 的多个实例
- Tomcat Maven 插件示例
- Spring,Tomcat – 获取负载均衡器后面的真实 IP
- Web 服务器如何工作?
- Linux 教程
- JStack 线程转储分析器
- 使用 Java 在 Linux 中管理系统日志文件不超过 N GB
- Swagger – Spring REST 示例
- GoF 设计模式
- 设计模式
- 创建型设计模式
- Java 单例模式介绍
- Java 中的构建器设计模式
- Java 工厂模式说明
- 抽象工厂模式解释
- Java 中的原型设计模式
- 行为型设计模式
- 责任链设计模式
- 命令设计模式
- 迭代器设计模式
- 中介者设计模式
- 备忘录设计模式
- 观察者设计模式
- 状态设计模式
- 策略设计模式
- 模板方法设计模式
- 访问者设计模式示例
- 结构型设计模式
- Java 中的适配器设计模式
- 桥接设计模式
- 组合设计模式
- Java 中的装饰器设计模式
- 外观设计模式
- 享元设计模式
- 代理设计模式
- 设计原则
- Java 中的 SOLID 原则(含示例)
- 开闭原则
- 单一责任原则
- Java 最佳实践
- Java 最佳实践指南
- 编写好的单元测试的 FIRST 原则
- 您应该如何对 DAO 层进行单元测试
- JUnit 最佳实践指南
- 不良单元测试用例的 8 个迹象
- 20 个 Java 异常处理最佳实践
- 13 个编写 Spring 配置文件的最佳实践
- Java Web 应用性能改进技巧
- Java 算法
- Java 算法和实现
- 冒泡排序 Java 示例
- 插入排序 Java 示例
- 归并排序 Java 示例
- 快速排序 Java 示例
- 选择排序 Java 示例
- Java AES 加密解密示例
- 使用 Soundex 算法实现语音搜索
- Java 比较和交换示例 – CAS 算法
- Python 教程
- Python 教程
- 如何在 Sublime 编辑器中安装 Python 包
- Python – 注释
- Python – 变量
- Python – 数据类型
- Python – 关键字
- Python – 字符串
- Python – 列表
- Python – 元组
- Python max()和min()– 在列表或数组中查找最大值和最小值
- Python 找到 N 个最大的或最小的项目
- Python 读写 CSV 文件
- Python httplib2 – HTTP GET 和 POST 示例
- Python 将元组解包为变量或参数
- Python 解包元组 – 太多值无法解包
- Python 多重字典示例 – 将单个键映射到字典中的多个值
- Python OrderedDict – 有序字典
- Python 字典交集 – 比较两个字典
- Python 优先级队列示例
- RxJava 教程
- 完整的 Java Servlet 教程
- vaadin 教程
- 使用 Maven 的 vaadin HelloWorld Web 应用
- Vaadin ComboBox示例
- vaadin 文本字段示例
- Vaadin Spring Security BasicAuth 示例
- SQL 教程
- SQL – 不使用临时表删除重复行
- 查找员工的第 N 高薪的 SQL 查询
- SQLException:用户root@localhost的访问被拒绝
- Struts2 教程
- Struts2 HelloWorld 示例
- Struts2 HelloWorld 注解示例
- 使用@InterceptorRef的 Struts2 自定义拦截器示例
- Struts2 – 如何正确设置结果路径
- Spring4 + Struts2 + Hibernate 集成教程
- [已解决] 无法找到ref-name引用的拦截器类
- [已解决]:找不到扩展名properties或xml的结果类型
- 数据结构教程
- 使用数组的 Java 栈实现
- Java 中的自定义列表实现示例
- HTML5 教程
- HTML5 – <section>标签示例
- HTML5 字符集 – 字符编码声明
- HTML5 DOCTYPE声明示例
- Java 题目
- Java 面试题目与答案
- Java 中的无效代码和无法访问的代码
- Java 字符串回文 – Java 数字回文示例
- 检测LinkedList中的无限循环的示例
- 复合赋值运算符i += j与 Java 中的i = i + j不同
- Java 中的 HiLo 猜谜游戏
- Java 题目 – 查找所有重复的元素
- Java 题目 – TreeMap的放置操作
- 题目 – 返回所有字符串中的第 N 长字符串
- Java 题目:好的字符串 – 坏的字符串
- 题目 – 检查字符串是否完整(包含所有字母)
- Java 中的反转字符串 - 单词反转字符串
- 用 Java 计算阶乘的 3 种方法
- Java 中的 FizzBuzz 解决方案
- 从 Java 中的序列/数组中查找缺失的数字
- Java – 不使用“new”关键字创建对象
- 面试问题
- Java 面试问题
- Java 字符串面试问题与答案
- Java 核心面试问题 – 第 1 部分
- Java 核心面试问题 – 第 2 部分
- Java 核心面试问题 – 第 3 部分
- Java 面试的 40 个热门问答集
- 中级开发人员的 Java 面试问题
- 针对 Oracle 企业管理器项目的实际 Java 面试问题
- HashMap和ConcurrentHashMap面试问题
- Java 版本和新特性
