在 FMXUI 中,有 TListExView 和 TListViewEx 两个ListView。其中第一个是对Delphi原有TListView的功能扩展版,用法和原有的基本一样。TListViewEx 则是 FMXUI 原创的一个 ListView , 今天我们要介绍的就是它了。
# 一、 IListAdapter 数据适配器
TListViewEx 的设计思想与Java原生安卓开发类似,使用了数据与显示分离的适配器模式。组件本身不存放数据,只负责显示控制。用户可以使用自带的几个简单的数据适配器或者实现IListAdapter接口,打造自己的数据适配器。通过自带义数据适配器,我们可以实现任意样式的列表。所以,这里的 IListAdapter 接口的重要性不言而预。
我们来看看 IListAdapter 的定义:

~~~
/// <summary>
/// 列表适配器接口
/// </summary>
IListAdapter = interface
['{5CC5F4AB-2D8C-4A84-98A7-51566E38EA47}']
function GetCount: Integer;
function GetItemID(const Index: Integer): Int64;
function GetItem(const Index: Integer): Pointer;
function IndexOf(const AItem: Pointer): Integer;
function GetView(const Index: Integer; ConvertView: TViewBase; Parent: TViewGroup): TViewBase;
function GetItemViewType(const Index: Integer): Integer;
function IsEmpty: Boolean;
function IsEnabled(const Index: Integer): Boolean;
function ItemDefaultHeight: Single;
procedure Clear;
procedure Repaint;
procedure NotifyDataChanged;
property Count: Integer read GetCount;
property Items[const Index: Integer]: Pointer read GetItem; default;
end;
~~~

* GetCount: 返回数据的大小(总行数)
* GetItemID: 指定索引项数据的ID(可以直接使用索引号)
* GetItem: 获取指定索引的数据
* IndexOf: 查找数据,返回索引号
* GetView: 根据索引号,返回对应的可视对象(这个超级重要!!)
* GetItemViewtype: 返回指定索引号的视图类型(这个也是重点)
* IsEmpty: 判断列表是否为空(Count = 0)
* IsEnabled: 判断某行数据是否有效
* ItemDefaultHeight: 默认行高度(很重要,返回所有视图类型中的最大默认行高)
* Clear: 清空数据
* Repaint: 重绘
* NotifyDataChanged: 通知列表框组件数据已经更新,需要重新绘制
* Count: 数据的总数
在接口中, 最常用的 GetView , GetItemViewType, ItemDefaultHeight , GetCount 这四个。一般情况我们只需要继承 TListAdapterBase 或者 TListAdapter , 然后重载这四个函数就可以了。
# 二、 使用 ListView
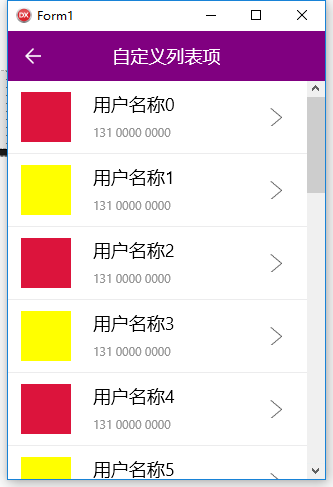
我们实现如下效果。

## 第一步: 创建自定义列表项视图。
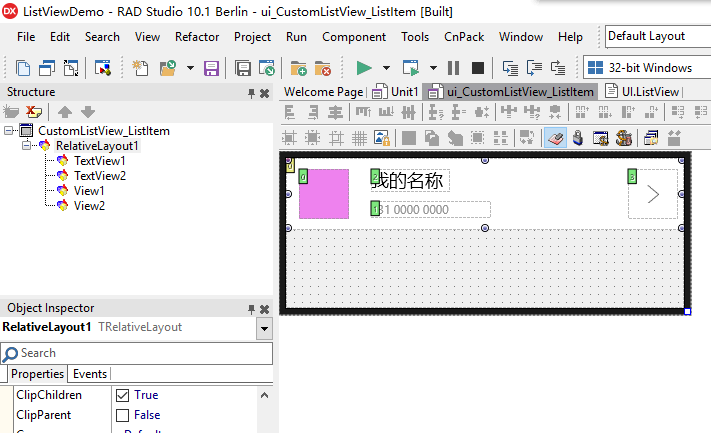
添加一个Frame,命名为 CustomListView\_ListItem 。然后设计成这样:

## 第二步: 创建数据适配器

~~~
type
TDataItem = record
Name: string;
Phone: string;
Color: TAlphaColor;
end;
TCustomListDataAdapter = class(TListAdapterBase)
private
[Weak] FList: TList<TDataItem>;
protected
function GetCount: Integer; override;
function ItemDefaultHeight: Single; override;
function GetItem(const Index: Integer): Pointer; override;
function IndexOf(const AItem: Pointer): Integer; override;
function GetView(const Index: Integer; ConvertView: TViewBase;
Parent: TViewGroup): TViewBase; override;
public
constructor Create(const AList: TList<TDataItem>);
end;
....
{ TCustomListDataAdapter }
constructor TCustomListDataAdapter.Create(const AList: TList<TDataItem>);
begin
FList := AList;
end;
function TCustomListDataAdapter.GetCount: Integer;
begin
if Assigned(FList) then
Result := FList.Count
else
Result := 0;
end;
function TCustomListDataAdapter.GetItem(const Index: Integer): Pointer;
begin
Result := nil;
end;
function TCustomListDataAdapter.GetView(const Index: Integer;
ConvertView: TViewBase; Parent: TViewGroup): TViewBase;
var
ViewItem: TCustomListView_ListItem;
Item: TDataItem;
begin
if (ConvertView = nil) or (not (ConvertView.ClassType = TCustomListView_ListItem)) then begin
ViewItem := TCustomListView_ListItem.Create(Parent);
ViewItem.Parent := Parent;
ViewItem.Width := Parent.Width;
ViewItem.CanFocus := False;
end else
ViewItem := TObject(ConvertView) as TCustomListView_ListItem;
Item := FList.Items[Index];
ViewItem.BeginUpdate;
ViewItem.TextView1.Text := Item.Name;
ViewItem.TextView2.Text := Item.Phone;
ViewItem.View1.Background.ItemDefault.Color := Item.Color;
ViewItem.EndUpdate;
Result := TViewBase(ViewItem);
end;
function TCustomListDataAdapter.IndexOf(const AItem: Pointer): Integer;
begin
Result := -1;
end;
function TCustomListDataAdapter.ItemDefaultHeight: Single;
begin
Result := 72;
end;
~~~

## 第三步、应用数据适配器
在窗口上添加 TListViewEx,命名为 ListView。 在窗口初始化事件中, 初始化数据适配器。
~~~
procedure TCustomListview.DoCreate;
begin
inherited;
FList := TList<TDataItem>.Create();
FAdapter := TCustomListDataAdapter.Create(FList);
end;
~~~
在窗口 Show 事件中,为 ListView 指定数据适配器。
~~~
procedure TCustomListview.DoShow;
begin
inherited;
ListView.Adapter := FAdapter;
AddItems(20); // 添加20行测试数据
end;
~~~
在窗口释放事件中,释放资源

~~~
procedure TCustomListview.DoFree;
begin
inherited;
ListView.Adapter := nil;
FAdapter := nil;
FreeAndNil(FList);
end;
~~~

添加测试数据的代码

~~~
procedure TCustomListview.AddItems(const Count: Integer);
var
I: Integer;
Item: TDataItem;
begin
for I := 0 to Count - 1 do begin
Item.Name := '用户名称' + IntToStr(I);
if I mod 2 = 0 then
Item.Color := TAlphaColorRec.Crimson
else
Item.Color := TAlphaColorRec.Yellow;
Item.Phone := '131 0000 0000';
FList.Add(Item);
end;
FAdapter.NotifyDataChanged;
end;
~~~

注意: 数据变更后,需要及时调用 NotifyDataChanged 来通知 ListView 更新显示。
# 三、 下拉刷新和上拉加载更多
TListViewEx 也实现了下拉刷新和上拉加载更多的功能。在属性面板中启用相应的选项即可。
* EnablePullRefresh: 是否启用下拉刷新
* EnablePullLoad: 是否启用上拉加载更多
* OnInitFooter: 加载自定义 Footer 事件, 如果不设置,将在需要时加载默认的 Footer
* OnInitHeader: 加载自定义 Header 事件, 如果不设置,将在需要时加载默认的 Header
* OnPullRefresh: 下拉刷新事件
* OnPullLoad: 上拉加载更多事件
TListViewEx 允许自定义 Footer 和 Header, 只需要在上述相应的事件中,初始化为对应的视图就可以了。自定义视图的实现方式也是新建一个 Frame 就可以了, 参考 ListItem 和默认的实现。不同的时需要实现 IListViewHeader 接口。
示例:

~~~
procedure TCustomListview.ListViewPullLoad(Sender: TObject);
begin
DelayExecute(1,
procedure (Sender: TObject)
begin
AddItems(20);
ListView.PullLoadComplete;
end
);
end;
procedure TCustomListview.ListViewPullRefresh(Sender: TObject);
begin
Hint('正在加载数据');
DelayExecute(2,
procedure (Sender: TObject)
begin
FList.Clear;
AddItems(20);
ListView.PullRefreshComplete;
end
);
end;
~~~
- 1.制作Android Splash启动界面
- 2.delphi之完美Splash方案
- 3. Android实例-解决虚拟键盘遮挡问题
- 0.Android开发小技巧
- 设 置 您 的 开 发 环 境 Windows PC(Android)
- Delphi XE控件
- 手机屏幕自适应程序问题
- 手势操作
- delphi xeandroid对硬件操作
- Datasnap
- Delphi XE 10 跨平台三层数据库应用教程
- 开发数据库三层应用的DataSnap
- ListView
- delphi xe10之控件 listview 的强大功能
- FMX.TListView的基本用法
- 初探ListView 的使用方法
- Delphi 常用控件之TlistView总结
- ListView基本用法大全
- android实现透明度可以调整的对话框
- android 获取网络状态
- FMXUI
- FMXUI - ListView用法简介
