**变量绑定**
* * *
我们现在回过头来看看,一些基础知识。
因为理解了前面的重要概念:所有权,借用,生命周期。
我们现在看基础知识就很简单了。
先看变量定义:
~~~
let a = true;//rust不要求显式定义类型,编译器女王自动会根据上下文和用途,来自动定义类型,这里 //是:bool
let b: bool = true;//如果显式定义类型,则通过:分号+类型
let (x, y) = (1, 2);
let mut z = 5;
z = 6;
~~~
在rust,这些变量定义叫变量绑定。
为什么这样说?因为rust的变量,默认是不可变的。
如果,要变成可变变量,要用关键字:mut。
那如果是常量呢?
看代码:
常量(const):
~~~
const N: i32 = 5;
~~~
静态变量(static):
~~~
static N: i32 = 5;
~~~
常量与静态变量的区别是:
1.常量const在内存没有固定地址,而静态变量static的地址是固定的。
2.静态变量一般用在全局变量,一般写在代码最上方,在函数体外,常量可以定义在函数内。
3.一般最好用const来定义常量,因为它地址不是固定的,可以让编译器优化。
布尔值(bool):
~~~
let x = true;
let y: bool = false;
// ⭐️ no TRUE, FALSE, 1, 0
~~~
字符(char):
~~~
let x = 'x';
let y = '😎';
// ⭐️ no "x", only single quotes
~~~
布尔值,类型关键字:bool,值:true 或者false,注意是小写。
字符类型,用的是单引号。因为rust是从底层支持unicode,所以char**占位4 byte**。
数组(arrays):
~~~
let a = [1, 2, 3]; // a[0] = 1, a[1] = 2, a[2] = 3
let mut b = [1, 2, 3];
let c: [i32; 0] = []; //[Type; NO of elements] -> [] /empty array
let d: [i32; 3] = [1, 2, 3];
let e = ["my value"; 3]; //["my value", "my value", "my value"];
println!("{:?}", a); //[1, 2, 3]
println!("{:#?}", a);
~~~
数组主要用来存放相同类型的数据,它的**长度是固定的,也是默认不可变的(长度和内容都不可变)**。如果,用mut来定义,它的长度也是不可变的,但数组内的数据可以变。
如果我想缓存一些不同类型的数据,怎么办?
用元组(tuples):
~~~
let a = (1, 1.5, true, 'a', "Hello, world!");
// a.0 = 1, a.1 = 1.5, a.2 = true, a.3 = 'a', a.4 = "Hello, world!"
let b: (i32, f64) = (1, 1.5);
let (c, d) = b; // c = 1, d = 1.5
let (e, _, _, _, f) = a; //e = 1, f = "Hello, world!", _ indicates not interested of that item
let g = (0,); //single-element tuple
let h = (b, (2, 4), 5); //((1, 1.5), (2, 4), 5)
println!("{:?}", a); //(1, 1.5, true, 'a', "Hello, world!")
~~~
元组主要用来存放不同类型的数据,它的**长度是固定的,也是默认不可变的(长度和内容都不可变)**。如果,用mut来定义,它的长度也是不可变的,数组内的数据可以变,但**变化的值与之前的值的类型要保持一致**。
切片(slice):
~~~
let a: [i32; 4] = [1, 2, 3, 4];//Parent Array
let b: &[i32] = &a; //Slicing whole array
let c = &a[0..4]; // From 0th position to 4th(excluding)
let d = &a[..]; //Slicing whole array
let e = &a[1..3]; //[2, 3]
let f = &a[1..]; //[2, 3, 4]
let g = &a[..3]; //[1, 2, 3]
~~~
切片,要rust中来说,就是其他数据结构(主要是数组)的**可变长度**的引用或视图。
字符串(str):
~~~
let a = "Hello, world."; //a: &'static str
let b: &str = "你好, 世界!";
~~~
在rust,str类型准确来说,是字符串切片。是最基本的字符串类型。
我们来看看下面两种写法是一样的:
~~~
let hello = "Hello, world!";
// with an explicit type annotation
let hello: &'static str = "Hello, world!";
~~~
我们看到,hello变量的生命周期注解是:'static,说明它的生命周期是跟整个程序的生命周期一样。
它是借用类型:&str,说明它是从字符串 "Hello, world!",借用过来的。
当然它还有一种写法:
~~~
let hello = String::from("Hello, world!");
let mut hello = String::from("Hello, ");
hello.push('w');
hello.push_str("orld!");
~~~
这里直接用方法:**String::from()**来构建。
str 和 String之间的区别:
**1.String是一个可变的、堆(heap)上分配的UTF-8的字节符串。**
**2.str是字符串切片,就像vector 切片一样,它包括:指针+长度,也就是说它是一个字符串变量(这个字符串已经从堆heap上分配内存,像String类型数据或字面值数据string literal )的“视图”;如果是从String解引用而来的,则指向堆上,如果是字面值,则指向静态内存。**
一般来说,
如果你相拥有所有权(ownership),就用String定义;
如果想直接借用(没有所有权,有借就要有还),就用&str;
注意:**字符串String是堆(heap)分配的,它是不定长的。**
说到这里,我想再深入来讲讲在Rust语言中String的内存分配原理。这很有意思。
其实,跟java一样,String都是从堆heap里分配内存的。我们来看看代码吧:
~~~
let s1 = String::from("hello");//从堆heap分配内存给"hello",并绑定到s1
let s2 = s1;
println!("{}, world!", s1);
~~~
第一行代码:
~~~
let s1 = String::from("hello");//从堆heap分配内存给"hello",并绑定到s1
~~~
在Rust里的内存分配是这样的:
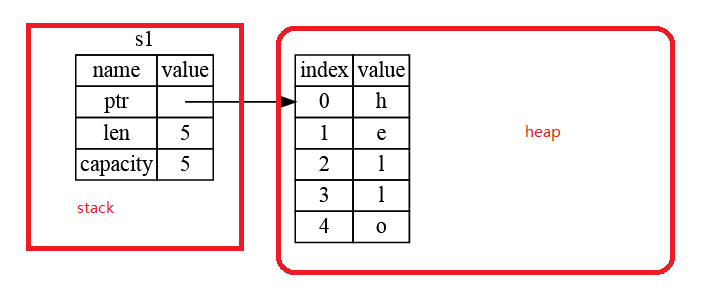
Rust在stack里分配一个空间给s1,分别存放:
1.指向堆heap地址的指针:ptr
2.长度变量len
3.容量变更capacity
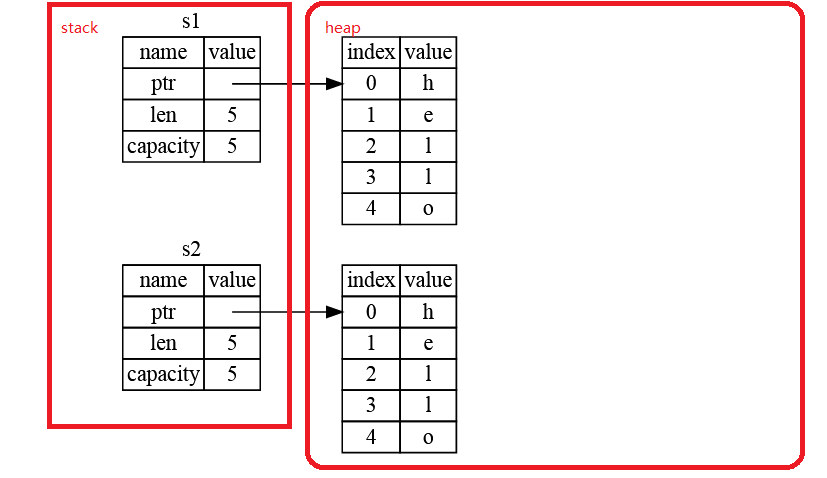
现在我们看第二行代码:
~~~
let s2 = s1;
~~~
把s1绑定到s2,Rust也会在栈stack分配内存空间给s2(因为stack内存分配是简单且成本低的,运行时runtime会及时回收),而我们知道Rust中的**所有权**概念,所以这时数据的所有权从s1**移动**到s2,如下图:

从上图可以看出,现在s1已经没有对数据"hello"拥有所有权,所以第三行代码:
~~~
println!("{}, world!", s1);//complier error
~~~
编译器女王会给你一个错误 :
~~~
error[E0382]: use of moved value: `s1`
--> src/main.rs:5:28
|
3 | let s2 = s1;
| -- value moved here
4 |
5 | println!("{}, world!", s1);
| ^^ value used here after move
|
= note: move occurs because `s1` has type `std::string::String`, which does
not implement the `Copy` trait
~~~
那要怎么样,才不会报错呢?用clone:
~~~
let s1 = String::from("hello");
let s2 = s1.clone();
println!("s1 = {}, s2 = {}", s1, s2);
~~~
它在内存中的分配,是这样的:
以上,希望对你有用。
- rustlang语言零基础快速入门(1)开篇
- rustlang语言零基础快速入门(2)VSCODE配置
- rustlang语言零基础快速入门(3)所有权Ownership
- rustlang语言零基础快速入门(4)
- rustlang语言零基础快速入门(5)
- rustlang语言零基础快速入门(6)变量绑定
- rustlang语言零基础快速入门(7)函数Functions与闭包Closure
- rustlang语言零基础快速入门(8)Operators操作符
- rustlang语言零基础快速入门(9)Control Flows流程控制
- rustlang语言零基础快速入门(10)Vectors容器
- rustlang语言零基础快速入门(11)Structs结构体
- rustlang语言零基础快速入门(12)Enums枚举
- rustlang语言零基础快速入门(13)Generics泛型
- rustlang语言零基础快速入门(14)Impls & Traits实现与特征
- rustlang语言零基础快速入门(15)Unit Testing单元测试
- rustlang语言零基础快速入门(16)代码组织与模块化
- rustlang语言零基础快速入门(17)装箱crates
- rustlang语言零基础快速入门(18)use关键词
- rustlang语言零基础快速入门(19)多线程
- rustlang语言零基础快速入门(20)错误处理
- rustlang语言零基础快速入门(21)智能指针
- rustlang语言零基础快速入门(22)宏Macro
- rustlang语言零基础快速入门(23)实战1:猜数字游戏
- rustlang语言零基础快速入门(24)实战2:命令行工具minigrep(1)
- rustlang语言零基础快速入门(25)实战2:命令行工具minigrep(2)
- rustlang语言零基础快速入门(26)实战3:Http服务器
- rustlang语言零基础快速入门(26)实战3:Http服务器(多线程版本)
- rustlang语言零基础快速入门(27)实战4:从零实现BTC区块链
- rustlang语言零基础快速入门(28)实战5:实现BTC价格转换工具
- rustlang语言零基础快速入门(29)实战6:BDD工具cucumber_rust