#### 1.进入宝塔软件商店,搜索redis,点击安装

#### 2.在软件商店中,选择php(选择网站所绑定版本),点击设置

#### 3.进入安装扩展,选择安装redis

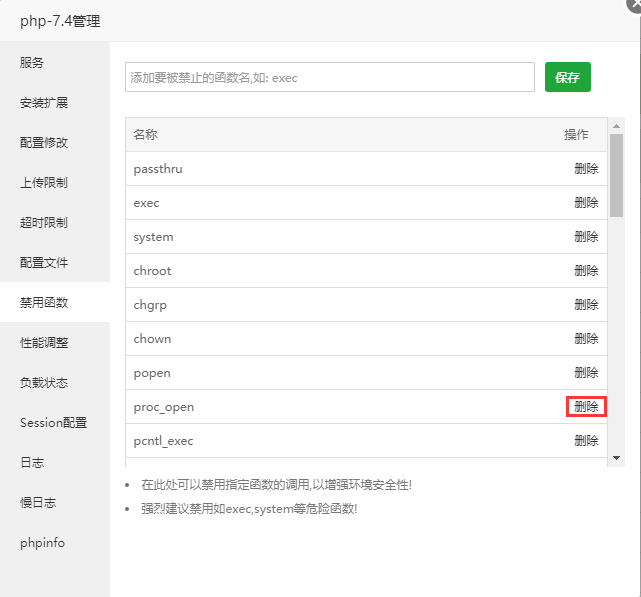
#### 4.进去禁用函数,删除这些函数
`proc_open``pcntl_signal``pcntl_signal_dispatch``pcntl_fork``pcntl_wait``pcntl_alarm`

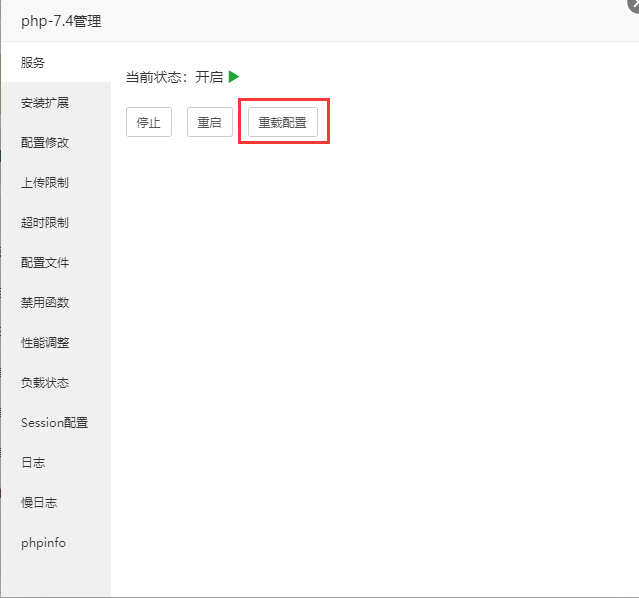
#### 5.进入服务,点击重载配置

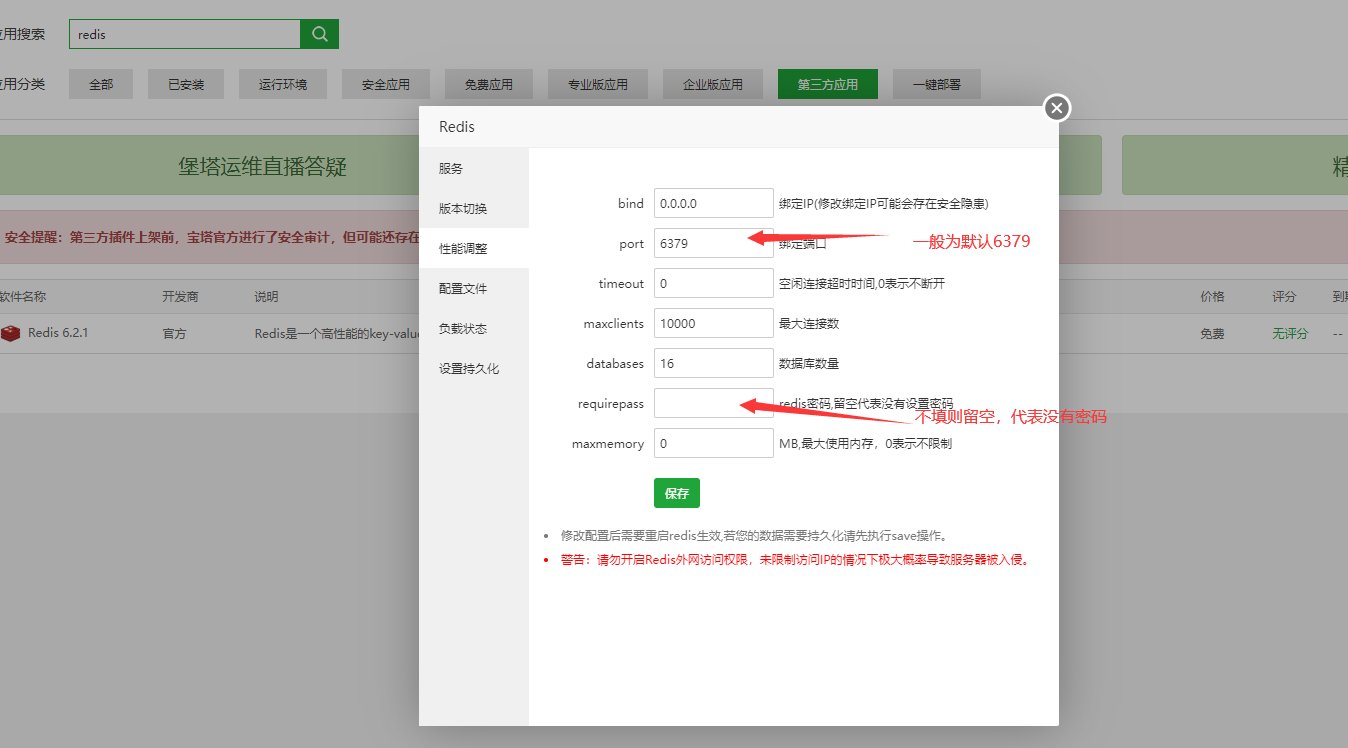
#### 6.选择性能调整,查看到redis配置信息

#### 7.打开网站内的config/cache.php
`将redis的配置信息填写到redis中`
~~~
return [
// 默认缓存驱动
'default' => Env::get('cache.driver', 'file'),
// 缓存连接方式配置
'stores' => [
'file' => [
// 驱动方式
'type' => 'File',
// 缓存保存目录
'path' => '',
// 缓存前缀
'prefix' => '',
// 缓存有效期 0表示永久缓存
'expire' => 0,
// 缓存标签前缀
'tag_prefix' => 'tag:',
// 序列化机制 例如 ['serialize', 'unserialize']
'serialize' => [],
],
// redis缓存
'redis' => [
// 驱动方式
'type' => 'redis',
// 服务器地址
'host' => '127.0.0.1',
// redis密码
'password' => '',
// 缓存有效期 0表示永久缓存
'expire' => 604800,
],
// 更多的缓存连接
],
];
~~~
- 序言
- 商城简介
- 系统部署
- 功能列表
- 系统部署
- 运行环境
- 宝塔部署
- 宝塔SSL证书申请
- apache部署
- 基础配置(基础安装)
- 微信公众号配置
- 微信公众号菜单
- 微信小程序配置
- 微信支付配置
- 微信模板消息
- 微信小程序直播配置
- 牛云短信配置
- 阿里云短信消息模板消息配置
- 地图设置
- 商家消息通知设置
- 微信小程序订阅消息
- gif动图配置
- Redis缓存配置
- 配置Redis
- 配置消息队列
- 支付宝小程序
- 计划任务配置
- 店铺设置
- 店铺信息
- 门店管理
- 注册登录
- 交易设置
- 配送设置
- 客服设置
- 客服配置(5.4.1及以下版本)
- 推送配置(5.4.2及以上版本)
- 核销人员
- 其他设置
- 系统维护
- 网站部署
- 插件管理
- 版权信息
- 缓存管理
- 系统授权
- 版本管理
- 更新日志
- 数据库管理
- 小程序隐私协议
- 小程序云上传
- 扩展功能配置
- 支付宝支付配置
- 电子面单配置
- 小票打印
- 阿里云短信配置
- 阿里云上传
- 微信小程序开源版
- 开源版小程序发行默认h5
- 后台登录路径配置
- h5单独部署
- 视频号配置
- 本地打印机配置
- 店铺装修
- 手机端
- 商城首页
- 分类装修
- 微页面
- 底部导航
- 商城风格
- 模板选择
- 广告管理
- 商品推荐
- 电脑端
- 首页楼层
- 首页浮层
- 导航管理
- 友情链接
- 广告位管理
- 首页分类
- 内容管理
- 店铺帮助
- 店铺公告
- 素材管理
- 文章管理
- 商品管理
- 商品分类
- 商品品牌
- 商品标签
- 商品参数
- 商品服务
- 回收站
- 商品导入
- 会员
- 会员管理
- 会员概况
- 会员列表
- 会员导入
- 会员标签
- 会员群体
- 等级权益
- 会员等级
- 超级会员卡
- 余额储值
- 充值套餐
- 余额流水
- 会员积分
- 积分规则
- 积分流水
- 订单操作
- 订单管理
- 商品订单
- 充值订单
- 会员卡订单
- 礼品卡订单
- 积分兑换订单
- 退款维权
- 订单处理
- 订单自提
- 订单发货
- 批量发货
- 订单核销
- 订单评价
- 代客下单
- 财务管理
- 财务报表
- 发票管理
- 门店结算
- 余额提现
- 分销提现
- 营业数据
- 数据概况
- 会员数据
- 交易数据
- 流量数据
- 会员卡数据
- 营销插件
- 满额包邮
- 砍价
- 组合套餐
- 优惠券
- 限时折扣
- 团购
- 满减活动
- 拼团
- 限时秒杀
- 专题活动
- 刮刮乐
- 幸运转盘
- 砸金蛋
- 预售
- 礼品卡
- 社群接龙
- 打包一口价
- 好友瓜分券
- 生日有礼
- 节日有礼
- 拼团返现
- 盲盒
- 裂变红包
- 积分抵现
- 积分商城
- 应用插件
- 分销
- 分销概况
- 分销商品
- 分销订单
- 分销商
- 分销等级
- 分销设置
- 分销市场
- 小程序直播
- 直播间
- 直播商品
- 微信圈子
- 店铺笔记
- 草稿箱
- 笔记分组
- 商品采集
- 电子卡密
- 系统表单
- 虚拟评价
- 商品海报
- 智慧门店
- 门店商品管理
- 门店订单管理
- 门店会员管理
- 门店员工管理
- 门店收银台
- 门店数据管理
- 门店库存管理
- 门店设置
- 升级说明
- V4与V5功能比对
- V4升级到V5说明
- 补丁上传
