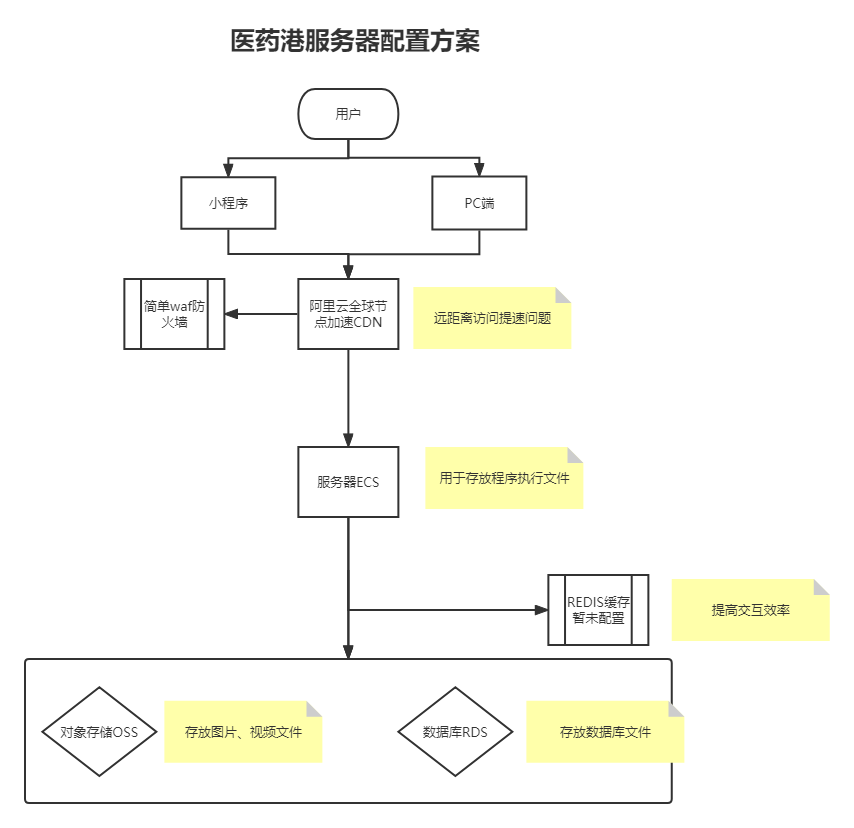
# :-: **健康方舟云上部署总览图**
服务器端采用Nginx+

## :-: 阿里云相关部署
云服务器配置:
云服务器放开对应端口:22(服务器连接ssh接口)、3306(mysql接口)、6379(redis接口)、80(HTTP接口)、443(HTTPS接口)
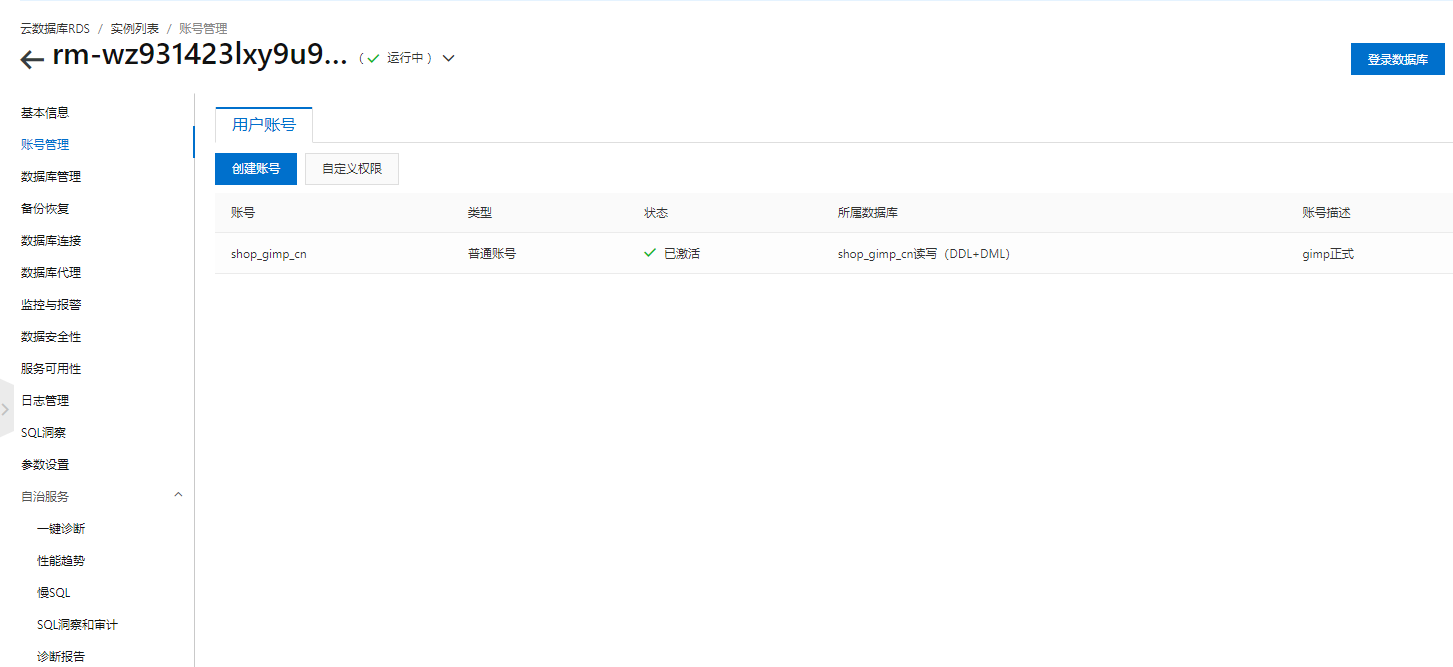
云数据库RDS部署:
建立与服务器同区域的RDS数据库服务

设置定时备份

配置数据库帐号密码

oss存储桶:
建立与服务器同区域的oss存储桶

配置图片存储域名

配置图片存储样式

## :-: 服务器相关部署
## **Nginx 1.17.10安装:**
### 一、安装编译工具及库文件
~~~
yum -y install make zlib zlib-devel gcc-c++ libtool openssl openssl-devel
~~~
### 二、首先要安装 PCRE
PCRE 作用是让 Nginx 支持 Rewrite 功能。
1、下载 PCRE 安装包,下载地址: [http://downloads.sourceforge.net/project/pcre/pcre/8.35/pcre-8.35.tar.gz](http://downloads.sourceforge.net/project/pcre/pcre/8.35/pcre-8.35.tar.gz)
~~~
[root@bogon src]# cd /usr/local/src/
[root@bogon src]# wget http://downloads.sourceforge.net/project/pcre/pcre/8.35/pcre-8.35.tar.gz
~~~

2、解压安装包:
~~~
[root@bogon src]# tar zxvf pcre-8.35.tar.gz
~~~
3、进入安装包目录
~~~
[root@bogon src]# cd pcre-8.35
~~~
4、编译安装
~~~
[root@bogon pcre-8.35]# ./configure
[root@bogon pcre-8.35]# make && make install
~~~
5、查看pcre版本
~~~
[root@bogon pcre-8.35]# pcre-config --version
~~~

### 安装 Nginx
1、下载 Nginx,下载地址:[https://nginx.org/en/download.html](https://nginx.org/en/download.html)
~~~
[root@bogon src]# cd /usr/local/src/
[root@bogon src]# wget http://nginx.org/download/nginx-1.6.2.tar.gz
~~~
2、解压安装包
~~~
[root@bogon src]# tar zxvf nginx-1.6.2.tar.gz
~~~
3、进入安装包目录
~~~
[root@bogon src]# cd nginx-1.6.2
~~~
4、编译安装
~~~
[root@bogon nginx-1.6.2]# ./configure --prefix=/usr/local/webserver/nginx --with-http_stub_status_module --with-http_ssl_module --with-pcre=/usr/local/src/pcre-8.35
[root@bogon nginx-1.6.2]# make
[root@bogon nginx-1.6.2]# make install
~~~
5、查看nginx版本
~~~
[root@bogon nginx-1.6.2]# /usr/local/webserver/nginx/sbin/nginx -v
~~~

到此,nginx安装完成。
* * *
## Nginx 配置
创建 Nginx 运行使用的用户 www:
~~~
[root@bogon conf]# /usr/sbin/groupadd www
[root@bogon conf]# /usr/sbin/useradd -g www www
~~~
配置nginx.conf ,将/usr/local/webserver/nginx/conf/nginx.conf替换为以下内容
~~~
[root@bogon conf]# cat /usr/local/webserver/nginx/conf/nginx.conf
user www www;
worker_processes 2; #设置值和CPU核心数一致
error_log /usr/local/webserver/nginx/logs/nginx_error.log crit; #日志位置和日志级别
pid /usr/local/webserver/nginx/nginx.pid;
#Specifies the value for maximum file descriptors that can be opened by this process.
worker_rlimit_nofile 65535;
events
{
use epoll;
worker_connections 65535;
}
http
{
include mime.types;
default_type application/octet-stream;
log_format main '$remote_addr - $remote_user [$time_local] "$request" '
'$status $body_bytes_sent "$http_referer" '
'"$http_user_agent" $http_x_forwarded_for';
#charset gb2312;
server_names_hash_bucket_size 128;
client_header_buffer_size 32k;
large_client_header_buffers 4 32k;
client_max_body_size 8m;
sendfile on;
tcp_nopush on;
keepalive_timeout 60;
tcp_nodelay on;
fastcgi_connect_timeout 300;
fastcgi_send_timeout 300;
fastcgi_read_timeout 300;
fastcgi_buffer_size 64k;
fastcgi_buffers 4 64k;
fastcgi_busy_buffers_size 128k;
fastcgi_temp_file_write_size 128k;
gzip on;
gzip_min_length 1k;
gzip_buffers 4 16k;
gzip_http_version 1.0;
gzip_comp_level 2;
gzip_types text/plain application/x-javascript text/css application/xml;
gzip_vary on;
#limit_zone crawler $binary_remote_addr 10m;
#下面是server虚拟主机的配置
server
{
listen 80;#监听端口
server_name localhost;#域名
index index.html index.htm index.php;
root /usr/local/webserver/nginx/html;#站点目录
location ~ .*\.(php|php5)?$
{
#fastcgi_pass unix:/tmp/php-cgi.sock;
fastcgi_pass 127.0.0.1:9000;
fastcgi_index index.php;
include fastcgi.conf;
}
location ~ .*\.(gif|jpg|jpeg|png|bmp|swf|ico)$
{
expires 30d;
# access_log off;
}
location ~ .*\.(js|css)?$
{
expires 15d;
# access_log off;
}
access_log off;
}
}
~~~
检查配置文件nginx.conf的正确性命令:
~~~
[root@bogon conf]# /usr/local/webserver/nginx/sbin/nginx -t
~~~

* * *
## 启动 Nginx
Nginx 启动命令如下:
~~~
[root@bogon conf]# /usr/local/webserver/nginx/sbin/nginx
~~~

* * *
## 访问站点
从浏览器访问我们配置的站点ip:

* * *
## Nginx 其他命令
以下包含了 Nginx 常用的几个命令:
~~~
/usr/local/webserver/nginx/sbin/nginx -s reload # 重新载入配置文件
/usr/local/webserver/nginx/sbin/nginx -s reopen # 重启 Nginx
/usr/local/webserver/nginx/sbin/nginx -s stop # 停止 Nginx
~~~
# MySQL 安装配置
MySQL 是最流行的关系型数据库管理系统,由瑞典MySQL AB公司开发,目前属于Oracle公司。
MySQL所使用的SQL语言是用于访问数据库的最常用标准化语言。
MySQL由于其体积小、速度快、总体拥有成本低,尤其是开放源码这一特点,一般中小型网站的开发都选择MySQL作为网站数据库。
* * *
## MySQL 安装
本教程的系统平台:CentOS release 6.6 (Final) 64位。
### 一、安装编译工具及库文件
~~~
yum -y install gcc gcc-c++ make autoconf libtool-ltdl-devel gd-devel freetype-devel libxml2-devel libjpeg-devel libpng-devel openssl-devel curl-devel bison patch unzip libmcrypt-devel libmhash-devel ncurses-devel sudo bzip2 flex libaio-devel
~~~
### 二、 安装cmake 编译器
cmake 版本:cmake-3.1.1。
1、下载地址:[http://www.cmake.org/files/v3.1/cmake-3.1.1.tar.gz](http://www.cmake.org/files/v3.1/cmake-3.1.1.tar.gz)
~~~
$ wget http://www.cmake.org/files/v3.1/cmake-3.1.1.tar.gz
~~~

2、解压安装包
~~~
$ tar zxvf cmake-3.1.1.tar.gz
~~~
3、进入安装包目录
~~~
$ cd cmake-3.1.1
~~~
4、编译安装
~~~
$ ./bootstrap
$ make && make install
~~~
* * *
### 安装 MySQL 5.6.50
MySQL版本:mysql-5.6.15。
1、下载地址: [http://dev.mysql.com/get/Downloads/MySQL-5.6/mysql-5.6.50.tar.gz](http://dev.mysql.com/get/Downloads/MySQL-5.6/mysql-5.6.50.tar.gz)
~~~
$ wget http://dev.mysql.com/get/Downloads/MySQL-5.6/mysql-5.6.15.tar.gz
~~~

2、解压安装包
~~~
$ tar zxvf mysql-5.6.15.tar.gz
~~~
3、进入安装包目录
~~~
$ cd mysql-5.6.15
~~~
4、编译安装
~~~
$ cmake -DCMAKE_INSTALL_PREFIX=/usr/local/webserver/mysql/ -DMYSQL_UNIX_ADDR=/tmp/mysql.sock -DDEFAULT_CHARSET=utf8 -DDEFAULT_COLLATION=utf8_general_ci -DWITH_EXTRA_CHARSETS=all -DWITH_MYISAM_STORAGE_ENGINE=1 -DWITH_INNOBASE_STORAGE_ENGINE=1 -DWITH_MEMORY_STORAGE_ENGINE=1 -DWITH_READLINE=1 -DWITH_INNODB_MEMCACHED=1 -DWITH_DEBUG=OFF -DWITH_ZLIB=bundled -DENABLED_LOCAL_INFILE=1 -DENABLED_PROFILING=ON -DMYSQL_MAINTAINER_MODE=OFF -DMYSQL_DATADIR=/usr/local/webserver/mysql/data -DMYSQL_TCP_PORT=3306
$ make && make install
~~~
5、查看mysql版本:
~~~
$ /usr/local/webserver/mysql/bin/mysql --version
~~~

到此,mysql安装完成。
* * *
## MySQL 配置
1、创建mysql运行使用的用户mysql:
~~~
$ /usr/sbin/groupadd mysql
$ /usr/sbin/useradd -g mysql mysql
~~~
2、创建binlog和库的存储路径并赋予mysql用户权限
~~~
$ mkdir -p /usr/local/webserver/mysql/binlog /www/data_mysql
$ chown mysql.mysql /usr/local/webserver/mysql/binlog/ /www/data_mysql/
~~~
3、创建my.cnf配置文件
将/etc/my.cnf替换为下面内容
~~~
$ cat /etc/my.cnf
[client]
port = 3306
socket = /tmp/mysql.sock
[mysqld]
replicate-ignore-db = mysql
replicate-ignore-db = test
replicate-ignore-db = information_schema
user = mysql
port = 3306
socket = /tmp/mysql.sock
basedir = /usr/local/webserver/mysql
datadir = /www/data_mysql
log-error = /usr/local/webserver/mysql/mysql_error.log
pid-file = /usr/local/webserver/mysql/mysql.pid
open_files_limit = 65535
back_log = 600
max_connections = 5000
max_connect_errors = 1000
table_open_cache = 1024
external-locking = FALSE
max_allowed_packet = 32M
sort_buffer_size = 1M
join_buffer_size = 1M
thread_cache_size = 600
#thread_concurrency = 8
query_cache_size = 128M
query_cache_limit = 2M
query_cache_min_res_unit = 2k
default-storage-engine = MyISAM
default-tmp-storage-engine=MYISAM
thread_stack = 192K
transaction_isolation = READ-COMMITTED
tmp_table_size = 128M
max_heap_table_size = 128M
log-slave-updates
log-bin = /usr/local/webserver/mysql/binlog/binlog
binlog-do-db=oa_fb
binlog-ignore-db=mysql
binlog_cache_size = 4M
binlog_format = MIXED
max_binlog_cache_size = 8M
max_binlog_size = 1G
relay-log-index = /usr/local/webserver/mysql/relaylog/relaylog
relay-log-info-file = /usr/local/webserver/mysql/relaylog/relaylog
relay-log = /usr/local/webserver/mysql/relaylog/relaylog
expire_logs_days = 10
key_buffer_size = 256M
read_buffer_size = 1M
read_rnd_buffer_size = 16M
bulk_insert_buffer_size = 64M
myisam_sort_buffer_size = 128M
myisam_max_sort_file_size = 10G
myisam_repair_threads = 1
myisam_recover
interactive_timeout = 120
wait_timeout = 120
skip-name-resolve
#master-connect-retry = 10
slave-skip-errors = 1032,1062,126,1114,1146,1048,1396
#master-host = 192.168.1.2
#master-user = username
#master-password = password
#master-port = 3306
server-id = 1
loose-innodb-trx=0
loose-innodb-locks=0
loose-innodb-lock-waits=0
loose-innodb-cmp=0
loose-innodb-cmp-per-index=0
loose-innodb-cmp-per-index-reset=0
loose-innodb-cmp-reset=0
loose-innodb-cmpmem=0
loose-innodb-cmpmem-reset=0
loose-innodb-buffer-page=0
loose-innodb-buffer-page-lru=0
loose-innodb-buffer-pool-stats=0
loose-innodb-metrics=0
loose-innodb-ft-default-stopword=0
loose-innodb-ft-inserted=0
loose-innodb-ft-deleted=0
loose-innodb-ft-being-deleted=0
loose-innodb-ft-config=0
loose-innodb-ft-index-cache=0
loose-innodb-ft-index-table=0
loose-innodb-sys-tables=0
loose-innodb-sys-tablestats=0
loose-innodb-sys-indexes=0
loose-innodb-sys-columns=0
loose-innodb-sys-fields=0
loose-innodb-sys-foreign=0
loose-innodb-sys-foreign-cols=0
slow_query_log_file=/usr/local/webserver/mysql/mysql_slow.log
long_query_time = 1
[mysqldump]
quick
max_allowed_packet = 32M
~~~
4、初始化数据库
~~~
$/usr/local/webserver/mysql/scripts/mysql_install_db --defaults-file=/etc/my.cnf --user=mysql
~~~
显示如下信息:
~~~
Installing MySQL system tables...2015-01-26 20:18:51 0 [Warning] TIMESTAMP with implicit DEFAULT value is deprecated. Please use --explicit_defaults_for_timestamp server option (see documentation for more details).
OK
Filling help tables...2015-01-26 20:18:57 0 [Warning] TIMESTAMP with implicit DEFAULT value is deprecated. Please use --explicit_defaults_for_timestamp server option (see documentation for more details).
OK
...
~~~
5、创建开机启动脚本
~~~
$ cd /usr/local/webserver/mysql/
$ cp support-files/mysql.server /etc/rc.d/init.d/mysqld
$ chkconfig --add mysqld
$ chkconfig --level 35 mysqld on
~~~
6、启动mysql服务器
~~~
$ service mysqld start
~~~

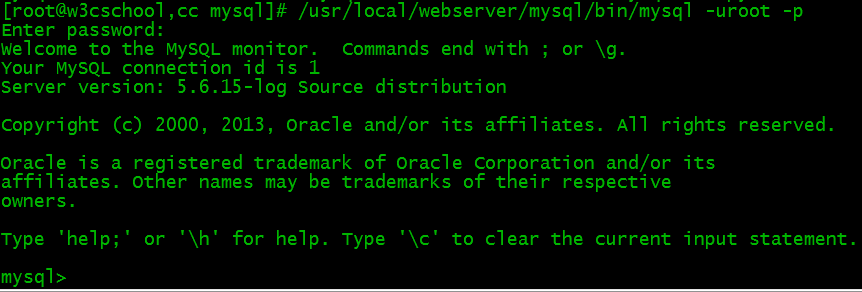
7、连接 MySQL
~~~
$ /usr/local/webserver/mysql/bin/mysql -u root -p
~~~

## 修改MySQL用户密码
~~~
mysqladmin -u用户名 -p旧密码 password 新密码
~~~
或进入mysql命令行
~~~
SET PASSWORD FOR '用户名'@'主机' = PASSWORD(‘密码');
~~~
创建新用户并授权:
~~~
grant all privileges on *.* to 用户名@'%' identified by '密码' with grant option;
~~~
### 其他命令
* 启动:service mysqld start
* 停止:service mysqld stop
* 重启:service mysqld restart
* 重载配置:service mysqld reload
[](https://www.runoob.com/linux/nginx-install-setup.html)[Nginx 安装配置](https://www.runoob.com/linux/nginx-install-setup.html "Nginx 安装配置")
##
1 篇笔记写笔记
1. li1121567428
li1\*\*\*567428@live.com
63
启动MySQL服务器程序,确认状态
1)启动MySQL服务程序
启动服务并查看状态:
~~~
[root@dbsvr1 pub]# service mysql start
Starting MySQL... [确定]
[root@dbsvr1 pub]# service mysql status
MySQL running (31724) [确定]
~~~
服务器进程为mysqld,监听的默认端口为TCP 3306:
~~~
[root@dbsvr1 pub]# netstat -anpt | grep mysql
tcp 0 0 :::3306 :::* LISTEN 31724/mysqld
~~~
2)查看MySQL服务器进程、运行用户
提供连接服务的进程为mysqld,由其父进程mysqld\_safe启动。
~~~
[root@dbsvr1 pub]# ps -elf | grep mysqld
4 S root 31619 1 0 80 0 - 2834 wait 15:14 pts/0 00:00:00 /bin/sh /usr/bin/mysqld_safe --datadir=/var/lib/mysql --pid file=/var/lib/mysql/dbsvr1.tarena.com.pid
4 S mysql 31724 31619 0 80 0 - 252496 poll_s 15:14 pts/0 00:00:01 /usr/sbin/mysqld --basedir=/usr --datadir=/var/lib/mysql --plugin-dir=/usr/lib64/mysql/plugin --user=mysql --log-error=/var/lib/mysql/dbsvr1.tarena.com.err --pid-file=/var/lib/mysql/dbsvr1.tarena.com.pid
~~~
数据库的默认存放位置为 /var/lib/mysql:
~~~
[root@dbsvr1 pub]# ls /var/lib/mysql/
auto.cnf ibdata1 mysql RPM_UPGRADE_HISTORY
dbsvr1.tarena.com.err ib_logfile0 mysql.sock RPM_UPGRADE_MARKER-LAST
dbsvr1.tarena.com.pid ib_logfile1 performance_schema test
~~~
安装PHP7.2
1)依赖包安装
yum install gcc-c++ libxml2 libxml2-devel openssl openssl-devel bzip2 bzip2-devel libcurl libcurl-devel libjpeg libjpeg-devel libpng libpng-devel freetype freetype-devel gmp gmp-devel libmcrypt libmcrypt-devel readline readline-devel libxslt libxslt-devel gd net-snmp-\*
libzip版本低问题处理
libzip要求1.1及以上,系统提供1.0需要升级
官方网站: [https://libzip.org/](https://links.jianshu.com/go?to=https%3A%2F%2Flibzip.org%2F)
\[root@apache\_251 ~\]# wget [https://libzip.org/download/libzip-1.5.2.tar.gz](https://links.jianshu.com/go?to=https%3A%2F%2Flibzip.org%2Fdownload%2Flibzip-1.5.2.tar.gz)
\[root@apache\_251 ~\]# tar xf [libzip-1.5.2.tar.gz](https://links.jianshu.com/go?to=https%3A%2F%2Flibzip.org%2Fdownload%2Flibzip-1.5.2.tar.gz)
\[root@apache\_251 ~\]# cd [libzip-1.5.2](https://links.jianshu.com/go?to=https%3A%2F%2Flibzip.org%2Fdownload%2Flibzip-1.5.2.tar.gz)
\[root@apache\_251 libzip-1.5.2\]# mkdir build
\[root@apache\_251 build\]# cd build
\[root@apache\_251 build\]#cmake ..
\[root@apache\_251 build\]#make
\[root@apache\_251 build\]#make install
2)配置
\[root@apache\_251 ~\]# tar xf php-7.3.4.tar.bz2
\[root@apache\_251 php-7.3.4\]# ./configure --prefix=/usr/local/php --with-config-file-path=/usr/local/php/etc --with-mysqli=mysqlnd --enable-pdo --with-pdo-mysql=mysqlnd --with-iconv-dir=/usr/local/ --enable-fpm --with-fpm-user=www --with-fpm-group=www --with-pcre-regex --with-zlib --with-bz2 --enable-calendar --disable-phar --with-curl --enable-dba --with-libxml-dir --enable-ftp --with-gd --with-jpeg-dir --with-png-dir --with-zlib-dir --with-freetype-dir --enable-gd-jis-conv --with-mhash --enable-mbstring --enable-opcache=yes --enable-pcntl --enable-xml --disable-rpath --enable-shmop --enable-sockets --enable-zip --enable-bcmath --with-snmp --disable-ipv6 --with-gettext --disable-rpath --disable-debug --enable-embedded-mysqli --with-mysql-sock=/usr/local/mysql/
~~~jsx
配置参数说明
---prefix=/usr/local/php 安装路径
--with-config-file-path=/usr/local/php/etc 配置文件路径
--with-mysqli=mysqlnd --enable-embedded-mysqli --with-mysql-sock=/usr/local/mysql/ mysql支持及客户端设置
--enable-pdo --with-pdo-mysql=mysqlnd 开启php pdo,PDO一是PHP数据对象(PHP Data Object)的缩写
--with-iconv-dir=/usr/local/ 指定转码工具,各种字符集间的转换
--enable-fpm --with-fpm-user=www --with-fpm-group=www 支持php-fpm,允许以服务的方式启动PHP
--with-pcre-regex 支持pcre正则表达式
--with-zlib --with-bz2 --with-zlib-dir --enable-zip 支持压缩
--enable-calendar 支持日历
--disable-phar PHAR (“Php ARchive”) 是PHP里类似于JAR的一种打包文件。如果你使用的是 PHP 5.3 或更高版本,那么Phar后缀文件是默认开启支持的.
--with-curl 支持curl
--enable-dba 开启dba函数支持
--with-libxml-dir 支持xml文件库 对xml读取和查询
--enable-ftp 支持ftp
--with-gd --with-jpeg-dir --with-png-dir 支持图片
--with-freetype-dir 支持字库
--enable-gd-jis-conv 支持gd库
--with-mhash --enable-mbstring 支持加密
--enable-opcache=yes 开启opcache
--enable-pcntl 开启PHP进程控制支持 默认是关闭的
--enable-xml 允许xml文件
--disable-rpath 关闭额外的运行库文件
--enable-shmop 开启Shmop 是一个易用的允许PHP读取、写入、创建和删除Unix共享内存段的函数集
--enable-sockets 打开 sockets 支持
--enable-bcmath 增加bcmath扩展的支持,这是一个支持大整数计算的扩展。
--with-snmp 支持snmp
--disable-ipv6 关闭IPV6支持
--with-gettext 打开gnu 的gettext 支持,编码库用到
--disable-debug 关闭调试模式
~~~
3)编译
\[root@apache\_251 php-7.3.4\]# make
4)安装
\[root@apache\_251 php-7.3.4\]# make install
5)拷贝一个配置文件
\[root@apache\_251 php-7.3.4\]# cp /usr/src/php-7.3.4/php.ini-production /usr/local/php/etc/php.ini
## 三、PHP配置
#### **关于PHP工作方式**
* #### 作为模块运行
* #### 独立服务运行
1)作为apache模块运行
# if bind to apache
\--with-apxs2=/usr/local/apache2/bin/apxs
AddType application/x-httpd-php .php
# if no mysql
./configure --with-mysql=mysqlnd --with-mysqli=mysqlnd --with-pdo-mysql=mysqlnd
2)作为服务运行
思考问题 apache如何将PHP请求交给PHP呢 PHP是一门语言
~~~objectivec
思路 CGI fastcgi
~~~
CGI 公共网关接口 (COMMON GATEWAY INTERFACE),是一个协议
~~~objectivec
它的作用就是帮助服务器与语言通信. 就是apache和php进行通信,因为apache和php的语言不通,因此需要一个沟通转换的过程,而CGI就是这个
沟通的协议。
~~~
FastCGI 快速通用网关接口(FastCommonGatewayInterface),是CGI的升级版,一种语言无关的协议,FastCGI是用来提高CGI程序性能的
缺点:传统的cgi协议在每次连接请求时,会开启一个进程进行处理,处理完毕会关闭该进程,因此下次连接,又要再次开启一个进程进行处理,因此有多少个连接就有多少个cgi进程,这也就是为什么传统的cgi会显得缓慢的原因,因此过多的进程会消耗资源和内存。而fast-cgi则是一个进程可以处理多个请求,和上面的cgi协议完全不一样,cgi是一个进程只能处理一个请求,这样就会导致大量的cgi程序,因此会给服务器带来负担。
php-fpm:是一个实现了FastCGI(协议)的程序
是php提供给http前端服务器(web serve)的fastcgi协议接口程序,允许一个进程对多个连接进行处理,而不会立即关闭这个进程,而是会接着处理下一个连接。
PHP-CGI:PHP-CGI是php自带的Fast-CGI管理器。
PHP-CGI的不足:
php-cgi变更php.ini配置后需重启php-cgi才能让新的php-ini生效,不可以平滑重启。
直接杀死php-cgi进程,php就不能运行了。(PHP-FPM和Spawn-FCGI就没有这个问题,守护进程会平滑从新生成新的子进程。)
PHP-FPM(FastCGI Process Manager:FastCGI进程管理器)是一个PHPFastCGI管理器,对于PHP 5.3.3之前的php来说,是一个补丁包 ,旨在将FastCGI进程管理整合进PHP包中。如果你使用的是PHP5.3.3之前的PHP的话,就必须将它patch到你的PHP源代码中,在编译安装PHP后才可以使用。从PHP 5.4 RC2开始,php-fpm已经转正了
**PHP-FPM特点**
1. listen:The address on which to accept FastCGI requests.它支持TCP Socket和unix socket两种通讯协议。可设置listen = \[::\]:9000。
2. listen.allowed\_clients:List of addresses (IPv4/IPv6) of FastCGI clients which are allowed to connect. 该配置项为逗号分隔的列表,如listen.allowed\_clients = 127.0.0.1,172.17.0.5。
3. pm:Choose how the process manager will control the number of child processes. 该配置项设置FPM管理进程池的方式,包括static、dynamic、ondemand三种。
4. pm.max\_requests:The number of requests each child process should execute before respawning. This can be useful to work around memory leaks in 3rd party libraries.设置每个子进程处理请求数的上限,对于处理第三方库中的内存泄漏很有用。
5. pm.status\_path:The URI to view the FPM status page. 支持状态页面监控php-fpm
**PHP-FPM工作原理:**
1、Web Server启动时载入FastCGI进程管理器(IIS ISAPI或Apache Module)
2、FastCGI进程管理器自身初始化,启动多个CGI解释器进程(可见多个php-cgi)并等待来自Web Server的连接。
3、当客户端请求到达Web Server时,FastCGI进程管理器选择并连接到一个CGI解释器。Web server将CGI环境变量和标准输入发送到FastCGI子进程php-cgi。
4、FastCGI子进程完成处理后将标准输出和错误信息从同一连接返回Web Server。当FastCGI子进程关闭连接时,请求便告处理完成。FastCGI子进程接着等待并处理来自FastCGI进程管理器(运行在Web Server中)的下一个连接。 在CGI模式中,php-cgi在此便退出了。
在上述情况中,你可以想象CGI通常有多慢。每一个Web请求PHP都必须重新解析php.ini、重新载入全部扩展并重初始化全部数据结构。使用FastCGI,所有这些都只在进程启动时发生一次。一个额外的好处是,持续数据库连接(Persistent database connection)可以工作。
# php-fpm服务设置 pool
每个pool可以监听不同的sock、tcp/ip,pool池是支持定义多个pool的。所有的网站使用同一个池,那其中一个网站发生一些故障,比如程序员写的一些程序有问题,就会把php资源耗尽,这样的结果就是其他站点的php也会502。所以有必要把每一个站点隔离开。每个pool的名字要唯一。
#### PHP服务配置
# 主配置文件
\[root@apache\_251 var\]# egrep -v ";|$" /usr/local/php/etc/php-fpm.conf
\[global\]
pid = run/php-fpm.pid
error\_log = log/php-fpm.log
daemonize = yes
include = /usr/local/php/etc/php-fpm.d/\*.conf
# 子配置文件
\[root@apache\_251 var\]# cp /usr/local/php/etc/php-fpm.d/[www.conf.default](https://links.jianshu.com/go?to=http%3A%2F%2Fwww.conf.default) /usr/local/php/etc/php-fpm.d/[www.conf](https://links.jianshu.com/go?to=http%3A%2F%2Fwww.conf)
\[root@apache\_251 var\]# egrep -v ";|$" /usr/local/php/etc/php-fpm.d/[www.conf](https://links.jianshu.com/go?to=http%3A%2F%2Fwww.conf)
\[www\]
user = www
group = www
listen = 127.0.0.1:9000
listen.owner = www
listen.group = www
listen.mode = 0660
pm = dynamic
pm.max\_children = 5
pm.start\_servers = 2
pm.min\_spare\_servers = 1
pm.max\_spare\_servers = 3
~~~csharp
注释
# 全局配置
[global]
# PID、可以不填
pid = /usr/local/php/var/run/php-fpm.pid
# 错误日志路径、可以不填
error_log = /usr/local/php/var/log/php-fpm.log
# www虚拟主机配置、可写多个
# pool命名:www
[www]
# 监听socket方式
# 可以写成listen = 127.0.0.1:9000
listen = /tmp/php-fcgi.sock
# 开启php-fpm的执行用户
user = www
# 开启php-fpm的所属组
group = www
# 监听socket listen的用户,和web服务器软件的一致
listen.owner = nobody
# 监听socket listen的组,和web服务器软件的一致
listen.group = nobody
# 怎样的形式启用进程
pm = dynamic
# 最大开启子进程数
pm.max_children = 50
# 一开始启动多少子进程
pm.start_servers = 20
# 空闲时保留多少个子进程
pm.min_spare_servers = 5
# 最多空闲子进程
pm.max_spare_servers = 35
# 进程处理多少个请求之后销毁重建
pm.max_requests = 500
# 限定打开最大的文件数
rlimit_files = 1024
~~~
## 四、PHP启动
\[root@apache\_251 ~\]# cp /usr/src/php-7.3.4/sapi/fpm/php-fpm.service /etc/systemd/system/
\[root@apache\_251 ~\]# systemctl daemon-reload
\[root@apache\_251 ~\]# systemctl enable php-fpm
\[root@apache\_251 ~\]# systemctl start php-fpm
## :-: 程序相关部署
数据库信息配置位置:/www/wwwroot/shop.gimp.cn/database.php
> <?php
return [
// 默认使用的数据库连接配置
'default' => 'mysql',
// 自定义时间查询规则
'time_query_rule' => [],
// 自动写入时间戳字段
// true为自动识别类型 false关闭
// 字符串则明确指定时间字段类型 支持 int timestamp datetime date
'auto_timestamp' => true,
// 时间字段取出后的默认时间格式
'datetime_format' => 'Y-m-d H:i:s',
// 数据库连接配置信息
'connections' => [
'mysql' => [
// 数据库类型
'type' => 'mysql',
// 服务器地址
'hostname' => '127.0.0.1',
// 数据库名
'database' => 'shop_gimp_cn',
// 用户名
'username' => 'shop_gimp_cn',
// 密码
'password' => 'kWy2dB8b8S4THi8p',
// 端口
'hostport' => '3306',
// 数据库连接参数
'params' => [],
// 数据库编码默认采用utf8
'charset' => 'utf8',
// 数据库表前缀
'prefix' => 'hyok',
// 数据库部署方式:0 集中式(单一服务器),1 分布式(主从服务器)
'deploy' => 0,
// 数据库读写是否分离 主从式有效
'rw_separate' => false,
// 读写分离后 主服务器数量
'master_num' => 1,
// 指定从服务器序号
'slave_no' => '',
// 是否严格检查字段是否存在
'fields_strict' => false,
// 是否需要断线重连
'break_reconnect' => true,
// 监听SQL
'trigger_sql' => true,
// 开启字段缓存
'fields_cache' => true,
// 字段缓存路径
'schema_cache_path' => app()->getRuntimePath() . 'schema' . DIRECTORY_SEPARATOR,
],
// 更多的数据库配置信息
],
];
OSS相关配置(如下图):https://test.gimp.cn/alioss/admin/config/config.html

- 健康方舟技术性文档
- 系统架构图
- 系统源代码
- 服务器配置方案
- 系统目录结构
- 小程序前端地址库
- 接口相关
- 系统接口
- 插件管理
- 插件列表
- 插件是否存在
- 地址管理
- 地址基础信息
- 地址列表
- 地址列表子项结构
- 城市列表
- 通过名称获取城市信息
- 网站设置
- 网站基础信息
- 手机端二维码
- 上传管理
- 头像上传
- 评价上传
- 网站公告
- 公告信息
- 公告列表
- 广告信息
- 默认图片
- 商品接口
- 商品公共信息
- 修改商品点击量
- 获取商品海报
- 售后保障
- 商品品牌
- 商品浏览历史
- 添加浏览历史
- 删除浏览记录
- 浏览记录分类列表
- 商品分类
- 分类树状结构信息
- 根据商品分类查询关联商品类型,查询关联品牌、属性
- 商品信息
- 商品SKU基础信息
- 商品SKU详细信息
- 商品SKU列表信息
- 商品SKU商品推荐
- 商品SKU商品二维码
- 商品收藏
- 添加信息
- 删除收藏信息
- 分类列表信息
- 是否收藏
- 商品评价
- 添加信息·第一次评价
- 追评
- 评价基础信息
- 评价列表信息
- 订单相关接口
- 购物车
- 添加购物车
- 列表信息
- 编辑购物车
- 删除信息
- 清空购物车
- 获取购物车数量
- 订单创建
- 创建订单
- 计算信息
- 待支付订单数据初始化
- 支付控制器
- 支付信息
- 支付调用
- 支付方式
- 获取订单支付状态
- 订单查询操作
- 订单详情信息
- 订单列表信息
- 订单评价基础信息
- 订单收货(收到所有货物)
- 关闭订单
- 获取订单数量
- 订单包裹信息
- 订单支付
- 订单退款
- 发起退款
- 售后列表
- 取消发起的退款申请
- 买家退货
- 维权详情
- 平台维权
- 发起维权
- 取消发起的平台维权申请
- 维权详情1
- 店铺相关接口
- 店铺会员
- 店铺会员添加店铺关注
- 店铺会员取消店铺关注
- 店铺会员检测是否关注
- 获取会员店铺分页列表
- 入驻指南
- 入驻基础信息
- 入驻列表信息
- 店铺商品分类
- 树状信息
- 店铺等级
- 店铺分类
- 店铺分类列表
- 店铺
- 店铺基础信息
- 店铺列表信息
- 会员相关接口
- 会员签到
- 注册
- 注册设置
- 注册协议
- 用户名密码注册
- 注册检测存在性
- 登陆
- 登陆方式
- 第三方登陆
- 检测openid是否存在
- 手机动态码登陆
- 手机号登陆验证码
- 会员充值
- 会员充值基础信息
- 会员充值配置
- 会员充值计算信息
- 会员充值订单
- 会员充值订单创建
- 会员
- 会员详细信息
- 会员基础信息
- 修改会员头像
- 修改会员昵称
- 修改会员手机
- 会员修改邮箱
- 修改会员密码
- 会员绑定短信验证
- 会员邮箱绑定验证
- 设置密码获取验证码
- 通过token获得会员id
- 账户奖励规则说明
- 拉取会员头像
- 统计会员优惠券
- 邮箱找回密码
- 发送邮箱验证码
- 手机号找回密码
- 短信验证码
- 会员账户
- 会员账户基础信息
- 会员账户列表信息
- 地址信息
- 添加地址
- 编辑地址
- 设置默认地址
- 删除地址信息
- 地址分页列表信息
- 添加第三方地址信息
- 验证码
- 签到
- 会员等级
- 支付接口
- 数据库相关
- 数据库操作
- 系统基础表
- 配送相关表
- 商品相关表
- 广告设置相关表
- 会员相关表
- 订单相关表
