
## Swagger
[OpenAPI](https://swagger.io/specification/)(Swagger)规范是一种用于描述 `RESTful API` 的强大定义格式。 `Nest` 提供了一个专用[模块](https://github.com/nestjs/swagger)来使用它。
### 安装
首先,您必须安装所需的包:
```bash
$ npm install --save @nestjs/swagger swagger-ui-express
```
如果你正在使用 `fastify` ,你必须安装 `fastify-swagger` 而不是 `swagger-ui-express` :
```bash
$ npm install --save @nestjs/swagger fastify-swagger
```
### 引导(Bootstrap)
安装过程完成后,打开引导文件(主要是 `main.ts` )并使用 `SwaggerModule` 类初始化 Swagger:
```typescript
import { NestFactory } from '@nestjs/core';
import { SwaggerModule, DocumentBuilder } from '@nestjs/swagger';
import { ApplicationModule } from './app.module';
async function bootstrap() {
const app = await NestFactory.create(ApplicationModule);
const options = new DocumentBuilder()
.setTitle('Cats example')
.setDescription('The cats API description')
.setVersion('1.0')
.addTag('cats')
.build();
const document = SwaggerModule.createDocument(app, options);
SwaggerModule.setup('api', app, document);
await app.listen(3000);
}
bootstrap();
```
`DocumentBuilder` 有助于构建符合 OpenAPI 规范的基础文档。它提供了几种允许设置诸如标题,描述,版本等属性的方法。为了创建一个完整的文档(使用已定义的 HTTP 路由),我们使用 `SwaggerModule` 类的 `createDocument()` 方法。 此方法接收两个参数,即应用程序实例和 Swagger 选项对象。
一旦创建完文档,我们就可以调用 `setup()` 方法。 它接收:
1. Swagger UI 的挂载路径
2. 应用程序实例
3. 上面已经实例化的文档对象
现在,您可以运行以下命令来启动 `HTTP` 服务器:
```bash
$ npm run start
```
应用程序运行时,打开浏览器并导航到 `http://localhost:3000/api` 。 你应该可以看到 Swagger UI
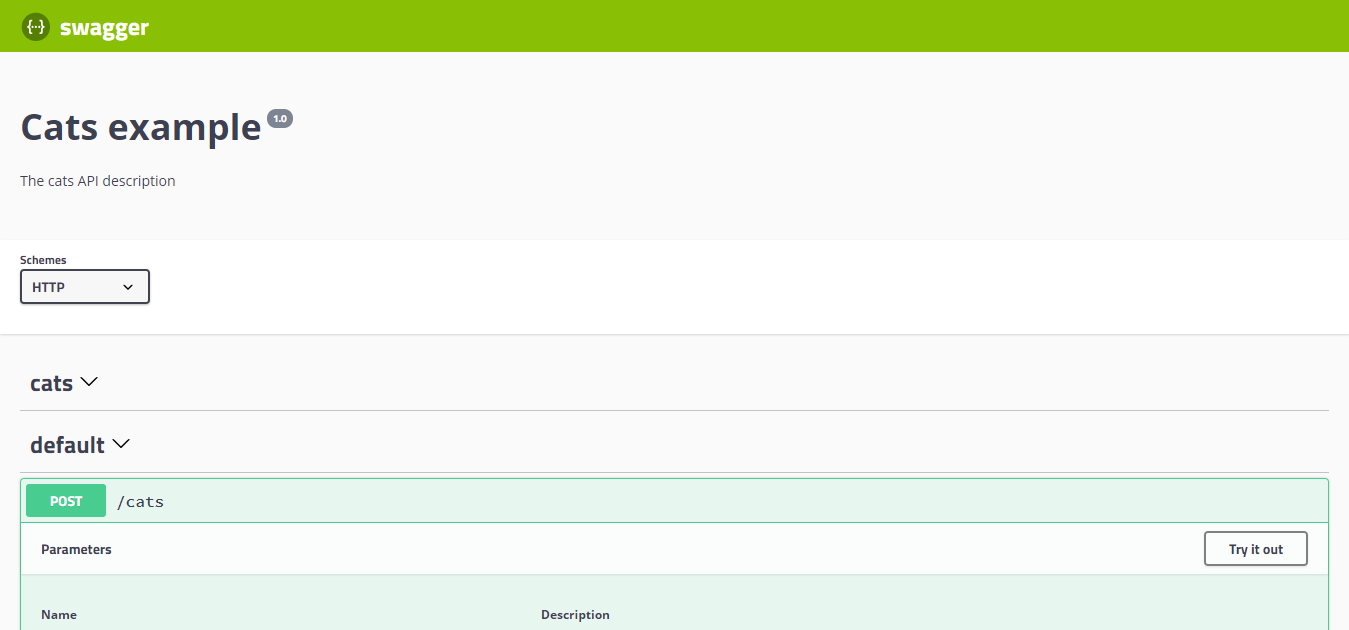
`SwaggerModule` 自动反映所有端点。同时,为了展现 Swagger UI,`@nestjs/swagger`依据平台使用 `swagger-ui-express` 或 `fastify-swagger`。
> 生成并下载 Swagger JSON 文件,只需在浏览器中导航到 `http://localhost:3000/api-json` (如果您的 Swagger 文档是在 `http://localhost:3000/api` 下)。
### 路由参数
`SwaggerModule` 在路由处理程序中查找所有使用的 `@Body()` , `@Query()` 和 `@Param()` 装饰器来生成 API 文档。该模块利用反射创建相应的模型定义。 看看下面的代码:
```typescript
@Post()
async create(@Body() createCatDto: CreateCatDto) {
this.catsService.create(createCatDto);
}
```
> 要显式地设置主体定义,可以使用 `@ApiBody()` 装饰器( `@nestjs/swagger` 包)。
基于 `CreateCatDto` ,将创建模块定义:

如您所见,虽然该类具有一些声明的属性,但定义为空。 为了使类属性对 `SwaggerModule` 可见,我们必须用 `@ApiProperty()` 装饰器对其进行注释或者使用 CLI 插件自动完成(更多请阅读**插件**小节):
```typescript
import { ApiProperty } from '@nestjs/swagger';
export class CreateCatDto {
@ApiProperty()
name: string;
@ApiProperty()
age: number;
@ApiProperty()
breed: string;
}
```
> 考虑使用 Swagger 插件(请阅读**插件**小节),它会自动帮你完成。
让我们打开浏览器并验证生成的 `CreateCatDto` 模型:

另外,`@ApiProperty()` 装饰器允许设计不同[模式对象](https://swagger.io/specification/#schemaObject) 属性:
```typescript
@ApiProperty({
description: 'The age of a cat',
min: 1,
default: 1,
})
age: number;
```
> 避免显式地输入 `{{"@ApiProperty({ required: false })"}}`,你可以使用 `@ApiPropertyOptional()` 短手装饰器。
为了显式地设置属性的类型,使用`type`键
```typescript
@ApiProperty({
type: Number,
})
age: number;
```
### 数组
当属性实际上是一个数组时,我们必须手动指定一个类型:
```typescript
@ApiProperty({ type: [String] })
names: string[];
```
> 考虑使用 Swagger 插件(请阅读**插件**小节),它会自动发现数组。
只需将您的类型作为数组的第一个元素(如上所示)或将 `isArray` 属性设置为 `true` 。
### 循环依赖
当类之间具有循环依赖关系时,请使用惰性函数为 `SwaggerModule` 提供类型信息:
```typescript
@ApiProperty({ type: () => Node })
node: Node;
```
> 考虑使用 Swagger 插件(请阅读**插件**小节),它会自动发现循环依赖。
### 泛型和接口
由于 TypeScript 不会存储有关泛型或接口的元数据,因此当您在 DTO 中使用它们时,`SwaggerModule` 可能无法在运行时正确生成模型定义。例如,以下代码将不会被 Swagger 模块正确检查:
```typescript
createBulk(@Body() usersDto: CreateUserDto[])
```
为了克服此限制,可以显式设置类型:
```typescript
@ApiBody({ type: [CreateUserDto] })
createBulk(@Body() usersDto: CreateUserDto[])
```
### 类型映射
在你建立例如CRUD(创建/读取/更新/删除)的功能时,基于一个基础的实体类型通常会比较有用。Nest提供了几个有用的函数以实现类型转换,让这个任务更方便一些。
当建立一个输入验证类型(也叫DTO)时,通常会采用同一个类型来建立**crete**和**update**。例如,**create**变量可能需要所有的字段,而**update**则可能需要让所有字段都是可选的。
Nest提供了`PartialType()`函数来保证简化任务并最小化模版。
`PartialType()`函数返回一个类型(类),并将所有输入类型设置为可选的。例如,我们由如下类型开始:
```typescript
import { ApiProperty } from '@nestjs/swagger';
export class CreateCatDto {
@ApiProperty()
name: string;
@ApiProperty()
age: number;
@ApiProperty()
breed: string;
}
```
默认地,所有字段都需要。要使用同一字段创建类型,但每个都是可选的,使用`PartialType()`,并传递类型引用(`CreateCatDto`)作为其参数:
```typescript
export class UpdateCatDto extends PartialType(CreateCatDto) {}
```
> `PartialType()`从`@nestjs/swagger`中导入。
`PickTYpe()`功能从一个输入类型中选择一部分属性来创建一个新类型(类)。例如,我们由如下类型开始:
```typescript
import { ApiProperty } from '@nestjs/swagger';
export class CreateCatDto {
@ApiProperty()
name: string;
@ApiProperty()
age: number;
@ApiProperty()
breed: string;
}
```
我们可以使用PickTYpe()函数从这个类中选取一部分属性:
```typescript
export class UpdateCatAgeDto extends PickType(CreateCatDto, ['age'] as const) {}
```
> `PartialType()`从`@nestjs/swagger`中导入。
`OmitType()`函数从一个输入类型中取出所有属性然后移除一些键。例如,我们由如下类型开始:
```typescript
import { ApiProperty } from '@nestjs/swagger';
export class CreateCatDto {
@ApiProperty()
name: string;
@ApiProperty()
age: number;
@ApiProperty()
breed: string;
}
```
我们可以生成并获取一个如下所示的`name`属性,在这个结构中,`OmitType`的第二个参数是属性名称的数组:
```typescript
export class UpdateCatDto extends OmitType(CreateCatDto, ['name'] as const) {}
```
> `OmitType()`从`@nestjs/swagger`中导入。
`IntersectionType()`函数将两种类型组合成一个新类型(类)。例如,我们由如下类型开始:
```typescript
import { ApiProperty } from '@nestjs/swagger';
export class CreateCatDto {
@ApiProperty()
name: string;
@ApiProperty()
breed: string;
}
export class AdditionalCatInfo {
@ApiProperty()
color: string;
}
```
我们可以生成一个新类型,将两个类型中所有属性组合在一起。
```typescript
export class UpdateCatDto extends IntersectionType(CreateCatDto, AdditionalCatInfo) {}
```
> `IntersectionType()`从`@nestjs/swagger`中导入。
类型映射函数是可以组合的。例如,下列示例将产生一个类(类型),其拥有`name`除外的`CreateCatDto`类型的所有属性,这些属性都被设置为可选的:
```typescript
export class UpdateCatDto extends PartialType(
OmitType(CreateCatDto, ['name'] as const),
) {}
```
### 枚举
为了定义一个 `enum`,我们必须手动在 `@ApiProperty` 上设置 `enum` 属性为数值数组。
```typescript
@ApiProperty({ enum: ['Admin', 'Moderator', 'User']})
role: UserRole;
```
或者,如下定义实际的 TypeScript 枚举:
```typescript
export enum UserRole {
Admin = 'Admin',
Moderator = 'Moderator',
User = 'User'
}
```
你可以直接将枚举在 `@Query()` 参数装饰器里使用,并结合 `@ApiQuery()` 装饰器。
```typescript
@ApiQuery({ name: 'role', enum: UserRole })
async filterByRole(@Query('role') role: UserRole = UserRole.User) {}
```

将 `isArray` 设置为 **true** ,`enum` 可以**多选**:

### 枚举 schema
默认地,`enum`属性将在参数中添加一个`[Enum](https://swagger.io/docs/specification/data-models/enums/)`的原生定义。
```typescript
- breed:
type: 'string'
enum:
- Persian
- Tabby
- Siamese
```
上述情况在大部分情况下都能正常工作。然而,如果你使用工具将该定义作为输入来生成客户端代码,你可能在生成代码时会遇到包含两层枚举的问题。考虑如下代码:
```typescript
// generated client-side code
export class CatDetail {
breed: CatDetailEnum;
}
export class CatInformation {
breed: CatInformationEnum;
}
export enum CatDetailEnum {
Persian = 'Persian',
Tabby = 'Tabby',
Siamese = 'Siamese',
}
export enum CatInformationEnum {
Persian = 'Persian',
Tabby = 'Tabby',
Siamese = 'Siamese',
}
```
> 上述代码使用一个叫做[NSwag](https://github.com/RicoSuter/NSwag)的工具生成。
你可以看到你现在有两个同样的枚举。要强调这个问题,你可以在你的装饰器中`enum`属性旁传递一个`enumName`。
```typescript
export class CatDetail {
@ApiProperty({ enum: CatBreed, enumName: 'CatBreed' })
breed: CatBreed;
}
```
`enumName`属性使能`@nestjs/swagger`来将`CatBreed`转换成它自身的`schema`从而使`CatBreed`枚举可重用,如下:
```typescript
CatDetail:
type: 'object'
properties:
...
- breed:
schema:
$ref: '#/components/schemas/CatBreed'
CatBreed:
type: string
enum:
- Persian
- Tabby
- Siamese
```
> 任何使用`enum`作为属性的装饰器也会使用`enumName`。
### 原生定义
在某些特定情况下(例如,深度嵌套的数组,矩阵),您可能需要手动描述类型。
```typescript
@ApiProperty({
type: 'array',
items: {
type: 'array',
items: {
type: 'number',
},
},
})
coords: number[][];
```
同样,为了在控制器类中手动定义输入/输出内容,请使用 `schema` 属性:
```typescript
@ApiBody({
schema: {
type: 'array',
items: {
type: 'array',
items: {
type: 'number',
},
},
},
})
async create(@Body() coords: number[][]) {}
```
### 额外模型
为了定义其他应由 Swagger 模块检查的模型,请使用 `@ApiExtraModels()` 装饰器:
```typescript
@ApiExtraModels(ExtraModel)
export class CreateCatDto {}
```
然后,您可以使用 `getSchemaPath(ExtraModel)` 获取对模型的引用(`$ref`):
```typescript
'application/vnd.api+json': {
schema: { $ref: getSchemaPath(ExtraModel) },
},
```
#### oneOf, anyOf, allOf
为了合并模式(schemas),您可以使用 `oneOf`,`anyOf` 或 `allOf` 关键字 ([阅读更多](https://swagger.io/docs/specification/data-models/oneof-anyof-allof-not/)).
```typescript
@ApiProperty({
oneOf: [
{ $ref: getSchemaPath(Cat) },
{ $ref: getSchemaPath(Dog) },
],
})
pet: Cat | Dog;
```
如果你想定义一个多态数组(例如,数组成员包含多个schema),你可以使用原生定义(如上)来手动定义你的类型。
```typescript
type Pet = Cat | Dog;
@ApiProperty({
type: 'array',
items: {
oneOf: [
{ $ref: getSchemaPath(Cat) },
{ $ref: getSchemaPath(Dog) },
],
},
})
pets: Pet[];
```
> `getSchemaPath()` 函数是从 `@nestjs/swagger`进行导入的
必须使用 `@ApiExtraModels()` 装饰器(在类级别)将 `Cat` 和 `Dog` 都定义为额外模型。
### 多种规格
`SwaggerModuler`还提供了一种支持多种规格的方法。 换句话说,您可以在不同的端点上使用不同的 UI 提供不同的文档。
为了支持多规格,您的应用程序必须使用模块化方法编写。 `createDocument()` 方法接受的第三个参数:`extraOptions` ,它是一个包含 `include` 属性的对象。`include` 属性的值是一个模块数组。
您可以设置多个规格支持,如下所示:
```typescript
import { NestFactory } from '@nestjs/core';
import { SwaggerModule, DocumentBuilder } from '@nestjs/swagger';
import { ApplicationModule } from './app.module';
async function bootstrap() {
const app = await NestFactory.create(ApplicationModule);
/**
* createDocument(application, configurationOptions, extraOptions);
*
* createDocument method takes in an optional 3rd argument "extraOptions"
* which is an object with "include" property where you can pass an Array
* of Modules that you want to include in that Swagger Specification
* E.g: CatsModule and DogsModule will have two separate Swagger Specifications which
* will be exposed on two different SwaggerUI with two different endpoints.
*/
const options = new DocumentBuilder()
.setTitle('Cats example')
.setDescription('The cats API description')
.setVersion('1.0')
.addTag('cats')
.build();
const catDocument = SwaggerModule.createDocument(app, options, {
include: [CatsModule]
});
SwaggerModule.setup('api/cats', app, catDocument);
const secondOptions = new DocumentBuilder()
.setTitle('Dogs example')
.setDescription('The dogs API description')
.setVersion('1.0')
.addTag('dogs')
.build();
const dogDocument = SwaggerModule.createDocument(app, secondOptions, {
include: [DogsModule]
});
SwaggerModule.setup('api/dogs', app, dogDocument);
await app.listen(3000);
}
bootstrap();
```
现在,您可以使用以下命令启动服务器:
```bash
$ npm run start
```
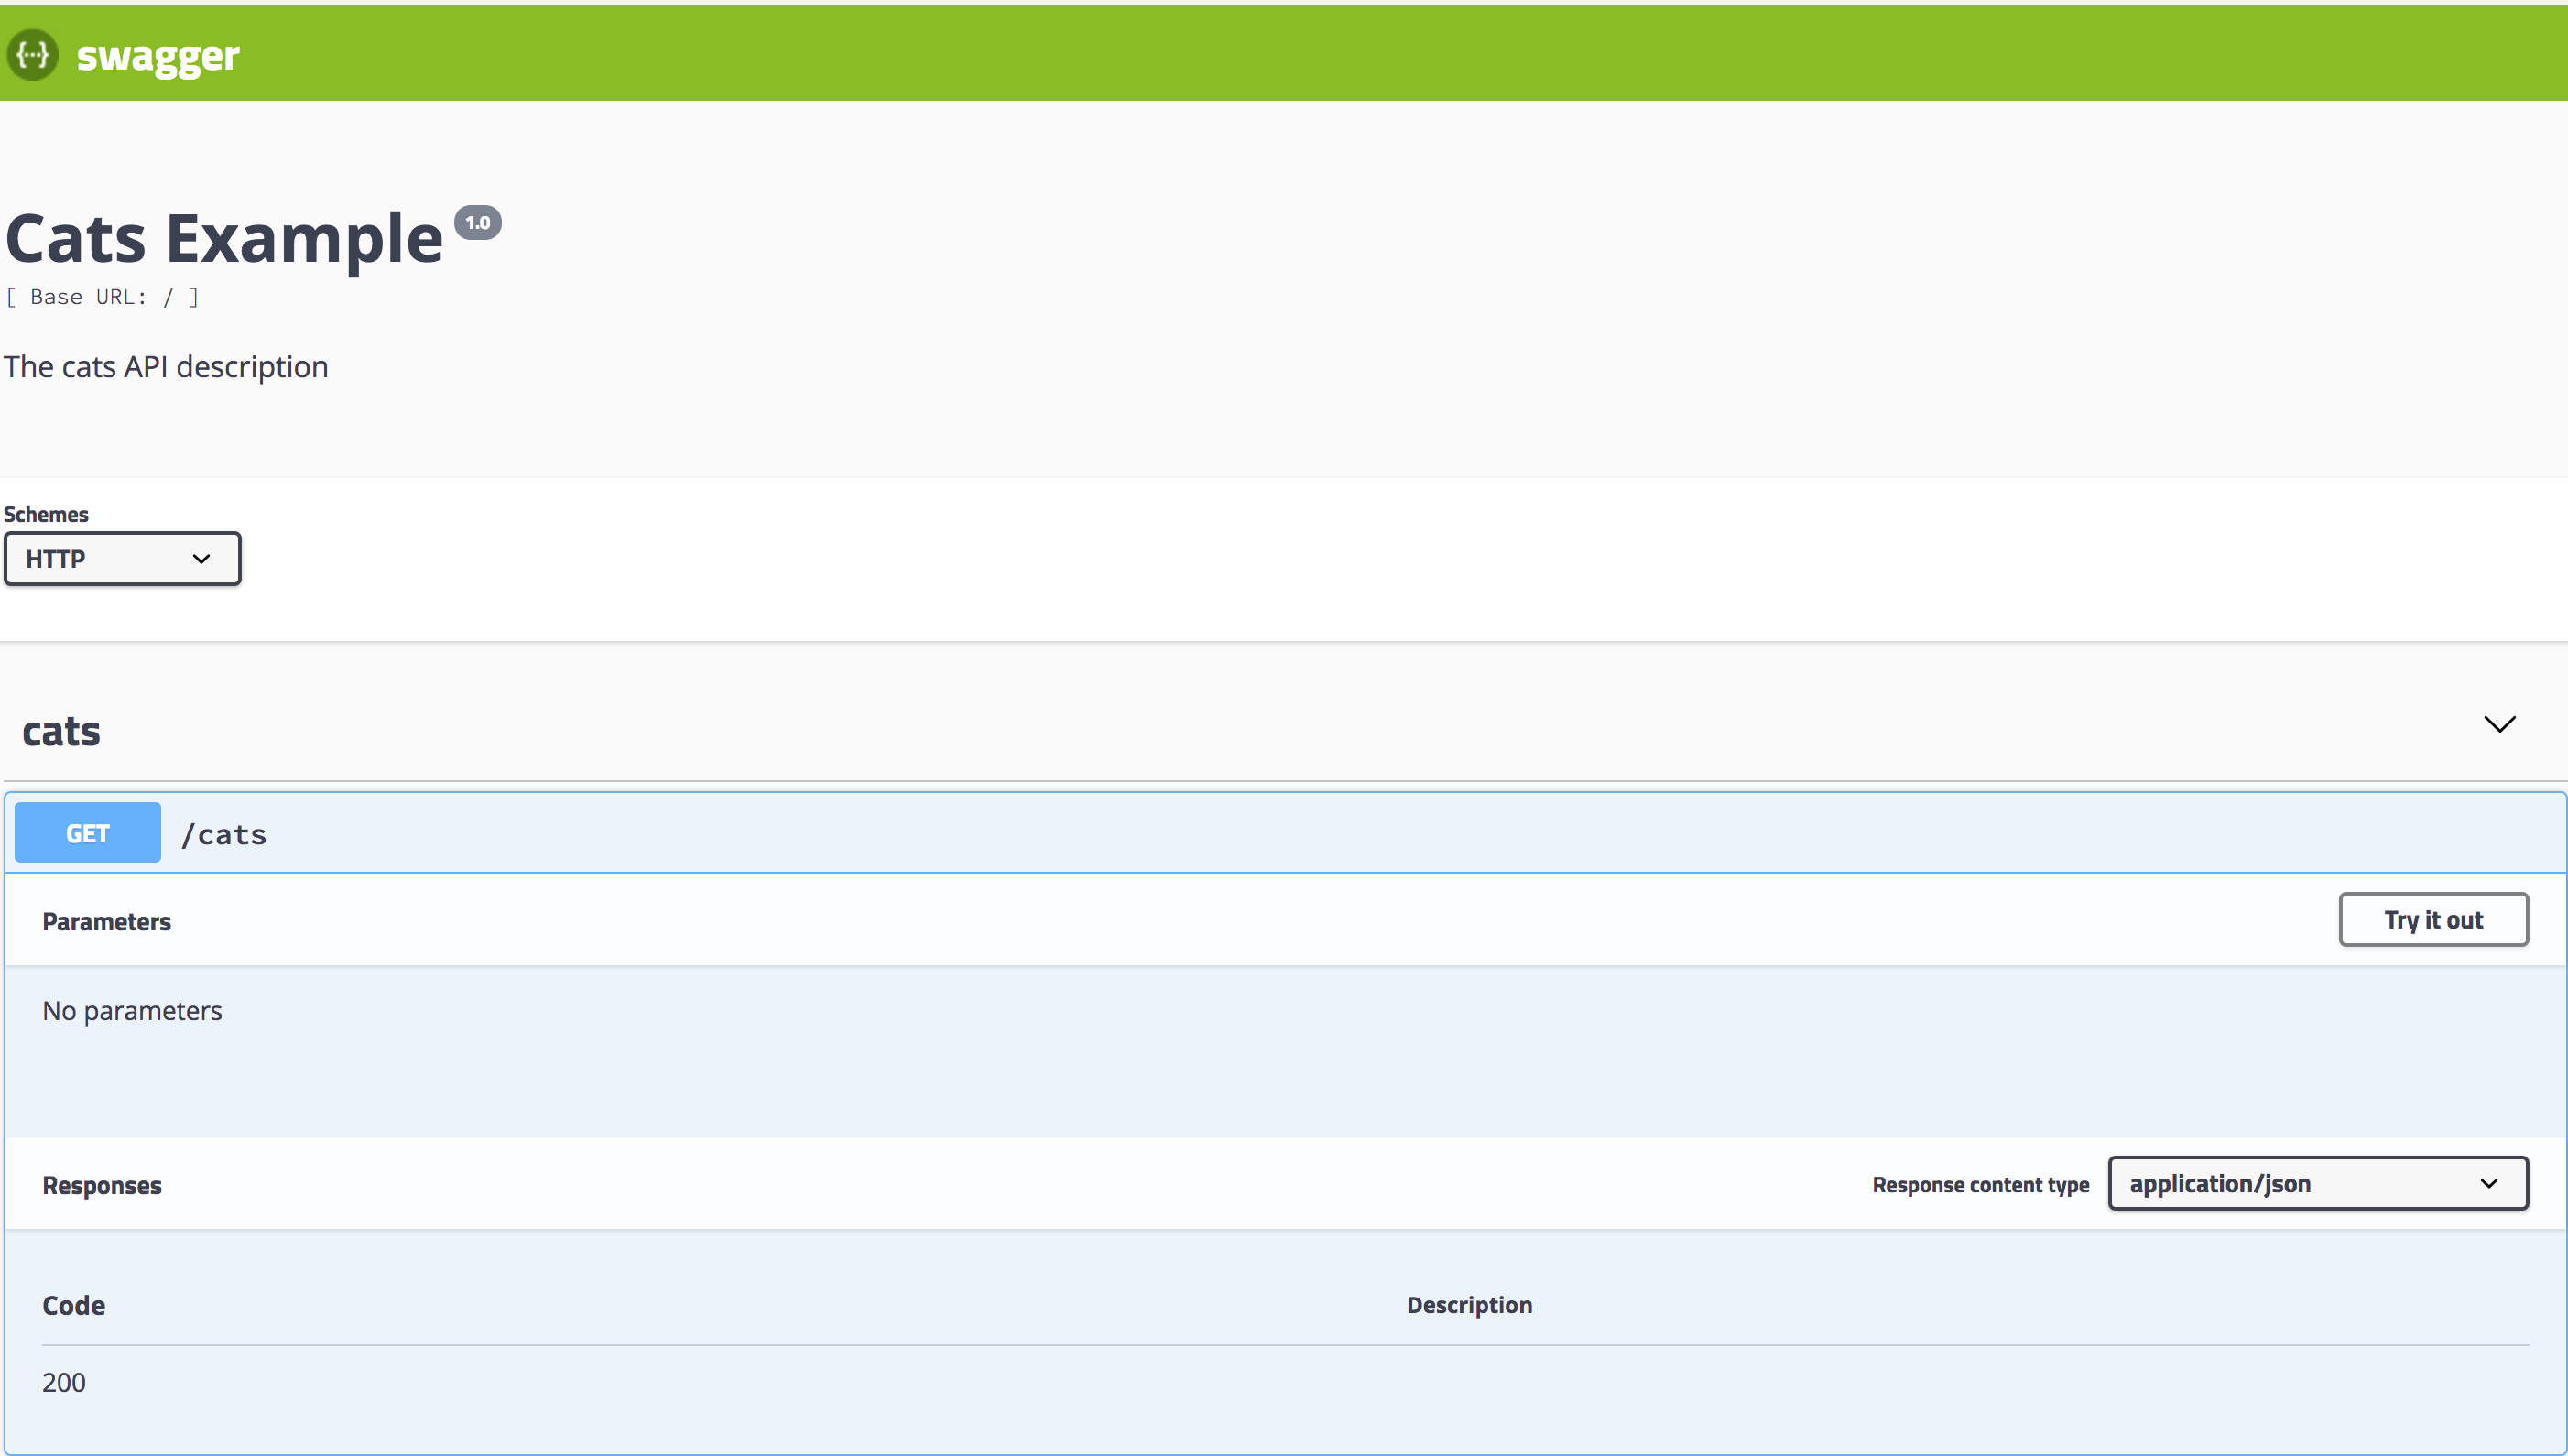
导航到 `http://localhost:3000/api/cats` 查看 Swagger UI 里的 cats:
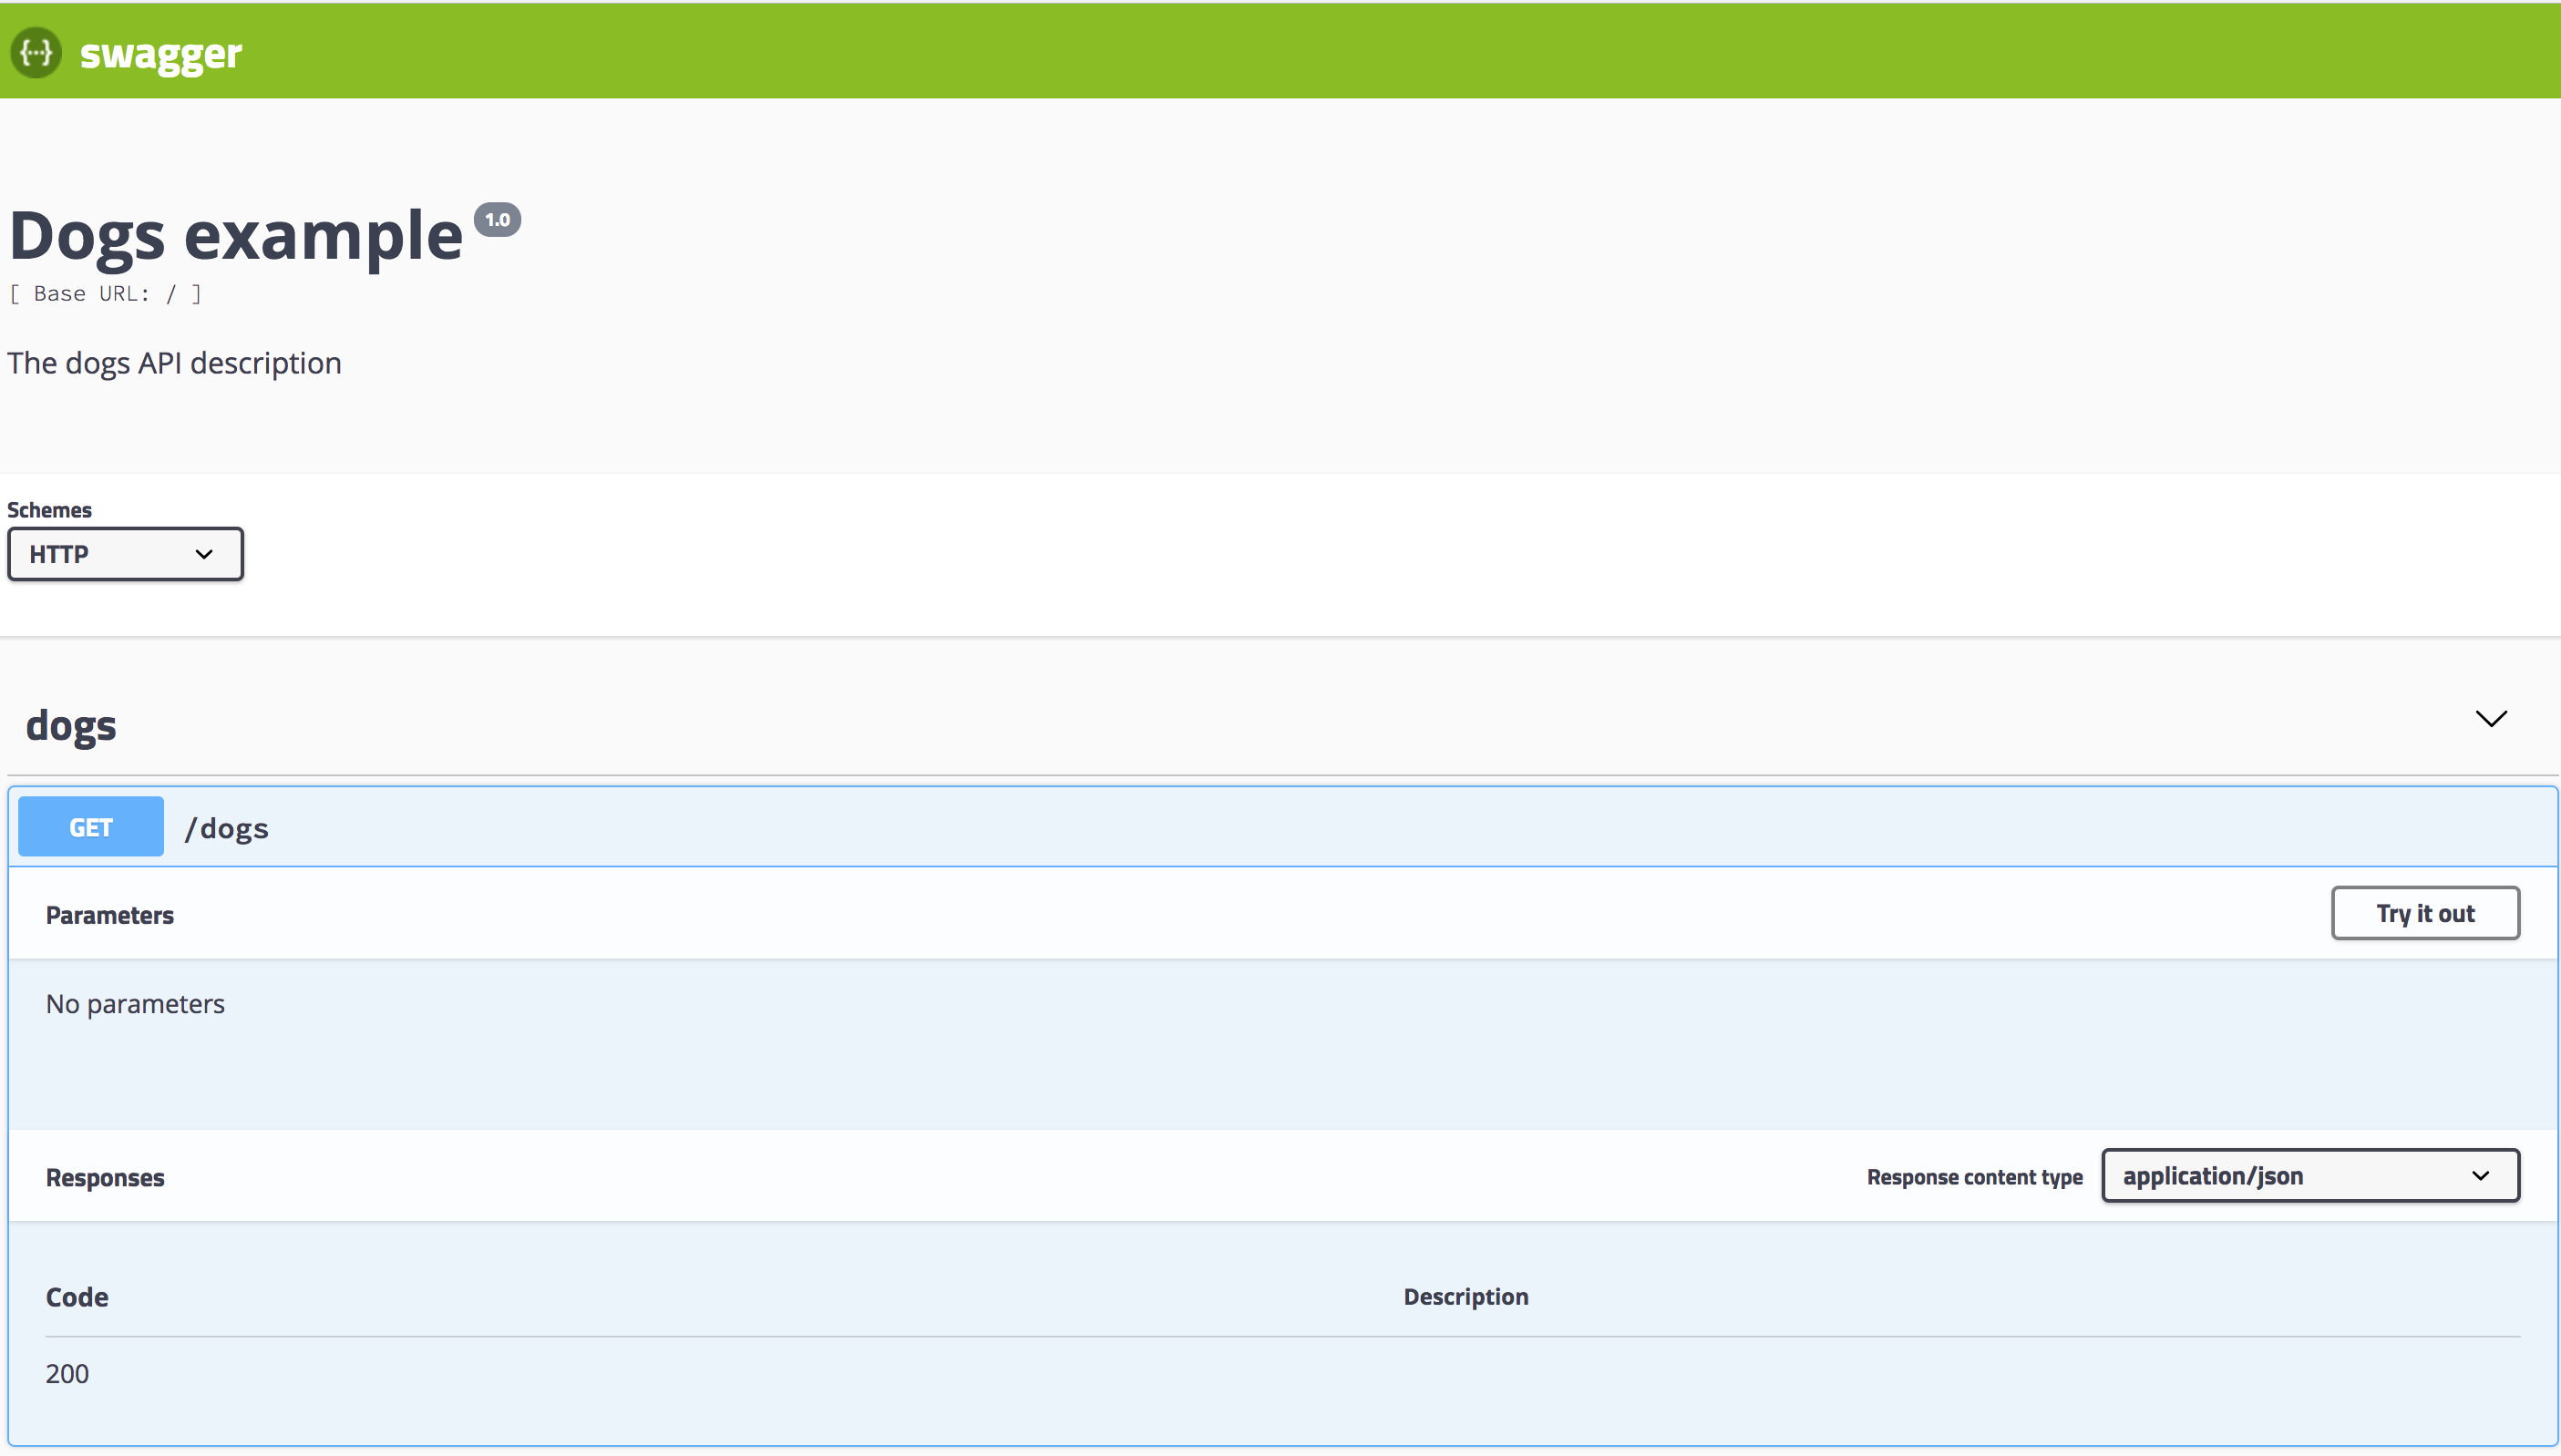
`http://localhost:3000/api/dogs` 查看 Swagger UI 里的 dogs:
### 标签(Tags)
要将控制器附加到特定标签,请使用 `@ApiTags(...tags)` 装饰器。
```typescript
@ApiUseTags('cats')
@Controller('cats')
export class CatsController {}
```
### HTTP 头字段
要定义自定义 HTTP 标头作为请求一部分,请使用 `@ApiHeader()` 。
```typescript
@ApiHeader({
name: 'Authorization',
description: 'Auth token'
})
@Controller('cats')
export class CatsController {}
```
### 响应
要定义自定义 `HTTP` 响应,我们使用 `@ApiResponse()` 装饰器。
```typescript
@Post()
@ApiResponse({ status: 201, description: 'The record has been successfully created.'})
@ApiResponse({ status: 403, description: 'Forbidden.'})
async create(@Body() createCatDto: CreateCatDto) {
this.catsService.create(createCatDto);
}
```
与异常过滤器部分中定义的常见 `HTTP` 异常相同,Nest 还提供了一组可重用的 **API 响应** ,这些响应继承自核心 `@ApiResponse` 装饰器:
- `@ApiOkResponse()`
- `@ApiCreatedResponse()`
- `@ApiBadRequestResponse()`
- `@ApiUnauthorizedResponse()`
- `@ApiNotFoundResponse()`
- `@ApiForbiddenResponse()`
- `@ApiMethodNotAllowedResponse()`
- `@ApiNotAcceptableResponse()`
- `@ApiRequestTimeoutResponse()`
- `@ApiConflictResponse()`
- `@ApiGoneResponse()`
- `@ApiPayloadTooLargeResponse()`
- `@ApiUnsupportedMediaTypeResponse()`
- `@ApiUnprocessableEntityResponse()`
- `@ApiInternalServerErrorResponse()`
- `@ApiNotImplementedResponse()`
- `@ApiBadGatewayResponse()`
- `@ApiServiceUnavailableResponse()`
- `@ApiGatewayTimeoutResponse()`
- `@ApiDefaultResponse()`
```typescript
@Post()
@ApiCreatedResponse({ description: 'The record has been successfully created.'})
@ApiForbiddenResponse({ description: 'Forbidden.'})
async create(@Body() createCatDto: CreateCatDto) {
this.catsService.create(createCatDto);
}
```
要为请求指定返回模型,必须创建一个类并使用 `@ApiProperty()` 装饰器注释所有属性。
```typescript
export class Cat {
@ApiProperty()
id: number;
@ApiProperty()
name: string;
@ApiProperty()
age: number;
@ApiProperty()
breed: string;
}
```
之后,必须将 `Cat` 模型与响应装饰器的 `type` 属性结合使用。
```typescript
@ApiTags('cats')
@Controller('cats')
export class CatsController {
@Post()
@ApiCreatedResponse({
description: 'The record has been successfully created.',
type: Cat
})
async create(@Body() createCatDto: CreateCatDto): Promise<Cat> {
return this.catsService.create(createCatDto);
}
}
```
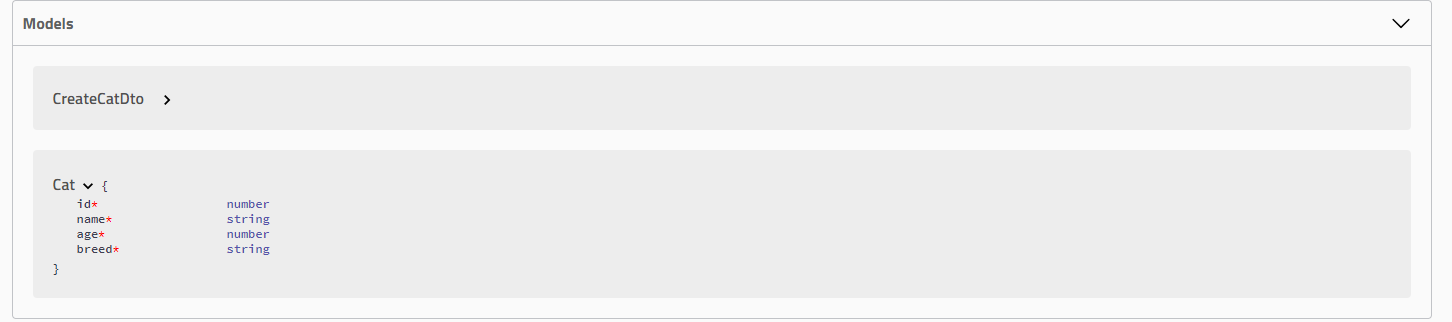
打开浏览器,验证生成的 `Cat` 模型:
### 全局前缀
要忽略通过 `setGlobalPrefix()` 设置的路由的全局前缀,请使用 `ignoreGlobalPrefix`:
```typescript
const document = SwaggerModule.createDocument(app, options, {
ignoreGlobalPrefix: true
});
```
### 安全
要定义针对特定操作应使用的安全性机制,请使用 `@ApiSecurity()` 装饰器。
```typescript
@ApiSecurity('basic')
@Controller('cats')
export class CatsController {}
```
在运行应用程序之前,请记住使用 `DocumentBuilder` 将安全性定义添加到您的基本文档中:
```typescript
const options = new DocumentBuilder().addSecurity('basic', {
type: 'http',
scheme: 'basic'
});
```
一些最流行的身份验证技术是预定义的(例如 `basic` 和 `bearer`),因此,您不必如上所述手动定义安全性机制。
### 基础认证
为了使用基础认证,使用 `@ApiBasicAuth()`。
```typescript
@ApiBasicAuth()
@Controller('cats')
export class CatsController {}
```
在运行应用程序之前,请记住使用 `DocumentBuilder` 将安全性定义添加到基本文档中:
```typescript
const options = new DocumentBuilder().addBasicAuth();
```
### Bearer 认证
为了使用 bearer 认证, 使用 `@ApiBearerAuth()`。
```typescript
@ApiBearerAuth()
@Controller('cats')
export class CatsController {}
```
在运行应用程序之前,请记住使用 `DocumentBuilder` 将安全性定义添加到基本文档中:
```typescript
const options = new DocumentBuilder().addBearerAuth();
```
### OAuth2 认证
为了使用 OAuth2 认证,使用 `@ApiOAuth2()`。
```typescript
@ApiOAuth2(['pets:write'])
@Controller('cats')
export class CatsController {}
```
在运行应用程序之前,请记住使用 `DocumentBuilder` 将安全性定义添加到基本文档中:
```typescript
const options = new DocumentBuilder().addOAuth2();
```
### Cookie 认证
使用`@ApiCookieAuth()`来使能cookie认证。
```typescript
@ApiCookieAuth()
@Controller('cats')
export class CatsController {}
```
在你运行应用前,记得使用`DocumentBuilder`来向你的基础文档添加安全定义。
```typescript
const options = new DocumentBuilder().addCookieAuth('optional-session-id');
```
### 文件上传
您可以使用 `@ApiBody` 装饰器和 `@ApiConsumes()` 为特定方法启用文件上载。 这里是使用[文件上传](https://docs.nestjs.com/techniques/file-upload)技术的完整示例:
```typescript
@UseInterceptors(FileInterceptor('file'))
@ApiConsumes('multipart/form-data')
@ApiBody({
description: 'List of cats',
type: FileUploadDto,
})
uploadFile(@UploadedFile() file) {}
```
`FileUploadDto` 如下所定义:
```typescript
class FileUploadDto {
@ApiProperty({ type: 'string', format: 'binary' })
file: any;
}
```
### 扩展
要使用`@ApiExtension()`装饰器添加一个扩展,扩展名称必须以`x-`作为前缀。
```typescript
@ApiExtension('x-foo', { hello: 'world' })
```
### 装饰器
所有可用的 OpenAPI 装饰器都有一个 `Api` 前缀,可以清楚地区分核心装饰器。 以下是导出的装饰器的完整列表,以及可以应用装饰器的级别的名称。
| | |
| :----------------------: | :-----------------: |
| `@ApiOperation()` | Method |
| `@ApiResponse()` | Method / Controller |
| `@ApiProduces()` | Method / Controller |
| `@ApiConsumes()` | Method / Controller |
| `@ApiBearerAuth()` | Method / Controller |
| `@ApiOAuth2()` | Method / Controller |
| `@ApiBasicAuth()` | Method / Controller |
| `@ApiSecurity()` | Method / Controller |
| `@ApiExtraModels()` | Method / Controller |
| `@ApiBody()` | Method |
| `@ApiParam()` | Method |
| `@ApiQuery()` | Method |
| `@ApiHeader()` | Method / Controller |
| `@ApiExcludeEndpoint()` | Method |
| `@ApiTags()` | Method / Controller |
| `@ApiProperty()` | Model |
| `@ApiPropertyOptional()` | Model |
| `@ApiHideProperty()` | Model |
| `@ApiExtension()` | Model |
### 插件
TypeScript 的元数据反射系统具有几个限制,这些限制使得例如无法确定类包含哪些属性或无法识别给定属性是可选属性还是必需属性。但是,其中一些限制可以在编译时解决。 Nest 提供了一个插件,可以增强 TypeScript 编译过程,以减少所需的样板代码量。
> 该插件是**选择性**的。可以手动声明所有装饰器,也可以只声明需要的特定装饰器。
Swagger 插件会自动:
- 除非使用 `@ApiHideProperty`,否则用 `@ApiProperty` 注释所有 DTO 属性
- 根据问号标记设置 `required` 属性(例如,`name?: string` 将设置 `required: false`)
- 根据类型设置 `type` 或 `enum` 属性(也支持数组)
- 根据分配的默认值设置 `default` 属性
- 根据 `class-validator` 装饰器设置多个验证规则(如果 `classValidatorShim` 设置为 `true`)
- 向具有正确状态和 `type`(响应模型)的每个端点添加响应装饰器
请注意,你的文件名必须包含如下前缀之一:['.dto.ts', '.entity.ts'] (例如, create-user.dto.ts) 从而能让插件对其进行分析。
以前,如果您想通过 Swagger UI 提供交互式体验,您必须重复很多代码,以使程序包知道应如何在规范中声明您的模型/组件。例如,您可以定义一个简单的 `CreateUserDto` 类,如下所示:
```typescript
export class CreateUserDto {
@ApiProperty()
email: string;
@ApiProperty()
password: string;
@ApiProperty({ enum: RoleEnum, default: [], isArray: true })
roles: RoleEnum[] = [];
@ApiProperty({ required: false, default: true })
isEnabled?: boolean = true;
}
```
尽管对于中型项目而言这并不是什么大问题,但是一旦您拥有大量的类,它就会变得冗长而笨拙。
现在,在启用 Swagger 插件的情况下,可以简单地声明上述类定义:
```typescript
export class CreateUserDto {
email: string;
password: string;
roles: RoleEnum[] = [];
isEnabled?: boolean = true;
}
```
该插件会基于**抽象语法树**动态添加适当的装饰器。因此,您不必再为分散在整个项目中的 `@ApiProperty` 装饰器而苦恼。
?> 该插件将自动生成所有缺少的 swagger 属性,但是如果您需要覆盖它们,则只需通过 `@ApiProperty()` 显式设置它们即可。
为了启用该插件,只需打开 `nest-cli.json`(如果使用[Nest CLI](/cli/overview)) 并添加以下`plugins`配置:
```javascript
{
"collection": "@nestjs/schematics",
"sourceRoot": "src",
"compilerOptions": {
"plugins": ["@nestjs/swagger/plugin"]
}
}
```
您可以使用 `options` 属性来自定义插件的行为。
```javascript
"plugins": [
{
"name": "@nestjs/swagger/plugin",
"options": {
"classValidatorShim": false
}
}
]
```
`options` 属性必须满足以下接口:
```typescript
export interface PluginOptions {
dtoFileNameSuffix?: string[];
controllerFileNameSuffix?: string[];
classValidatorShim?: boolean;
}
```
<table>
<tr>
<th>选项(Option)</th>
<th>默认(Default)</th>
<th>描述(Description)</th>
</tr>
<tr>
<td><code>dtoFileNameSuffix</code></td>
<td><code>['.dto.ts', '.entity.ts']</code></td>
<td>DTO(数据传输对象)文件后缀</td>
</tr>
<tr>
<td><code>controllerFileNameSuffix</code></td>
<td><code>.controller.ts</code></td>
<td>控制器文件后缀</td>
</tr>
<tr>
<td><code>classValidatorShim</code></td>
<td><code>true</code></td>
<td>如果设置为true,则模块将重用 <code>class-validator</code> 验证装饰器 (例如 <code>@Max(10)</code> 会将 <code>max: 10</code> 添加到 schema 定义中) </td>
</tr>
</table>
如果您不使用 CLI,而是使用自定义的 `webpack` 配置,则可以将此插件与 `ts-loader` 结合使用:
```javascript
getCustomTransformers: (program: any) => ({
before: [require('@nestjs/swagger/plugin').before({}, program)]
}),
```
### 移植到 4.0
如果你现在正在使用 `@nestjs/swagger@3.*`,请注意版本 4.0 中的以下重大更改/ API 更改。
以下装饰器已经被更改/重命名:
- `@ApiModelProperty` 现在是 `@ApiProperty`
- `@ApiModelPropertyOptional` 现在是 `@ApiPropertyOptional`
- `@ApiResponseModelProperty` 现在是 `@ApiResponseProperty`
- `@ApiImplicitQuery` 现在是 `@ApiQuery`
- `@ApiImplicitParam` 现在是 `@ApiParam`
- `@ApiImplicitBody` 现在是 `@ApiBody`
- `@ApiImplicitHeader` 现在是 `@ApiHeader`
- `@ApiOperation({{ '{' }} title: 'test' {{ '}' }})` 现在是 `@ApiOperation({{ '{' }} summary: 'test' {{ '}' }})`
- `@ApiUseTags` 现在是 `@ApiTags`
`DocumentBuilder` 重大更改(更新的方法签名):
- `addTag`
- `addBearerAuth`
- `addOAuth2`
- `setContactEmail` 现在是 `setContact`
- `setHost` 已经被移除
- `setSchemes` 已经被移除
如下方法被添加:
- `addServer`
- `addApiKey`
- `addBasicAuth`
- `addSecurity`
- `addSecurityRequirements`
### 示例
请参考这里的[示例](https://github.com/nestjs/nest/tree/master/sample/11-swagger)。
- 介绍
- 概述
- 第一步
- 控制器
- 提供者
- 模块
- 中间件
- 异常过滤器
- 管道
- 守卫
- 拦截器
- 自定义装饰器
- 基础知识
- 自定义提供者
- 异步提供者
- 动态模块
- 注入作用域
- 循环依赖
- 模块参考
- 懒加载模块
- 应用上下文
- 生命周期事件
- 跨平台
- 测试
- 技术
- 数据库
- Mongo
- 配置
- 验证
- 缓存
- 序列化
- 版本控制
- 定时任务
- 队列
- 日志
- Cookies
- 事件
- 压缩
- 文件上传
- 流式处理文件
- HTTP模块
- Session(会话)
- MVC
- 性能(Fastify)
- 服务器端事件发送
- 安全
- 认证(Authentication)
- 授权(Authorization)
- 加密和散列
- Helmet
- CORS(跨域请求)
- CSRF保护
- 限速
- GraphQL
- 快速开始
- 解析器(resolvers)
- 变更(Mutations)
- 订阅(Subscriptions)
- 标量(Scalars)
- 指令(directives)
- 接口(Interfaces)
- 联合类型
- 枚举(Enums)
- 字段中间件
- 映射类型
- 插件
- 复杂性
- 扩展
- CLI插件
- 生成SDL
- 其他功能
- 联合服务
- 迁移指南
- Websocket
- 网关
- 异常过滤器
- 管道
- 守卫
- 拦截器
- 适配器
- 微服务
- 概述
- Redis
- MQTT
- NATS
- RabbitMQ
- Kafka
- gRPC
- 自定义传输器
- 异常过滤器
- 管道
- 守卫
- 拦截器
- 独立应用
- Cli
- 概述
- 工作空间
- 库
- 用法
- 脚本
- Openapi
- 介绍
- 类型和参数
- 操作
- 安全
- 映射类型
- 装饰器
- CLI插件
- 其他特性
- 迁移指南
- 秘籍
- CRUD 生成器
- 热重载
- MikroORM
- TypeORM
- Mongoose
- 序列化
- 路由模块
- Swagger
- 健康检查
- CQRS
- 文档
- Prisma
- 静态服务
- Nest Commander
- 问答
- Serverless
- HTTP 适配器
- 全局路由前缀
- 混合应用
- HTTPS 和多服务器
- 请求生命周期
- 常见错误
- 实例
- 迁移指南
- 发现
- 谁在使用Nest?