## 按钮
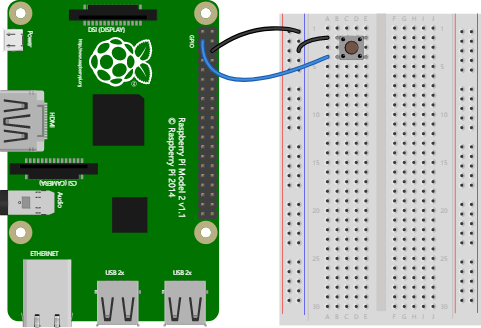
检测按钮是否按下:
~~~
from gpiozero import Button
button = Button(2)
while True:
if button.is_pressed:
print("Button is pressed")
else:
print("Button is not pressed")
~~~
直到按下代码程序才继续运行:
~~~
from gpiozero import Button
button = Button(2)
button.wait_for_press()
print("Button was pressed")
~~~
每按代码一次都执行特定函数一次:
~~~
from gpiozero import Button
from signal import pause
def say_hello():
print("Hello!")
button = Button(2)
button.when_pressed = say_hello # 没有括号
pause()
~~~
>注意:```button.when_pressed = say_hello```不会执行```say_hello```函数,只是创建了一个```say_hello```函数的引用,指明按钮按下的时候需要执行```say_hello```函数。
类似的,我们可以指定一个释放按钮时需要执行的函数:
~~~
from gpiozero import Button
from signal import pause
def say_hello():
print("Hello!")
def say_goodbye():
print("Goodbye!")
button = Button(2)
button.when_pressed = say_hello
button.when_released = say_goodbye
pause()
~~~

## 大按钮
上面的例子用的是微动开关,比较简单,市面上比较常见的按钮模块,也是出于按键方便和美观的考虑,大按钮模块:
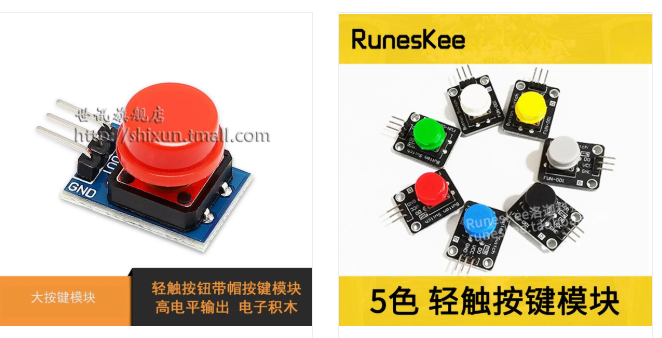
需要注意到是上图中的两种按钮都有3个引脚,但其实有一点小差异的:

上图的这种有3个引脚,分别是VCC,OUT和GND,需要注意的是OUT是在中间的。而且
按个按钮OUT连接树莓派数字引脚,VCC连接5V,Gnd连接树莓派接地之后,按下是输出高电平的,释放输出低电平。
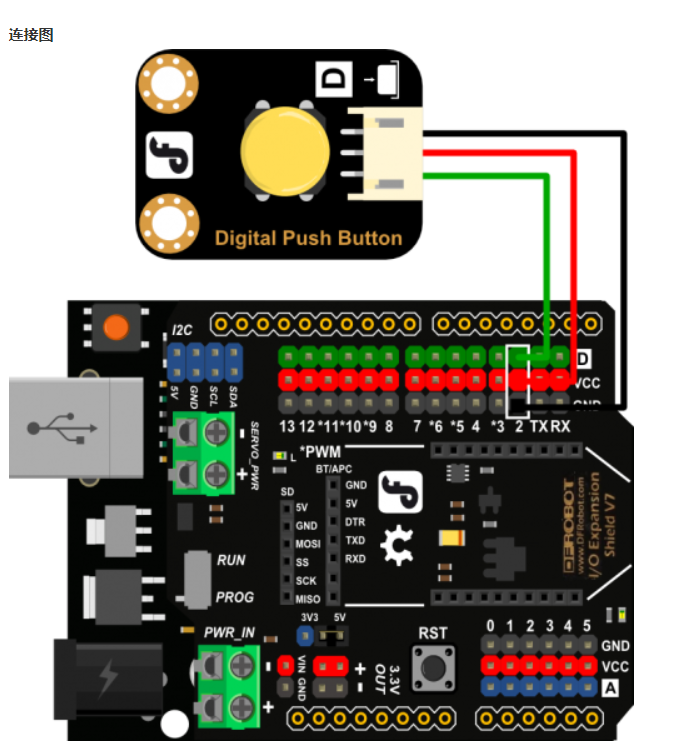
上图是参考资料中的按钮,则是按下高电平,释放低电平。
而下图中的按钮也就是`5色轻触按键模块`:
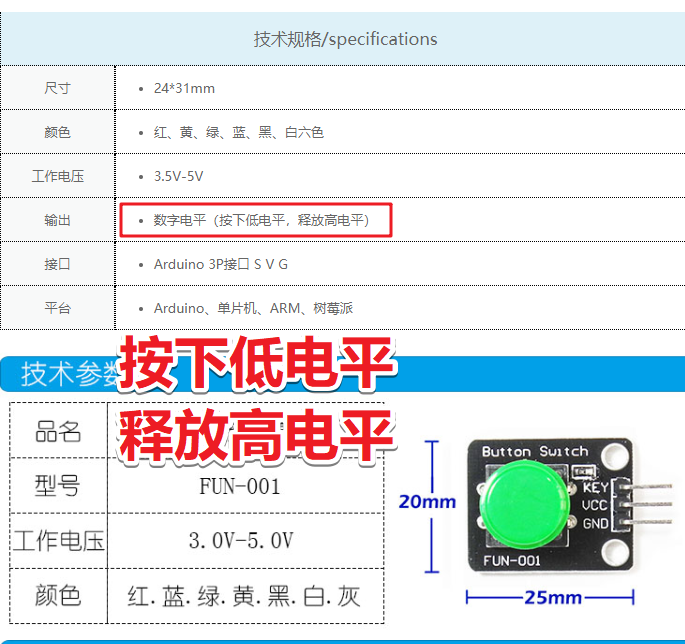
则是按下低电平,释放高电平。
而GPIO Zer类中的按钮,默认的是按下低电平,释放高电平,如果是用按下高电平释放低电平的按钮,上面的代码需要略作修改才能够得到相同的结果:
```
from gpiozero import Button
button = Button(6, pull_up=True)
while True:
if button.is_pressed:
print("Button is pressed")
else:
print("Button is not pressed")
```
>这里就是涉及到树莓派引脚的`pull_up`。参考资料[http://www.geekfans.com/article-5086-1.html](http://www.geekfans.com/article-5086-1.html)树莓派的上拉和下拉设置。如果按钮不能按照预期工作,修改下`pull_up`参数试试看,
### 正负极反接
或者把按钮的vcc连接到树莓派的gnd,把按钮的gnd连接到树莓派的5v。

对于这个按钮,如果想要跟上面`微动开关`的代码相同,不想修改代码的话,只需要把按钮的gnd连接到树莓派5v,按钮的vcc连接到树莓派Gnd,里面的原理待我搞透彻了再补充。
这样的话,微动开关的例子,可以原封不动的运行生效。
```
from gpiozero import Button, LED
from signal import pause
led = LED(16)
button = Button(5)
led.source = button
pause()
```
这段代码的意思是,LED灯是否亮取决于按钮的状态,当然如果是正常的接法,led的亮灭其实跟按钮相反的代码就是:
```
>`gpio_pull Desired pull-up/down state (off, down, up)`
`Default is "up".`
`Note that the default pin (GPIO3) has an`
`external pullup.`
```
树莓派的GPIO2是个很特殊的按钮。
# 不知道按钮按下输出高电平还是低电平怎么办
可以在正确连接线路的基础上,编写代码进行测试。
```
from gpiozero import Button
from signal import pause
button = Button(6)
while True:
print(button.value)
pause()
```
这样就可以很轻易的测试出硬件连接正确的情况下,按下按钮出处的值了。然后根据值来判断LED的亮灭就可以了:
```
from gpiozero import Button, LED
from signal import pause
from gpiozero.tools import negated
led = LED(16)
button = Button(6)
# led.source = negated(button)
while True:
if button.value: # 按钮没按下是1
led.off()
else: # 按钮按下 button的值是0
led.on()
pause()
```
但是这样写比较麻烦,我们可以简化一下:
```from gpiozero import Button, LED
from signal import pause
led = LED(16)
button = Button(6)
while True:
led.value = not button.value
pause()
```
注意因为在python中0在进行布尔判断的时候是False,其余的是True,所以如果是1 然后not 1,结果是False。但是这样写还是不够简练,我们用GPIO Zero提供的数据源工具更加优雅的实现,按下按钮LED亮,松开按钮LED灭的效果:
```
from gpiozero import Button, LED
from signal import pause
from gpiozero.tools import negated
led = LED(16)
button = Button(6)
led.source = negated(button)
pause()
```
上面这段代码就用到了GPIO Zero中精心设计的声明式编程范式,声明led灯的状态与button按钮返回的状态相反,这样就实现了按下灯亮,抬起灯灭的效果了。
>A GPIO pin designated as an input pin can be read as high (3V3) or low (0V). This is made easier with the use of internal pull-up or pull-down resistors. Pins GPIO2 and GPIO3 have fixed pull-up resistors, but for other pins this can be configured in software.[https://www.ccarea.cn/archives/215](https://www.ccarea.cn/archives/215)
## 参考资料:
* [Arduino大按钮](https://www.ncnynl.com/archives/201606/108.html)
- 简介
- 更新树莓派源
- GPIO Zero基础案例
- 导入GPIO Zero库
- 引脚编码
- 树莓派代码编辑器
- LED
- 电磁继电器
- 呼吸灯
- LED条形图
- led条
- 交通灯
- 按钮
- 按钮控制LED灯
- 用按钮控制摄像头
- 舵机
- 关机按钮
- 按钮拍照
- 反应速度游戏
- 音乐盒子
- 单个按钮控制多个元件
- 全彩灯
- 人体红外传感器
- 亮度传感器
- 距离传感器
- 马达控制
- 机器人
- 按钮控制机器人
- 键盘控制机器人
- 红外感应机器人
- 电位器
- 用数模转换器测量温度
- 通过3个电位器控制全彩灯
- 时控加热灯
- 联网状态指示
- CPU温度条形图
- 更多
- OLED屏幕
- GPIO Zero基础案例2
- 古德微树莓派案例
- ws2812灯带python案例
- ads1115
- 高级秘籍
- 4 配置远程GPIO
- 5 远程GPIO案例
- 5.1 LED和按钮
- 6 树莓派Zero OTG USB数据线
- 7.数据源和值
- 微信发送疫情
- 8. 命令行工具
- 9. 常见问题
- 10. 从RPi.GPIO库迁移到GPIO Zero
- 公众号文章
- Python绘制疫情图表
- 百度人工智能案例
- vscode配置树莓派远程开发环境
- Jupyter Notebook相关
- 树莓派拍摄定格动画
- oled
- 创客与音乐
- 如何入门Python
- 交通标志