# 第 2 章 Python 语法基础,IPython 和 Jupyter Notebooks
当我在2011年和2012年写作本书的第一版时,可用的学习Python数据分析的资源很少。这部分上是一个鸡和蛋的问题:我们现在使用的库,比如pandas、scikit-learn和statsmodels,那时相对来说并不成熟。2017年,数据科学、数据分析和机器学习的资源已经很多,原来通用的科学计算拓展到了计算机科学家、物理学家和其它研究领域的工作人员。学习Python和成为软件工程师的优秀书籍也有了。
因为这本书是专注于Python数据处理的,对于一些Python的数据结构和库的特性难免不足。因此,本章和第3章的内容只够你能学习本书后面的内容。
在我来看,没有必要为了数据分析而去精通Python。我鼓励你使用IPython shell和Jupyter试验示例代码,并学习不同类型、函数和方法的文档。虽然我已尽力让本书内容循序渐进,但读者偶尔仍会碰到没有之前介绍过的内容。
本书大部分内容关注的是基于表格的分析和处理大规模数据集的数据准备工具。为了使用这些工具,必须首先将混乱的数据规整为整洁的表格(或结构化)形式。幸好,Python是一个理想的语言,可以快速整理数据。Python使用得越熟练,越容易准备新数据集以进行分析。
最好在IPython和Jupyter中亲自尝试本书中使用的工具。当你学会了如何启动Ipython和Jupyter,我建议你跟随示例代码进行练习。与任何键盘驱动的操作环境一样,记住常见的命令也是学习曲线的一部分。
> 笔记:本章没有介绍Python的某些概念,如类和面向对象编程,你可能会发现它们在Python数据分析中很有用。 为了加强Python知识,我建议你学习官方Python教程,[https://docs.python.org/3/,或是通用的Python教程书籍,比如:](https://docs.python.org/3/,或是通用的Python教程书籍,比如:)
>
> * Python Cookbook,第3版,David Beazley和Brian K. Jones著(O’Reilly)
> * 流畅的Python,Luciano Ramalho著 \(O’Reilly\)
> * 高效的Python,Brett Slatkin著 \(Pearson\)
## 2.1 Python解释器
Python是解释性语言。Python解释器同一时间只能运行一个程序的一条语句。标准的交互Python解释器可以在命令行中通过键入`python`命令打开:
```text
$ python
Python 3.6.0 | packaged by conda-forge | (default, Jan 13 2017, 23:17:12)
[GCC 4.8.2 20140120 (Red Hat 4.8.2-15)] on linux
Type "help", "copyright", "credits" or "license" for more information.
>>> a = 5
>>> print(a)
5
```
`>>>`提示输入代码。要退出Python解释器返回终端,可以输入`exit()`或按Ctrl-D。
运行Python程序只需调用Python的同时,使用一个`.py`文件作为它的第一个参数。假设创建了一个`hello_world.py`文件,它的内容是:
```python
print('Hello world')
```
你可以用下面的命令运行它(`hello_world.py`文件必须位于终端的工作目录):
```python
$ python hello_world.py
Hello world
```
一些Python程序员总是这样执行Python代码的,从事数据分析和科学计算的人却会使用IPython,一个强化的Python解释器,或Jupyter notebooks,一个网页代码笔记本,它原先是IPython的一个子项目。在本章中,我介绍了如何使用IPython和Jupyter,在附录A中有更深入的介绍。当你使用`%run`命令,IPython会同样执行指定文件中的代码,结束之后,还可以与结果交互:
```text
$ ipython
Python 3.6.0 | packaged by conda-forge | (default, Jan 13 2017, 23:17:12)
Type "copyright", "credits" or "license" for more information.
IPython 5.1.0 -- An enhanced Interactive Python.
? -> Introduction and overview of IPython's features.
%quickref -> Quick reference.
help -> Python's own help system.
object? -> Details about 'object', use 'object??' for extra details.
In [1]: %run hello_world.py
Hello world
In [2]:
```
IPython默认采用序号的格式`In [2]:`,与标准的`>>>`提示符不同。
## 2.2 IPython基础
在本节中,我们会教你打开运行IPython shell和jupyter notebook,并介绍一些基本概念。
### 运行IPython Shell
你可以用`ipython`在命令行打开IPython Shell,就像打开普通的Python解释器:
```text
$ ipython
Python 3.6.0 | packaged by conda-forge | (default, Jan 13 2017, 23:17:12)
Type "copyright", "credits" or "license" for more information.
IPython 5.1.0 -- An enhanced Interactive Python.
? -> Introduction and overview of IPython's features.
%quickref -> Quick reference.
help -> Python's own help system.
object? -> Details about 'object', use 'object??' for extra details.
In [1]: a = 5
In [2]: a
Out[2]: 5
```
你可以通过输入代码并按Return(或Enter),运行任意Python语句。当你只输入一个变量,它会显示代表的对象:
```python
In [5]: import numpy as np
In [6]: data = {i : np.random.randn() for i in range(7)}
In [7]: data
Out[7]:
{0: -0.20470765948471295,
1: 0.47894333805754824,
2: -0.5194387150567381,
3: -0.55573030434749,
4: 1.9657805725027142,
5: 1.3934058329729904,
6: 0.09290787674371767}
```
前两行是Python代码语句;第二条语句创建一个名为`data`的变量,它引用一个新创建的Python字典。最后一行打印`data`的值。
许多Python对象被格式化为更易读的形式,或称作`pretty-printed`,它与普通的`print`不同。如果在标准Python解释器中打印上述`data`变量,则可读性要降低:
```text
>>> from numpy.random import randn
>>> data = {i : randn() for i in range(7)}
>>> print(data)
{0: -1.5948255432744511, 1: 0.10569006472787983, 2: 1.972367135977295,
3: 0.15455217573074576, 4: -0.24058577449429575, 5: -1.2904897053651216,
6: 0.3308507317325902}
```
IPython还支持执行任意代码块(通过一个华丽的复制-粘贴方法)和整段Python脚本的功能。你也可以使用Jupyter notebook运行大代码块,接下来就会看到。
### 运行Jupyter Notebook
notebook是Jupyter项目的重要组件之一,它是一个代码、文本(有标记或无标记)、数据可视化或其它输出的交互式文档。Jupyter Notebook需要与内核互动,内核是Jupyter与其它编程语言的交互编程协议。Python的Jupyter内核是使用IPython。要启动Jupyter,在命令行中输入`jupyter notebook`:
```text
$ jupyter notebook
[I 15:20:52.739 NotebookApp] Serving notebooks from local directory:
/home/wesm/code/pydata-book
[I 15:20:52.739 NotebookApp] 0 active kernels
[I 15:20:52.739 NotebookApp] The Jupyter Notebook is running at:
http://localhost:8888/
[I 15:20:52.740 NotebookApp] Use Control-C to stop this server and shut down
all kernels (twice to skip confirmation).
Created new window in existing browser session.
```
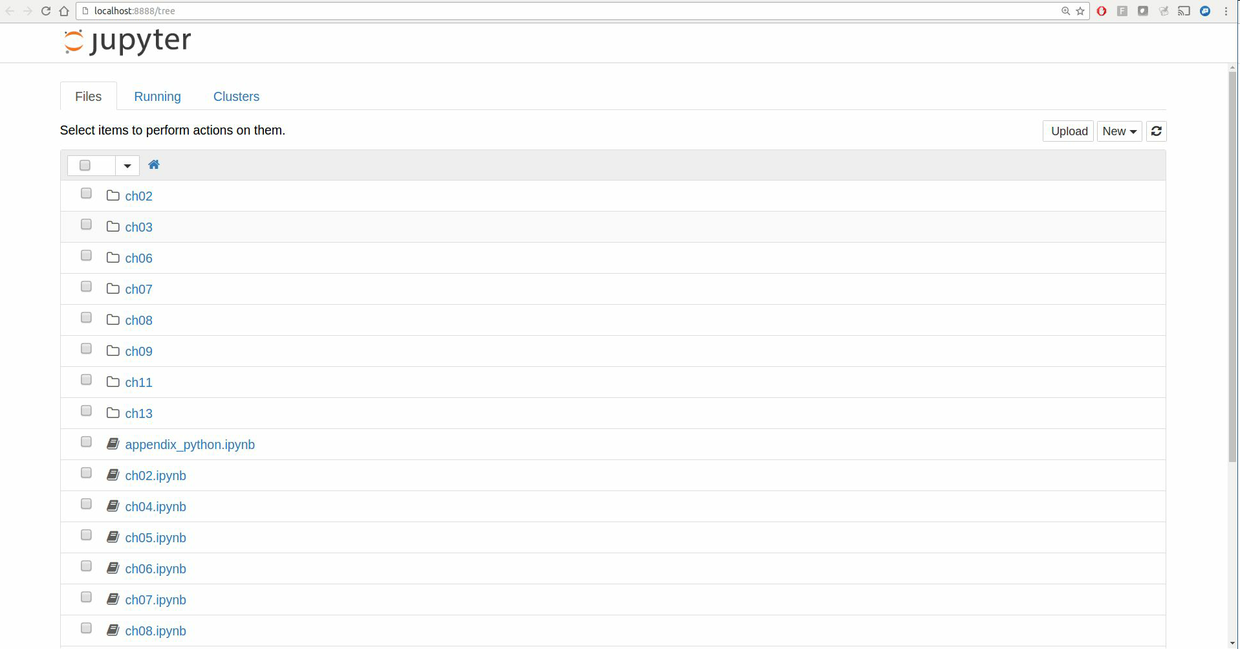
在多数平台上,Jupyter会自动打开默认的浏览器(除非指定了`--no-browser`)。或者,可以在启动notebook之后,手动打开网页`http://localhost:8888/`。图2-1展示了Google Chrome中的notebook。
> 笔记:许多人使用Jupyter作为本地的计算环境,但它也可以部署到服务器上远程访问。这里不做介绍,如果需要的话,鼓励读者自行到网上学习。
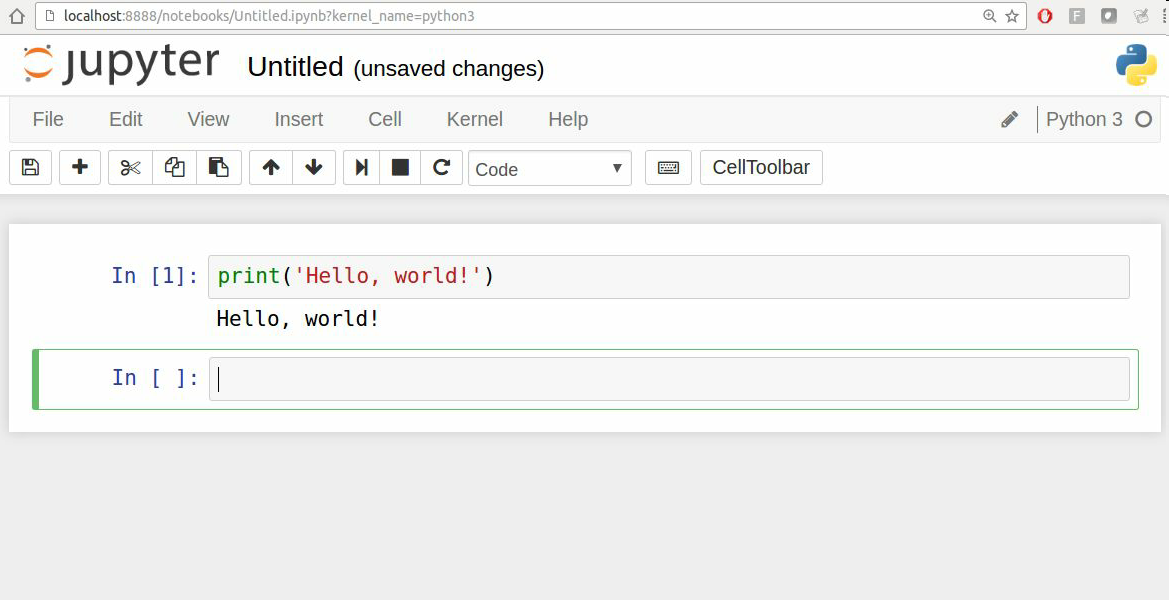
要新建一个notebook,点击按钮New,选择“Python3”或“conda\[默认项\]”。如果是第一次,点击空格,输入一行Python代码。然后按Shift-Enter执行。
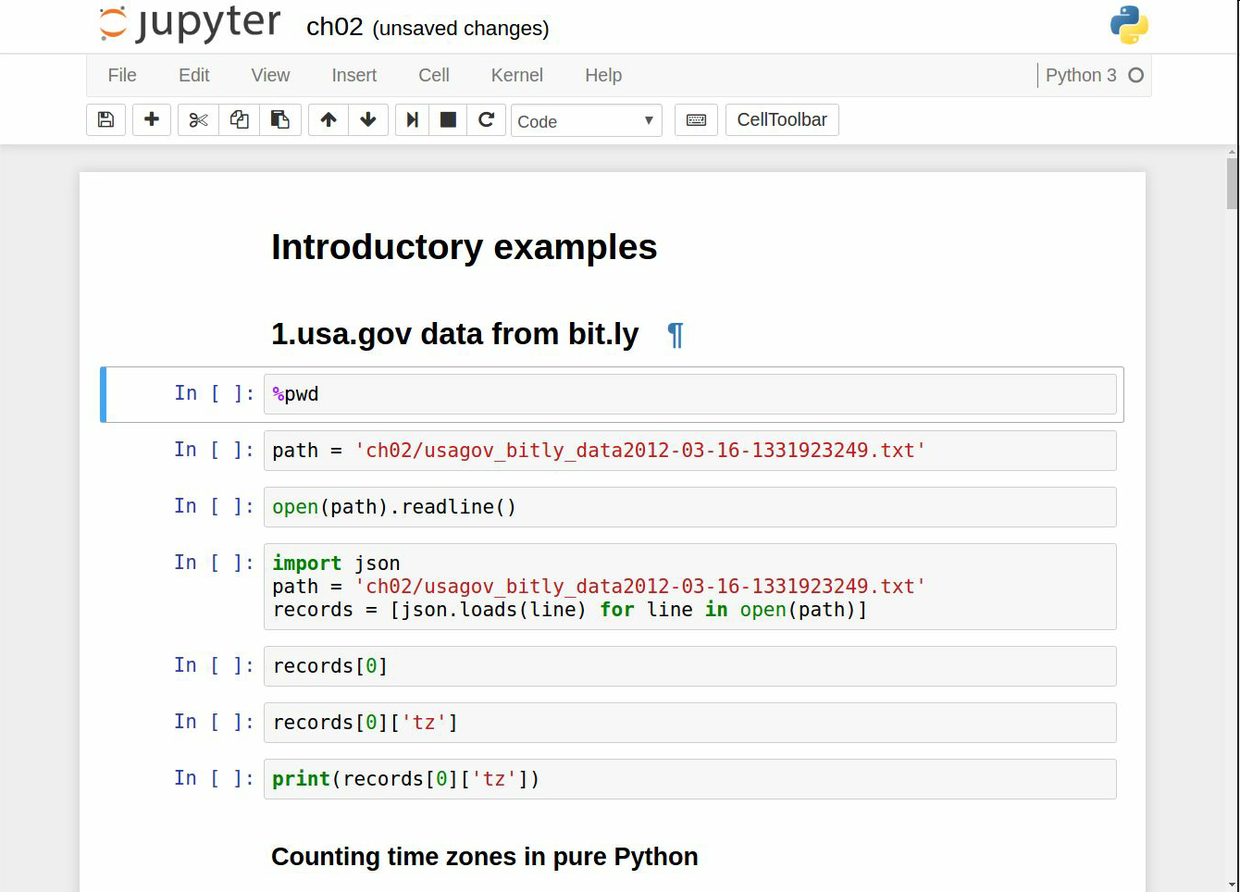
当保存notebook时(File目录下的Save and Checkpoint),会创建一个后缀名为`.ipynb`的文件。这是一个自包含文件格式,包含当前笔记本中的所有内容(包括所有已评估的代码输出)。可以被其它Jupyter用户加载和编辑。要加载存在的notebook,把它放到启动notebook进程的相同目录内。你可以用本书的示例代码练习,见图2-3。
虽然Jupyter notebook和IPython shell使用起来不同,本章中几乎所有的命令和工具都可以通用。
### Tab补全
从外观上,IPython shell和标准的Python解释器只是看起来不同。IPython shell的进步之一是具备其它IDE和交互计算分析环境都有的tab补全功能。在shell中输入表达式,按下Tab,会搜索已输入变量(对象、函数等等)的命名空间:
```text
In [1]: an_apple = 27
In [2]: an_example = 42
In [3]: an<Tab>
an_apple and an_example any
```
在这个例子中,IPython呈现出了之前两个定义的变量和Python的关键字和内建的函数`any`。当然,你也可以补全任何对象的方法和属性:
```text
In [3]: b = [1, 2, 3]
In [4]: b.<Tab>
b.append b.count b.insert b.reverse
b.clear b.extend b.pop b.sort
b.copy b.index b.remove
```
同样也适用于模块:
```text
In [1]: import datetime
In [2]: datetime.<Tab>
datetime.date datetime.MAXYEAR datetime.timedelta
datetime.datetime datetime.MINYEAR datetime.timezone
datetime.datetime_CAPI datetime.time datetime.tzinfo
```
在Jupyter notebook和新版的IPython(5.0及以上),自动补全功能是下拉框的形式。
> 笔记:注意,默认情况下,IPython会隐藏下划线开头的方法和属性,比如魔术方法和内部的“私有”方法和属性,以避免混乱的显示(和让新手迷惑!)这些也可以tab补全,但是你必须首先键入一个下划线才能看到它们。如果你喜欢总是在tab补全中看到这样的方法,你可以IPython配置中进行设置。可以在IPython文档中查找方法。
除了补全命名、对象和模块属性,Tab还可以补全其它的。当输入看似文件路径时(即使是Python字符串),按下Tab也可以补全电脑上对应的文件信息:
```text
In [7]: datasets/movielens/<Tab>
datasets/movielens/movies.dat datasets/movielens/README
datasets/movielens/ratings.dat datasets/movielens/users.dat
In [7]: path = 'datasets/movielens/<Tab>
datasets/movielens/movies.dat datasets/movielens/README
datasets/movielens/ratings.dat datasets/movielens/users.dat
```
结合`%run`,tab补全可以节省许多键盘操作。
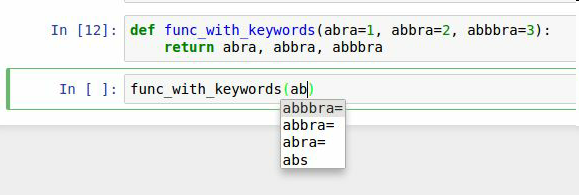
另外,tab补全可以补全函数的关键词参数(包括等于号=)。见图2-4。
后面会仔细地学习函数。
### 自省
在变量前后使用问号?,可以显示对象的信息:
```python
In [8]: b = [1, 2, 3]
In [9]: b?
Type: list
String Form:[1, 2, 3]
Length: 3
Docstring:
list() -> new empty list
list(iterable) -> new list initialized from iterable's items
In [10]: print?
Docstring:
print(value, ..., sep=' ', end='\n', file=sys.stdout, flush=False)
Prints the values to a stream, or to sys.stdout by default.
Optional keyword arguments:
file: a file-like object (stream); defaults to the current sys.stdout.
sep: string inserted between values, default a space.
end: string appended after the last value, default a newline.
flush: whether to forcibly flush the stream.
Type: builtin_function_or_method
```
这可以作为对象的自省。如果对象是一个函数或实例方法,定义过的文档字符串,也会显示出信息。假设我们写了一个如下的函数:
```python
def add_numbers(a, b):
"""
Add two numbers together
Returns
-------
the_sum : type of arguments
"""
return a + b
```
然后使用?符号,就可以显示如下的文档字符串:
```python
In [11]: add_numbers?
Signature: add_numbers(a, b)
Docstring:
Add two numbers together
Returns
-------
the_sum : type of arguments
File: <ipython-input-9-6a548a216e27>
Type: function
```
使用??会显示函数的源码:
```python
In [12]: add_numbers??
Signature: add_numbers(a, b)
Source:
def add_numbers(a, b):
"""
Add two numbers together
Returns
-------
the_sum : type of arguments
"""
return a + b
File: <ipython-input-9-6a548a216e27>
Type: function
```
?还有一个用途,就是像Unix或Windows命令行一样搜索IPython的命名空间。字符与通配符结合可以匹配所有的名字。例如,我们可以获得所有包含load的顶级NumPy命名空间:
```python
In [13]: np.*load*?
np.__loader__
np.load
np.loads
np.loadtxt
np.pkgload
```
### %run命令
你可以用`%run`命令运行所有的Python程序。假设有一个文件`ipython_script_test.py`:
```python
def f(x, y, z):
return (x + y) / z
a = 5
b = 6
c = 7.5
result = f(a, b, c)
```
可以如下运行:
```python
In [14]: %run ipython_script_test.py
```
这段脚本运行在空的命名空间(没有import和其它定义的变量),因此结果和普通的运行方式`python script.py`相同。文件中所有定义的变量(import、函数和全局变量,除非抛出异常),都可以在IPython shell中随后访问:
```python
In [15]: c
Out [15]: 7.5
In [16]: result
Out[16]: 1.4666666666666666
```
如果一个Python脚本需要命令行参数(在`sys.argv`中查找),可以在文件路径之后传递,就像在命令行上运行一样。
> 笔记:如果想让一个脚本访问IPython已经定义过的变量,可以使用`%run -i`。
在Jupyter notebook中,你也可以使用`%load`,它将脚本导入到一个代码格中:
```text
>>> %load ipython_script_test.py
def f(x, y, z):
return (x + y) / z
a = 5
b = 6
c = 7.5
result = f(a, b, c)
```
### 中断运行的代码
代码运行时按Ctrl-C,无论是%run或长时间运行命令,都会导致`KeyboardInterrupt`。这会导致几乎所有Python程序立即停止,除非一些特殊情况。
> 警告:当Python代码调用了一些编译的扩展模块,按Ctrl-C不一定将执行的程序立即停止。在这种情况下,你必须等待,直到控制返回Python解释器,或者在更糟糕的情况下强制终止Python进程。
### 从剪贴板执行程序
如果使用Jupyter notebook,你可以将代码复制粘贴到任意代码格执行。在IPython shell中也可以从剪贴板执行。假设在其它应用中复制了如下代码:
```python
x = 5
y = 7
if x > 5:
x += 1
y = 8
```
最简单的方法是使用`%paste`和`%cpaste`函数。`%paste`可以直接运行剪贴板中的代码:
```python
In [17]: %paste
x = 5
y = 7
if x > 5:
x += 1
y = 8
## -- End pasted text --
```
`%cpaste`功能类似,但会给出一条提示:
```python
In [18]: %cpaste
Pasting code; enter '--' alone on the line to stop or use Ctrl-D.
:x = 5
:y = 7
:if x > 5:
: x += 1
:
: y = 8
:--
```
使用`%cpaste`,你可以粘贴任意多的代码再运行。你可能想在运行前,先看看代码。如果粘贴了错误的代码,可以用Ctrl-C中断。
### 键盘快捷键
IPython有许多键盘快捷键进行导航提示(类似Emacs文本编辑器或UNIX bash Shell)和交互shell的历史命令。表2-1总结了常见的快捷键。图2-5展示了一部分,如移动光标。

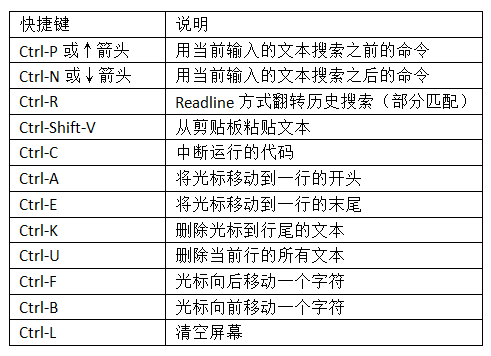
Jupyter notebooks有另外一套庞大的快捷键。因为它的快捷键比IPython的变化快,建议你参阅Jupyter notebook的帮助文档。
### 魔术命令
IPython中特殊的命令(Python中没有)被称作“魔术”命令。这些命令可以使普通任务更便捷,更容易控制IPython系统。魔术命令是在指令前添加百分号%前缀。例如,可以用`%timeit`(这个命令后面会详谈)测量任何Python语句,例如矩阵乘法,的执行时间:
```python
In [20]: a = np.random.randn(100, 100)
In [20]: %timeit np.dot(a, a)
10000 loops, best of 3: 20.9 µs per loop
```
魔术命令可以被看做IPython中运行的命令行。许多魔术命令有“命令行”选项,可以通过?查看:
```text
In [21]: %debug?
Docstring:
::
%debug [--breakpoint FILE:LINE] [statement [statement ...]]
Activate the interactive debugger.
This magic command support two ways of activating debugger.
One is to activate debugger before executing code. This way, you
can set a break point, to step through the code from the point.
You can use this mode by giving statements to execute and optionally
a breakpoint.
The other one is to activate debugger in post-mortem mode. You can
activate this mode simply running %debug without any argument.
If an exception has just occurred, this lets you inspect its stack
frames interactively. Note that this will always work only on the last
traceback that occurred, so you must call this quickly after an
exception that you wish to inspect has fired, because if another one
occurs, it clobbers the previous one.
If you want IPython to automatically do this on every exception, see
the %pdb magic for more details.
positional arguments:
statement Code to run in debugger. You can omit this in cell
magic mode.
optional arguments:
--breakpoint <FILE:LINE>, -b <FILE:LINE>
Set break point at LINE in FILE.
```
魔术函数默认可以不用百分号,只要没有变量和函数名相同。这个特点被称为“自动魔术”,可以用`%automagic`打开或关闭。
一些魔术函数与Python函数很像,它的结果可以赋值给一个变量:
```text
In [22]: %pwd
Out[22]: '/home/wesm/code/pydata-book
In [23]: foo = %pwd
In [24]: foo
Out[24]: '/home/wesm/code/pydata-book'
```
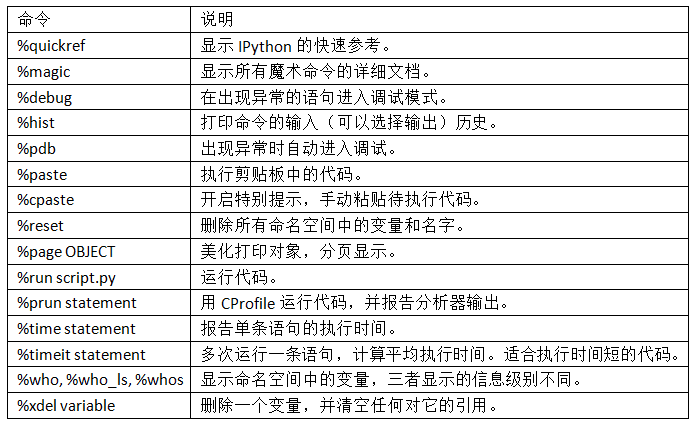
IPython的文档可以在shell中打开,我建议你用`%quickref`或`%magic`学习下所有特殊命令。表2-2列出了一些可以提高生产率的交互计算和Python开发的IPython指令。
### 集成Matplotlib
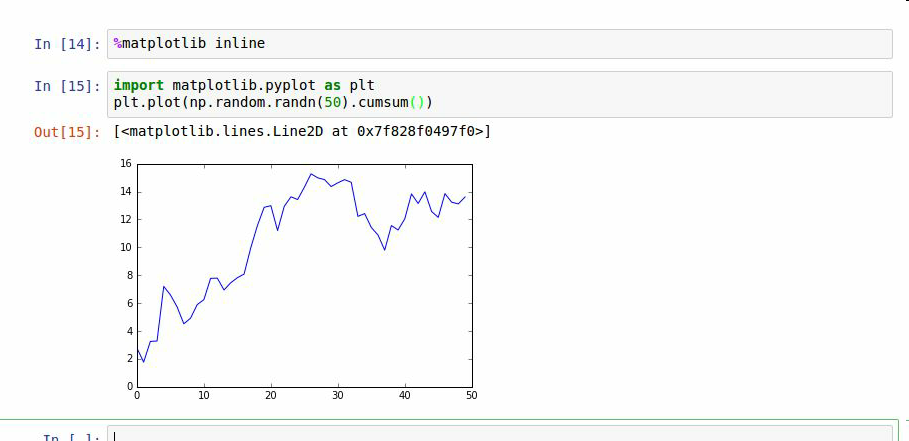
IPython在分析计算领域能够流行的原因之一是它非常好的集成了数据可视化和其它用户界面库,比如matplotlib。不用担心以前没用过matplotlib,本书后面会详细介绍。`%matplotlib`魔术函数配置了IPython shell和Jupyter notebook中的matplotlib。这点很重要,其它创建的图不会出现(notebook)或获取session的控制,直到结束(shell)。
在IPython shell中,运行`%matplotlib`可以进行设置,可以创建多个绘图窗口,而不会干扰控制台session:
```text
In [26]: %matplotlib
Using matplotlib backend: Qt4Agg
```
在JUpyter中,命令有所不同(图2-6):
```text
In [26]: %matplotlib inline
```
## 2.3 Python语法基础
在本节中,我将概述基本的Python概念和语言机制。在下一章,我将详细介绍Python的数据结构、函数和其它内建工具。
### 语言的语义
Python的语言设计强调的是可读性、简洁和清晰。有些人称Python为“可执行的伪代码”。
### 使用缩进,而不是括号
Python使用空白字符(tab和空格)来组织代码,而不是像其它语言,比如R、C++、JAVA和Perl那样使用括号。看一个排序算法的`for`循环:
```python
for x in array:
if x < pivot:
less.append(x)
else:
greater.append(x)
```
冒号标志着缩进代码块的开始,冒号之后的所有代码的缩进量必须相同,直到代码块结束。不管是否喜欢这种形式,使用空白符是Python程序员开发的一部分,在我看来,这可以让python的代码可读性大大优于其它语言。虽然期初看起来很奇怪,经过一段时间,你就能适应了。
> 笔记:我强烈建议你使用四个空格作为默认的缩进,可以使用tab代替四个空格。许多文本编辑器的设置是使用制表位替代空格。某些人使用tabs或不同数目的空格数,常见的是使用两个空格。大多数情况下,四个空格是大多数人采用的方法,因此建议你也这样做。
你应该已经看到,Python的语句不需要用分号结尾。但是,分号却可以用来给同在一行的语句切分:
```python
a = 5; b = 6; c = 7
```
Python不建议将多条语句放到一行,这会降低代码的可读性。
### 万物皆对象
Python语言的一个重要特性就是它的对象模型的一致性。每个数字、字符串、数据结构、函数、类、模块等等,都是在Python解释器的自有“盒子”内,它被认为是Python对象。每个对象都有类型(例如,字符串或函数)和内部数据。在实际中,这可以让语言非常灵活,因为函数也可以被当做对象使用。
### 注释
任何前面带有井号\#的文本都会被Python解释器忽略。这通常被用来添加注释。有时,你会想排除一段代码,但并不删除。简便的方法就是将其注释掉:
```python
results = []
for line in file_handle:
# keep the empty lines for now
# if len(line) == 0:
# continue
results.append(line.replace('foo', 'bar'))
```
也可以在执行过的代码后面添加注释。一些人习惯在代码之前添加注释,前者这种方法有时也是有用的:
```python
print("Reached this line") # Simple status report
```
### 函数和对象方法调用
你可以用圆括号调用函数,传递零个或几个参数,或者将返回值给一个变量:
```python
result = f(x, y, z)
g()
```
几乎Python中的每个对象都有附加的函数,称作方法,可以用来访问对象的内容。可以用下面的语句调用:
```python
obj.some_method(x, y, z)
```
函数可以使用位置和关键词参数:
```python
result = f(a, b, c, d=5, e='foo')
```
后面会有更多介绍。
### 变量和参数传递
当在Python中创建变量(或名字),你就在等号右边创建了一个对这个变量的引用。考虑一个整数列表:
```python
In [8]: a = [1, 2, 3]
```
假设将a赋值给一个新变量b:
```python
In [9]: b = a
```
在有些方法中,这个赋值会将数据\[1, 2, 3\]也复制。在Python中,a和b实际上是同一个对象,即原有列表\[1, 2, 3\](见图2-7)。你可以在a中添加一个元素,然后检查b:
```python
In [10]: a.append(4)
In [11]: b
Out[11]: [1, 2, 3, 4]
```
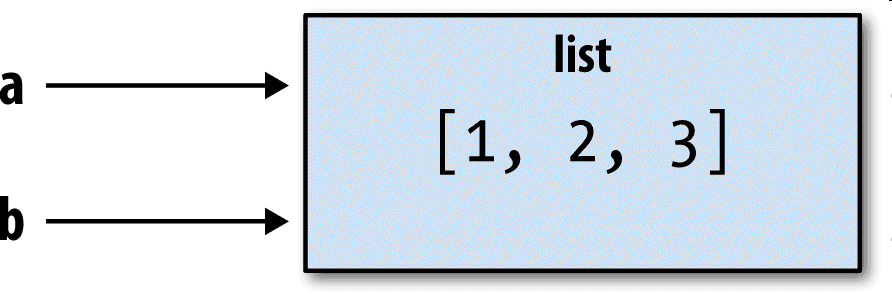
理解Python的引用的含义,数据是何时、如何、为何复制的,是非常重要的。尤其是当你用Python处理大的数据集时。
> 笔记:赋值也被称作绑定,我们是把一个名字绑定给一个对象。变量名有时可能被称为绑定变量。
当你将对象作为参数传递给函数时,新的局域变量创建了对原始对象的引用,而不是复制。如果在函数里绑定一个新对象到一个变量,这个变动不会反映到上一层。因此可以改变可变参数的内容。假设有以下函数:
```python
def append_element(some_list, element):
some_list.append(element)
```
然后有:
```python
In [27]: data = [1, 2, 3]
In [28]: append_element(data, 4)
In [29]: data
Out[29]: [1, 2, 3, 4]
```
### 动态引用,强类型
与许多编译语言(如JAVA和C++)对比,Python中的对象引用不包含附属的类型。下面的代码是没有问题的:
```python
In [12]: a = 5
In [13]: type(a)
Out[13]: int
In [14]: a = 'foo'
In [15]: type(a)
Out[15]: str
```
变量是在特殊命名空间中的对象的名字,类型信息保存在对象自身中。一些人可能会说Python不是“类型化语言”。这是不正确的,看下面的例子:
```text
In [16]: '5' + 5
---------------------------------------------------------------------------
TypeError Traceback (most recent call last)
<ipython-input-16-f9dbf5f0b234> in <module>()
----> 1 '5' + 5
TypeError: must be str, not int
```
在某些语言中,例如Visual Basic,字符串‘5’可能被默许转换(或投射)为整数,因此会产生10。但在其它语言中,例如JavaScript,整数5会被投射成字符串,结果是联结字符串‘55’。在这个方面,Python被认为是强类型化语言,意味着每个对象都有明确的类型(或类),默许转换只会发生在特定的情况下,例如:
```text
In [17]: a = 4.5
In [18]: b = 2
# String formatting, to be visited later
In [19]: print('a is {0}, b is {1}'.format(type(a), type(b)))
a is <class 'float'>, b is <class 'int'>
In [20]: a / b
Out[20]: 2.25
```
知道对象的类型很重要,最好能让函数可以处理多种类型的输入。你可以用`isinstance`函数检查对象是某个类型的实例:
```text
In [21]: a = 5
In [22]: isinstance(a, int)
Out[22]: True
```
`isinstance`可以用类型元组,检查对象的类型是否在元组中:
```text
In [23]: a = 5; b = 4.5
In [24]: isinstance(a, (int, float))
Out[24]: True
In [25]: isinstance(b, (int, float))
Out[25]: True
```
### 属性和方法
Python的对象通常都有属性(其它存储在对象内部的Python对象)和方法(对象的附属函数可以访问对象的内部数据)。可以用`obj.attribute_name`访问属性和方法:
```text
In [1]: a = 'foo'
In [2]: a.<Press Tab>
a.capitalize a.format a.isupper a.rindex a.strip
a.center a.index a.join a.rjust a.swapcase
a.count a.isalnum a.ljust a.rpartition a.title
a.decode a.isalpha a.lower a.rsplit a.translate
a.encode a.isdigit a.lstrip a.rstrip a.upper
a.endswith a.islower a.partition a.split a.zfill
a.expandtabs a.isspace a.replace a.splitlines
a.find a.istitle a.rfind a.startswith
```
也可以用`getattr`函数,通过名字访问属性和方法:
```text
In [27]: getattr(a, 'split')
Out[27]: <function str.split>
```
在其它语言中,访问对象的名字通常称作“反射”。本书不会大量使用`getattr`函数和相关的`hasattr`和`setattr`函数,使用这些函数可以高效编写原生的、可重复使用的代码。
### 鸭子类型
经常地,你可能不关心对象的类型,只关心对象是否有某些方法或用途。这通常被称为“鸭子类型”,来自“走起来像鸭子、叫起来像鸭子,那么它就是鸭子”的说法。例如,你可以通过验证一个对象是否遵循迭代协议,判断它是可迭代的。对于许多对象,这意味着它有一个`__iter__`魔术方法,其它更好的判断方法是使用`iter`函数:
```python
def isiterable(obj):
try:
iter(obj)
return True
except TypeError: # not iterable
return False
```
这个函数会返回字符串以及大多数Python集合类型为`True`:
```text
In [29]: isiterable('a string')
Out[29]: True
In [30]: isiterable([1, 2, 3])
Out[30]: True
In [31]: isiterable(5)
Out[31]: False
```
我总是用这个功能编写可以接受多种输入类型的函数。常见的例子是编写一个函数可以接受任意类型的序列(list、tuple、ndarray)或是迭代器。你可先检验对象是否是列表(或是NUmPy数组),如果不是的话,将其转变成列表:
```python
if not isinstance(x, list) and isiterable(x):
x = list(x)
```
### 引入
在Python中,模块就是一个有`.py`扩展名、包含Python代码的文件。假设有以下模块:
```python
# some_module.py
PI = 3.14159
def f(x):
return x + 2
def g(a, b):
return a + b
```
如果想从同目录下的另一个文件访问`some_module.py`中定义的变量和函数,可以:
```python
import some_module
result = some_module.f(5)
pi = some_module.PI
```
或者:
```python
from some_module import f, g, PI
result = g(5, PI)
```
使用`as`关键词,你可以给引入起不同的变量名:
```python
import some_module as sm
from some_module import PI as pi, g as gf
r1 = sm.f(pi)
r2 = gf(6, pi)
```
### 二元运算符和比较运算符
大多数二元数学运算和比较都不难想到:
```python
In [32]: 5 - 7
Out[32]: -2
In [33]: 12 + 21.5
Out[33]: 33.5
In [34]: 5 <= 2
Out[34]: False
```
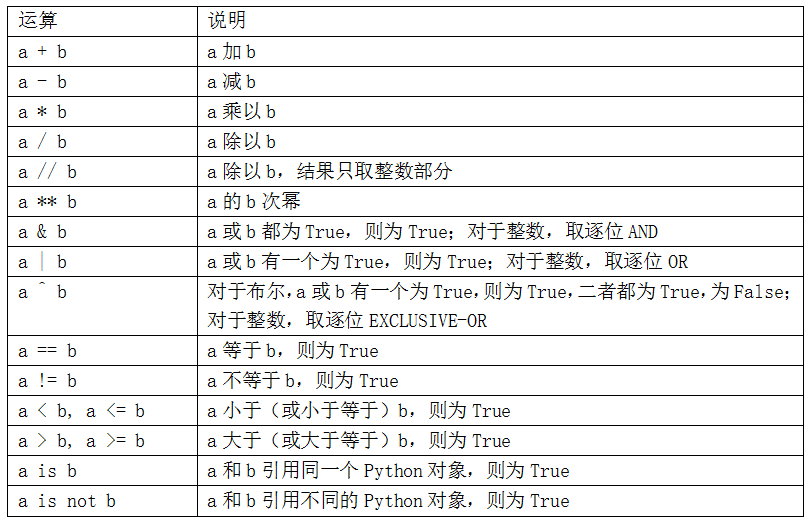
表2-3列出了所有的二元运算符。
要判断两个引用是否指向同一个对象,可以使用`is`方法。`is not`可以判断两个对象是不同的:
```python
In [35]: a = [1, 2, 3]
In [36]: b = a
In [37]: c = list(a)
In [38]: a is b
Out[38]: True
In [39]: a is not c
Out[39]: True
```
因为`list`总是创建一个新的Python列表(即复制),我们可以断定c是不同于a的。使用`is`比较与`==`运算符不同,如下:
```python
In [40]: a == c
Out[40]: True
```
`is`和`is not`常用来判断一个变量是否为`None`,因为只有一个`None`的实例:
```python
In [41]: a = None
In [42]: a is None
Out[42]: True
```
### 可变与不可变对象
Python中的大多数对象,比如列表、字典、NumPy数组,和用户定义的类型(类),都是可变的。意味着这些对象或包含的值可以被修改:
```python
In [43]: a_list = ['foo', 2, [4, 5]]
In [44]: a_list[2] = (3, 4)
In [45]: a_list
Out[45]: ['foo', 2, (3, 4)]
```
其它的,例如字符串和元组,是不可变的:
```python
In [46]: a_tuple = (3, 5, (4, 5))
In [47]: a_tuple[1] = 'four'
---------------------------------------------------------------------------
TypeError Traceback (most recent call last)
<ipython-input-47-b7966a9ae0f1> in <module>()
----> 1 a_tuple[1] = 'four'
TypeError: 'tuple' object does not support item assignment
```
记住,可以修改一个对象并不意味就要修改它。这被称为副作用。例如,当写一个函数,任何副作用都要在文档或注释中写明。如果可能的话,我推荐避免副作用,采用不可变的方式,即使要用到可变对象。
### 标量类型
Python的标准库中有一些内建的类型,用于处理数值数据、字符串、布尔值,和日期时间。这些单值类型被称为标量类型,本书中称其为标量。表2-4列出了主要的标量。日期和时间处理会另外讨论,因为它们是标准库的`datetime`模块提供的。

### 数值类型
Python的主要数值类型是`int`和`float`。`int`可以存储任意大的数:
```python
In [48]: ival = 17239871
In [49]: ival ** 6
Out[49]: 26254519291092456596965462913230729701102721
```
浮点数使用Python的`float`类型。每个数都是双精度(64位)的值。也可以用科学计数法表示:
```python
In [50]: fval = 7.243
In [51]: fval2 = 6.78e-5
```
不能得到整数的除法会得到浮点数:
```python
In [52]: 3 / 2
Out[52]: 1.5
```
要获得C-风格的整除(去掉小数部分),可以使用底除运算符//:
```python
In [53]: 3 // 2
Out[53]: 1
```
### 字符串
许多人是因为Python强大而灵活的字符串处理而使用Python的。你可以用单引号或双引号来写字符串:
```python
a = 'one way of writing a string'
b = "another way"
```
对于有换行符的字符串,可以使用三引号,'''或"""都行:
```python
c = """
This is a longer string that
spans multiple lines
"""
```
字符串`c`实际包含四行文本,"""后面和lines后面的换行符。可以用`count`方法计算`c`中的新的行:
```python
In [55]: c.count('\n')
Out[55]: 3
```
Python的字符串是不可变的,不能修改字符串:
```python
In [56]: a = 'this is a string'
In [57]: a[10] = 'f'
---------------------------------------------------------------------------
TypeError Traceback (most recent call last)
<ipython-input-57-5ca625d1e504> in <module>()
----> 1 a[10] = 'f'
TypeError: 'str' object does not support item assignment
In [58]: b = a.replace('string', 'longer string')
In [59]: b
Out[59]: 'this is a longer string'
```
经过以上的操作,变量`a`并没有被修改:
```python
In [60]: a
Out[60]: 'this is a string'
```
许多Python对象使用`str`函数可以被转化为字符串:
```python
In [61]: a = 5.6
In [62]: s = str(a)
In [63]: print(s)
5.6
```
字符串是一个序列的Unicode字符,因此可以像其它序列,比如列表和元组(下一章会详细介绍两者)一样处理:
```python
In [64]: s = 'python'
In [65]: list(s)
Out[65]: ['p', 'y', 't', 'h', 'o', 'n']
In [66]: s[:3]
Out[66]: 'pyt'
```
语法`s[:3]`被称作切片,适用于许多Python序列。后面会更详细的介绍,本书中用到很多切片。
反斜杠是转义字符,意思是它备用来表示特殊字符,比如换行符\n或Unicode字符。要写一个包含反斜杠的字符串,需要进行转义:
```python
In [67]: s = '12\\34'
In [68]: print(s)
12\34
```
如果字符串中包含许多反斜杠,但没有特殊字符,这样做就很麻烦。幸好,可以在字符串前面加一个r,表明字符就是它自身:
```python
In [69]: s = r'this\has\no\special\characters'
In [70]: s
Out[70]: 'this\\has\\no\\special\\characters'
```
r表示raw。
将两个字符串合并,会产生一个新的字符串:
```python
In [71]: a = 'this is the first half '
In [72]: b = 'and this is the second half'
In [73]: a + b
Out[73]: 'this is the first half and this is the second half'
```
字符串的模板化或格式化,是另一个重要的主题。Python 3拓展了此类的方法,这里只介绍一些。字符串对象有`format`方法,可以替换格式化的参数为字符串,产生一个新的字符串:
```python
In [74]: template = '{0:.2f} {1:s} are worth US${2:d}'
```
在这个字符串中,
* `{0:.2f}`表示格式化第一个参数为带有两位小数的浮点数。
* `{1:s}`表示格式化第二个参数为字符串。
* `{2:d}`表示格式化第三个参数为一个整数。
要替换参数为这些格式化的参数,我们传递`format`方法一个序列:
```python
In [75]: template.format(4.5560, 'Argentine Pesos', 1)
Out[75]: '4.56 Argentine Pesos are worth US$1'
```
字符串格式化是一个很深的主题,有多种方法和大量的选项,可以控制字符串中的值是如何格式化的。推荐参阅Python官方文档。
这里概括介绍字符串处理,第8章的数据分析会详细介绍。
### 字节和Unicode
在Python 3及以上版本中,Unicode是一级的字符串类型,这样可以更一致的处理ASCII和Non-ASCII文本。在老的Python版本中,字符串都是字节,不使用Unicode编码。假如知道字符编码,可以将其转化为Unicode。看一个例子:
```python
In [76]: val = "español"
In [77]: val
Out[77]: 'español'
```
可以用`encode`将这个Unicode字符串编码为UTF-8:
```python
In [78]: val_utf8 = val.encode('utf-8')
In [79]: val_utf8
Out[79]: b'espa\xc3\xb1ol'
In [80]: type(val_utf8)
Out[80]: bytes
```
如果你知道一个字节对象的Unicode编码,用`decode`方法可以解码:
```python
In [81]: val_utf8.decode('utf-8')
Out[81]: 'español'
```
虽然UTF-8编码已经变成主流,但因为历史的原因,你仍然可能碰到其它编码的数据:
```python
In [82]: val.encode('latin1')
Out[82]: b'espa\xf1ol'
In [83]: val.encode('utf-16')
Out[83]: b'\xff\xfee\x00s\x00p\x00a\x00\xf1\x00o\x00l\x00'
In [84]: val.encode('utf-16le')
Out[84]: b'e\x00s\x00p\x00a\x00\xf1\x00o\x00l\x00'
```
工作中碰到的文件很多都是字节对象,盲目地将所有数据编码为Unicode是不可取的。
虽然用的不多,你可以在字节文本的前面加上一个b:
```python
In [85]: bytes_val = b'this is bytes'
In [86]: bytes_val
Out[86]: b'this is bytes'
In [87]: decoded = bytes_val.decode('utf8')
In [88]: decoded # this is str (Unicode) now
Out[88]: 'this is bytes'
```
### 布尔值
Python中的布尔值有两个,True和False。比较和其它条件表达式可以用True和False判断。布尔值可以与and和or结合使用:
```python
In [89]: True and True
Out[89]: True
In [90]: False or True
Out[90]: True
```
### 类型转换
str、bool、int和float也是函数,可以用来转换类型:
```python
In [91]: s = '3.14159'
In [92]: fval = float(s)
In [93]: type(fval)
Out[93]: float
In [94]: int(fval)
Out[94]: 3
In [95]: bool(fval)
Out[95]: True
In [96]: bool(0)
Out[96]: False
```
### None
None是Python的空值类型。如果一个函数没有明确的返回值,就会默认返回None:
```python
In [97]: a = None
In [98]: a is None
Out[98]: True
In [99]: b = 5
In [100]: b is not None
Out[100]: True
```
None也常常作为函数的默认参数:
```python
def add_and_maybe_multiply(a, b, c=None):
result = a + b
if c is not None:
result = result * c
return result
```
另外,None不仅是一个保留字,还是唯一的NoneType的实例:
```python
In [101]: type(None)
Out[101]: NoneType
```
### 日期和时间
Python内建的`datetime`模块提供了`datetime`、`date`和`time`类型。`datetime`类型结合了`date`和`time`,是最常使用的:
```python
In [102]: from datetime import datetime, date, time
In [103]: dt = datetime(2011, 10, 29, 20, 30, 21)
In [104]: dt.day
Out[104]: 29
In [105]: dt.minute
Out[105]: 30
```
根据`datetime`实例,你可以用`date`和`time`提取出各自的对象:
```python
In [106]: dt.date()
Out[106]: datetime.date(2011, 10, 29)
In [107]: dt.time()
Out[107]: datetime.time(20, 30, 21)
```
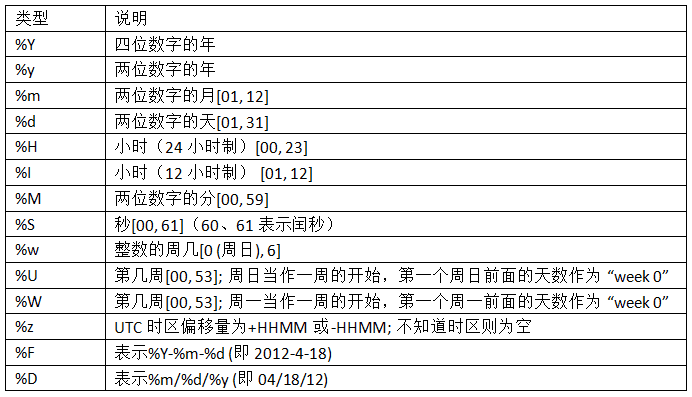
`strftime`方法可以将datetime格式化为字符串:
```python
In [108]: dt.strftime('%m/%d/%Y %H:%M')
Out[108]: '10/29/2011 20:30'
```
`strptime`可以将字符串转换成`datetime`对象:
```python
In [109]: datetime.strptime('20091031', '%Y%m%d')
Out[109]: datetime.datetime(2009, 10, 31, 0, 0)
```
表2-5列出了所有的格式化命令。
当你聚类或对时间序列进行分组,替换datetimes的time字段有时会很有用。例如,用0替换分和秒:
```python
In [110]: dt.replace(minute=0, second=0)
Out[110]: datetime.datetime(2011, 10, 29, 20, 0)
```
因为`datetime.datetime`是不可变类型,上面的方法会产生新的对象。
两个datetime对象的差会产生一个`datetime.timedelta`类型:
```python
In [111]: dt2 = datetime(2011, 11, 15, 22, 30)
In [112]: delta = dt2 - dt
In [113]: delta
Out[113]: datetime.timedelta(17, 7179)
In [114]: type(delta)
Out[114]: datetime.timedelta
```
结果`timedelta(17, 7179)`指明了`timedelta`将17天、7179秒的编码方式。
将`timedelta`添加到`datetime`,会产生一个新的偏移`datetime`:
```python
In [115]: dt
Out[115]: datetime.datetime(2011, 10, 29, 20, 30, 21)
In [116]: dt + delta
Out[116]: datetime.datetime(2011, 11, 15, 22, 30)
```
### 控制流
Python有若干内建的关键字进行条件逻辑、循环和其它控制流操作。
### if、elif和else
if是最广为人知的控制流语句。它检查一个条件,如果为True,就执行后面的语句:
```python
if x < 0:
print('It's negative')
```
`if`后面可以跟一个或多个`elif`,所有条件都是False时,还可以添加一个`else`:
```python
if x < 0:
print('It's negative')
elif x == 0:
print('Equal to zero')
elif 0 < x < 5:
print('Positive but smaller than 5')
else:
print('Positive and larger than or equal to 5')
```
如果某个条件为True,后面的`elif`就不会被执行。当使用and和or时,复合条件语句是从左到右执行:
```python
In [117]: a = 5; b = 7
In [118]: c = 8; d = 4
In [119]: if a < b or c > d:
.....: print('Made it')
Made it
```
在这个例子中,`c > d`不会被执行,因为第一个比较是True:
也可以把比较式串在一起:
```python
In [120]: 4 > 3 > 2 > 1
Out[120]: True
```
### for循环
for循环是在一个集合(列表或元组)中进行迭代,或者就是一个迭代器。for循环的标准语法是:
```python
for value in collection:
# do something with value
```
你可以用continue使for循环提前,跳过剩下的部分。看下面这个例子,将一个列表中的整数相加,跳过None:
```python
sequence = [1, 2, None, 4, None, 5]
total = 0
for value in sequence:
if value is None:
continue
total += value
```
可以用`break`跳出for循环。下面的代码将各元素相加,直到遇到5:
```python
sequence = [1, 2, 0, 4, 6, 5, 2, 1]
total_until_5 = 0
for value in sequence:
if value == 5:
break
total_until_5 += value
```
break只中断for循环的最内层,其余的for循环仍会运行:
```python
In [121]: for i in range(4):
.....: for j in range(4):
.....: if j > i:
.....: break
.....: print((i, j))
.....:
(0, 0)
(1, 0)
(1, 1)
(2, 0)
(2, 1)
(2, 2)
(3, 0)
(3, 1)
(3, 2)
(3, 3)
```
如果集合或迭代器中的元素序列(元组或列表),可以用for循环将其方便地拆分成变量:
```python
for a, b, c in iterator:
# do something
```
### While循环
while循环指定了条件和代码,当条件为False或用break退出循环,代码才会退出:
```python
x = 256
total = 0
while x > 0:
if total > 500:
break
total += x
x = x // 2
```
### pass
pass是Python中的非操作语句。代码块不需要任何动作时可以使用(作为未执行代码的占位符);因为Python需要使用空白字符划定代码块,所以需要pass:
```python
if x < 0:
print('negative!')
elif x == 0:
# TODO: put something smart here
pass
else:
print('positive!')
```
### range
range函数返回一个迭代器,它产生一个均匀分布的整数序列:
```python
In [122]: range(10)
Out[122]: range(0, 10)
In [123]: list(range(10))
Out[123]: [0, 1, 2, 3, 4, 5, 6, 7, 8, 9]
```
range的三个参数是(起点,终点,步进):
```python
In [124]: list(range(0, 20, 2))
Out[124]: [0, 2, 4, 6, 8, 10, 12, 14, 16, 18]
In [125]: list(range(5, 0, -1))
Out[125]: [5, 4, 3, 2, 1]
```
可以看到,range产生的整数不包括终点。range的常见用法是用序号迭代序列:
```python
seq = [1, 2, 3, 4]
for i in range(len(seq)):
val = seq[i]
```
可以使用list来存储range在其他数据结构中生成的所有整数,默认的迭代器形式通常是你想要的。下面的代码对0到99999中3或5的倍数求和:
```python
sum = 0
for i in range(100000):
# % is the modulo operator
if i % 3 == 0 or i % 5 == 0:
sum += i
```
虽然range可以产生任意大的数,但任意时刻耗用的内存却很小。
### 三元表达式
Python中的三元表达式可以将if-else语句放到一行里。语法如下:
```python
value = true-expr if condition else false-expr
```
`true-expr`或`false-expr`可以是任何Python代码。它和下面的代码效果相同:
```python
if condition:
value = true-expr
else:
value = false-expr
```
下面是一个更具体的例子:
```python
In [126]: x = 5
In [127]: 'Non-negative' if x >= 0 else 'Negative'
Out[127]: 'Non-negative'
```
和if-else一样,只有一个表达式会被执行。因此,三元表达式中的if和else可以包含大量的计算,但只有True的分支会被执行。因此,三元表达式中的if和else可以包含大量的计算,但只有True的分支会被执行。
虽然使用三元表达式可以压缩代码,但会降低代码可读性。
- 利用 Python 进行数据分析 · 第 2 版
- 第 1 章 准备工作
- 第 2 章 Python 语法基础,IPython 和 Jupyter Notebooks
- 第 3 章 Python 的数据结构、函数和文件
- 第 4 章 NumPy 基础:数组和矢量计算
- 第 5 章 pandas 入门
- 第 6 章 数据加载、存储与文件格式
- 第 7 章 数据清洗和准备
- 第 8 章 数据规整:聚合、合并和重塑
- 第 9 章 绘图和可视化
- 第 10 章 数据聚合与分组运算
- 第 11 章 时间序列
- 第 12 章 pandas 高级应用
- 第 13 章 Python 建模库介绍
- 第 14 章 数据分析案例
- 附录 A NumPy 高级应用
- 附录 B 更多关于 IPython 的内容
