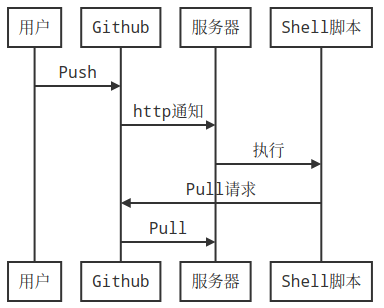
# webhook工具
## webhook工作流程

## 安装
由于`webhook`是golang开发的, 所以要先安装`golang`
```
$ yum install -y golang
```
然后安装webhook
```
$ go get github.com/adnanh/webhook
```
查看`GOPATH`找到安装目录
```
$ go env
>>>
GOPATH=/root/go
>>>
```
所以安装目录就是`/root/go/bin/webhook`
## 生成ssh key
要获得`pull`权限, 需要把服务器的`ssh key`添加到(github, gitee, gitlab, gitea)上
```
$ ssh-keygen
一路回车
```
然后查看公钥
```
$ cat ~/.ssh/id_rsa.pub
ssh-rsa JHGGGKGYUUGH..........GYUFGUYFUGKJIFGUTFUU root@xxx
```
把她添加到github或者gitee等网站的公钥中, 就可以获得pull权限
## Shell脚本编写
```bash
#!/bin/bash
cd /www/wwwroot
if [ ! -d "webapp" ]; then
git clone [仓库地址]
fi
cd webapp
git pull origin master
```
这里我们拟保存在`/home/webhook/webapp.sh`
**记得添加执行权限, 和测试**
```
$ chmod +x webapp.sh
```
## hook配置和启动
**hooks.json**
```
[
{
"id": "woc",
"execute-command": "webapp.sh",
"command-working-directory": "/home/webhook"
}
]
```
- id 顾名思义, 可以自定义
- execute-command 执行脚本名称
- command-working-directory 脚本所在目录
支持多个
**启动**
```
$ /root/go/bin/webhook -hooks hooks.json -verbose
后台运行, 关闭终端也会运行
$ nohup /root/go/bin/webhook -hooks hooks.json -verbose > /dev/null 2>&1 &
```
然后你可以访问
```
http://yourdomain:9000/hooks/{id}
````
并添加在`github webhook中`
## 参考
- [https://zhuanlan.zhihu.com/p/136364880](https://zhuanlan.zhihu.com/p/136364880)
- 前言
- Android
- 签名证书生成
- JavaScript
- WebSocket 协议心跳
- 选择预览本地图片(不上传)
- Ajax 上传文件
- 代码片
- js 播放声音
- Verify 验证
- 验证金额 / 限制保留两位小数
- 原型链&继承
- 经典算法
- 冒泡排序
- 递归算法
- 二分查找
- 帮助函数
- 取URL查询参数为对象
- Date 日期时间
- 浅拷贝与深拷贝
- 进制转换
- Canvas
- 画圆形头像
- 计算字符串宽度
- 常用第三方包
- XLSX
- Layui
- layer.open select 遮挡问题
- 模板中使用 JS 表达式
- Form 表单
- on 监听事件
- select 下拉选择框
- 取表单数据 / 置表单数据
- form.verify 表单验证
- address 三级联动
- Table 表格
- 动态添加表格行
- 设置行高
- 单元格显示图片
- 开启编辑-阻止用户修改
- 主动触发事件
- 文件上传
- 单图上传
- Vue
- Vue.js 代码片
- 模态框/弹出层
- 单页面电影院选座
- vuex
- WebSocket聊天模板
- 解决办法
- vue-router多级路由中无父级组件设置方法
- Mui
- vue2+mui实现上拉刷新下拉加载
- JQuery
- 序列号表单为 JSON 对象
- Ajax 网络请求
- 选择器
- 插件
- selectpage
- HTML+CSS 布局
- Nodejs
- flex 布局
- 水平对齐方式
- 垂直对齐方式
- 九宫格/列表
- PHP
- gd 图像处理
- 图片写字
- 图片合并
- 图像压缩
- 图片写字居中
- 超全局变量
- helper 帮助函数
- ThinkPHP
- 生成用户分享二维码
- tp5.0 模型关联查询field无效
- Composer
- phpmailer
- 第三方接口
- 快递 100 物流记录
- 动态加载
- pdf解决方案
- 图片转换pdf
- 阿里云
- OSS 对象储存
- 阿里短信
- 辅助函数
- 取两个数组差异部分
- 从完整地址中取出省市区
- 钉钉
- 进制转换 & pack/unpack
- Yii2
- ActiveForm 常见问题
- FastAdmin
- layer的妙用
- \fast\Auth 权限
- 前端的各种常见问题
- 点击图片放大预览
- js
- ajax请求
- 前端
- Table
- selectPage
- 后端
- 腾讯cos插件后台上传文件工具类
- XDebug
- php.ini
- Linux
- RabbitMQ
- 防火墙
- iptables
- firewalld
- 环境变量
- shell
- bash
- crontab 定时任务
- 数据归档与解压缩
- tar
- 图像处理
- imagemagick
- 文档表格处理
- 转换word、pdf等
- 常用命令
- 文件资源管理
- xxd 十六进制编辑与查看
- 疑难杂症
- 开启swap虚拟文件系统缓解内存紧张卡顿
- wine
- deepin-wine(qq/微信综合)
- Python
- 代码片
- bs4 解析 html 插入到数据库
- webdriver 操作浏览器
- requests 请求库
- easyxlsx 导出 excel
- opencv
- 提取印章
- orc图片文字识别
- tesseract
- 进制转换
- WebSocket
- ws 服务示例
- 进程守护
- PM2
- Golang
- net/http
- Server
- 基本
- array 数组
- 循环
- os 文件目录基本操作
- map
- json处理
- Qrcode 二维码
- go-sqlite3
- go-redis
- mysql
- go-sql-driver
- 正则表达式
- beego
- fmt
- io
- ioutil
- net
- http
- Docker
- docker run
- Nginx
- CORS 允许跨域配置
- 负载均衡&反向代理
- rewaite 重写
- nginx配置
- 易语言
- 汇编 call 执行子程序
- HpSocketTcp 大文件传输
- 类指针
- Vim
- UniApp
- request.js
- 微信小程序登录处理(oauth2)
- vuex
- WebSocket聊天
- 腾讯云-人脸核身
- Java
- Spring Boot
- 请求与响应
- nginx部署
- 配置文件
- 创建项目
- 控制器
- 一个控制器示例
- 数据库
- MySQL
- 集成 SLF4J
- 集成 PageHelper 分页
- maven
- Markdown
- mermaid
- ffmpeg
- 基本使用
- 介绍/安装
- 简单示例
- php
- python
- office
- excel
- 单元格选择数据区域
- 截取字符串
- vlookup 选择值
- iferror 错误默认值
- search 搜索
- weekday 取星期几
- left 取左边n个字符
- right 取右边n个字符
- sum 合计
- sumif 条件合计
- sumifs 多条件合计
- datedif 取时间间隔
- roundup 向上舍入数字
- rounddown 向下舍入数字
- large 取第n大值
- mod 求余函数
- word
- 邮件合并-保留两位小数
- MySql
- 安装
- 基础操作
- 备份还原数据库
- 创建、删除、修改数据表
- 表结构查询
- Docker方案
- 慢查询
- 全文搜索
- 备份与还原
- 备份数据表
- 支付
- 支付宝
- ssh证书生成
- 支付申请
- 成考
- 英语
- 音标-掐头法
- 音标-去尾法
- 音标-元音
- 对比法学习辅音发音
- 短元音-长元音
- 双元音
- 数学
- 1.实数系
- 2.乘方
- 3.代数式
- 4.单项式多项式
- 5.整式的概念与方程综合
- 6.合并同类项和移项
- 7.二次根式
- 8.方程
- Git
- WebHook
- 宝塔
- webhook工具实现
- commit 规范
- 安装
- 创建
- 发布、提交
- 查看
- 更新
- 分支
- 找回文件、目录
- Svn
- 设置默认编辑器
- ignore 忽略提交目录
- revert 恢复撤销
- C语言
- 环境安装
- 基础部分
- 单片机
- ESP8266
- ESP8266开发环境安装
- 基础知识
- sim800
- Windows
- Win7
- Win10
- wsl (Linux子系统)
- ArtTemplate
- 正则表达式
- 常用正则
- VsCode
- easy less
- 腾讯云
- 数据万象
- 任务接口
- 音视频转码任务
- 算法
- 宽高按比例缩放大小尺寸
- IOS
- 开发者账号
- uniapp-ios打包上架的坑
- 协议模板
- 隐私协议
- 酸酸乳
- bower
- SQL Server
- 多行数据连接字符串
- GROUP BY选取其他字段
- 支付宝
- IoT小程序
- 支付
- RSA秘钥生成
