
[TOC]
# 1. SonarQube上配置
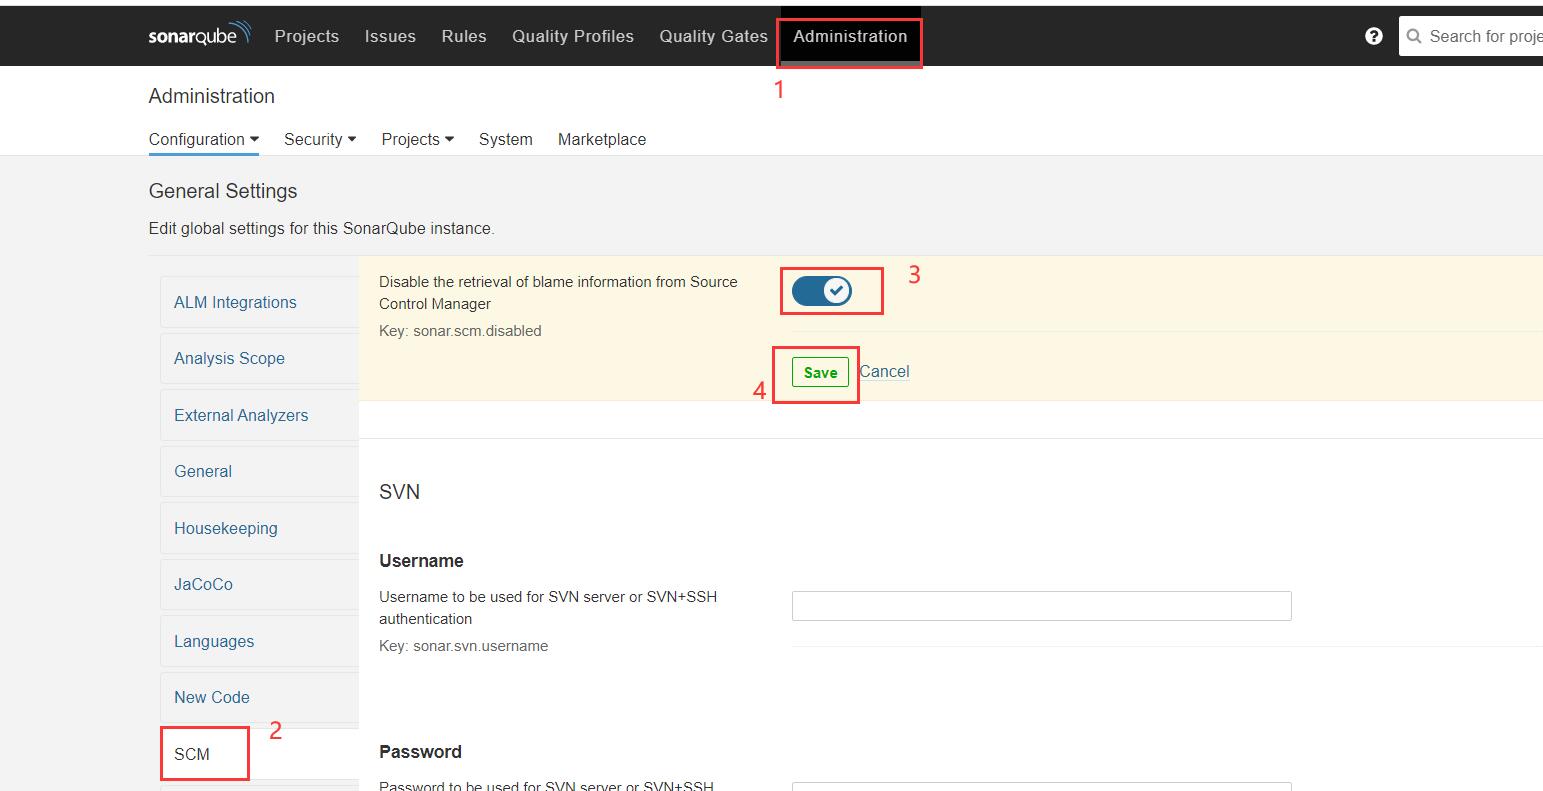
**1. 关闭审查结果上传到SCM功能**
**2. 添加项目**


```
daae43d6a75f1367245e7d5acc79cb97f3c60bd8
```

```
mvn sonar:sonar \
-Dsonar.projectKey=web-demo-pipeline-sonarqube \
-Dsonar.host.url=http://192.168.1.25:9000/sonarqube \
-Dsonar.login=daae43d6a75f1367245e7d5acc79cb97f3c60bd8
```
<br/>
# 2. Jenkins上配置
**1. 安装插件 SonarQube Scanner**
**2. 添加SonarQube凭证**
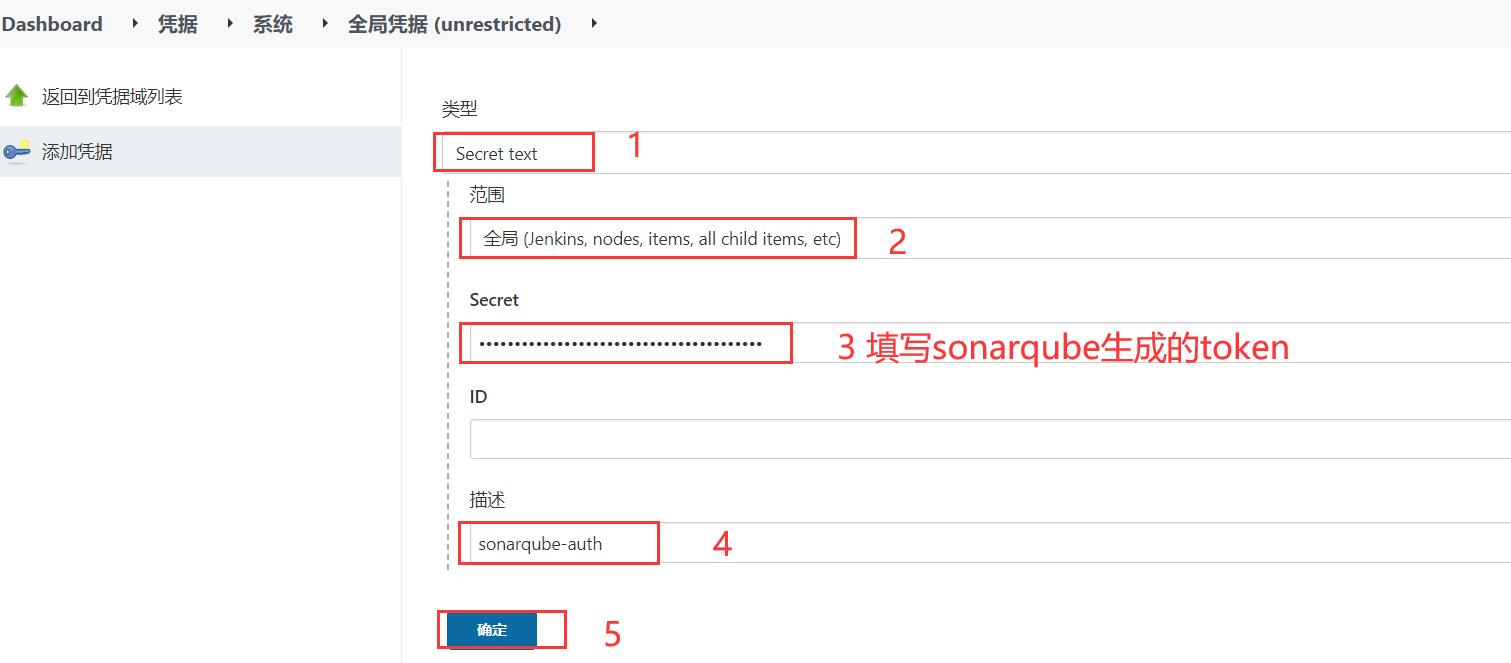
>[warning]提醒:不是一个sonarqube项目就需要在jenkins中添加一个sonarqube凭证,首次添加这个凭证后,后面在sonarqube创建的所有项目都可以共享这个凭证与jenkins交互。
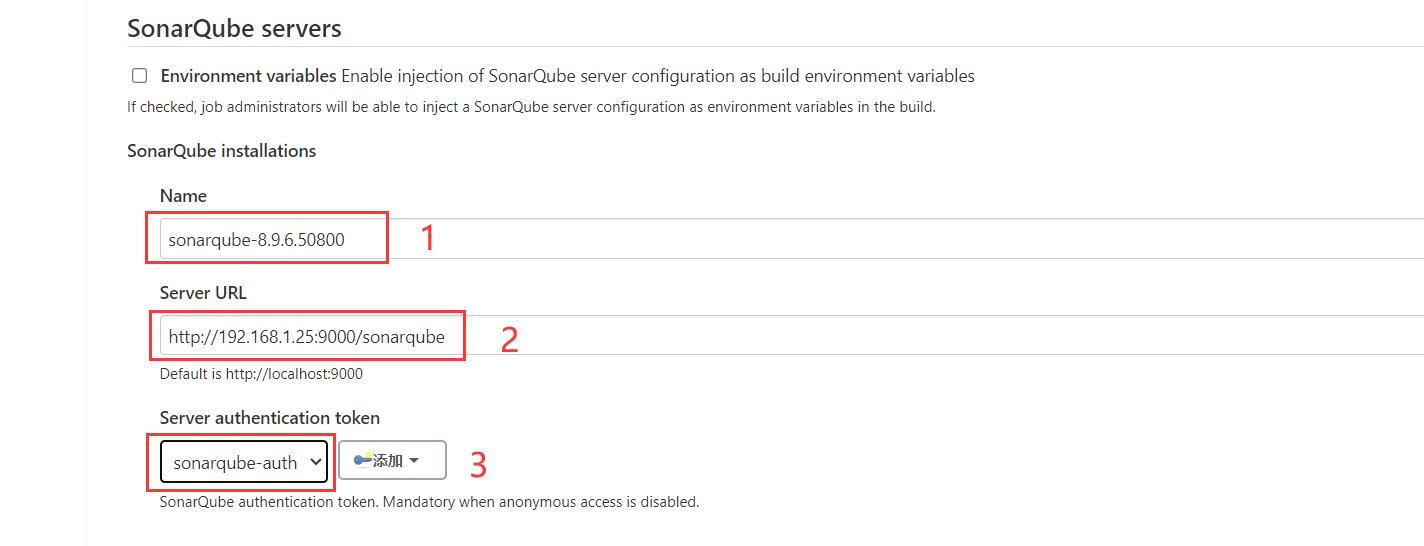
**3. 配置SonarQube servers**
Manage Jenkins(系统管理) -> Configure System(系统配置) -> SonarQube servers。
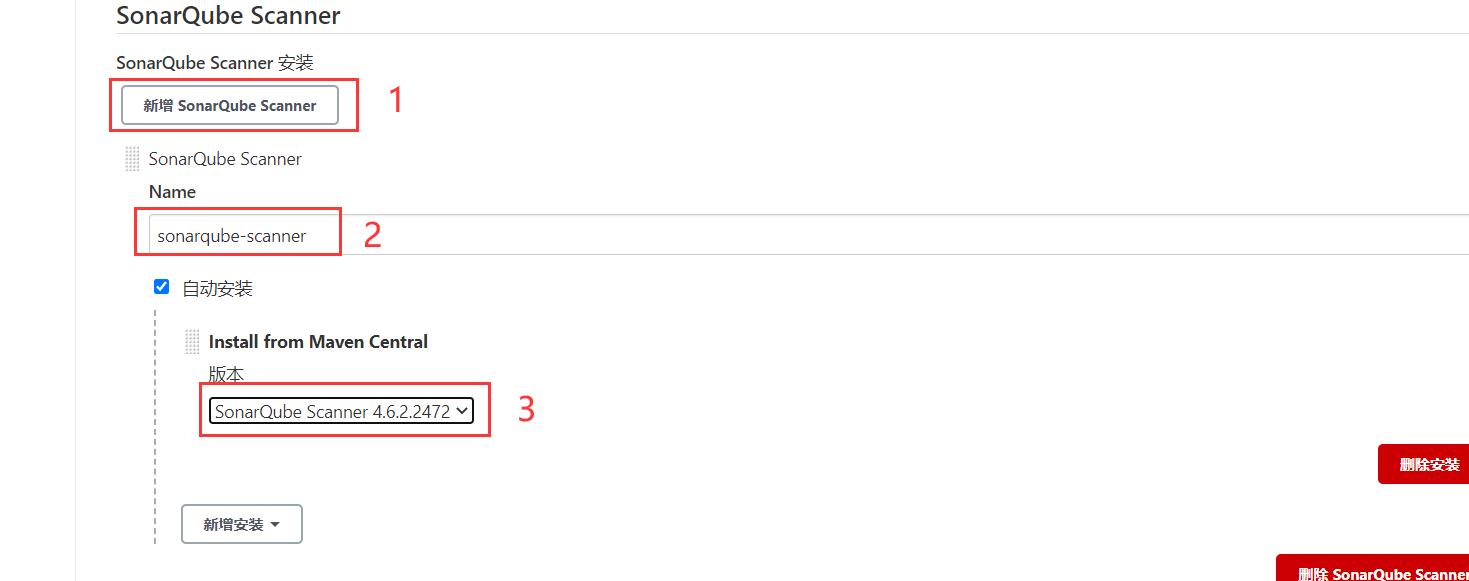
**4. 配置SonarQube Scanner**
Manage Jenkins(系统管理) -> Global Tool Configuration(全局工具配置) -> SonarQube Scanner。
<br/>
# 3. 项目上配置
在项目添加SonarQube代码审查。
<br/>
## 3.1 非流水线项目
如果是非流水线项目按照本章步骤在项目中添加sonarqube审查代码。
**1. 在项目根目录下添加文件`sonar-project.properties`**

>[warning]1. 文件名必须是`sonar-project.properties` 。
> 2. 必须放在项目根目录下,不能放在resources目录下。
```properties
# must be unique in a given SonarQube instance
sonar.projectKey=web-demo-maven-sonarqube
# this is the name and version displayed in the SonarQube UI. Was mandatory prior to SonarQube 6.1.
sonar.projectName=web-demo-maven-sonarqube
sonar.projectVersion=1.0
# Path is relative to the sonar-project.properties file. Replace "\" by "/" on Windows.
# This property is optional if sonar.modules is set.
sonar.sources=.
sonar.exclusions=**/test/**,**/target/**
sonar.java.source=1.8
sonar.java.target=1.8
# Encoding of the source code. Default is default system encoding
sonar.sourceEncoding=UTF-8
```
**2. 记得把修改提交到gitlab上**
<br/>
## 3.2 流水线项目
如果是流水线项目按照本章步骤在项目中添加sonarqube审查代码。
**1. 项目根目录下添加文件`sonar-project.properties`**

>[warning]1. 文件名必须是`sonar-project.properties` 。
> 2. 必须放在项目根目录下,不能放在resources目录下。
```properties
# must be unique in a given SonarQube instance
sonar.projectKey=web-demo-pipeline-sonarqube
# this is the name and version displayed in the SonarQube UI. Was mandatory prior to SonarQube 6.1.
sonar.projectName=web-demo-pipeline-sonarqube
sonar.projectVersion=1.0
# Path is relative to the sonar-project.properties file. Replace "\" by "/" on Windows.
# This property is optional if sonar.modules is set.
sonar.sources=.
sonar.exclusions=**/test/**,**/target/**
sonar.java.source=1.8
sonar.java.target=1.8
# Encoding of the source code. Default is default system encoding
sonar.sourceEncoding=UTF-8
```
**2. 在`Jenkinsfile`文件中加入SonarQube代码审查阶段**
```groovy
pipeline {
agent any
stages {
stage('拉取代码') {
steps {
checkout([$class: 'GitSCM', branches: [[name: '*/master']]
, doGenerateSubmoduleConfigurations: false
, extensions: [], submoduleCfg: []
, userRemoteConfigs: [[credentialsId: 'e4e02eb6-f6bb-4040-b842-c1423c397493'
, url: 'git@gitlab.master.com:itheima_group/web-demo-pipeline-sonarqube.git']]])
}
}
stage('编译构建') {
steps {
sh label: '', script: 'mvn clean package'
}
}
stage('SonarQube代码审查') {
steps{
script {
scannerHome = tool 'sonarqube-scanner'
}
withSonarQubeEnv('sonarqube-8.9.6.50800') {
sh "${scannerHome}/bin/sonar-scanner"
}
}
}
stage('项目部署') {
steps {
deploy adapters: [tomcat9(credentialsId: '748ce750-b1af-4730-9e43-1b6b4905a8dc', path: '', url: 'http://tomcat.master.com:8080')], contextPath: null, war: 'target/*.war'
}
}
}
post {
always {
emailext body: '${FILE,path="src/main/resources/email.html"}',
subject: '构建通知:${PROJECT_NAME} - Build # ${BUILD_NUMBER} - ${BUILD_STATUS} !',
to: 'xxxb@163.com,xxxx10@qq.com'
}
}
}
```
**3. 记得把修改提交到gitlab上**
<br/>
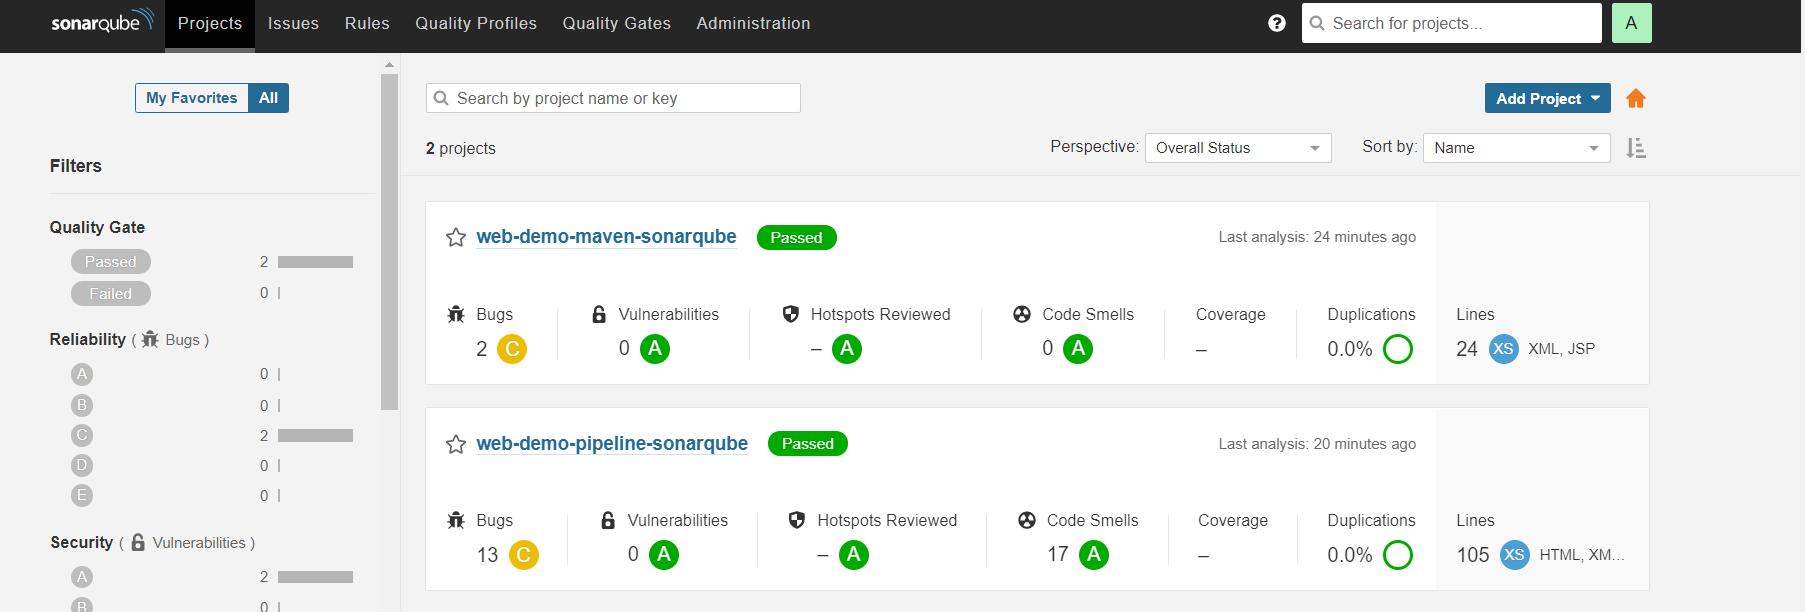
# 4. Jenkins上构建并到SonarQube查看审查结果
在Jenkins上构建后到SonarQube查看审查结果。
- 相关概念
- 软件开发生命周期
- 软件开发瀑布模型
- 软件的敏捷开发
- 持续集成
- Jenkins介绍
- Jenkins是什么
- Jenkins的特征
- Jenkins环境搭建
- 搭建架构说明
- Gitlab安装与配置
- Jenkins安装与配置
- Tomcat安装和配置
- Jenkins构建项目
- 自由风格软件项目构建
- Maven项目构建
- Pipeline流水线项目构建
- Pipeline是什么
- Pipeline语法
- 流水线项目构建演示
- Pipeline Script from SCM
- 构建触发器
- 触发远程构建
- 其他工程构建后触发
- 定时构建
- 轮询SCM
- Git hook自动触发构建
- 参数化构建
- 配置邮箱发送构建结果
- SonarQube代码审查平台
- SonarQube是什么
- SonarQube平台搭建
- 安装jdk11
- 安装数据库PostgreSQL12
- 安装SonarQube
- SonarQube实现代码审查
- Jenkins+Docker+SpringCloud(1)
- 流程说明
- 环境搭建
- 服务器列表
- Docker安装与配置
- Harbor安装与配置
- Nginx安装与配置
- 微服务持续集成演示
- Jenkins上配置
- 微服务项目配置
- 部署前端静态web网站
