[TOC]
# 1. 安装Harbor
**1. 安装Docker并启动Docker(已完成)**
**2. 安装docker-compose**
```shell
sudo curl -L https://github.com/docker/compose/releases/download/1.21.2/docker-compose-$(uname -s)-$(uname -m) \
-o /usr/local/bin/docker-compose
```
**3. 给docker-compose添加执行权限**
```shell
sudo chmod +x /usr/local/bin/docker-compose
```
**4. 查看docker-compose是否安装成功**
```shell
# docker-compose -version
docker-compose version 1.21.2, build a133471
```
**5. 下载Harbor压缩包并解压**
下载地址:https://github.com/goharbor/harbor/releases
```shell
wget https://github.com/goharbor/harbor/releases/download/v2.4.1/harbor-offline-installer-v2.4.1.tgz
tar -xzf harbor-offline-installer-v2.4.1.tgz -C /opt/install
```
**6. 修改Harbor的配置**
```shell
cd /opt/install/harbor/
cp harbor.yml.tmpl harbor.yml
# vim harbor.yml
hostname: 192.168.1.29
port: 85
--将https的都注释掉
#https:
# https port for harbor, default is 443
# port: 443
# The path of cert and key files for nginx
# certificate: /your/certificate/path
# private_key: /your/private/key/path
```
**7. 安装Harbor**
```shell
./prepare
./install.sh
```
**8. 启动Harbor**
```shell
--启动。 ps. 如果下面的命令启动失败则用该命令 docker-compose -f /opt/install/harbor/harbor.yml up -d 启动
docker-compose up -d
--停止
docker-compose stop
--重启
docker-compose restart
```
**9. 浏览器访问Harbor:http://192.168.1.29:85**
默认账户`admin`,默认密码`Harbor12345`。
<br/>
# 2. 在Harbor创建用户和项目
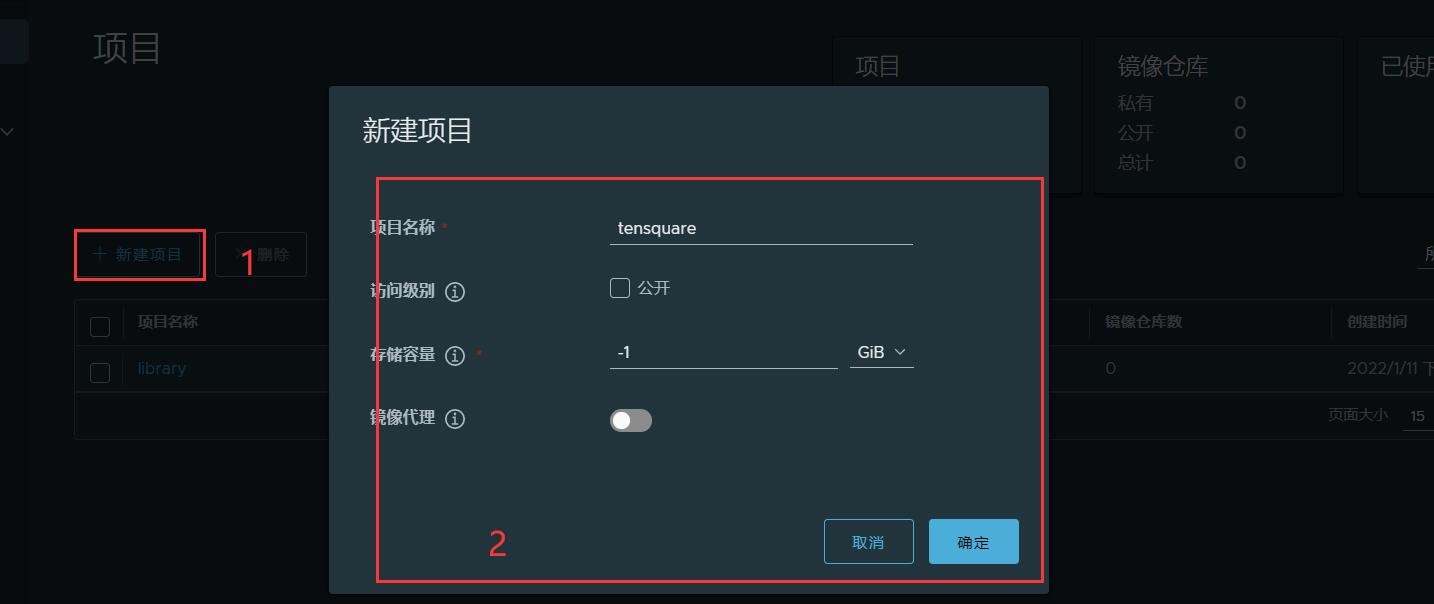
**1. 创建项目`tensquare`**
>[info]Harbor的项目分为公开和私有的:
>公开项目:所有用户都可以访问,通常存放公共的镜像,默认有一个library公开项目。
>私有项目:只有授权用户才可以访问,通常存放项目本身的镜像。

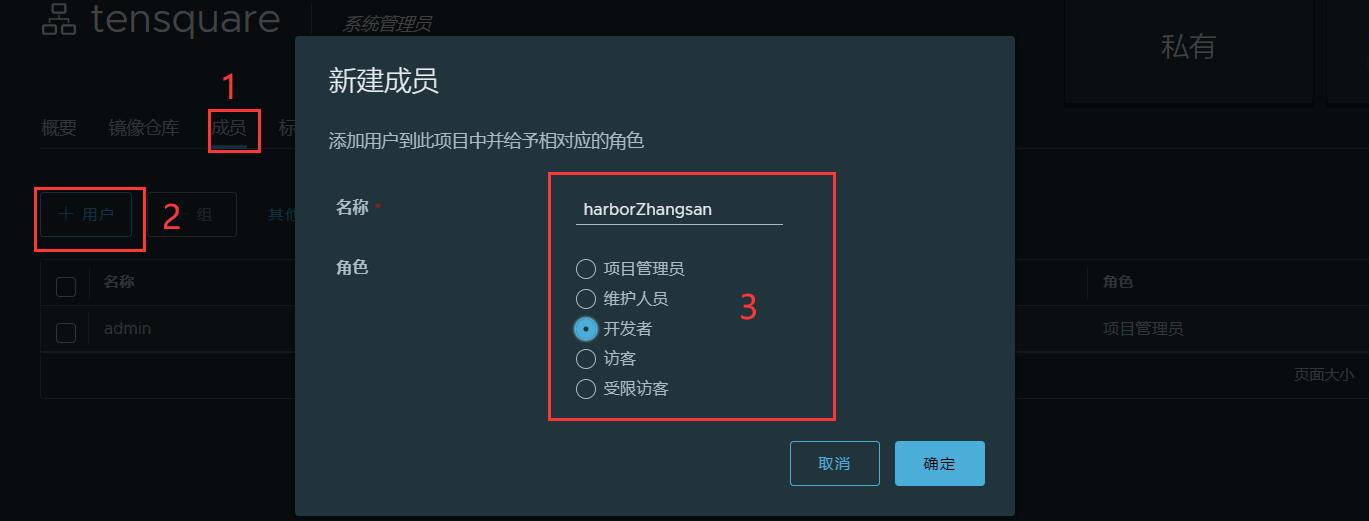
**2. 创建用户`harborZhangsan/harborZhang3`**

**3. 给私有项目分配用户**


| 角色 |权限说明|
|----|----|
| 访客 |对于指定项目拥有只读权限|
| 开发人员 |对于指定项目拥有读写权限|
| 维护人员 |对于指定项目拥有读写权限,创建 Webhooks|
| 项目管理员 |除了读写权限,同时拥有用户管理/镜像扫描等管理权限|
<br/>
# 3. 把镜像上传到Harbor
下面演示将`production-server`机器上的镜像上传到位于`docker-server`机器上的Harbor。
<br/>
**1. 在production-server机器上完成下面步骤**
```shell
(1) 把Harbor地址加入到Docker信任列表
# vim /etc/docker/daemon.json
{
"registry-mirrors":[
"https://zydiol88.mirror.aliyuncs.com"
],
"insecure-registries":[
"192.168.1.29:85" --这个是harbor地址
]
}
(2) 重启docker
systemctl restart docker
(3) 登录Harbor
docker login -u harbor账号 -p harbor密码 192.168.1.29:85
(4) 给需要上传到Harbor的镜像打标签
--查看当前机器有哪些镜像
# docker images
REPOSITORY TAG IMAGE ID CREATED SIZE
tensquare-eureka-server v1.0 b82ccd24a80b About an hour ago 150MB
--给 tensquare-eureka-server 镜像打标签
docker tag tensquare-eureka-server:v1.0 192.168.1.29:85/tensquare/tensquare-eureka-server:v1.0
(5) 推送镜像到Harbor
docker push 192.168.1.29:85/tensquare/tensquare-eureka-server:v1.0
```
**2. 登录到Harbor便可以看到推送的镜像了**

<br/>
# 4. 从Harbor下载镜像
下面演示从Harbor上下载镜像。
<br/>
**1. 在需要从Harbor上拉取镜像的机器需要完成如下步骤**
```shell
(1) 安装Docker,并启动Docker
(2) 把Harbor地址加入到Docker信任列表
# vim /etc/docker/daemon.json
{
"registry-mirrors":[
"https://zydiol88.mirror.aliyuncs.com"
],
"insecure-registries":[
"192.168.1.29:85" --这个是harbor地址
]
}
(3) 重启docker
systemctl restart docker
(4) 登录Harbor
docker login -u harbor账号 -p harbor密码 192.168.1.29:85
```
**2. 拉取镜像**
Harbor提供了镜像拉取命令。

```shell
docker pull 192.168.1.29:85/tensquare/tensquare-eureka-server@sha256:f8e52604958377d7934d3f211d0537df2fbd41a085e7f48673f963ce03b82a54
或者如下拉取:
docker pull 192.168.1.29:85/tensquare/tensquare-eureka-server:v1.0
```
- 相关概念
- 软件开发生命周期
- 软件开发瀑布模型
- 软件的敏捷开发
- 持续集成
- Jenkins介绍
- Jenkins是什么
- Jenkins的特征
- Jenkins环境搭建
- 搭建架构说明
- Gitlab安装与配置
- Jenkins安装与配置
- Tomcat安装和配置
- Jenkins构建项目
- 自由风格软件项目构建
- Maven项目构建
- Pipeline流水线项目构建
- Pipeline是什么
- Pipeline语法
- 流水线项目构建演示
- Pipeline Script from SCM
- 构建触发器
- 触发远程构建
- 其他工程构建后触发
- 定时构建
- 轮询SCM
- Git hook自动触发构建
- 参数化构建
- 配置邮箱发送构建结果
- SonarQube代码审查平台
- SonarQube是什么
- SonarQube平台搭建
- 安装jdk11
- 安装数据库PostgreSQL12
- 安装SonarQube
- SonarQube实现代码审查
- Jenkins+Docker+SpringCloud(1)
- 流程说明
- 环境搭建
- 服务器列表
- Docker安装与配置
- Harbor安装与配置
- Nginx安装与配置
- 微服务持续集成演示
- Jenkins上配置
- 微服务项目配置
- 部署前端静态web网站
