## 编写一个 Web 服务
> Web 网页其实也是一个 Console 命令行,只是在 Command 中启动了一个 gin 服务器,并将配置好的路由传入服务器中执行而已
首先我们使用 `mix` 命令创建一个 Web 项目骨架:
~~~
mix web --name=hello
~~~
通过前面我们对 Console 命令行程序结构的了解,我们先看一下骨架的 `manifest/commands` 目录配置的命令:
~~~
package commands
import (
"github.com/mix-go/console"
"github.com/mix-go/web-skeleton/commands"
)
var (
Commands []console.CommandDefinition
)
func init() {
Commands = append(Commands,
console.CommandDefinition{
Name: "web",
Usage: "\tStart the api server",
Options: []console.OptionDefinition{
{
Names: []string{"a", "addr"},
Usage: "\tListen to the specified address",
},
{
Names: []string{"d", "daemon"},
Usage: "\tRun in the background",
},
},
Command: &commands.WebCommand{},
},
)
}
~~~
从上面我们可以看到定义了一个名称为 `api` 的命令,关联的是 `commands.WebCommand` 结构体,然后我们打开骨架 `commands/web.go` 的源码查看他:
- WebCommand 结构体中启动了一个 gin 服务器
- 并且设置 logrus 为服务器的日志组件
- 还捕获信号,做了服务器的 Shutdown 处理
- 代码中 `routes.RouteDefinitionCallbacks` 定义了全部的路由配置,只需修改这个全局变量即可扩展其他接口
- `router.LoadHTMLGlob` 提前读取了全部视图模板文件
- `router.Static` 设置了静态文件的处理
~~~
package commands
import (
"context"
"fmt"
gin2 "github.com/gin-gonic/gin"
"github.com/mix-go/console"
"github.com/mix-go/console/flag"
"github.com/mix-go/dotenv"
"github.com/mix-go/gin"
"github.com/mix-go/web-skeleton/globals"
"github.com/mix-go/web-skeleton/routes"
"net/http"
"os"
"os/signal"
"strings"
"syscall"
"time"
)
const Addr = ":8080"
type WebCommand struct {
}
func (t *WebCommand) Main() {
logger := globals.Logger()
// server
gin.SetMode(dotenv.Getenv("GIN_MODE").String(gin.ReleaseMode))
router := gin.New(routes.RouteDefinitionCallbacks...)
srv := &http.Server{
Addr: flag.Match("a", "addr").String(Addr),
Handler: router,
}
// signal
ch := make(chan os.Signal)
signal.Notify(ch, syscall.SIGHUP, syscall.SIGINT, syscall.SIGTERM)
go func() {
<-ch
logger.Info("Server shutdown")
ctx, cancel := context.WithTimeout(context.Background(), 10*time.Second)
defer cancel()
if err := srv.Shutdown(ctx); err != nil {
globals.Logger().Errorf("Server shutdown error: %s", err)
}
}()
// error handle
router.Use(gin2.Recovery())
// logger
router.Use(gin.LoggerWithFormatter(logger, func(params gin.LogFormatterParams) string {
return fmt.Sprintf("%s|%s|%d|%s",
params.Method,
params.Path,
params.StatusCode,
params.ClientIP,
)
}))
// templates
router.LoadHTMLGlob(fmt.Sprintf("%s/../templates/*", console.App.BasePath))
// static file
router.Static("/static", fmt.Sprintf("%s/../public/static", console.App.BasePath))
router.StaticFile("/favicon.ico", fmt.Sprintf("%s/../public/favicon.ico", console.App.BasePath))
// run
welcome()
logger.Info("Server start")
if err := srv.ListenAndServe(); err != nil && !strings.Contains(err.Error(), "http: Server closed") {
panic(err)
}
}
~~~
因为骨架中已经处理了基本的常用逻辑,所以我们无需修改这个文件,只需修改 `api.RouteDefinitionCallbacks` 定义的路由,该全局变量在 `routes/all.go` 文件中:
- 我们在路由配置中增加一个 `users/add` 的路由,由于新增用户需要登录才可操作,因此这里增加了 `middleware.SessionMiddleware()` 中间件在前面,并且使用 `router.Any` 接收全部类型的请求。
~~~
router.Any("users/add",
middleware.SessionMiddleware(),
func(ctx *gin.Context) {
user := controllers.UserController{}
user.Add(ctx)
},
)
~~~
然后创建一个 `controllers.UserController` 结构体,文件路径为 `controllers/user.go`:
- 代码中当请求为 GET 时,渲染 `user_add.tmpl` 模板并传入参数,当为 POST 时使用 gorm 在 users 表中插入了一个新记录。
~~~
package controllers
import (
"github.com/gin-gonic/gin"
"github.com/mix-go/web-skeleton/globals"
"github.com/mix-go/web-skeleton/models"
"net/http"
"time"
)
type UserController struct {
}
func (t *UserController) Add(c *gin.Context) {
// 网页
if c.Request.Method == http.MethodGet {
c.HTML(http.StatusOK, "user_add.tmpl", gin.H{
"title": "User add",
})
c.Abort()
return
}
db := globals.DB()
if err := db.Create(&models.User{
Name: c.Request.PostFormValue("name"),
CreateAt: time.Now(),
}).Error; err != nil {
c.String(http.StatusInternalServerError, "<html><h1>%s</h1></html>", "Add error!")
c.Abort()
return
}
c.String(http.StatusInternalServerError, "<html><h1>%s</h1></html>", "Add ok!")
}
~~~
上面的代码中使用了 `models.User` 模型,该文件定义在 `models/users.go`:
- 结构体中的备注指定了字段关联的数据库字段名称,表名可自行增加前缀等
~~~
package models
import "time"
type User struct {
ID int `gorm:"primary_key"`
Name string `gorm:"column:name"`
CreateAt time.Time `gorm:"column:create_at"`
}
func (User) TableName() string {
return "users"
}
~~~
上面使用的 `globals.DB()` 都是骨架中定义好的全局方法,方法内部是采用 `mix-go/bean` 库的依赖注入容器获取的全局 GORM 实例,改实例的依赖配置在 `manifest/beans/db.go` 文件中:
- 文件中的依赖配置定义了使用 `gorm.Open` 实例化,`bean.SINGLETON` 定义了这个实例化后的对象是单例模式,`ConstructorArgs` 字段定义了实例化时传入的构造参数,这里传入的 `DATABASE_DSN` 是从环境变量中获取的,也就是说如果我们要修改连接信息,我们还需要到 `.env` 环境配置文件中修改。
~~~
package beans
import (
"github.com/jinzhu/gorm"
_ "github.com/jinzhu/gorm/dialects/mysql"
"github.com/mix-go/bean"
"github.com/mix-go/dotenv"
)
func DB() {
Beans = append(Beans,
bean.BeanDefinition{
Name: "db",
Reflect: bean.NewReflect(gorm.Open),
Scope: bean.SINGLETON,
ConstructorArgs: bean.ConstructorArgs{"mysql", dotenv.Getenv("DATABASE_DSN").String()},
},
)
}
~~~
## 编译与测试
> 也可以在 Goland Run 里配置 Program arguments 直接编译执行,[Goland 使用] 章节有详细介绍
接下来我们编译上面的程序:
~~~
// linux & macOS
go build -o bin/go_build_main_go main.go
// win
go build -o bin/go_build_main_go.exe main.go
~~~
首先在命令行启动 `web` 服务器:
~~~
$ bin/go_build_main_go web
___
______ ___ _ /__ ___ _____ ______
/ __ `__ \/ /\ \/ /__ __ `/ __ \
/ / / / / / / /\ \/ _ /_/ // /_/ /
/_/ /_/ /_/_/ /_/\_\ \__, / \____/
/____/
Server Name: mix-web
Listen Addr: :8080
System Name: darwin
Go Version: 1.13.4
Framework Version: 1.0.9
time=2020-09-16 20:24:41.515 level=info msg=Server start file=web.go:58
~~~
浏览器测试
- 首先浏览器进入 http://127.0.0.1:8080/login 获取 session

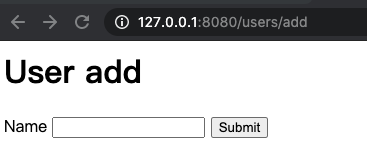
- 提交表单后跳转到 http://127.0.0.1:8080/users/add 页面

