**1、安装rabbitmq**
**2、crontab定时检测rabbtimq状态**
**2、使用thinphp6.0框架rabbitmq示例,supervisor守护消费者**
**3、RabbitMQ有四种交换机类型**

[rabbitmq](https://so.csdn.net/so/search?q=rabbitmq&spm=1001.2101.3001.7020 "rabbitmq")组成部分如下:
> Broker:消息队列服务进程,此进程包括两个部分:Exchange和Queue。
> Exchange:消息队列交换机,按一定的规则将消息路由转发到某个队列对消息进行过虑。
> Queue:消息队列,存储消息的队列,消息到达队列并转发给指定的消费方。
> Producer:消息生产者,即生产方客户端,生产方客户端将消息发送到MQ。
> Consumer:消息消费者,即消费方客户端,接收MQ转发的消息。
消息发布接收流程:
> —–发送消息—–
> 1、生产者和Broker建立TCP连接。
> 2、生产者和Broker建立通道。
> 3、生产者通过通道消息发送给Broker,由Exchange将消息进行转发。
> 4、Exchange将消息转发到指定的Queue(队列)
—-接收消息—–
> 1、消费者和Broker建立TCP连接
> 2、消费者和Broker建立通道
> 3、消费者监听指定的Queue(队列)
> 4、当有消息到达Queue时Broker默认将消息推送给消费者。
> 5、消费者接收到消息。
> 6、消费者应使用[supervisor](https://so.csdn.net/so/search?q=supervisor&spm=1001.2101.3001.7020)进行监控保持在线

### **1、方式一:docker安装RabbitMQ**
**查看仓库里的RabbitMQ**
~~~csharp
[root@localhost ~]# docker search rabbitmq
~~~

**安装RabbitMQ**
~~~csharp
[root@localhost ~]# docker pull rabbitmq
~~~
这里是直接安装最新的,如果需要安装其他版本在[rabbitmq](https://so.csdn.net/so/search?q=rabbitmq&spm=1001.2101.3001.7020)后面跟上版本号即可
**启动RabbitMQ**
~~~cobol
[root@localhost ~]# docker run -d --hostname my-rabbit --name rabbit -p 15672:15672 -p 5672:5672 rabbitmq
~~~
**安装插件**
1\. 先执行docker ps 拿到当前的镜像ID
~~~csharp
[root@localhost ~]# docker ps
~~~
2\. 进入容器
~~~csharp
[root@localhost ~]# docker exec -it 镜像ID /bin/bash
~~~
3\. 安装web页面插件
~~~csharp
[root@localhost ~]# rabbitmq-plugins enable rabbitmq_management
~~~
### 2、方式二:[CentOS6.9下安装rabbitmq消息队列](https://link.zhihu.com/?target=https%3A//www.cnblogs.com/vipzhou/p/7890674.html "CentOS6.9下安装rabbitmq消息队列")
安装如下步骤:
**首先安装erlang**
~~~csharp
[root@localhost ~]# yum install erlang
~~~
**安装rabbitmq rpm包**
~~~cobol
[root@localhost ~]# wget http://www.rabbitmq.com/releases/rabbitmq-server/v3.5.0/rabbitmq-server-3.5.0-1.noarch.rpm[root@localhost ~]# rpm -ivh rabbitmq-server-3.5.0-1.noarch.rpm
~~~
**启动rabbitmq**
~~~csharp
[root@localhost ~]# service start rabbitmq-server
~~~
注:如果启动失败,报错如下:

则修改hosts,添加hostname:
~~~csharp
[root@localhost ~]# vi /etc/hosts
~~~
添加hostname:

再次重启即可:

**打开5672端口(**注意 15672,5672端口防火墙之类的问题需要开启一下**)**
~~~cobol
[root@localhost ~]# /sbin/iptables -I INPUT -p tcp --dport 5672 -j ACCEPT [root@localhost ~]# /etc/rc.d/init.d/iptables save [root@localhost ~]# /etc/init.d/iptables restart
~~~

**启用web页面插件**
~~~csharp
[root@localhost ~]# rabbitmq-plugins enable rabbitmq_management
~~~
**重启rabbitmq**
~~~csharp
[root@localhost ~]# systemctl start rabbitmq-server
~~~
**web访问:** ip地址**可以通过ip add 或者 ifconfig查看**
**用户名和密码:guest guest**
****
**无法登录请使用如下:**
~~~cobol
[root@localhost ~]# vim /etc/rabbitmq/rabbitmq.config
~~~
写入如下信息并保存:
~~~less
[{rabbit, [{loopback_users, []}]}].
~~~

再重启:

再次访问即可:

> 服务启动
> \[root@localhost ~\]# systemctl start rabbitmq-server.service
> 看看是否启动成功
> \[root@localhost ~\]# rabbitmqctl status
> 设置开机自启
> \[root@localhost ~\]# \[root@localhost ~\]# chkconfig rabbitmq-server on
> 添加到启动项并设置开机自启
> \[root@localhost ~\]# systemctl enable rabbitmq-server.service
> 开启管理界面
> \[root@localhost ~\]# rabbitmq-plugins enable rabbitmq\_management
> 添加账号
> \[root@localhost ~\]# rabbitmqctl add\_user abc 123456
> 设置用户角色
> \[root@localhost ~\]# rabbitmqctl set\_user\_tags abc administrator
> 设置用户权限
> \[root@localhost ~\]# rabbitmqctl set\_permissions -p "/" abc ".\*" ".\*" ".\*"
> 查看用户和角色 需要启动服务
> \[root@localhost ~\]# rabbitmqctl list\_users
> 删除角色
> \[root@localhost ~\]# rabbitmqctl delete\_user Username
**2、crontab定时检测rabbtimq状态(应使用supervisor实时监听)**
1)[crontab](https://so.csdn.net/so/search?q=crontab&spm=1001.2101.3001.7020 "crontab")定时任务(每分钟检查运行脚本【分,时,日,月,周】)
\[root@localhost ~\]#[crontab](https://so.csdn.net/so/search?q=crontab&spm=1001.2101.3001.7020)\-e
~~~cobol
...*/1 * * * * /bin/bash /usr/local/sbin/rabbitmq.sh
~~~
2)rabbitmq启动脚本(通过获取pgrep获取rabbitmq-server进程号再进行判断)
~~~cobol
[root@localhost ~]# cd /usr/local/sbin[root@localhost ~]# vim rabbitmq.sh#!/bin/bash pgrep -x rabbitmq-server &> /dev/null if [ $? -ne 0 ] then echo "At time: `date` :rabbitmq error stop .">> /var/log/rabbitmqCheck.log/etc/init.d/rabbitmq-server start#echo "At time: `date` :rabbitmq server is stop." elseecho "rabbitmq server is running ." >> /var/log/rabbitmqCheck.log fi
~~~
测试:
1)停止rabbitmq【Active:inactive(dead)】
~~~cobol
[root@localhost sbin]# /etc/init.d/rabbitmq-server stopStopping rabbitmq-server (via systemctl): [ OK ][root@localhost sbin]# [root@localhost sbin]# systemctl status rabbitmq-server● rabbitmq-server.service - LSB: Enable AMQP service provided by RabbitMQ broker Loaded: loaded (/etc/rc.d/init.d/rabbitmq-server; bad; vendor preset: disabled) Active: inactive (dead) since Wed 2021-01-13 18:01:33 CST; 46s ago Docs: man:systemd-sysv-generator(8) Process: 14618 ExecStop=/etc/rc.d/init.d/rabbitmq-server stop (code=exited, status=0/SUCCESS) Process: 14346 ExecStart=/etc/rc.d/init.d/rabbitmq-server start (code=exited, status=0/SUCCESS) Jan 13 18:01:02 localhost.localdomain su[14426]: (to rabbitmq) root on noneJan 13 18:01:02 localhost.localdomain su[14421]: (to rabbitmq) root on noneJan 13 18:01:05 localhost.localdomain rabbitmq-server[14346]: Starting rabbitmq-server: SUCCESSJan 13 18:01:05 localhost.localdomain rabbitmq-server[14346]: rabbitmq-server.Jan 13 18:01:05 localhost.localdomain systemd[1]: Started LSB: Enable AMQP service provided by RabbitMQ broker.Jan 13 18:01:29 localhost.localdomain systemd[1]: Stopping LSB: Enable AMQP service provided by RabbitMQ broker...Jan 13 18:01:29 localhost.localdomain su[14623]: (to rabbitmq) root on noneJan 13 18:01:30 localhost.localdomain su[14684]: (to rabbitmq) root on noneJan 13 18:01:33 localhost.localdomain rabbitmq-server[14618]: Stopping rabbitmq-server: rabbitmq-server.Jan 13 18:01:33 localhost.localdomain systemd[1]: Stopped LSB: Enable AMQP service provided by RabbitMQ broker.[root@localhost sbin]#
~~~
2)隔一分钟再次查看rabbitmq状态【Active:active running】
\[root@localhost sbin\]# systemctl status rabbitmq-server
~~~cobol
● rabbitmq-server.service - LSB: Enable AMQP service provided by RabbitMQ broker Loaded: loaded (/etc/rc.d/init.d/rabbitmq-server; bad; vendor preset: disabled) Active: active (running) since Wed 2021-01-13 18:03:04 CST; 35s ago Docs: man:systemd-sysv-generator(8) Process: 14618 ExecStop=/etc/rc.d/init.d/rabbitmq-server stop (code=exited, status=0/SUCCESS) Process: 14917 ExecStart=/etc/rc.d/init.d/rabbitmq-server start (code=exited, status=0/SUCCESS) Tasks: 2 Memory: 1.4M CGroup: /system.slice/rabbitmq-server.service ├─14990 /bin/sh /etc/rc.d/init.d/rabbitmq-server start └─14995 /bin/bash -c ulimit -S -c 0 >/dev/null 2>&1 ; /usr/sbin/rabbitmq-server Jan 13 18:03:01 localhost.localdomain systemd[1]: Starting LSB: Enable AMQP service provided by RabbitMQ broker...Jan 13 18:03:01 localhost.localdomain su[14921]: (to rabbitmq) root on noneJan 13 18:03:02 localhost.localdomain su[14998]: (to rabbitmq) root on noneJan 13 18:03:02 localhost.localdomain su[14991]: (to rabbitmq) root on noneJan 13 18:03:04 localhost.localdomain rabbitmq-server[14917]: Starting rabbitmq-server: SUCCESSJan 13 18:03:04 localhost.localdomain systemd[1]: Started LSB: Enable AMQP service provided by RabbitMQ broker.Jan 13 18:03:04 localhost.localdomain rabbitmq-server[14917]: rabbitmq-server.You have new mail in /var/spool/mail/root[root@localhost sbin]#
~~~
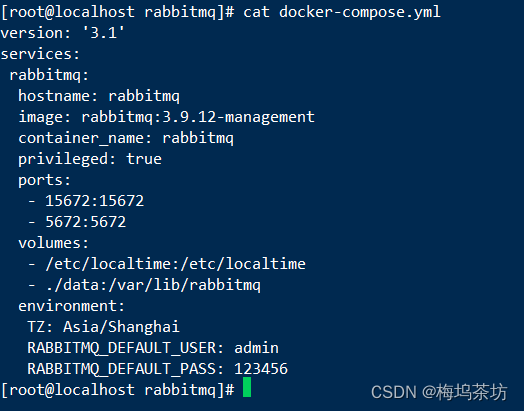
### 方式三:docker-compose.yml安装

~~~cobol
version: '3.1'services: rabbitmq: hostname: rabbitmq image: rabbitmq:3.9.12-management container_name: rabbitmq privileged: true ports: - 15672:15672 - 5672:5672 volumes: - /etc/localtime:/etc/localtime - ./data:/var/lib/rabbitmq environment: TZ: Asia/Shanghai RABBITMQ_DEFAULT_USER: admin RABBITMQ_DEFAULT_PASS: 123456
~~~
### **3、thinkphp6.0使用composer安装rabbitmq安装包**
**本次需要修改的文件有**
~~~delphi
Comer.php 使用php think生产的命令行Index.php 测试类MqConsumer.php 消费者MqProducer.php 生产者Console.php 命令行配置项rabbitmq.php 消息队列配置项
~~~

**1、安装amqplib**
进入到tp6项目根目录安装rabbitmq包,如需忽略版本安装 --ignore-platform-reqs
~~~php
$composer require --ignore-platform-reqs php-amqplib/php-amqplib
~~~

**2、在config文件夹下添加rabbitmq.php配置文件**
~~~cobol
<?php// 示例配置文件return [ # 连接信息 'AMQP' => [ 'host' => '192.168.1.130', //连接rabbitmq,此为安装rabbitmq服务器 'port'=>'5672', 'login'=>'guest', 'password'=>'guest', 'vhost'=>'/' ], # 队列 'direct_queue' => [ 'exchange_name' => 'direct_exchange', 'exchange_type'=>'direct',#直连模式 'queue_name' => 'direct_queue', 'route_key' => 'direct_roteking', 'consumer_tag' => 'direct' ]];
~~~
**3、编写生产者代码**
~~~cobol
<?phpnamespace app\controller; use app\BaseController;use PhpAmqpLib\Connection\AMQPStreamConnection;use PhpAmqpLib\Message\AMQPMessage;use think\facade\Log; class MqProducer{ public static function pushMessage($data) { $param = config('rabbitmq.AMQP'); $amqpDetail = config('rabbitmq.direct_queue'); $connection = new AMQPStreamConnection( $param['host'], $param['port'], $param['login'], $param['password'], $param['vhost'] ); $channel = $connection->channel(); /* * 创建队列(Queue) * name: hello // 队列名称 * passive: false // 如果设置true存在则返回OK,否则就报错。设置false存在返回OK,不存在则自动创建 * durable: true // 是否持久化,设置false是存放到内存中RabbitMQ重启后会丢失, * 设置true则代表是一个持久的队列,服务重启之后也会存在,因为服务会把持久化的Queue存放在硬盘上,当服务重启的时候,会重新加载之前被持久化的Queue * exclusive: false // 是否排他,指定该选项为true则队列只对当前连接有效,连接断开后自动删除 * auto_delete: false // 是否自动删除,当最后一个消费者断开连接之后队列是否自动被删除 */ $channel->queue_declare($amqpDetail['queue_name'], false, true, false, false); /* * 创建交换机(Exchange) * name: vckai_exchange// 交换机名称 * type: direct // 交换机类型,分别为direct/fanout/topic,参考另外文章的Exchange Type说明。 * passive: false // 如果设置true存在则返回OK,否则就报错。设置false存在返回OK,不存在则自动创建 * durable: false // 是否持久化,设置false是存放到内存中的,RabbitMQ重启后会丢失 * auto_delete: false // 是否自动删除,当最后一个消费者断开连接之后队列是否自动被删除 */ $channel->exchange_declare($amqpDetail['exchange_name'], $amqpDetail['exchange_type'], false, true, false); /* * 绑定队列和交换机 * @param string $queue 队列名称 * @param string $exchange 交换器名称 * @param string $routing_key 路由key * @param bool $nowait * @param array $arguments * @param int|null $ticket * @throws \PhpAmqpLib\Exception\AMQPTimeoutException if the specified operation timeout was exceeded * @return mixed|null */ $channel->queue_bind($amqpDetail['queue_name'], $amqpDetail['exchange_name'], $amqpDetail['route_key']); /* $messageBody:消息体 content_type:消息的类型 可以不指定 delivery_mode:消息持久化最关键的参数 AMQPMessage::DELIVERY_MODE_NON_PERSISTENT = 1; 不持久化 AMQPMessage::DELIVERY_MODE_PERSISTENT = 2; 持久化 */ //将要发送数据变为json字符串 $messageBody = json_encode($data); /* * 创建AMQP消息类型 * $messageBody:消息体 * delivery_mode 消息是否持久化 * AMQPMessage::DELIVERY_MODE_NON_PERSISTENT = 1; 不持久化 * AMQPMessage::DELIVERY_MODE_PERSISTENT = 2; 持久化 */ $message = new AMQPMessage($messageBody, array('content_type' => 'text/plain', 'delivery_mode' => AMQPMessage::DELIVERY_MODE_PERSISTENT)); /* * 发送消息 * msg // AMQP消息内容 * exchange // 交换机名称 * routing key // 路由键名称 */ $channel->basic_publish($message, $amqpDetail['exchange_name'],$amqpDetail['route_key']); $channel->close(); $connection->close(); echo "ok"; }}
~~~
**4、消费者代码**
~~~cobol
<?phpnamespace app\controller; use app\BaseController;use PhpAmqpLib\Connection\AMQPStreamConnection;use think\Controller;use think\facade\Log; class MqConsumer{ /** * 消费端 消费端需要保持运行状态实现方式 * 1 linux上写定时任务每隔5分钟运行下该脚本,保证访问服务器的ip比较平缓,不至于崩溃 * 2 nohup php index.php index/Message_Consume/start & 用nohup命令后台运行该脚本 * 3 **/ function shutdown($channel, $connection) { $channel->close(); $connection->close(); Log::write("closed",3); } //消息处理 function process_message($message) { //休眠两秒 //sleep(2); echo $message->body."\n"; //自定义日志为rabbitmq-consumer Log::write($message->body,'rabbitmq-consumer'); //[2021-01-14T16:14:17+08:00][rabbitmq-consumer] {"time":1610612057,"order":85} //手动发送ack $message->delivery_info['channel']->basic_ack($message->delivery_info['delivery_tag']); // Send a message with the string "quit" to cancel the consumer. if ($message->body === 'quit') { $message->delivery_info['channel']->basic_cancel($message->delivery_info['consumer_tag']); } } /** * 启动 * @return \think\Response */ public function start() { $param = config('rabbitmq.AMQP'); $amqpDetail = config('rabbitmq.direct_queue'); $connection = new AMQPStreamConnection( $param['host'], $param['port'], $param['login'], $param['password'], $param['vhost'] ); /* * 创建通道 */ $channel = $connection->channel(); /* * 设置消费者(Consumer)客户端同时只处理一条队列 * 这样是告诉RabbitMQ,再同一时刻,不要发送超过1条消息给一个消费者(Consumer), * 直到它已经处理了上一条消息并且作出了响应。这样,RabbitMQ就会把消息分发给下一个空闲的消费者(Consumer)。 */ $channel->basic_qos(0, 1, false); /* * 同样是创建路由和队列,以及绑定路由队列,注意要跟publisher的一致 * 这里其实可以不用,但是为了防止队列没有被创建所以做的容错处理 */ $channel->queue_declare($amqpDetail['queue_name'], false, true, false, false); $channel->exchange_declare($amqpDetail['exchange_name'], $amqpDetail['exchange_type'], false, true, false); $channel->queue_bind($amqpDetail['queue_name'], $amqpDetail['exchange_name'],$amqpDetail['route_key']); /* queue: 从哪里获取消息的队列 consumer_tag: 消费者标识符,用于区分多个客户端 no_local: 不接收此使用者发布的消息 no_ack: 设置为true,则使用者将使用自动确认模式。详情请参见. 自动ACK:消息一旦被接收,消费者自动发送ACK 手动ACK:消息接收后,不会发送ACK,需要手动调用 exclusive:是否排他,即这个队列只能由一个消费者消费。适用于任务不允许进行并发处理的情况下 nowait: 不返回执行结果,但是如果排他开启的话,则必须需要等待结果的,如果两个一起开就会报错 callback: :回调逻辑处理函数,PHP回调 array($this, 'process_message') 调用本对象的process_message方法 */ $channel->basic_consume($amqpDetail['queue_name'], $amqpDetail['consumer_tag'], false, false, false, false, array($this, 'process_message')); register_shutdown_function(array($this, 'shutdown'), $channel, $connection); // 阻塞队列监听事件 while (count($channel->callbacks)) { $channel->wait(); } }}
~~~
**5、编写测试代码Index.php**
~~~cobol
<?phpnamespace app\controller; use app\BaseController;use app\controller\MqProducer; class Index{ public function index() { echo "tp6";die; } public function hello($name = 'ThinkPHP6') { return 'hello,' . $name; } public function send() { // for($i=0; $i<5; $i++){ $consumer = new MqProducer();//生产者 $data = [ 'time'=>time(), 'order'=> rand(1, 100), ]; $consumer->pushMessage($data); // sleep(1);// } }}
~~~
6、项目更目录使用php think生成指令
1)进入到项目目录:php -v 查看是否配置环境,否则配置php系统环境
Windows7下的php环境配置教程\_php技巧\_脚本之家www.jb51.net/article/61507.htm正在上传…重新上传取消
2)执行:php think make:command Comer Comer 会在command目录下生成Comer .php文件

3)在config/console.php添加指令
~~~php
<?php// +----------------------------------------------------------------------// | 控制台配置// +----------------------------------------------------------------------return [ // 指令定义 'commands' => [ // consumer是app\Command\Consumer文件中自定义命令行的名字不能使用 'comer' => 'app\command\Comer', ],];
~~~
4.修改指令文件
~~~php
<?phpdeclare (strict_types = 1); namespace app\command; use app\controller\MqConsumer;use think\console\Command;use think\console\Input;use think\console\input\Argument;use think\console\input\Option;use think\console\Output; class Comer extends Command{ protected function configure() { // 指令配置 $this->setName('Comer') ->setDescription('the Comer command'); } protected function execute(Input $input, Output $output) { // 指令输出// $output->writeln('Comer'); $consumer = new MqConsumer(); //消费者 $consumer->start(); //启动 }}
~~~
**7、测试**
步骤:
> (1)启动监听指令(消费者消费)
> (2)生产者发送消息
> (3)查看rabbitmq管理界面是否有消息
> (4)查看消费者已消费消息
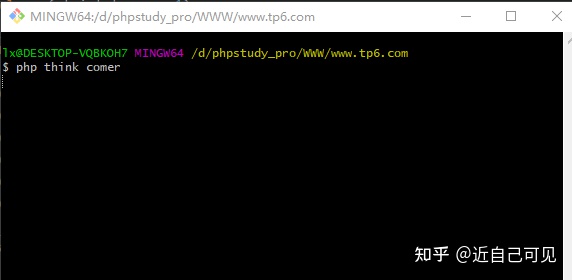
**1)在项目根目录指令监听 php think comer**
****
**2)发送消息**
~~~php
http://www.tp6.net/index.php/index/send
~~~

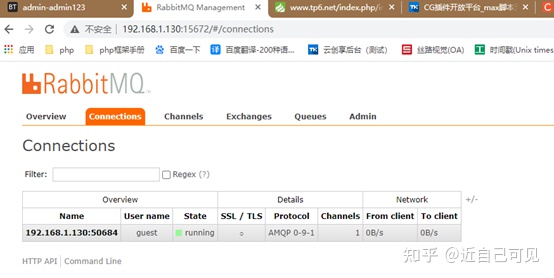
**3)rabbitmq管理界面**
****
**4)查看消费者已消费消息**
****
**8、使用supervisor监控消费者实时在线**
**安装supervisor:**
监听守护【rabbitmq消费者】配置文件如下,然后保存退出
> \[user@localhost [tp6.com](https://link.zhihu.com/?target=http%3A//www.tp6.com/ "tp6.com")\]$ cd /etc/supervisord.d/
> \[user@localhost supervisord.d\]$ sudo vim tp\_amqp.ini
~~~php
[program:tp_amqp]directory = /www/wwwroot/www.tp6.com ;启动目录command = /www/server/php/72/bin/php think comer ;启动命令autostart = true ;在supervisord启动的时候也启动startsecs = 5 ;启动5秒后没有异常退出,就当作已经正常启动了autorestart = true ;程序异常退出后自动重启startretries = 3 ;启动失败自动重试次数,默认是3user = root ;哪个用户启动redirect_stderr = true ;把stderr重定向到stdout,默认falsestdout_logfile_maxbytes = 20MB ;stdout日志文件大小,默认50MBstdout_logfile_backups = 20 ;stdout日志文件备份数stdout_logfile = /usr/log/tp_amqp.log;stdout日志文件,需要手动创建/usr/log/tp_amqp.log
~~~
**4、启动守护进程**
> 更新配置文件:supervisorctl update
> 启动进程:sudo supervisorctl start tp\_amqp
通过ps查看守护的命令:
~~~php
[user@localhost www.tp6.com]$ sudo supervisorctl status tp_amqptp_amqp RUNNING pid 16595, uptime 0:01:27[user@localhost www.tp6.com]$ ps afx | grep php 2364 ? Ss 0:00 php-fpm: master process (/www/server/php/72/etc/php-fpm.conf) 2365 ? S 0:00 \_ php-fpm: pool www 2366 ? S 0:00 \_ php-fpm: pool www 2367 ? S 0:00 \_ php-fpm: pool www 2368 ? S 0:00 \_ php-fpm: pool www 2369 ? S 0:00 \_ php-fpm: pool www14478 ? S 0:00 \_ php-fpm: pool www16746 pts/1 S+ 0:00 \_ grep --color=auto php16595 ? S 0:00 \_ /www/server/php/72/bin/php think comer[user@localhost www.tp6.com]$ sudo kill 16595[user@localhost www.tp6.com]$ ps afx | grep php 2364 ? Ss 0:00 php-fpm: master process (/www/server/php/72/etc/php-fpm.conf) 2365 ? S 0:00 \_ php-fpm: pool www 2366 ? S 0:00 \_ php-fpm: pool www 2367 ? S 0:00 \_ php-fpm: pool www 2368 ? S 0:00 \_ php-fpm: pool www 2369 ? S 0:00 \_ php-fpm: pool www14478 ? S 0:00 \_ php-fpm: pool www16823 pts/1 S+ 0:00 \_ grep --color=auto php16821 ? S 0:00 \_ /www/server/php/72/bin/php think comer[user@localhost www.tp6.com]$
~~~
简单描述一下RabbitMQ中的几个关键的概念:
Broker:可以简单的理解为安装了RabbitMQ服务的这台机器就可以称为中间人
Exchange:交换机,消息经由它,通过路由键来判断并决定把消息投递给哪个队列,它类似于一个路由器的角色
Queue:队列,最终将消息投递到队列中,由消费端监听队列进行消费
Binding:绑定关系,需要给交换机绑定队列,绑定时需要给一个路由键
Routingkey:路由键,交换机和队列进行绑定时,需要指定路由键或通配符路由键。
交换机根据路由键来决定消息投递到哪个或哪些队列
大致流程:使用RabbitMQ前,首先需要根据业务来创建交换机和队列,创建完成后需要给交换机绑定队列(交换机和队列可以是多对多的关系),绑定队列时要指定具体的路由键或者通配符路由键当生产者发送一条消息的时候,需要指定交换机和路由键,消息到达Broker后先转给刚才指定的交换机,交换机再根据路由键来决定把消息投递给与自己绑定的哪一个或哪一些队列,最后再由消费端来监听这些队列,消费处理对应的消息
最新版本的RabbitMQ有四种交换机类型,分别是:Direct exchange、Fanout exchange、Topic exchange、Headers exchange
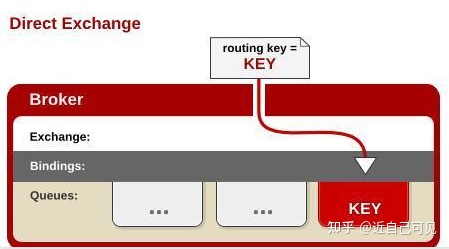
#### 1、Direct exchange---直接类型交换机
要求消息带的路由键和绑定的路由键**完全**匹配,这是一个完整的匹配。\\

2、Fanout Exchange---扇出类型交换机
只需要简单的将队列绑定到该类型交换机上,该类型的交换机绑定队列时可以不指定路由键(Routingkey)
当消息发送给该交换机后,它会将消息投递给与该交换机绑定的所有队列
很像广播,每台子网内的机器都会获得一份消息,Fanout交换机转发消息是最快的

#### 3、Topic Exchange---主题类型交换机
将路由键和某模式进行匹配。此时队列需要绑定某一个模式上。符号#匹配0个或多个单词,符号 \*匹配一个单词。

#### 4、Headers Exchanges
- Golang
- Beego框架
- Gin框架
- gin框架介绍
- 使用Gin web框架的知名开源线上项目
- go-admin-gin
- air 热启动
- 完整的form表单参数验证语法
- Go 语言入门练手项目推荐
- Golang是基于多线程模型
- golang 一些概念
- Golang程序开发注意事项
- fatal error: all goroutines are asleep - deadlock
- defer
- Golang 的内建调试器
- go部署
- golang指针重要性
- 包(golang)
- Golang框架选型比较: goframe, beego, iris和gin
- GoFrame
- golang-admin-项目
- go module的使用方法及原理
- go-admin支持多框架的后台系统(go-admin.cn)
- docker gocv
- go-fac
- MSYS2
- 企业开发框架系统推荐
- gorm
- go-zero
- 优秀系统
- GinSkeleton(gin web 及gin 知识)
- 一次 request -> response 的生命周期概述
- 路由与路由组以及gin源码学习
- 中间件以及gin源码学习
- golang项目部署
- 独立部署golang
- 代理部署golang
- 容器部署golang
- golang交叉编译
- goravel
- kardianos+gin 项目作为windows服务运行
- go env
- 适用在Windows、Linux和macOS环境下打包Go应用程序的详细步骤和命令
- Redis
- Dochub
- Docker部署开发go环境
- Docker部署运行go环境
- dochub说明
- Vue
- i18n
- vue3
- vue3基本知识
- element-plus 表格单选
- vue3后台模板
- Thinkphp
- Casbin权限控制中间件
- 容器、依赖注入、门面、事件、中间件
- tp6问答
- 伪静态
- thinkphp-queue
- think-throttle
- thinkphp队列queue的一些使用说明,queue:work和queue:listen的区别
- ThinkPHP6之模型事件的触发条件
- thinkphp-swoole
- save、update、insert 的区别
- Socket
- workerman
- 介绍
- 从ThinkPHP6移植到Webman的一些技术和经验(干货)
- swoole
- swoole介绍
- hyperf
- hf官网
- Swoft
- swoft官网
- easyswoole
- easyswoole官网地址
- EASYSWOOLE 聊天室DEMO
- socket问答
- MySQL
- 聚簇索引与非聚簇索引
- Mysql使用max获取最大值细节
- 主从复制
- 随机生成20万User表的数据
- MySQL进阶-----前缀索引、单例与联合索引
- PHP
- 面向切面编程AOP
- php是单线程的一定程度上也可以看成是“多线程”
- PHP 线程,进程、并发、并行 的理解
- excel数据画表格图片
- php第三方包
- monolog/monolog
- league/glide
- 博客-知识网站
- php 常用bc函数
- PHP知识点的应用场景
- AOP(面向切面编程)
- 注解
- 依赖注入
- 事件机制
- phpspreadsheet导出数据和图片到excel
- Hyperf
- mineAdmin
- 微服务
- nacos注册服务
- simps-mqtt连接客户端simps
- Linux
- 切换php版本
- Vim
- Laravel
- RabbitMQ
- thinkphp+rabbitmq
- 博客
- Webman框架
- 框架注意问题
- 关于内存泄漏
- 移动端自动化
- 懒人精灵
- 工具应用
- render
- gitlab Sourcetree
- ssh-agent失败 错误代码-1
- 资源网站
- Git
- wkhtmltopdf
- MSYS2 介绍
- powershell curl 使用教程
- NSSM(windows服务工具)
- MinGW64
- 知识扩展
- 对象存储系统
- minio
- 雪花ID
- 请求body参数类型
- GraphQL
- js 深拷贝
- window 共享 centos文件夹
- 前端get/post 请求 特殊符号 “+”传参数问题
- 什么是SCM系统?SCM系统与ERP系统有什么区别?
- nginx 日志格式统一为 json
- 特殊符号怎么打
- 收藏网址
- 收藏-golang
- 收藏-vue3
- 收藏-php
- 收藏-node
- 收藏-前端
- 规划ITEM
- 旅游类
- 人脸识别
- dlib
- Docker&&部署
- Docker-compose
- Docker的网络模式
- rancher
- DHorse
- Elasticsearch
- es与kibana都docke连接
- 4种数据同步到Elasticsearch方案
- GPT
- 推荐系统
- fastposter海报生成
- elasticsearch+logstash+kibana
- beego文档系统-MinDoc
- jeecg开源平台
- Java
- 打包部署
- spring boot
- 依赖
- Maven 相关 命令
- Gradle 相关命令
- mybatis
- mybatis.plus
- spring boot 模板引擎
- SpringBoot+Maven多模块项目(创建、依赖、打包可执行jar包部署测试)完整流程
- Spring Cloud
- Sentinel
- nacos
- Apollo
- java推荐项目
- gradle
- Maven
- Nexus仓库管理器
- Python
- Masonite框架
- scrapy
- Python2的pip2
- Python3 安装 pip3
- 安全攻防
- 运维技术
- 腾讯云安全加固建议
- 免费freessl证书申请
- ruby
- homeland
- Protobuf
- GIT
- FFMPEG
- 命令说明
- 音频
- ffmpeg合并多个MP4视频
- NODEJS
- 开发npm包
- MongoDB
- php-docker-mongodb环境搭建
- mongo基本命令
- Docker安装MongoDB最新版并连接
- 少儿编程官网
- UI推荐
- MQTT
- PHP连接mqtt
- EMQX服务端
- php搭建mqtt服务端
