
[TOC]
>[success] # Element ui做批量上传功能
~~~
如下图:'element ui'所说的多文件上传实际上是,'每个文件都会单独走一次接口,多次走接口'
~~~

~~~
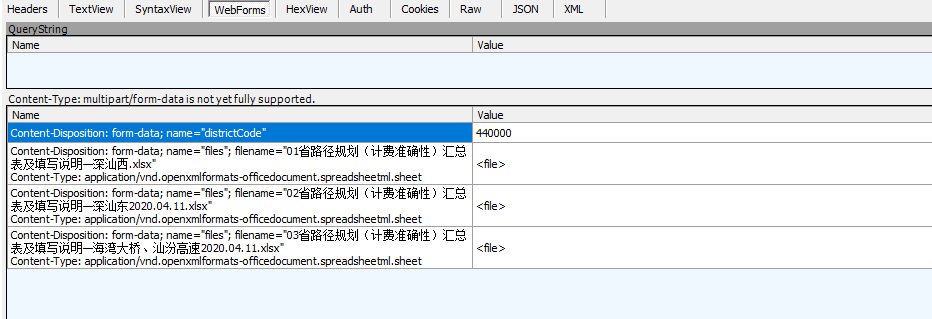
而我想要的是下图这种,'一个接口上传多个文件'
~~~
1. html代码
~~~
<template>
<div>
<!-- 隐藏的上传组件 Start -->
<el-upload
v-show="false"
ref="uploadFile"
action
:multiple="true"
accept=".xlsx"
:limit="100"
:on-exceed="handleExceed"
:http-request="uploadPathBillingData"
:auto-upload="true">
</el-upload>
<!-- 上传按钮,点击时候会手动调用ref触发上传组件上传方法 -->
<el-button size="small" @click="handleBeforeUpload">上传数据</el-button>
</div>
</template>
~~~
~~~
这里用到的几个'主要属性'和'事件':
1. 'v-show="false"':想做一个'确定要上传数据么?'的'提示信息','element ui'不支持这样做,所以
下面写了一个'上传按钮',点击'上传按钮'时候会先'给出提示',然后'确定后会弹出选择文件窗口'
2. 'multiple="true"':是否支持多选文件
3. 'limit="100"':最大允许上传个数
4.':on-exceed':文件超出个数限制时的钩子
5. 'http-request':自定义上传事件(正常来说,上传文件'走接口的逻辑在这里写')
6. 'auto-upload="true"':是否在选取文件后立即进行上传,这里设置为'true',设置为'true'后,
选中了几个文件,他就会走几次'http-request'属性对应的方法,也就是会'走几次接口'
~~~~
2. JS代码
~~~
<script>
export default{
data(){
return {
filedata: null, // 储存文件的formData对象
errorMassageList: [], // 错误信息列表
timer: null, // 定时器
isMaskLayer: false // 弹窗控制
}
},
methods: {
async handleBeforeUpload(){ // 01. 确认要上传数据吗?
try{
await this.$confirm(`确定要上传数据么?`, '提示', {
closeOnClickModal: false,
confirmButtonText: '确定',
cancelButtonText: '取消'
});
this.filedata = new FormData();
this.$refs['uploadFile'].$refs['upload-inner'].handleClick() // 通过$refs模拟点击上传按钮
} catch(e) { return }
},
uploadPathBillingData(){ // 02. 自动向formData对象中添加文件
// 验证规则
let isFile = file.file.type === "application/vnd.openxmlformats-officedocument.spreadsheetml.sheet";
// 验证文件格式和文件size
if(!isFile){
this.errorMassageList.push(`【${ file.file.name }】上传文件格式不正确`)
}
else if(file.file.size <= 0){
this.errorMassageList.push(`【${ file.file.name }】上传数据不能为空`)
}
// 向formData对象中添加要上传的文件
this.filedata.append('files', file.file)
this.proxySynchronousFile()
},
proxySynchronousFile(){ // 03. 监听是否完成添加文件操作,如果完成自动上传文件
// 每次进入清除上次的定时器,清除后重新从0开始计时
if(this.timer) {
this.handleTimeout();
}
// lodding弹窗控制显示,上传多个文件会走多次,为了让lodding只执行一次
if(!this.isMaskLayer){
this.$store.commit("SHOW_WAITING");
this.isMaskLayer = true; // 弹窗状态重置
}
// 开始进入自动上传步骤
this.timer = setTimeout(async () =>{
// 文件错误验证提示判断
if(this.errorMassageList.length > 0){
this.$store.commit("CLOSE_WAITING");
this.isMaskLayer = false; // 弹窗状态重置,这里一定要在message弹出的上面重置
this.$message.error(this.errorMassageList[0]);
this.filedata = null; // 清空formData文件列表
this.errorMassageList = []; //
this.handleTimeout(); // 清空定时器
this.$refs.uploadFile.clearFiles() // 清空缓存的文件列表
return;
}
// 上传文件操作
try {
this.filedata.append("districtCode", this.districtCode);
const res = await importDistrictSelf(this.filedata);
this.handleTimeout(); // 清除定时器
this.filedata = null; // 清空formData文件列表
this.errorMassageList = []; // 清空错误信息列表
this.$refs.uploadFile.clearFiles() // 清空缓存的文件列表
} catch(e){
console.warn(e)
this.$message.error(e && e.message);
} finally {
this.$store.commit("CLOSE_WAITING");
this.isMaskLayer = false; // 弹窗状态重置
}
}, 2000);
},
handleTimeout(){ // 清空定时器方法
clearTimeout(this.timer);
this.timer = null;
}
}
}
</script>
~~~
<br/>
>[success] ## 利用防抖的思想做自动上传功能
**防抖的思想**:第一次触发事件后,函数**不会立即执行**,而是**设置一个N秒的定时器**,在这个时间内,如果事件**再次触发**,则**打破定时器同时生成一个新的N秒定时器,直到某个定时器完整结束且没有生成新的定时器,则执行相应函数**,利用这个思想来做**自动上传功能**。
~~~
let timer = null // 定时器
function timeout() {
console.log('测试一下会抖动几次')
// 有定时器就清空定时器
if (timer) {
clearTimeout(timer)
timer = null
}
// 新建一个定时器
timer = setTimeout(() => {
console.log('执行最后一次要执行的代码')
}, 2000)
}
for (let i = 0; i < 3; i++) { // 模拟多次抖动
timeout()
}
~~~
- vue复选框逻辑
- get请求给后台传数组
- 提交表单时传值参数处理方案
- Element ui上传图片功能
- async和await的使用
- 时间戳转换
- 日期格式转换时间戳
- 时间戳转换日期格式
- 对深拷贝的认知总结
- vue-右键菜单功能
- textarea中换行、回车、空格的识别与处理
- element ui表格合并
- 合并行(上下行)
- 双层for循环
- 数组去重
- 瀑布流
- 前端多条件筛选
- 闭包的理解
- 改变this指向
- vue单选框逻辑
- 对象数组根据某个属性来进行排序
- vscode插件整理
- 对象数组多条件去重
- Blob类型数据转换Json数据类型
- Element ui做批量上传功能
- 前端cookie和后端cookie
- 强制转换https协议
- 给事件传额外参数
- 树形结构数据处理
- 查找所有父级数据
- 根据id筛选单条数据
- 动态引入阿里图标库
- 四舍五入
- 封装一个Promise.allSettled方法
- 判断输入框内是否有emoji表情
- element-ui的popover组件位置偏移
- formData上传文件时,携带【数组对象参数】
- 前端解压压缩包(zip)解压后上传解压的文件
- element ui表格列相同解决办法
- elementUI,table复选框多选,翻页/切换条数时保持选中状态
- cookie 和 token 的区别