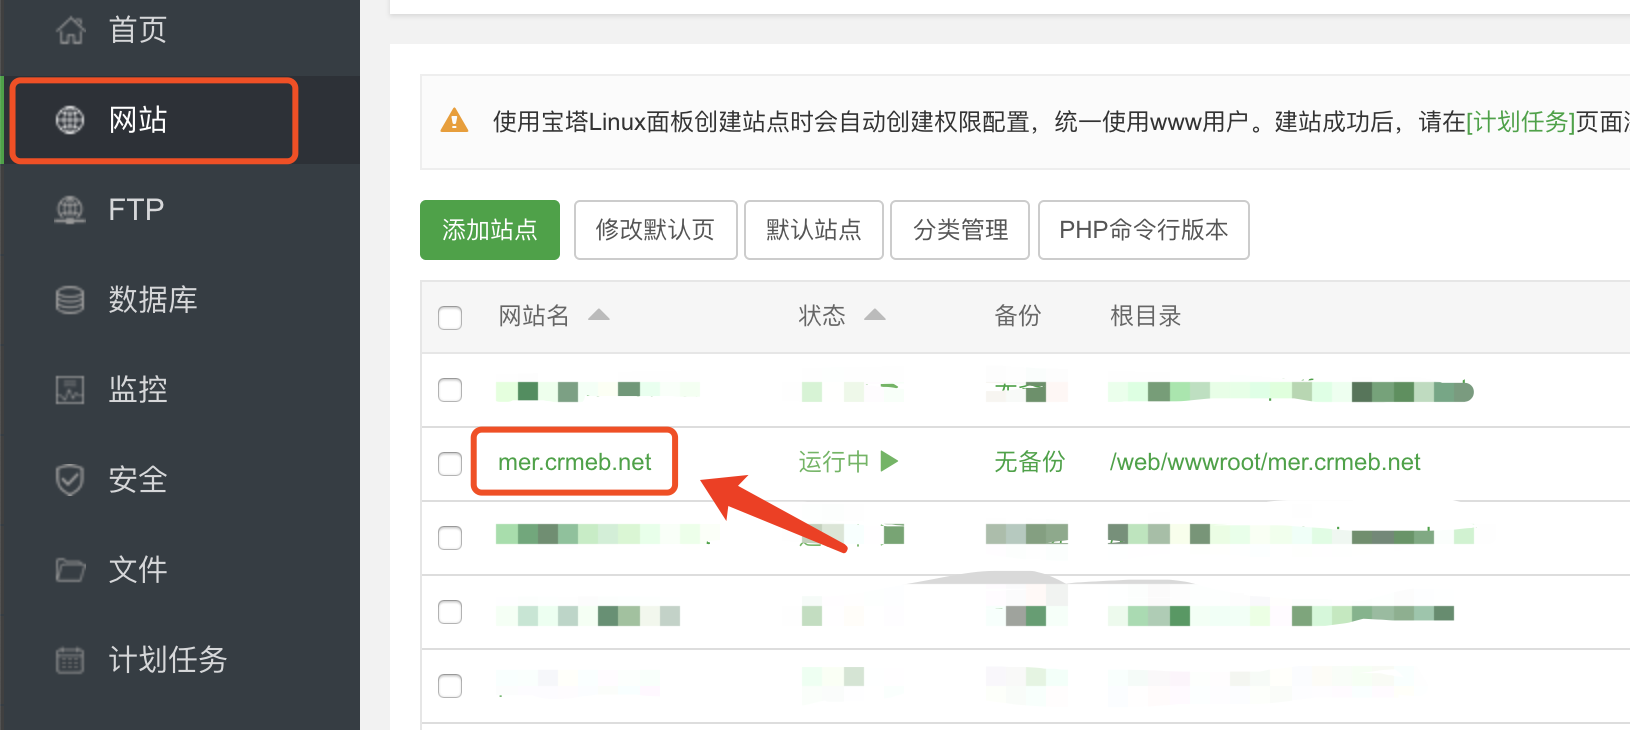
1.配置站点,点击项目站点名称

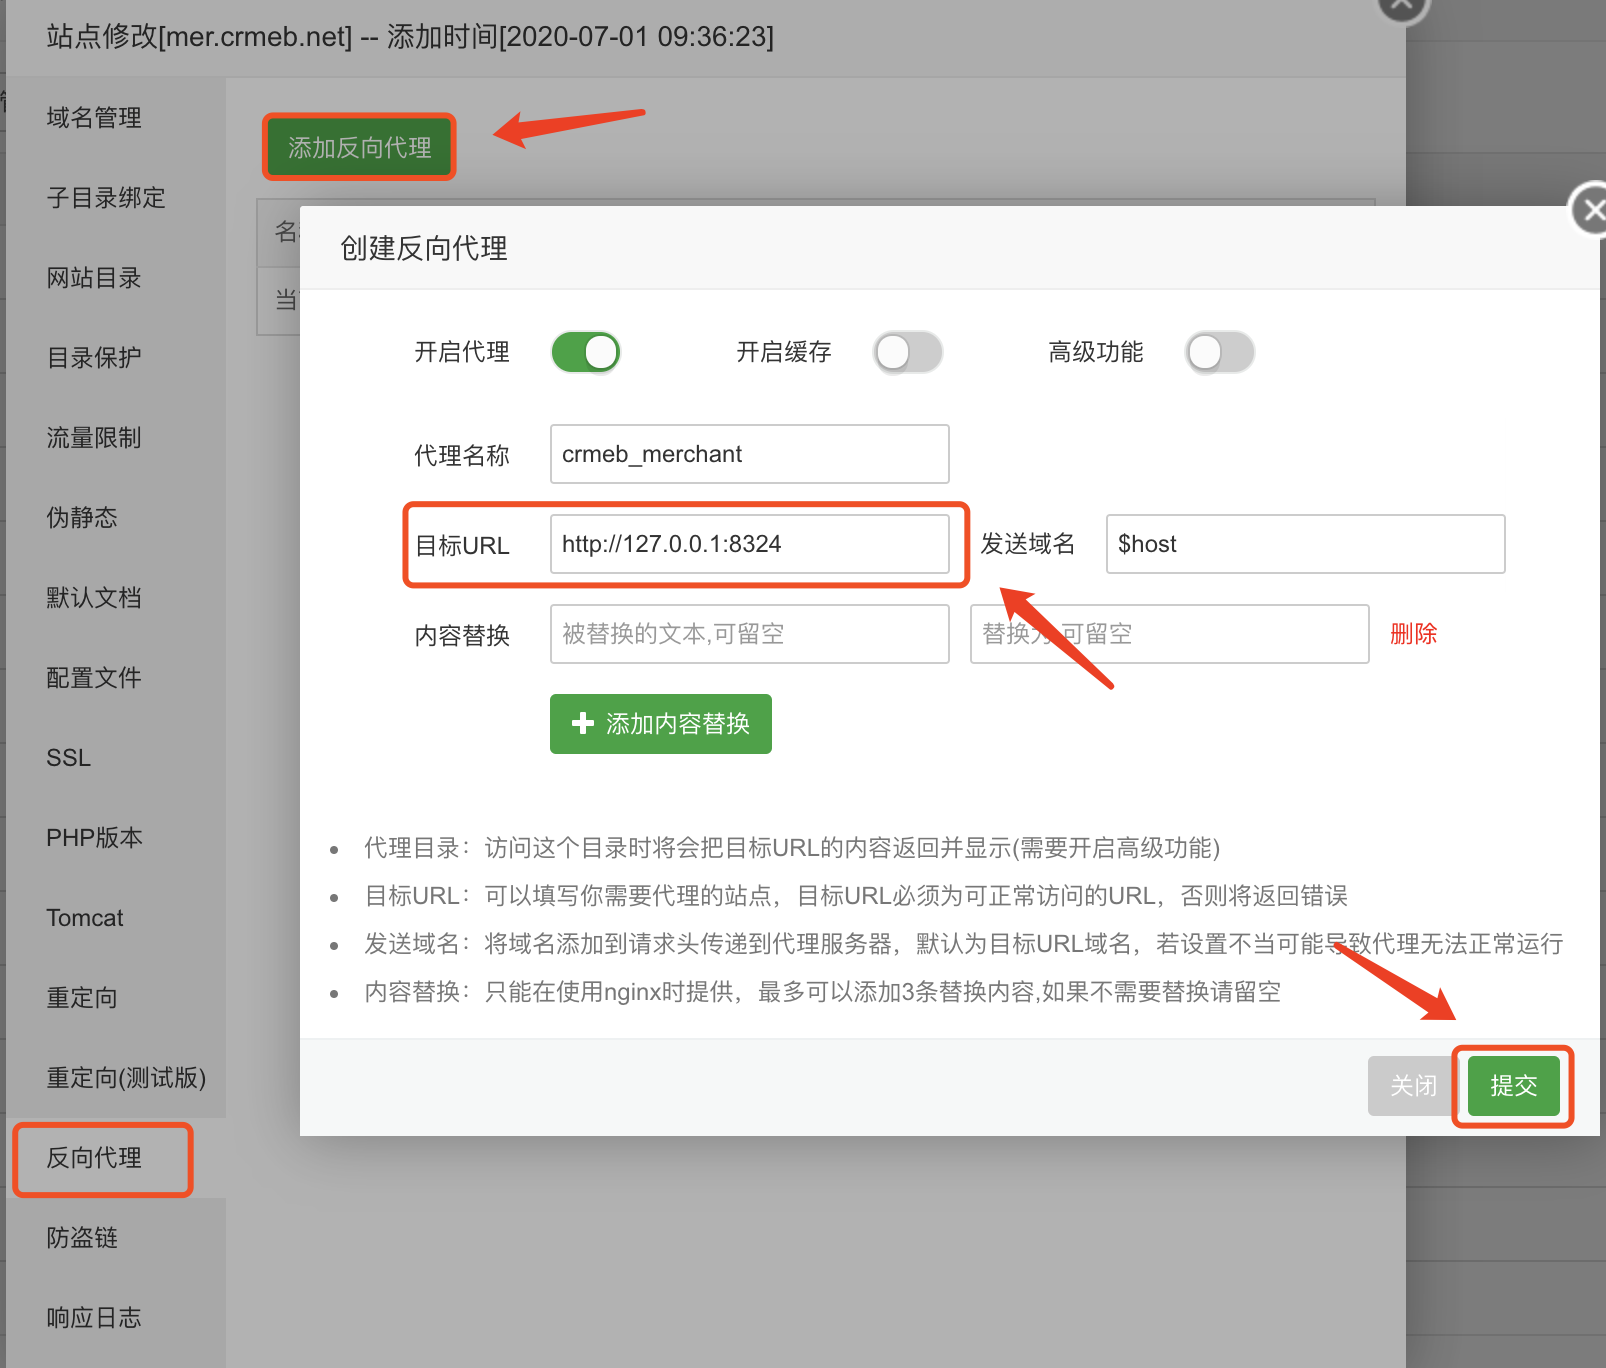
2.配置反向代理,代理名称随意填写,添加目标 URL:`http://127.0.0.1:8324`

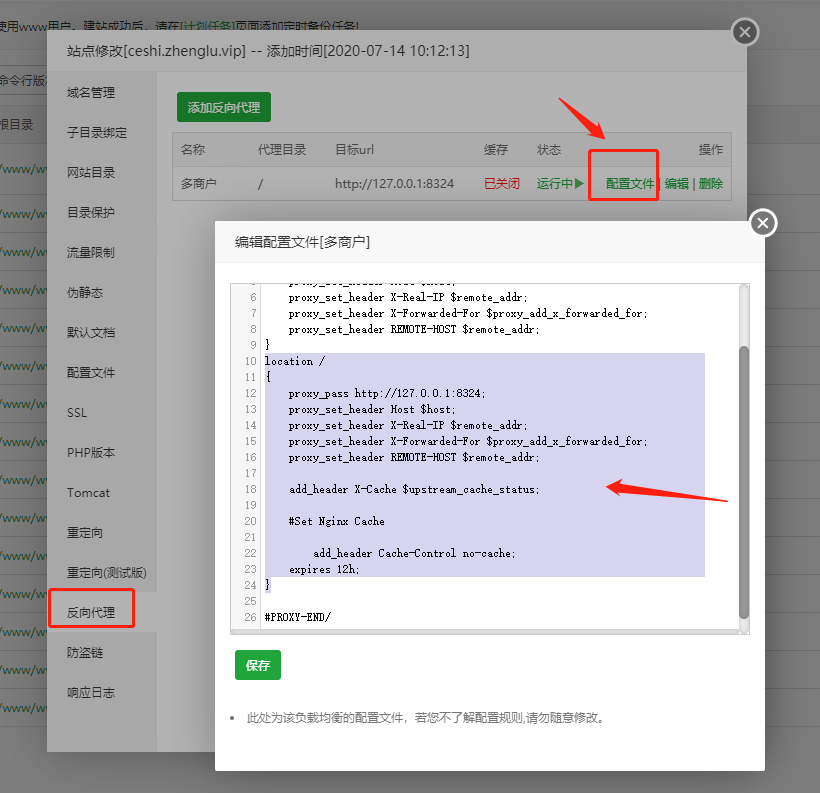
3.配置 ws反向代理,点击 **配置文件**

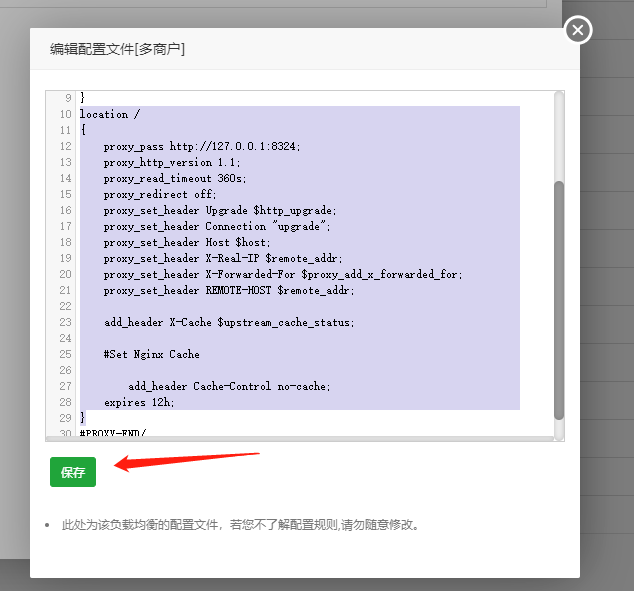
复制以下内容,替换配置文件里10-24行并保存
```
location /
{
proxy_pass http://127.0.0.1:8324;
proxy_http_version 1.1;
proxy_read_timeout 360s;
proxy_redirect off;
proxy_set_header Upgrade $http_upgrade;
proxy_set_header Connection "upgrade";
proxy_set_header Host $host;
proxy_set_header X-Real-IP $remote_addr;
proxy_set_header X-Forwarded-For $proxy_add_x_forwarded_for;
proxy_set_header REMOTE-HOST $remote_addr;
add_header X-Cache $upstream_cache_status;
#Set Nginx Cache
add_header Cache-Control no-cache;
expires 12h;
}
```
替换后,点击保存

OK.进行下一步,运行服务
- 序言
- 系统简介
- 系统介绍
- 前端脑图
- 项目介绍
- 新手入门(源码安装)
- 运行环境
- 服务器配置及安装
- 视频安装教程
- 服务器及环境搭建
- 服务器购买
- 域名购买
- 域名解析
- 服务器配置
- 宝塔配置
- 创建站点
- 安装项目
- 1.源码上传(必看内容)
- 2.PHP扩展安装
- 3.环境配置
- 4.运行服务
- 5.一键安装
- 注意事项(很重要)
- 重启swoole服务
- linux安装swoole方法
- 特别注意事项
- mysql 5.7注意事项
- https域名
- ssl证书申请
- 公众号配置
- 公众号配置
- 公众号开发配置
- 公众号菜单
- 设置公众号菜单
- 关键字
- 跳转网页
- 跳转小程序
- 小程序配置
- 1.微信平台配置
- 2.CRMEB后台配置
- 3.前端提交审核
- 4.确认发布
- 支付配置
- 支付配置
- 公众号支付
- 小程序支付
- 支付宝支付
- 其他配置
- 公众号模板消息
- 小程序订阅消息
- 商业授权
- 授权说明
- 申请授权
- 安装常见问题汇总
- 请修改sql_mode文件为NO_AUTO提示
- 版本更新
- 客服设置
- uni-app 打包H5、公众号
- 版本更新
- 清空数据
- 测试域名
- 部署多套多商户
- 使用说明
- 商品分类
- 分类说明
- 分类管理
- 品牌分类
- 商品标签
- 商品管理
- 发布商品
- 商品规格
- 配置说明
- 文件上传
- 移动端展示说明
- 首页
- 分类页
- 个人中心
- 热门搜索
- 分销规则
- 分销配置
- 分销员管理
- 分销规则说明
- 分销员等级
- 分销礼包
- 佣金说明
- 用户管理
- 商户用户管理
- 平台用户管理
- 用户协议
- 用户搜索记录
- 秒杀
- 秒杀规则
- 开启秒杀活动
- 直播
- 主播实名认证
- 开启直播
- 添加直播商品
- 预售
- 开启全款预售
- 开启定金预售
- 预售协议
- 专题
- 后台配置
- 前端展示
- 助力
- 开启助力
- 查看助力活动
- 拼团
- 虚拟拼团设置
- 开启拼团
- 查看拼团活动
- 积分
- 积分设置
- 积分来源
- 积分使用
- 提现
- 提现规则
- 提现步骤
- 新闻资讯
- 新闻页面
- 发布资讯
- 账户管理
- 账号信息
- 账户资金
- 优惠券
- 添加优惠券
- 发布优惠券
- 领取及使用
- 发放优惠券
- 订单管理
- 后台订单处理
- 前端订单处理
- 订单退款
- 订单打印
- 客服管理
- 添加客服
- 客服权限
- 门店自提
- 开启门店自提
- 设置核销权限
- 订单核销说明
- 商户管理
- 商户分类
- 商户入驻
- 商户列表
- 商户菜单管理
- 店铺类型
- 财务
- 财务对账
- 发票管理
- 自动分账(v1.5及以后版本)
- 邮费说明
- 运费设置
- 运费组成
- 运费模板
- 物流配置
- 公告管理
- 店铺相关
- 店铺定位设置
- 店铺街入口
- 店铺活动
- 店铺基本信息设置
- 小票打印
- 小票打印机配置
- 小票打印机设置
- 技术文档
- 开发规范
- 数据字典
- 目录结构
- 移动端路由
- 系统配置
- 后台表单说明
- 短信设置
- 短信账户
- 短信配置
- 短信模板
- 一号通
- 电子面单
- 短信提醒
- 商品采集
- 物流查询
- 付费采集商品配置
- PC端展示说明
- PC端开启
- PC端平台页面配置
- PC端店铺页面配置
- 保障服务
- 移动端商品管理
- 开启移动端商品管理
- 功能说明
- 会员管理
- 会员管理
- 会员权益
- 会员配置
- 社区功能
- 社区分类
- 社区话题
- 社区文章
- 社区评论
- 社区配置
- 通知管理
- 移动前端
- 目录结构
- 配置说明
- 页面路径
- 后台前端说明
- 总后台目录结构
- 商户后台目录结构
- 开发和构建
- APP 打包
- 基础配置
- 开发调试
- 打包上线
- App打包
- PC端说明
- 安装教程
- 目录结构
- 打包教程
- 常见问题
- 服务器问题
- 服务器环境说明
- MySQL 5.7注意事项
- PHP fileinfo扩展安装
- 后台登录页幻灯片
- 后台登录页logo
- 论坛常见问题汇总
- 个人中心菜单加链接
- 子账号登录名
- 前后端分离配置
- 重启swoole进程
- 开论坛勋章
- 源码下载地址
- 查看/隐藏版本号
- 搜索商品后服务挂了
- 开发文档
- 架构
- config配置文件
- 容器和依赖注入
- 异常处理
- 路由
- 控制器模块
- 日志处理
- 自定义指令
- CRMEB类库
- Basic基类
- Exceptions异常处理
- Interfaces接口类
- Jobs消息队列
- services服务类
- traits
- listens定时监听类
- 接口流程
- Controller
- Repository
- Dao
- Model
- 流程
- 订单流程
- 下单流程
- 退款流程
- 二开教程
- 定义新的接口
- 创建新的页面
- 创建新的组合数据
- 更换短信模板
