
[介绍一个官方的第一个built in 示例,](https://www.arduino.cc/en/Tutorial/AnalogReadSerial)对应的示例项目为:示例文件> 01.Basics > AnalogReadSerial。
官方教程介绍范例如下:
This example shows you how to read analog input from the physical world using a potentiometer. A potentiometer is a simple mechanical device that provides a varying amount of resistance when its shaft is turned. By passing voltage through a potentiometer and into an analog input on your board, it is possible to measure the amount of resistance produced by a potentiometer (or pot for short) as an analog value. In this example you will monitor the state of your potentiometer after establishing serial communication between your Arduino or Genuino and your computer running the Arduino Software (IDE).
使用chrome自动翻译如下:
**这个示例向您展示了如何使用电位器从物理世界读取模拟输入。电位计是一种简单的机械装置,当它的轴转动时,能提供不同的电阻。通过将电压通过电位器并输入到板上的模拟输入,就可以将电位器(或简称为pot)产生的电阻量作为模拟值进行测量。在本例中,您将在Arduino或Genuino与运行Arduino软件(IDE)的计算机建立串行通信之后监视电位器的状态。**
解释:电路分为模拟电路和数字电路,模拟和数字有点类似于数学中的整数和实数,模拟输入类似于实数,换句话说模拟电路的电压信号是连续的(高等数学里面研究的内容);数字电路仅仅包含了1和0连个整数,依靠高低电平表示。数字电路是计算机实现的基础,可以很容易的和计算机通信,模拟信号则和计算机需要进行A/D或者D/A转换才能通信。模拟信号容易收到干扰(比如仅仅0.1伏特的变化就改变了信号),数字信号则具有很强的抗干扰能力(从低电平到高电平距离比较大,同时采用各种编码技术提高正确率)。数字信号是目前通信的主流。
Hardware Required
* Arduino or Genuino Board
* 10k ohm Potentiometer
对应翻译就是:需要的硬件,包含Arduino或者Genuino板,10k欧姆的电位器
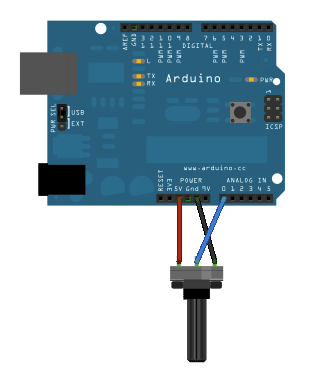
* By turning the shaft of the potentiometer, you change the amount of resistance on either side of the wiper, which is connected to the center pin of the potentiometer. This changes the voltage at the center pin. When the resistance between the center and the side connected to 5 volts is close to zero (and the resistance on the other side is close to 10k ohm), the voltage at the center pin nears 5 volts. When the resistances are reversed, the voltage at the center pin nears 0 volts, or ground. This voltage is the analog voltage that you're reading as an input.
* 通过转动电位器的轴,你可以改变连接在电位器中心销上的雨刷两边的电阻。这改变了中心引脚的电压。当中心与5伏特相连侧之间的电阻接近于零(另一侧的电阻接近于10k欧姆)时,中心引脚处的电压接近于5伏特。当电阻反向时,中心引脚的电压接近于零伏特或接地。这个电压是你作为输入读取的模拟电压。
解释:这段意思比较容易理解,但是wiper翻译为雨刷可能不妥。应该翻译为滑动片吧!有初中物理的电学基础就知道,电位器相当于两个电阻串联,改变滑动端位置,相当于一个电阻变大(小),另外一个变小(大)。滑动端电压由串联电阻分压公式计算: V=r1/(r1+r2), r1+r2是不变的10k。这里假设r1为地(GND)和中端之间的电阻。
* The Arduino and Genuino boards have a circuit inside called an analog-to-digital converter or ADC that reads this changing voltage and converts it to a number between 0 and 1023. When the shaft is turned all the way in one direction, there are 0 volts going to the pin, and the input value is 0. When the shaft is turned all the way in the opposite direction, there are 5 volts going to the pin and the input value is 1023. In between, analogRead() returns a number between 0 and 1023 that is proportional to the amount of voltage being applied to the pin.
* Arduino和Genuino电路板内部有一个称为模数转换器(ADC)的电路,可以读取变化的电压并将其转换为0到1023之间的数字。当轴向一个方向转动时,有0伏的电压通到引脚,输入值为0。当轴向相反的方向转动时,有5伏特的电压进入引脚,输入值为1023。在这两者之间,analogRead()返回一个0到1023之间的数字,该数字与施加到pin上的电压量成比例。
解释:ADC电路在传感器信号输入时常用,如果传感器信号很弱往往首先放大电路之后接ADC。
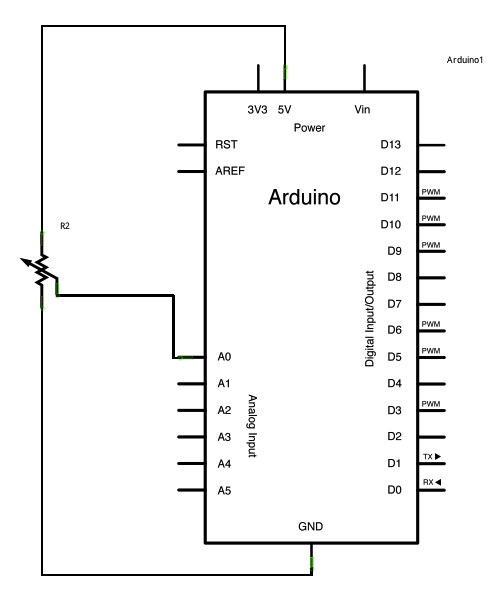
Schematic
对应的中文意思是原理图。
:-: 
Code:
就是开始代码部分的关键点解释。
```
// the setup routine runs once when you press reset:
void setup() {
// initialize serial communication at 9600 bits per second:
Serial.begin(9600);
}
// the loop routine runs over and over again forever:
void loop() {
// read the input on analog pin 0:
int sensorValue = analogRead(A0);
// print out the value you read:
Serial.println(sensorValue);
delay(1); // delay in between reads for stability
}
```
英文代码解释:
* In the sketch below, the only thing that you do in the setup function is to begin serial communications, at 9600 bits of data per second, between your board and your computer with the command:
```
Serial.begin(9600);
```
* Next, in the main loop of your code, you need to establish a variable to store the resistance value (which will be between 0 and 1023, perfect for an int datatype) coming in from your potentiometer:
```
int sensorValue = analogRead(A0);
```
* Finally, you need to print this information to your serial monitor window. You can do this with the command Serial.println() in your last line of code:
```
Serial.println(sensorValue)
```
* Now, when you open your Serial Monitor in the Arduino Software (IDE) (by clicking the icon that looks like a lens, on the right, in the green top bar or using the keyboard shortcut Ctrl+Shift+M), you should see a steady stream of numbers ranging from 0-1023, correlating to the position of the pot. As you turn your potentiometer, these numbers will respond almost instantly.
自动翻译如下:
在下面的示意图中,你在setup函数中所做的唯一一件事就是开始串行通信,以每秒9600位数据的速度,在你的板子和你的计算机之间使用以下命令:
```
Serial.begin (9600);
```
接下来,在你的代码的主循环中,你需要建立一个变量来存储来自你的电位计的电阻值(它将是0到1023之间,完美的int数据类型):
```
int sensorValue = analogRead(A0);
```
最后,您需要将此信息打印到您的串行监视器窗口。你可以用命令Serial.println(sensorValue)在你的最后一行代码:
现在,当你打开你的连续监测Arduino软件(IDE)(通过单击图标看起来像一个镜头,在右边,在**绿色顶级酒吧**或者使用快捷键Ctrl + Shift + M),您应该看到一个稳定的数字从0 - 1023,关联到锅的位置。当你把你的电位计,这些数字会立刻做出反应。
**注意:green top bar被错误的翻译成:绿色顶级酒吧。**
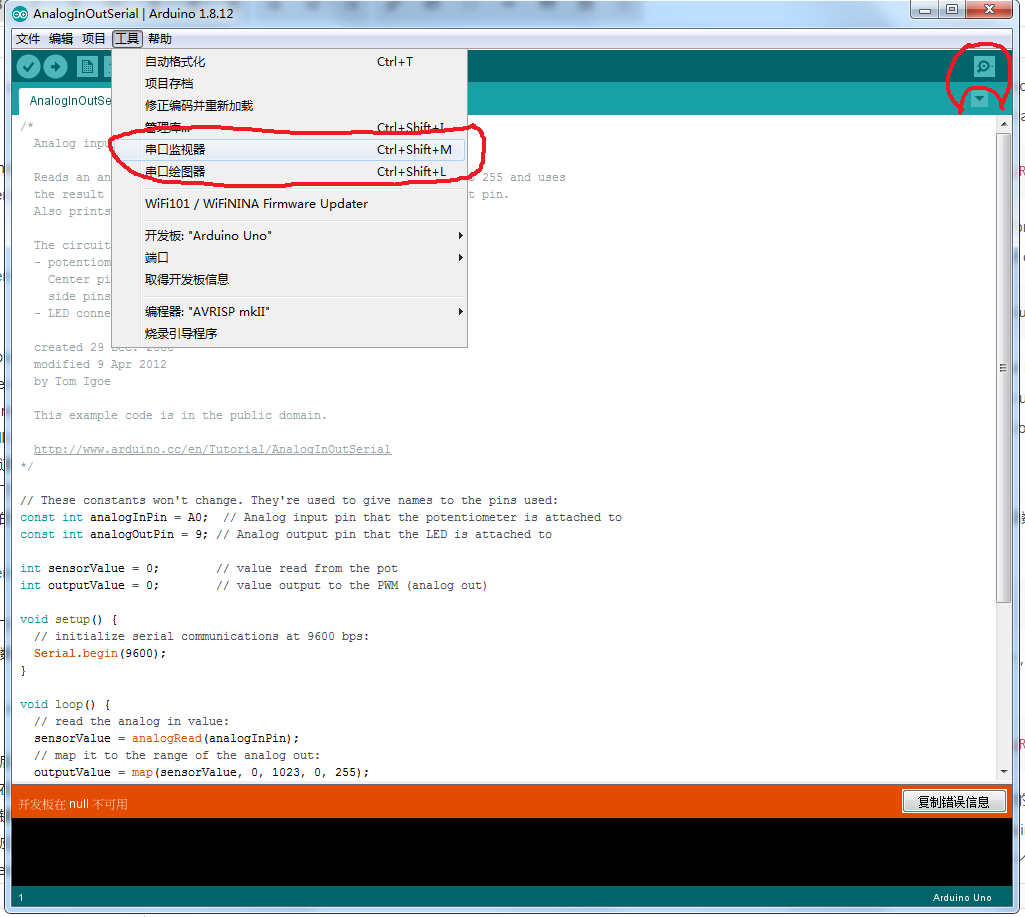
大家看看我的截图,串口监视器和串口绘图器的快捷键分别是Ctrl+shift+M,Ctrol+shift+L。前者直接显示串口发过来的数字,后者将其绘制成图。串口监视器也可以使用图标打开,就在图标栏(顶部绿色条最右边类似镜头的图标),快捷键和图标我都用红色标出来了。
解释:
* Arduino的程序叫做Sketch,是英文示意图的意思。
* 串口通信是计算机和arduino重要的通信通道,烧写程序也靠它。在使用之前要告诉计算机通信速率,这个一定要和 对面Arduino一致。串口通信可以让计算机和arduino互相传递信息,叫做双工通信。
* 为了存储模拟电压输入值(经过AD变换以后为整形数值),用到了临时存储变量 int sensorValue, int意思是整形(integer缩写)。编程中有不同类似的变量,比如 float,int,boolean等等。它们能够存储的数值不同,所占空间不同。数字电路只用高低两个电平代表1和0两个符号,而0和1通过组合构成了二进制数字,二进制又是计算机运算存储的基础,所以数字电路可以很直接的和计算机沟通。
最后,有一个更进一步的学习指导:
:-: 
英文叫做,参看(see also)。
对于理解Arduino程序,setup()和loop()两个函数比较关键。所有的Arduino程序,都包含这两个函数,相当于系统规定的框架,其中setup()程序只执行一次,进行程序初始化等准备工作,是在arduino上电以后程序框架调用一次setup()函数。而loop()则是arduino运行中,框架反复调用的函数,是主要任务执行部分。loop的英文意思也是循环。
:-: 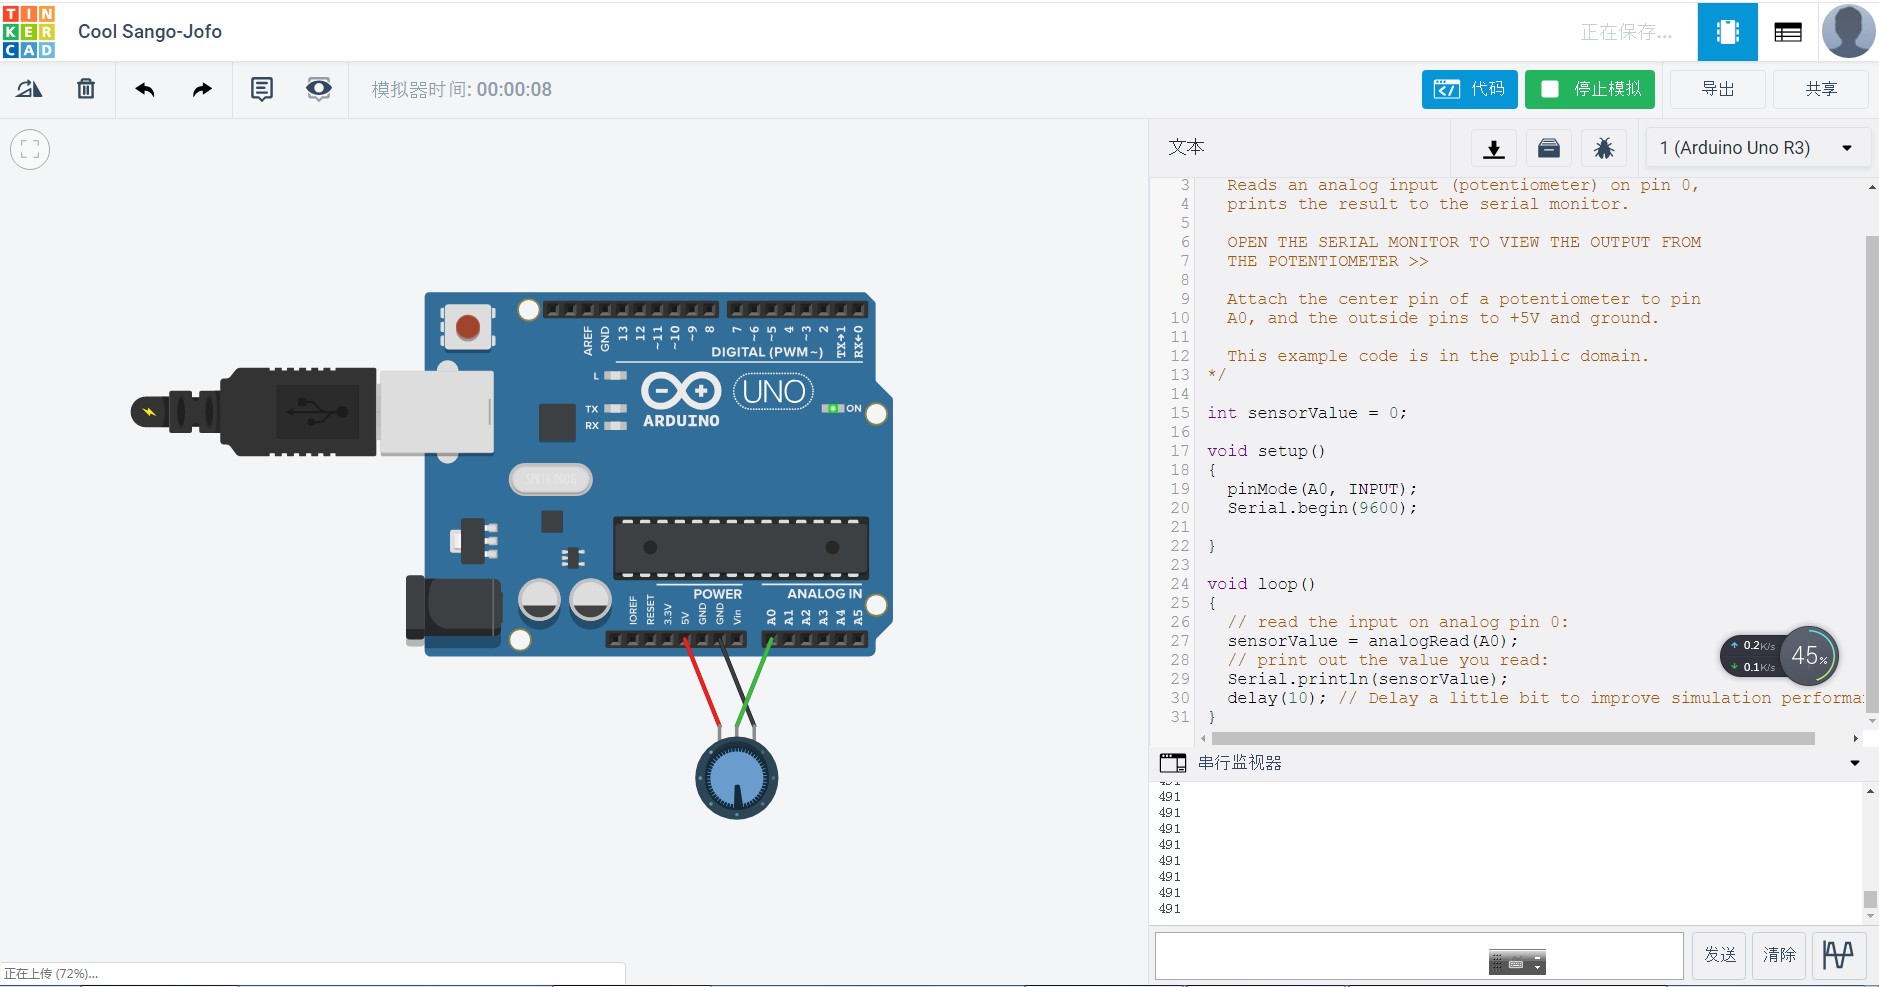
在tinkercan中仿真运行如上图。仿真中,我用鼠标改变滑动变阻器的阻值,而串口输入的数字也跟着改变。非常类似真实的程序执行。
今天介绍了第一个基本的例子,并且在线仿真了程序的运行。希望大家都实际操作一下加深印象。
- 序言
- 第一章 arduino简介和学习
- 第一节 arduino介绍
- 第二节 学习方法概述
- 第三节 计算机的智能
- 第二章 开始学习之旅
- 第一节 安装环境和购买硬件的说明
- 第二节 介绍一个具体的范例
- 第三章 分类官网教程讲解
- 第一节 Basics类的示例项目
- 第二节 数字端口的示例
- 第三节 模拟端口的示例
- 第四节 串口通信的示例
- 第五节 LED显示的示例
- 第六节 arduino处理矩阵键盘
- 第七节 LCD显示范例
- 第四章 综合实践项目制作教程
- 第一节 简单的计算器
- 第五章 复习题
- 单选题
- 编程题目
- 单选题答案
- 编程题答案
- 第1题
- 第2题
- 第3题
- 第4题
- 第5题
- 第6题
- 第7题
- 第8题
- 第9题
- 第10题
- 第11题
- 第12题
- 第13题
- 第14题
- 第15题
- 第16题
- 第17题
- 复习题包含翻译
- 第六章 快速复习
- 第一节 英文解说