
# Kubernetes可视化界面kubesphere
## 前言
Kubernetes也提供了默认的dashboard页面,但是功能不是很强大,这里就不使用了
而是采用Kubesphere大桶全部的devops链路,通过kubesphere集成了很多套件
- https://kubesphere.io/zh/ :集群要求高
- https://kuboard.cn/:开源kuboard也不错,集群要求不高【轻量级】
## 简介
KubeSphere是一款面向云原生设计的开源项目,在目前主流容器调度平台Kubernetes之上构建的分布式多租户容器管理平台,提供简单易用的操作界面以及向导式操作方式,在降低用户使用容器调度平台学习成本的同时,极大降低开发、测试、运维的日常工作的复杂度。
## 安装
### 前提条件
https://kubesphere.com.cn/docs/quick-start/minimal-kubesphere-on-k8s/
- Kubernetes 版本必须为 “1.15.x,1.16.x,1.17.x 或 1.18.x”;
- 确保您的计算机满足最低硬件要求:CPU > 1 核,内存 > 2 G;
- 在安装之前,需要配置 Kubernetes 集群中的默认存储类;
- 当使用 `--cluster-signing-cert-file` 和 `--cluster-signing-key-file` 参数启动时,在 kube-apiserver 中会激活 CSR 签名功能。 请参阅 [RKE 安装问题](https://github.com/kubesphere/kubesphere/issues/1925#issuecomment-591698309);
- 有关在 Kubernetes 上安装 KubeSphere 的前提条件的详细信息,请参阅[前提条件](https://kubesphere.com.cn/docs/installing-on-kubernetes/introduction/prerequisites/)。
### 安装helm
下面我们需要在 **master** 节点安装 **helm**
Helm是Kubernetes的包管理器。包管理器类似于我们在 **Ubuntu** 中使用的 **apt**。**Centos** 中使用的 **yum** 或者**Python** 中的 **pip** 一样,能快速查找、下载和安装软件包。Helm由客户端组件helm和服务端组件Tiller组成,能够将一组K8S资源打包统一管理,是查找、共享和使用为Kubernetes构建的软件的最佳方式。
安装3.0的 helm 首先我们需要去 [官网下载](https://helm.sh/docs/intro/quickstart/)
- 第一步,[下载helm](https://github.com/helm/helm/releases)安装压缩文件,上传到linux系统中
- 第二步,解压helm压缩文件,把解压后的helm目录复制到 usr/bin 目录中
- 使用命令:helm
## 部署KubeSphere
### 安装前
如果您的服务器无法访问 GitHub,则可以分别复制 [kubesphere-installer.yaml](https://github.com/kubesphere/ks-installer/releases/download/v3.0.0/kubesphere-installer.yaml) 和 [cluster-configuration.yaml](https://github.com/kubesphere/ks-installer/releases/download/v3.0.0/cluster-configuration.yaml) 中的内容并将其粘贴到本地文件中。然后,您可以对本地文件使用 `kubectl apply -f` 来安装 KubeSphere。
同时查看k8s集群的默认存储类
```bash
kubectl get storageclass
```

如果没有默认存储类,那么就需要安装默认的存储类,参考博客:[Kubernetes配置默认存储类](http://moguit.cn/#/info?blogOid=575)
因为我安装的是 **nfs**,所以在安装了 **nfs** 服务器启动
```bash
systemctl start nfs
```
### 开始安装
如果无法正常访问github,可以提前把文件下载到本地
```BASH
kubectl apply -f https://github.com/kubesphere/ks-installer/releases/download/v3.0.0/kubesphere-installer.yaml
kubectl apply -f https://github.com/kubesphere/ks-installer/releases/download/v3.0.0/cluster-configuration.yaml
```
如果下载到了本地,可以这样安装
```bash
# 安装
kubectl apply -f kubesphere-installer.yaml
kubectl apply -f cluster-configuration.yaml
# 卸载
kubectl delete -f kubesphere-installer.yaml
kubectl delete -f cluster-configuration.yaml
```
### 检查安装日志
```bash
kubectl logs -n kubesphere-system $(kubectl get pod -n kubesphere-system -l app=ks-install -o jsonpath='{.items[0].metadata.name}') -f
```
然后在查看pod运行状况
```bash
kubectl get pod -n kubesphere-system
```
能够发现,我们还有两个容器正在创建

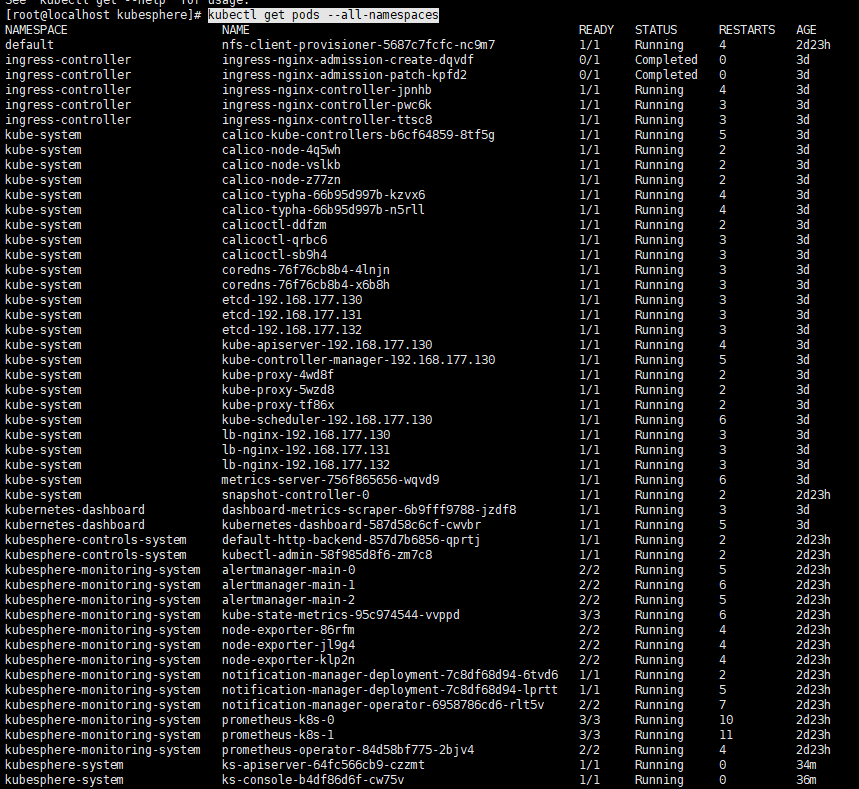
使用 `kubectl get pod --all-namespaces` 查看所有 Pod 是否在 KubeSphere 的相关命名空间中正常运行。
```bash
kubectl get pods --all-namespaces
```
能够发现所有的节点已经成功运行
如果是,请通过以下命令检查控制台的端口:
```bash
kubectl get svc/ks-console -n kubesphere-system
```
能够看到我们的服务确保在安全组中打开了端口 30880,并通过 NodePort(IP:30880)

使用默认帐户和密码(admin/P@88w0rd)访问 Web 控制台。
```bash
# 图形化页面 admin P@88w0rd
http://192.168.177.130:30880/
```
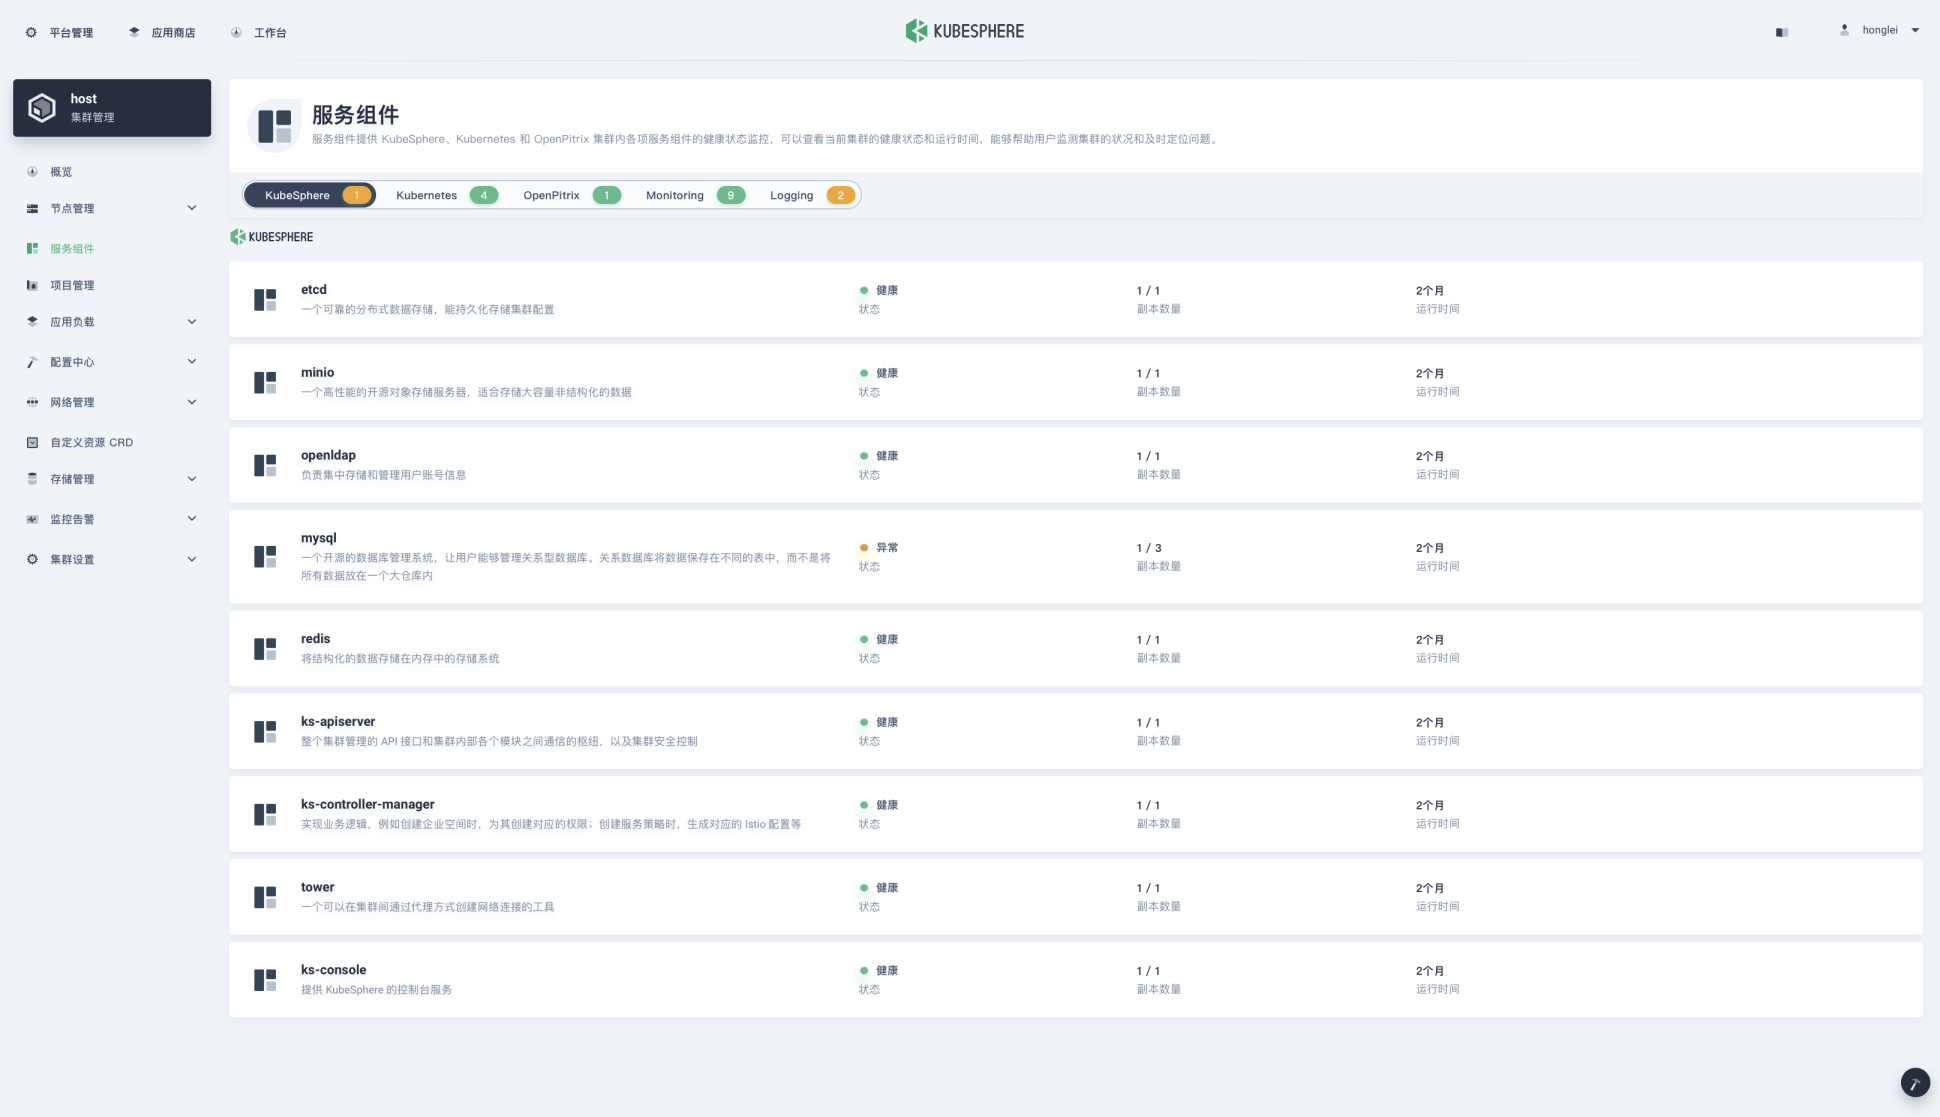
登录控制台后,您可以在组件中检查不同组件的状态。如果要使用相关服务,可能需要等待某些组件启动并运行。
## 错误排查
### 错误1
kubesphere无法登录,提示 account is not active
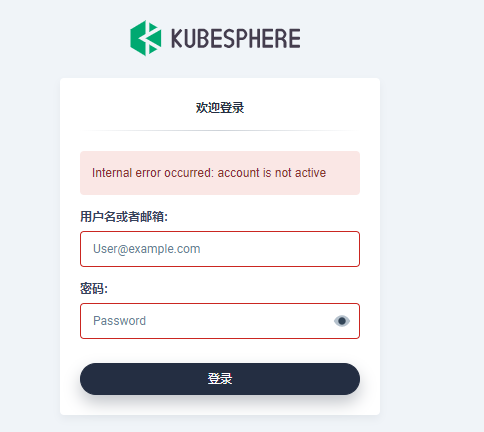
kubesphere 安装完成后会创建默认账户admin/P@88w0rd,待ks-controller-manager启动就绪,user controller 会将 user CRD中定义的password加密,user会被转换为active状态,至此账户才可以正常登录。
当安装完成后遇到默认账户无法登录,看到account is not active相关错误提示时,需要检查ks-controller-manager的运行状态和日志。常见问题及解决方式如下:
```bash
kubectl -n kubesphere-system get ValidatingWebhookConfiguration users.iam.kubesphere.io -o yaml >> users.iam.kubesphere.io.yaml
kubectl -n kubesphere-system get secret ks-controller-manager-webhook-cert -o yaml >> ks-controller-manager-webhook-cert.yaml
# edit ca as pr
kubectl -n kubesphere-system apply -f ks-controller-manager-webhook-cert.yaml
kubectl -n kubesphere-system apply -f users.iam.kubesphere.io.yaml
# restart
kubectl -n kubesphere-system rollout restart deploy ks-controller-manager
```
来源:https://kubesphere.com.cn/forum/d/2217-account-is-not-active
- Kubernetes简介
- 搭建K8S集群前置知识
- 使用kubeadm方式搭建K8S集群
- 使用二进制方式搭建K8S集群
- Kubeadm和二进制方式对比
- Kubernetes集群管理工具kubectl
- Kubernetes集群YAML文件详解
- Kubernetes核心技术Pod
- Kubernetes核心技术Controller
- Kubernetes核心技术Service
- Kubernetes控制器Controller详解
- Kubernetes配置管理
- Kubernetes集群安全机制
- Kubernetes核心技术Ingress
- Kubernetes核心技术Helm
- Kubernetes持久化存储
- Kubernetes集群资源监控
- Kubernetes搭建高可用集群
- Kubernetes容器交付介绍
- 使用kubeadm-ha脚本一键安装K8S
- Kubernetes可视化界面kubesphere
- Kubernetes配置默认存储类
- 使用Rancher搭建Kubernetes集群
- Kubernetes中的CRI