
>[success] # h 函数
1. 在通常情况下我们使用的是模板的形式进行编程,把用户在`<template></template>`标签中写的类似于原生HTML的内容进行编译,把原生`HTML`的内容找出来,再把非原生`HTML`找出来,经过一系列的逻辑处理生成渲染函数,也就是`render`函数的这一段过程称之为模板编译过程。
* **Vue在生成真实的DOM之前,会将我们的节点转换成VNode,而VNode组合在一起形成一颗树结构,就是虚拟DOM**
2. `vue `提供了`h() `函数是一个**用于创建 vnode 的一个函数**,其实更准备的命名是 `createVNode() `函数,但是为了简便在Vue将之简化为` h()` 函数;其实可以发现[h ](https://github1s.com/vuejs/core/blob/060c5f1d0ae999cd8c8fb965e8526ffab17ac2d1/packages/runtime-core/src/h.ts)函数内部就是一个包裹[createVNode ]([https://github.com/vuejs/vue-next/blob/060c5f1d0ae999cd8c8fb965e8526ffab17ac2d1/packages/runtime-core/src/vnode.ts#L326](https://github.com/vuejs/vue-next/blob/060c5f1d0ae999cd8c8fb965e8526ffab17ac2d1/packages/runtime-core/src/vnode.ts#L326))函数
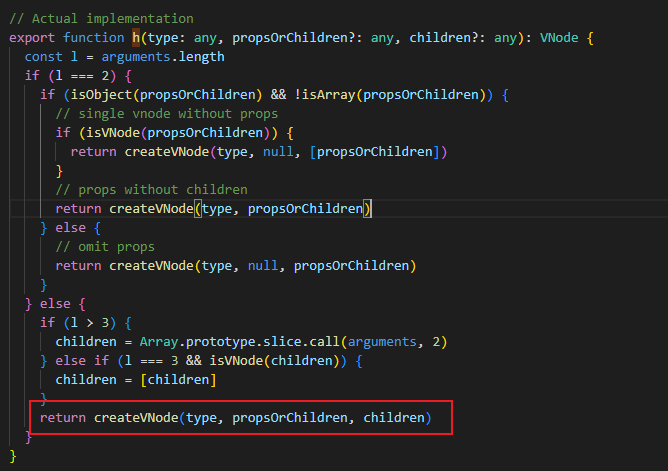
* 二者的区别
~~~
h('strong', 'Foo')
~~~
对于 createVNode,必须执行以下操作:
~~~
createVNode('strong', null, 'Foo')
~~~
3. `h` 函数用法
~~~
// 完整参数签名
function h(
type: string | Component,
props?: object | null,
children?: Children | Slot | Slots
): VNode
// 省略 props
function h(type: string | Component, children?: Children | Slot): VNode
type Children = string | number | boolean | VNode | null | Children[]
type Slot = () => Children
type Slots = { [name: string]: Slot }
~~~
* 创建原生元素
~~~
import { h } from 'vue'
// 除了 type 外,其他参数都是可选的
h('div')
h('div', { id: 'foo' })
// attribute 和 property 都可以用于 prop
// Vue 会自动选择正确的方式来分配它
h('div', { class: 'bar', innerHTML: 'hello' })
// class 与 style 可以像在模板中一样
// 用数组或对象的形式书写
h('div', { class: [foo, { bar }], style: { color: 'red' } })
// 事件监听器应以 onXxx 的形式书写
h('div', { onClick: () => {} })
// children 可以是一个字符串
h('div', { id: 'foo' }, 'hello')
// 没有 prop 时可以省略不写
h('div', 'hello')
h('div', [h('span', 'hello')])
// children 数组可以同时包含 vnode 和字符串
h('div', ['hello', h('span', 'hello')])
~~~
* 如果是使用组件,**子节点必须以插槽函数进行传递。如果组件只有默认槽,可以使用单个插槽函数进行传递。否则,必须以插槽函数的对象形式来传递**
~~~
import Foo from './Foo.vue'
// 传递 prop
h(Foo, {
// 等价于 some-prop="hello"
someProp: 'hello',
// 等价于 @update="() => {}"
onUpdate: () => {}
})
// 传递单个默认插槽
h(Foo, () => 'default slot')
// 传递具名插槽
// 注意,需要使用 `null` 来避免
// 插槽对象被当作是 prop
h(MyComponent, null, {
default: () => 'default slot',
foo: () => h('div', 'foo'),
bar: () => [h('span', 'one'), h('span', 'two')]
})
~~~
>[info] ## 案例
1. 使用`h` 函数 可以在` Option API` 或者 `Composition API` 中使用,完成下面视图效果案例
>[danger] ##### Option Api 案例
* 可以发现使用 h 函数后完全不在需要`template `模板了
* 在使用事件使用不能在使用`@`缩写了 ,应该使用全程写法
~~~
<script>
import { h } from 'vue'
import Home from "./Home.vue"
export default {
data() {
return {
counter: 0
}
},
render() {
return h("div", { className: "app" }, [
h("h2", null, `当前计数: ${this.counter}`),
h("button", { onClick: this.increment }, "+1"),
h("button", { onClick: this.decrement }, "-1"),
h(Home)
])
},
methods: {
increment() {
this.counter++
},
decrement() {
this.counter--
}
}
}
</script>
<style scoped>
</style>
~~~
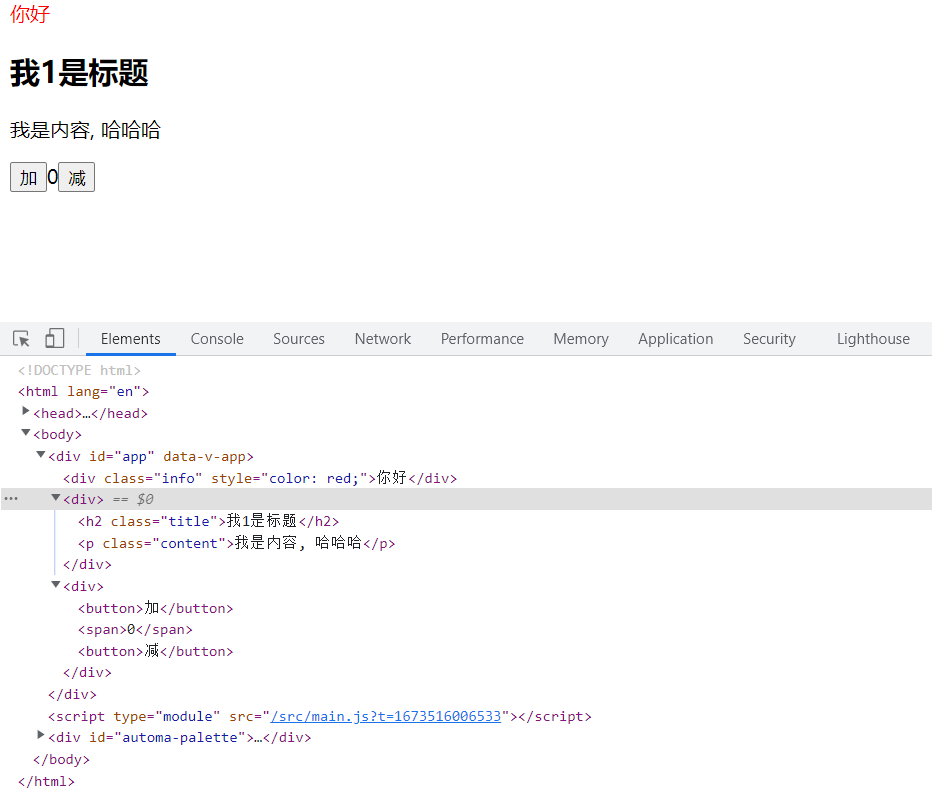
>[danger] ##### Composition API 案例
* 不在使用`this`
* `ref` 不在`h` 函数使用时候需要自己进行 `.value`
~~~
<script>
import { h, ref } from 'vue'
export default {
setup() {
const counter = ref(0)
const increment = () => {
counter.value++
}
const decrement = () => {
counter.value--
}
return () => [
h('div', { class: 'info', style: { color: 'red' } }, '你好'),
h('div', [
h('h2', { className: 'title' }, '我1是标题'),
h('p', { className: 'content' }, '我是内容, 哈哈哈'),
]),
h('div', [
h(
'button',
{ onClick: increment },
// 显示的内容字符串
'加'
),
h('span', `${counter.value}`),
h(
'button',
{ onClick: decrement },
// 显示的内容字符串
'减'
),
]),
]
},
}
</script>
~~~
>[danger] ##### 使用setup 语法糖
* 使用 `setup` 语法糖需要在`template`使用定义好的`render `函数
~~~
<template>
<render />
</template>
<script setup>
import { h, ref } from 'vue'
const counter = ref(0)
const increment = () => {
counter.value++
}
const decrement = () => {
counter.value--
}
const render = () => [
h('div', { class: 'info', style: { color: 'red' } }, '你好'),
h('div', [
h('h2', { className: 'title' }, '我1是标题'),
h('p', { className: 'content' }, '我是内容, 哈哈哈'),
]),
h('div', [
h(
'button',
{ onClick: increment },
// 显示的内容字符串
'加'
),
h('span', `${counter.value}`),
h(
'button',
{ onClick: decrement },
// 显示的内容字符串
'减'
),
]),
]
</script>
~~~
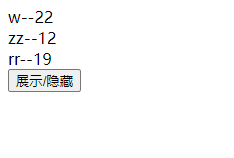
>[info] ## 综合案例
* v-for 使用map 来代替了
* v-if 使用三元做判断
整体完全都是按照js 思路去书写
~~~
<script>
import { h, ref } from 'vue'
export default {
setup() {
const infos = ref([
{ name: 'w', age: '22' },
{ name: 'zz', age: '12' },
{ name: 'rr', age: '19' },
])
const show = ref(false)
const findInfoByName = (name) => {
return infos.value.find((info) => info.name === name)
}
return () => [
h(
'div',
// 用map 替代了v-for
infos.value.map(({ name, age }, index) => {
return h('div', { key: index }, `${name}--${age}`)
})
),
h(
'button',
{
onClick: () => {
show.value = !show.value
},
},
'展示/隐藏'
),
// 三元代替了 v-if
[show.value ? h('div', `${findInfoByName('w').name}`) : ''],
]
},
}
</script>
~~~
>[info] ## 官网地址
https://cn.vuejs.org/guide/extras/render-function.html#jsx-tsx
https://cn.vuejs.org/api/render-function.html#h
- 官网给的工具
- 声明vue2 和 vue3
- 指令速览
- Mustache -- 语法
- v-once -- 只渲染一次
- v-text -- 插入文本
- v-html -- 渲染html
- v-pre -- 显示原始的Mustache标签
- v-cloak -- 遮盖
- v-memo(新)-- 缓存指定值
- v-if/v-show -- 条件渲染
- v-for -- 循环
- v-bind -- 知识
- v-bind -- 修饰符
- v-on -- 点击事件
- v-model -- 双向绑定
- 其他基础知识速览
- 快速使用
- 常识知识点
- key -- 作用 (后续要更新)
- computed -- 计算属性
- watch -- 侦听
- 防抖和节流
- vue3 -- 生命周期
- vue-cli 和 vite 项目搭建方法
- vite -- 导入动态图片
- 组件
- 单文件组件 -- SFC
- 组件通信 -- porp
- 组件通信 -- $emit
- 组件通信 -- Provide / Inject
- 组件通信 -- 全局事件总线mitt库
- 插槽 -- slot
- 整体使用案例
- 动态组件 -- is
- keep-alive
- 分包 -- 异步组价
- mixin -- 混入
- v-model-- 组件
- 使用计算属性
- v-model -- 自定义修饰符
- Suspense -- 实验属性
- Teleport -- 指定挂载
- 组件实例 -- $ 属性
- Option API VS Composition API
- Setup -- 组合API 入口
- api -- reactive
- api -- ref
- 使用ref 和 reactive 场景
- api -- toRefs 和 toRef
- api -- readonly
- 判断性 -- API
- 功能性 -- API
- api -- computed
- api -- $ref 使用
- api -- 生命周期
- Provide 和 Inject
- watch
- watchEffect
- watch vs. watchEffect
- 简单使用composition Api
- 响应性语法糖
- css -- 功能
- 修改css -- :deep() 和 var
- Vue3.2 -- 语法
- ts -- vscode 配置
- attrs/emit/props/expose/slots -- 使用
- props -- defineProps
- props -- defineProps Ts
- emit -- defineEmits
- emit -- defineEmits Ts
- $ref -- defineExpose
- slots/attrs -- useSlots() 和 useAttrs()
- 自定义指令
- Vue -- 插件
- Vue2.x 和 Vue3.x 不同点
- $children -- 移除
- v-for 和 ref
- attribute 强制行为
- 按键修饰符
- v-if 和 v-for 优先级
- 组件使用 v-model -- 非兼容
- 组件
- h -- 函数
- jsx -- 编写
- Vue -- Router
- 了解路由和vue搭配
- vueRouter -- 简单实现
- 安装即使用
- 路由懒加载
- router-view
- router-link
- 路由匹配规则
- 404 页面配置
- 路由嵌套
- 路由组件传参
- 路由重定向和别名
- 路由跳转方法
- 命名路由
- 命名视图
- Composition API
- 路由守卫
- 路由元信息
- 路由其他方法 -- 添加/删除/获取
- 服务器配置映射
- 其他
- Vuex -- 状态管理
- Option Api -- VUEX
- composition API -- VUEX
- module -- VUEX
- 刷新后vuex 数据同步
- 小技巧
- Pinia -- 状态管理
- 开始使用
- pinia -- state
- pinia -- getter
- pinia -- action
- pinia -- 插件 ??
- Vue 源码解读
- 开发感悟
- 练手项目