[TOC]
# **文件中心**
## SpringBoot 文件上传原理
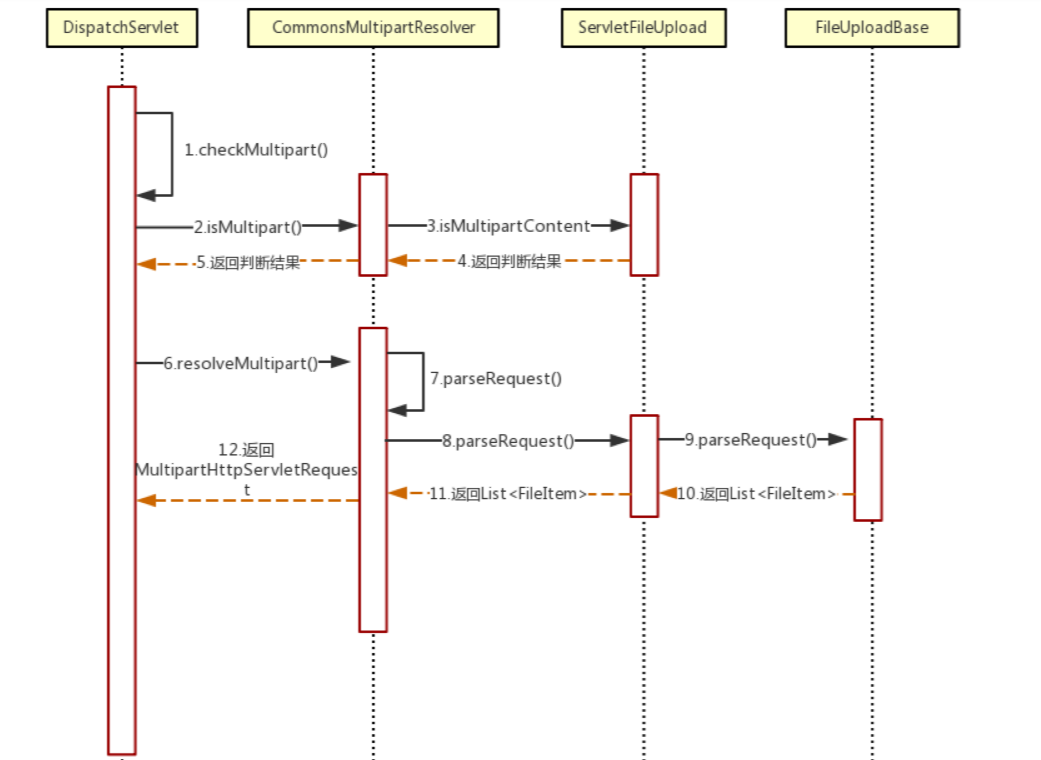
> SpringBoot 中的`DispatcherServlet`在处理请求时会调用`MultipartResolver`中的方法判断此请求是不是文件上传请求,如果是的话`DispatcherServlet`将调用`MultipartResolver`的`resolveMultipart(request)`方法对该请求对象进行装饰并返回一个新的`MultipartHttpServletRequest`供后继处理流程使用,注意!此时的请求对象会由`HttpServletRequest`类型转换成`MultipartHttpServletRequest`类型,这个类中会包含所上传的文件对象可供后续流程直接使用而无需自行在代码中实现对文件内容的读取逻辑。
## 依赖关系
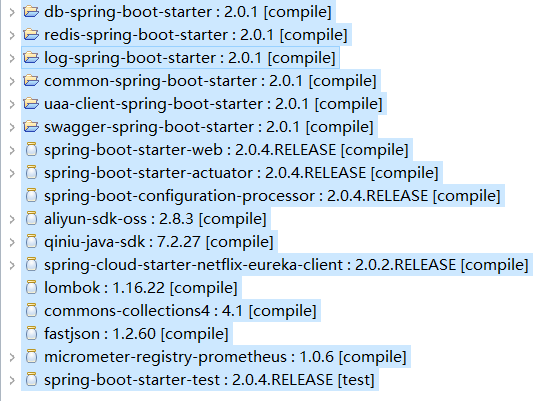
```
<!-- 资源服务器 -->
<dependency>
<groupId>com.open.capacity</groupId>
<artifactId>uaa-client-spring-boot-starter</artifactId>
</dependency>
```
## swagger测试文件接口
* 查询接口测试

* 上传文件测试

* swagger测试

## file-center 授权流程

```
public Authentication authenticate(Authentication authentication) throws AuthenticationException {
if (authentication == null) {
throw new InvalidTokenException("Invalid token (token not found)");
}
String token = (String) authentication.getPrincipal();
OAuth2Authentication auth = tokenServices.loadAuthentication(token);
if (auth == null) {
throw new InvalidTokenException("Invalid token: " + token);
}
Collection<String> resourceIds = auth.getOAuth2Request().getResourceIds();
if (resourceId != null && resourceIds != null && !resourceIds.isEmpty() && !resourceIds.contains(resourceId)) {
throw new OAuth2AccessDeniedException("Invalid token does not contain resource id (" + resourceId + ")");
}
checkClientDetails(auth);
if (authentication.getDetails() instanceof OAuth2AuthenticationDetails) {
OAuth2AuthenticationDetails details = (OAuth2AuthenticationDetails) authentication.getDetails();
// Guard against a cached copy of the same details
if (!details.equals(auth.getDetails())) {
// Preserve the authentication details from the one loaded by token services
details.setDecodedDetails(auth.getDetails());
}
}
auth.setDetails(authentication.getDetails());
auth.setAuthenticated(true);
return auth;
```
* token校验redis配置以及文件数据库配置
```
spring:
datasource:
dynamic:
enable: true
druid:
# JDBC 配置(驱动类自动从url的mysql识别,数据源类型自动识别)
core:
url: jdbc:mysql://59.110.164.254:3306/file_center?useUnicode=true&characterEncoding=utf-8&allowMultiQueries=true&useSSL=false
username: root
password: root
driver-class-name: com.mysql.cj.jdbc.Driver
log:
url: jdbc:mysql://59.110.164.254:3306/log-center?useUnicode=true&characterEncoding=utf-8&allowMultiQueries=true&useSSL=false
username: root
password: root
driver-class-name: com.mysql.cj.jdbc.Driver
#连接池配置(通常来说,只需要修改initialSize、minIdle、maxActive
initial-size: 1
max-active: 20
min-idle: 1
# 配置获取连接等待超时的时间
max-wait: 60000
#打开PSCache,并且指定每个连接上PSCache的大小
pool-prepared-statements: true
max-pool-prepared-statement-per-connection-size: 20
validation-query: SELECT 'x'
test-on-borrow: false
test-on-return: false
test-while-idle: true
#配置间隔多久才进行一次检测,检测需要关闭的空闲连接,单位是毫秒
time-between-eviction-runs-millis: 60000
#配置一个连接在池中最小生存的时间,单位是毫秒
min-evictable-idle-time-millis: 300000
filters: stat,wall
# WebStatFilter配置,说明请参考Druid Wiki,配置_配置WebStatFilter
#是否启用StatFilter默认值true
web-stat-filter.enabled: true
web-stat-filter.url-pattern: /*
web-stat-filter.exclusions: "*.js , *.gif ,*.jpg ,*.png ,*.css ,*.ico , /druid/*"
web-stat-filter.session-stat-max-count: 1000
web-stat-filter.profile-enable: true
# StatViewServlet配置
#展示Druid的统计信息,StatViewServlet的用途包括:1.提供监控信息展示的html页面2.提供监控信息的JSON API
#是否启用StatViewServlet默认值true
stat-view-servlet.enabled: true
#根据配置中的url-pattern来访问内置监控页面,如果是上面的配置,内置监控页面的首页是/druid/index.html例如:
#http://110.76.43.235:9000/druid/index.html
#http://110.76.43.235:8080/mini-web/druid/index.html
stat-view-servlet.url-pattern: /druid/*
#允许清空统计数据
stat-view-servlet.reset-enable: true
stat-view-servlet.login-username: admin
stat-view-servlet.login-password: admin
#StatViewSerlvet展示出来的监控信息比较敏感,是系统运行的内部情况,如果你需要做访问控制,可以配置allow和deny这两个参数
#deny优先于allow,如果在deny列表中,就算在allow列表中,也会被拒绝。如果allow没有配置或者为空,则允许所有访问
#配置的格式
#<IP>
#或者<IP>/<SUB_NET_MASK_size>其中128.242.127.1/24
#24表示,前面24位是子网掩码,比对的时候,前面24位相同就匹配,不支持IPV6。
#stat-view-servlet.allow=
#stat-view-servlet.deny=128.242.127.1/24,128.242.128.1
# Spring监控配置,说明请参考Druid Github Wiki,配置_Druid和Spring关联监控配置
#aop-patterns= # Spring监控AOP切入点,如x.y.z.service.*,配置多个英文逗号分隔
################### mysq end ##########################
# zipkin:
# base-url: http://127.0.0.1:11008
redis:
################### redis 单机版 start ##########################
host: 59.110.164.254
port: 6379
timeout: 6000
database: 1
lettuce:
pool:
max-active: 10 # 连接池最大连接数(使用负值表示没有限制),如果赋值为-1,则表示不限制;如果pool已经分配了maxActive个jedis实例,则此时pool的状态为exhausted(耗尽)
max-idle: 8 # 连接池中的最大空闲连接 ,默认值也是8
max-wait: 100 # # 等待可用连接的最大时间,单位毫秒,默认值为-1,表示永不超时。如果超过等待时间,则直接抛出JedisConnectionException
min-idle: 2 # 连接池中的最小空闲连接 ,默认值也是0
shutdown-timeout: 100ms
################### redis 单机版 end ##########################
# cluster:
# nodes: 130.75.131.237:7000,130.75.131.238:7000,130.75.131.239:7000,130.75.131.237:7001,130.75.131.238:7001,130.75.131.239:7001
# #130.75.131.237:7000,130.75.131.238:7000,130.75.131.239:7000,130.75.131.237:7001,130.75.131.238:7001,130.75.131.239:7001
# #192.168.3.157:7000,192.168.3.158:7000,192.168.3.159:7000,192.168.3.157:7001,192.168.3.158:7001,192.168.3.159:7001
# timeout: 1000 # 连接超时时间(毫秒)
# lettuce:
# pool:
# max-active: 10 # 连接池最大连接数(使用负值表示没有限制),如果赋值为-1,则表示不限制;如果pool已经分配了maxActive个jedis实例,则此时pool的状态为exhausted(耗尽)
# max-idle: 8 # 连接池中的最大空闲连接 ,默认值也是8
# max-wait: 100 # # 等待可用连接的最大时间,单位毫秒,默认值为-1,表示永不超时。如果超过等待时间,则直接抛出JedisConnectionException
# min-idle: 2 # 连接池中的最小空闲连接 ,默认值也是0
# shutdown-timeout: 100ms
#mybatis:
mybatis-plus:
configuration:
log-impl: org.apache.ibatis.logging.stdout.StdOutImpl
config-location: classpath:mybatis.cfg.xml
mapper-locations: classpath*:com/open/**/dao/*.xml
security:
oauth2:
ignored: /files-anon/** , /doc.html ,/upload.html , /uploads.html ,/js/** ,/document.html
token:
store:
type: redis
#设置最大超时时间
ribbon:
httpclient:
enabled: false
okhttp:
enabled: true
ReadTimeout: 90000
ConnectTimeout: 90000
OkToRetryOnAllOperations: true
MaxAutoRetries: 1
MaxAutoRetriesNextServer: 1
#设置最大容错超时时间
hystrix:
command:
default:
execution:
timeout:
enabled: true
isolation:
thread:
timeoutInMilliseconds: 90000
logging:
level:
com.open.capacity: INFO
org.hibernate: INFO
org.hibernate.type.descriptor.sql.BasicBinder: TRACE
org.hibernate.type.descriptor.sql.BasicExtractor: TRACE
# com.neusoft: DEBUG
# com.netflix: DEBUG #用于心跳检测输出的日志
```
## OSS 存储服务

* 支持阿里云oss,七牛oss,本地,fastdfs四种配置

```
#阿里云文件上传
aliyun:
oss:
access-key: LTAIMjvZWiXRuClW
accessKeySecret: YwJar7gkdZx3Q3Zk6TRuEAWaAz6n8y
endpoint: oss-cn-beijing.aliyuncs.com
bucketName: owenwangwen
domain: https://owenwangwen.oss-cn-beijing.aliyuncs.com
#七牛文件上传
qiniu:
oss:
access-key: owGiAWGn6DpU5zlrfLP4K9iQusahmspTW6PxRABW
accessKeySecret: 5CBWKFd1pP-OSiusd1Bvhokp-ih4i3bs2QA2r-U2
endpoint: http://q4c5xw7eb.bkt.clouddn.com
bucketName: ocpowenwangwen
## 本地文件上传
file:
oss:
domain: http://127.0.0.1:9200/api-file
path: d:/uploadshp
prefix: /statics
#fastDFS配置
fdfs:
oss :
##nginx需要安装fastdfs插件
domain: http://192.168.235.173/
soTimeout: 1500
connectTimeout: 600
pool:
jmx-enabled: false
trackerList: 192.168.235.173:22122
```
* 代码默认采用七牛云上传,如果要改用别的方式注意修改FileType.QINIU

* 七牛云,七牛云核心配置

* 七牛云上传核心类

## 大文件分片上传
### 前端webuploader
分片与并发结合,将一个大文件分割成多块,并发上传,极大地提高大文件的上传速度。
当网络问题导致传输错误时,只需要重传出错分片,而不是整个文件。另外分片传输能够更加实时的跟踪上传进度。
### 文件分片
```
/**
* 上传大文件
* @param file
* @param chunks
*/
@PostMapping(value = "/files-anon/bigFile")
// @ResponseStatus(code= HttpStatus.INTERNAL_SERVER_ERROR,reason="server error")
public ResponseEntity bigFile( String guid, Integer chunk, MultipartFile file, Integer chunks){
try {
fileServiceFactory.getFileService(FileType.LOCAL.toString()).chunk(guid,chunk,file,chunks,localFilePath);
return ResponseEntity.succeed("操作成功");
}catch (Exception ex){
return ResponseEntity.failed("操作失败");
}
}
```
### 文件合并
```
/**
* 合并文件
* @param mergeFileDTO
*/
@RequestMapping(value = "/files-anon/merge",method =RequestMethod.POST )
public ResponseEntity mergeFile(@RequestBody MergeFileDTO mergeFileDTO){
try {
return ResponseEntity.succeed(fileServiceFactory.getFileService(FileType.LOCAL.toString()).merge(mergeFileDTO.getGuid(),mergeFileDTO.getFileName(),localFilePath),"操作成功");
}catch (Exception ex){
return ResponseEntity.failed("操作失败");
}
}
```
## FastDFS文件系统详解
### FastDFS介绍
FastDFS的开发者——淘宝的架构师余庆老师
FastDFS开源地址:https://github.com/happyfish100
### FastDFS是什么?
FastDFS是一个开源的轻量级分布式文件系统
FastDFS 不是通用的文件系统,只能通过装有API访问,追求高性能,高扩展性
FastDFS 是一款用户态的分布式文件系统
### FastDFS能做什么?
它的主要功能包括:文件存储,文件同步和文件访问,以及高容量和负载平衡。主要解决了海量数据存储问题,特别适合以中小文件(建议范围:4KB < file_size <500MB)为载体的在线服务。在底层存储上通过逻辑的分组概念,使得通过在同组内配置多个Storage,从而实现软RAID10
相关术语
• Tracker Server:跟踪服务器,主要做调度工作,起到均衡的作用;负责管理所有的 storage server和 group,每个 storage 在启动后会连接 Tracker,告知自己所属 group 等信息,并保持周期性心跳。tracker根据storage的心跳信息,建立group==>[storage server list]的映射表。由此可见Tracker的作用至关重要,也就增加了系统的单点故障,为此FastDFS支持多个备用的Tracker
• Storage Server:存储服务器,主要提供容量和备份服务;以 group 为单位,每个 group 内可以有多台 storage server,数据互为备份。
• Client:客户端,上传下载数据的服务器,也就是我们自己的项目所部署在的服务器。
• group:组,也可称为卷。同组内服务器上的文件是完全相同的。
• 文件标识:包括两部分:组名和文件名(包含路径)。
• meta data:文件相关属性,键值对(Key Value Pair)方式,如:width=1024,heigth=768。
### FastDFS架构图

### 文件系统的对比

### 文件上传流程

### 文件下载流程

### 同步机制
•同一组内的storage server之间是对等的,文件上传、删除等操作可以在任意一台storage server上进行;
•文件同步只在同组内的storage server之间进行,采用push方式,即源服务器同步给目标服务器;
•源头数据才需要同步,备份数据不需要再次同步,否则就构成环路了;
•上述第二条规则有个例外,就是新增加一台storage server时,由已有的一台storage server将已有的所有数据(包括源头数据和备份数据)同步给该新增服务器。
### 运行时目录结构-tracker server

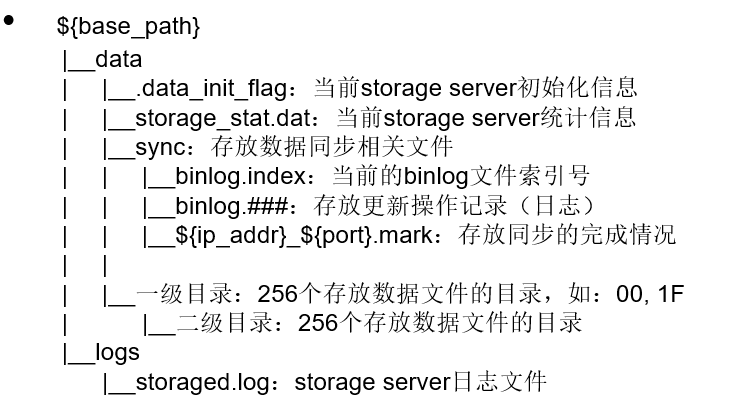
### 运行时目录结构-storage server
### 快速搭建
服务器192.168.235.173准备
| 软件 | 版本 | 备注 |
| --- | --- |--- |
| centos| 7.5 | |
| docker-ce| 18.06.1 | |
```
docker pull registry.cn-beijing.aliyuncs.com/tianzuo/fastdfs
mkdir /var/local/fdfs
docker run \
--net=host \
--name=fastdfs \
-e IP=192.168.235.173 \
-e WEB_PORT=80 \
-v $PWD/fdfs:/var/local/fdfs \
-d registry.cn-beijing.aliyuncs.com/tianzuo/fastdfs
```
确保80、22122和23000这3个端口未被占用
IP:配置所在服务器的ip
WEB_PORT:配置nginx的端口,用于文件下载
- 前言
- 1.项目说明
- 2.项目更新日志
- 3.文档更新日志
- 01.快速开始
- 01.maven构建项目
- 02.环境安装
- 03.STS项目导入
- 03.IDEA项目导入
- 04.数据初始化
- 05.项目启动
- 06.付费文档说明
- 02.总体流程
- 1.oauth接口
- 2.架构设计图
- 3.微服务介绍
- 4.功能介绍
- 5.梳理流程
- 03.模块详解
- 01.老版本1.0.1分支模块讲解
- 01.db-core模块
- 02.api-commons模块
- 03.log-core模块
- 04.security-core模块
- 05.swagger-core模块
- 06.eureka-server模块
- 07.auth-server模块
- 08.auth-sso模块解析
- 09.user-center模块
- 10.api-gateway模块
- 11.file-center模块
- 12.log-center模块
- 13.batch-center模块
- 14.back-center模块
- 02.spring-boot-starter-web那点事
- 03.自定义db-spring-boot-starter
- 04.自定义log-spring-boot-starter
- 05.自定义redis-spring-boot-starter
- 06.自定义common-spring-boot-starter
- 07.自定义swagger-spring-boot-starter
- 08.自定义uaa-server-spring-boot-starter
- 09.自定义uaa-client-spring-boot-starter
- 10.自定义ribbon-spring-boot-starter
- 11.springboot启动原理
- 12.eureka-server模块
- 13.auth-server模块
- 14.user-center模块
- 15.api-gateway模块
- 16.file-center模块
- 17.log-center模块
- 18.back-center模块
- 19.auth-sso模块
- 20.admin-server模块
- 21.zipkin-center模块
- 22.job-center模块
- 23.batch-center
- 04.全新网关
- 01.基于spring cloud gateway的new-api-gateway
- 02.spring cloud gateway整合Spring Security Oauth
- 03.基于spring cloud gateway的redis动态路由
- 04.spring cloud gateway聚合swagger文档
- 05.技术详解
- 01.互联网系统设计原则
- 02.系统幂等性设计与实践
- 03.Oauth最简向导开发指南
- 04.oauth jdbc持久化策略
- 05.JWT token方式启用
- 06.token有效期的处理
- 07.@PreAuthorize注解分析
- 08.获取当前用户信息
- 09.认证授权白名单配置
- 10.OCP权限设计
- 11.服务安全流程
- 12.认证授权详解
- 13.验证码技术
- 14.短信验证码登录
- 15.动态数据源配置
- 16.分页插件使用
- 17.缓存击穿
- 18.分布式主键生成策略
- 19.分布式定时任务
- 20.分布式锁
- 21.网关多维度限流
- 22.跨域处理
- 23.容错限流
- 24.应用访问次数控制
- 25.统一业务异常处理
- 26.日志埋点
- 27.GPRC内部通信
- 28.服务间调用
- 29.ribbon负载均衡
- 30.微服务分布式跟踪
- 31.异步与线程传递变量
- 32.死信队列延时消息
- 33.单元测试用例
- 34.Greenwich.RELEASE升级
- 35.混沌工程质量保证
- 06.开发初探
- 1.开发技巧
- 2.crud例子
- 3.新建服务
- 4.区分前后台用户
- 07.分表分库
- 08.分布式事务
- 1.Seata介绍
- 2.Seata部署
- 09.shell部署
- 01.eureka-server
- 02.user-center
- 03.auth-server
- 04.api-gateway
- 05.file-center
- 06.log-center
- 07.back-center
- 08.编写shell脚本
- 09.集群shell部署
- 10.集群shell启动
- 11.部署阿里云问题
- 10.网关安全
- 1.openresty https保障服务安全
- 2.openresty WAF应用防火墙
- 3.openresty 高可用
- 11.docker配置
- 01.docker安装
- 02.Docker 开启远程API
- 03.采用docker方式打包到服务器
- 04.docker创建mysql
- 05.docker网络原理
- 06.docker实战
- 6.01.安装docker
- 6.02.管理镜像基本命令
- 6.03.容器管理
- 6.04容器数据持久化
- 6.05网络模式
- 6.06.Dockerfile
- 6.07.harbor部署
- 6.08.使用自定义镜像
- 12.统一监控中心
- 01.spring boot admin监控
- 02.Arthas诊断利器
- 03.nginx监控(filebeat+es+grafana)
- 04.Prometheus监控
- 05.redis监控(redis+prometheus+grafana)
- 06.mysql监控(mysqld_exporter+prometheus+grafana)
- 07.elasticsearch监控(elasticsearch-exporter+prometheus+grafana)
- 08.linux监控(node_exporter+prometheus+grafana)
- 09.micoservice监控
- 10.nacos监控
- 11.druid数据源监控
- 12.prometheus.yml
- 13.grafana告警
- 14.Alertmanager告警
- 15.监控微信告警
- 16.关于接口监控告警
- 17.prometheus-HA架构
- 18.总结
- 13.统一日志中心
- 01.统一日志中心建设意义
- 02.通过ELK收集mysql慢查询日志
- 03.通过elk收集微服务模块日志
- 04.通过elk收集nginx日志
- 05.统一日志中心性能优化
- 06.kibana安装部署
- 07.日志清理方案
- 08.日志性能测试指标
- 09.总结
- 14.数据查询平台
- 01.数据查询平台架构
- 02.mysql配置bin-log
- 03.单节点canal-server
- 04.canal-ha部署
- 05.canal-kafka部署
- 06.实时增量数据同步mysql
- 07.canal监控
- 08.clickhouse运维常见脚本
- 15.APM监控
- 1.Elastic APM
- 2.Skywalking
- 01.docker部署es
- 02.部署skywalking-server
- 03.部署skywalking-agent
- 16.压力测试
- 1.ocp.jmx
- 2.test.bat
- 3.压测脚本
- 4.压力报告
- 5.报告分析
- 6.压测平台
- 7.并发测试
- 8.wrk工具
- 9.nmon
- 10.jmh测试
- 17.SQL优化
- 1.oracle篇
- 01.基线测试
- 02.调优前奏
- 03.线上瓶颈定位
- 04.执行计划解读
- 05.高级SQL语句
- 06.SQL tuning
- 07.数据恢复
- 08.深入10053事件
- 09.深入10046事件
- 2.mysql篇
- 01.innodb存储引擎
- 02.BTree索引
- 03.执行计划
- 04.查询优化案例分析
- 05.为什么会走错索引
- 06.表连接优化问题
- 07.Connection连接参数
- 08.Centos7系统参数调优
- 09.mysql监控
- 10.高级SQL语句
- 11.常用维护脚本
- 12.percona-toolkit
- 18.redis高可用方案
- 1.免密登录
- 2.安装部署
- 3.配置文件
- 4.启动脚本
- 19.消息中间件搭建
- 19-01.rabbitmq集群搭建
- 01.rabbitmq01
- 02.rabbitmq02
- 03.rabbitmq03
- 04.镜像队列
- 05.haproxy搭建
- 06.keepalived
- 19-02.rocketmq搭建
- 19-03.kafka集群
- 20.mysql高可用方案
- 1.环境
- 2.mysql部署
- 3.Xtrabackup部署
- 4.Galera部署
- 5.galera for mysql 集群
- 6.haproxy+keepalived部署
- 21.es集群部署
- 22.生产实施优化
- 1.linux优化
- 2.jvm优化
- 3.feign优化
- 4.zuul性能优化
- 23.线上问题诊断
- 01.CPU性能评估工具
- 02.内存性能评估工具
- 03.IO性能评估工具
- 04.网络问题工具
- 05.综合诊断评估工具
- 06.案例诊断01
- 07.案例诊断02
- 08.案例诊断03
- 09.案例诊断04
- 10.远程debug
- 24.fiddler抓包实战
- 01.fiddler介绍
- 02.web端抓包
- 03.app抓包
- 25.疑难解答交流
- 01.有了auth/token获取token了为啥还要配置security的登录配置
- 02.权限数据存放在redis吗,代码在哪里啊
- 03.其他微服务和认证中心的关系
- 04.改包问题
- 05.use RequestContextListener or RequestContextFilter to expose the current request
- 06./oauth/token对应代码在哪里
- 07.验证码出不来
- 08./user/login
- 09.oauth无法自定义权限表达式
- 10.sleuth引发线程数过高问题
- 11.elk中使用7x版本问题
- 12.RedisCommandTimeoutException问题
- 13./oauth/token CPU过高
- 14.feign与权限标识符问题
- 15.动态路由RedisCommandInterruptedException: Command interrupted
- 26.学习资料
- 海量学习资料等你来拿
- 27.持续集成
- 01.git安装
- 02.代码仓库gitlab
- 03.代码仓库gogs
- 04.jdk&&maven
- 05.nexus安装
- 06.sonarqube
- 07.jenkins
- 28.Rancher部署
- 1.rancher-agent部署
- 2.rancher-server部署
- 3.ocp后端部署
- 4.演示前端部署
- 5.elk部署
- 6.docker私服搭建
- 7.rancher-server私服
- 8.rancher-agent docker私服
- 29.K8S部署OCP
- 01.准备OCP的构建环境和部署环境
- 02.部署顺序
- 03.在K8S上部署eureka-server
- 04.在K8S上部署mysql
- 05.在K8S上部署redis
- 06.在K8S上部署auth-server
- 07.在K8S上部署user-center
- 08.在K8S上部署api-gateway
- 09.在K8S上部署back-center
- 30.Spring Cloud Alibaba
- 01.统一的依赖管理
- 02.nacos-server
- 03.生产可用的Nacos集群
- 04.nacos配置中心
- 05.common.yaml
- 06.user-center
- 07.auth-server
- 08.api-gateway
- 09.log-center
- 10.file-center
- 11.back-center
- 12.sentinel-dashboard
- 12.01.sentinel流控规则
- 12.02.sentinel熔断降级规则
- 12.03.sentinel热点规则
- 12.04.sentinel系统规则
- 12.05.sentinel规则持久化
- 12.06.sentinel总结
- 13.sentinel整合openfeign
- 14.sentinel整合网关
- 1.sentinel整合zuul
- 2.sentinel整合scg
- 15.Dubbo与Nacos共存
- 31.Java源码剖析
- 01.基础数据类型和String
- 02.Arrays工具类
- 03.ArrayList源码分析
- 32.面试专题汇总
- 01.JVM专题汇总
- 02.多线程专题汇总
- 03.Spring专题汇总
- 04.springboot专题汇总
- 05.springcloud面试汇总
- 文档问题跟踪处理