在进行功能测试以前,首先尝试画一张流程图来梳理下功能点:
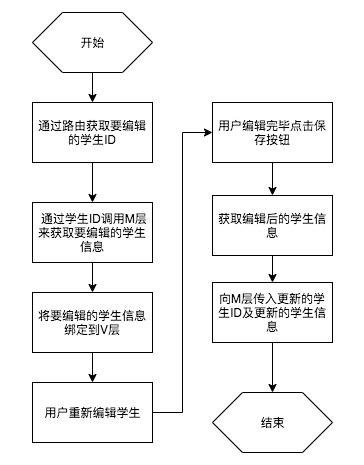
接下来,按图索骥分别进行功能开发及测试:
# 通过路由获取要编辑的学生ID
人类的记忆有个规律:记忆结束以后,遗忘马上开始。基于这个基本的规律,我们发现好像已经忘却了如何获取路由中的参数值了。但是没有关系,因为大脑除了遗忘一些繁文缛节以后,还为我们记忆了更为关键的信息:我们曾经做过类似的"编辑教师"与"编辑班级"。此时,我们可以依靠这个简短的记忆来快速的找到 2.4.1或3.4.1小节,参考其中的代码来快速的完成本功能。这也是为什么我们会自嘲上班只做两件事--"ctrl+c"与"ctrl+v"的原因。
## 引入路由
src/app/student/edit/edit.component.ts
```javascript
constructor(private activatedRoute: ActivatedRoute✚) { }
ngOnInit() {
this.activatedRoute.params.subscribe((param: {id: number}) => { ✚
this.student.id = param.id; ✚
}); ✚
this.formGroup = new FormGroup({
name: new FormControl(''),
sno: new FormControl('')
});
}
```
## 单元测试
单元测试的方法同样可能参考班级管理中的编辑功能测试。在班级编辑功能的测试中,新建了`ActivatedRouteStub`来提供路由的服务。在此依然采用该方法。
src/app/student/edit/edit.component.spec.ts
```javascript
import {ActivatedRouteStub} from '../../klass/edit/activated-route-stub'; ①
...
beforeEach(async(() => {
TestBed.configureTestingModule({
declarations: [ EditComponent, KlassSelectComponentStub ],
imports: [
ReactiveFormsModule,
],
providers: [
{provide: ActivatedRoute, useClass: ActivatedRouteStub} ②
]
})
.compileComponents();
}));
...
fit('通过路由获取要编辑的学生ID', () => { ③
});
```
* ① 在测试模块中,直接使用班级编辑测试中的模拟路由桩(替身)
* ② 声明提供者:当测试模块需要ActivatedRoute时,提供ActivatedRouteStub
* ③ 新建测试用例
单元测试点:使用路由发送请求参数时,被测试组件成功的接收到发送的参数。代码如下:
```javascript
fit('通过路由获取要编辑的学生ID', () => {
expect(component.student.id).toBeUndefined(); ①
const activatedRoute: ActivatedRouteStub = TestBed.get(ActivatedRoute); ②
const id = Math.floor(Math.random() * 100); ③
activatedRoute.subject.next({id}); ④
expect(component.student.id).toBe(id); ⑤
});
```
* ① 断言初始化时ID为undefined
* ② 获取ActivatedRoute的替身
* ③ 获取一个100以内的随机数
* ④ 路由发送ID。`{id}`等价于`{id: id}`
* ⑤ 断言组件接收到了ID,且使用该ID为组件的student.id赋值
# 通过学生ID调用M层来获取要编辑的学生信息
同样还是参考以前已有组件的编辑功能。在获取数据时不应该直接向后台发起http请求,而应该选择调用对应的service。
src/app/student/edit/edit.component.ts
```javascript
constructor(private activatedRoute: ActivatedRoute,
private studentService: StudentService ✚) { }
ngOnInit() {
this.activatedRoute.params.subscribe((param: {id: number}) => {
this.student.id = param.id;
this.loadStudentById(this.student.id); ✚
});
this.formGroup = new FormGroup({
name: new FormControl(''),
sno: new FormControl('')
});
}
/**
* 加载学生 ✚ ①
* @param id 学生ID
*/
loadStudentById(id: number) {
this.studentService.getById(id)
.subscribe(student => {
this.student = student;
});
}
```
* ① 调用M层,传入ID获取要编辑的学生
此时`studentService`尚无`getById`方法,为此打开`studentService`并新建对应的方法及设置相关的返回值。
src/app/service/student.service.ts
```javascript
/**
* 获取某个学生
* @param id 学生ID
*/
getById(id: number): Observable<Student> {
return null;
}
```
## 单元测试
单元测试时我们无形中遵守了以下原则:1. 有参考的代码,坚决在第一时间参考。2. 可以使用替身的,坚持不用真身。
对于原则2,我们已经学习过了很多种建立替身的方法,比如前面刚刚使用`provide`来为某位真身来指定替身;使用定义与真身相同的`selector`的方法来为某个组件来定制替身。除以上两个方法外,在第三章第四节的第4小节中还使用了另外一种创建替身的方法:`jasmine.createSpyObj`,此方法具有简单、高效的优点,缺点是难以复用。适合于低频调用的测试场合。比如此时只有当前组件会调用`StudentService.getById`方法,可以认为这是一种低频调用,适用于使用:`jasmine.createSpyObj`来创建替身。在此,使用该方法来协助进行单元测试。
src/app/student/edit/edit.component.spec.ts
```javascript
beforeEach(async(() => {
const studentServiceSpy: SpyObj<StudentService> = jasmine.createSpyObj<StudentService>(['getById']); ✚ ①
TestBed.configureTestingModule({
declarations: [ EditComponent, KlassSelectComponentStub ],
imports: [
ReactiveFormsModule,
],
providers: [
{provide: ActivatedRoute, useClass: ActivatedRouteStub},
{provide: StudentService, useValue: studentServiceSpy} ✚ ②
]
})
.compileComponents();
}));
```
* ① 创建一个StudentService的间谍(替身),该替身拥有`getById`方法。该替身的类型为SpyObj。
* ② 声明提供者:当测试模块需要基于StudentService的实例时,提供StudentService间谍。
按功能制定测试点如下:1. ngOnit方法成功调用了loadStudentById方法。2.loadStudentById方法成功调用了StudentService的getById方法。
功能点1测试:
src/app/student/edit/edit.component.spec.ts
```javascript
fit('通过路由获取要编辑的学生ID', () => {
expect(component.student.id).toBeUndefined();
spyOn(component, 'loadStudentById'); ①
const activatedRoute: ActivatedRouteStub = TestBed.get(ActivatedRoute);
const id = Math.floor(Math.random() * 100);
activatedRoute.subject.next({id});
expect(component.student.id).toBe(id);
expect(component.loadStudentById).toHaveBeenCalledWith(id); ②
});
```
* ① 在当前组件的loadStudentById方法上创建间谍(方法的替身),当调用此方法时实际上调用的为该方法的替身。
* ② 断言间谍的方法被调用,且参数值正确。
功能点2测试:
src/app/student/edit/edit.component.spec.ts
```javascript
fit('通过学生ID调用M层来获取要编辑的学生信息 loadStudentById', () => {
console.log('测试准备');
const studentServiceSpy: SpyObj<StudentService>① = TestBed.get(StudentService);
const id = Math.floor(Math.random() * 100);
const mockResultStudent = new Student();
studentServiceSpy.getById.and.returnValue(of(mockResultStudent)); ①
console.log('调用方法。并断言参数传值正确,接收返回值正确');
component.loadStudentById(id);
expect(studentServiceSpy.getById).toHaveBeenCalledWith(id);
expect(component.student).toBe(mockResultStudent);
});
```
* ① 这的类型很重要:在此测试模块中,我们为`StudentService`提供的类型是个由`jasmine.createSpyObj`所创建的替身,而该替身的类型应为`SpyObj<StudentService>`,所以在此使用`TestBed.get`(StudentService)获取对象时,其类型也应当为`SpyObj<StudentService>`。在此手动指定其类型的目的主要是触发编辑器的自动提示功能,没有任何功能方面的影响。也就是说我们完全可以使用`const studentServiceSpy = TestBed.get(StudentService);`。
* ② 使用`of`发送`Observable`类型的值。
本测试用例的开发思想为:先准备好传入的参数及返回值,接着进行调用,最后进行传入参数及返回值的断言。
# 将要编辑的学生信息绑定到V层
由于form数据的绑定是由angular内置模块实现的,所以在进行绑定测试时,我们测试的目的是:是否绑定成功。而双向绑定成功的标准有两个(任一一个满足即可):C层向V层绑定成功、V层向C层绑定成功;单向绑定成功的标准仅一个:C层向V层绑定成功。鉴于此,测试中选择的标准为通用的:验证C层向V层是否成功绑定。
> tips: 要实现分功能点测试,就需要为每个功能点建立独立的方法:
src/app/student/edit/edit.component.ts
```javascript
/**
* 加载学生
* @param id 学生ID
*/
loadStudentById(id: number) {
this.studentService.getById(id)
.subscribe(student => {
this.student = student;
this.setFormGroupValue(this.student); ✚
});
}
/**
* 设置表单值 ✚ ①
* @param student 学生
*/
setFormGroupValue(student: Student) {
this.formGroup.setValue({
name: student.name,
sno: student.sno
});
}
```
* ① 为此功能点建立独立的方法,这可以大幅度的降低单元测试间的耦合度。我们再也不需要在一个测试用例中输出千百行代码了。
有了独立的方法后,首先要确定该独立方法被loadStudentById方法成功的调用了。
src/app/student/edit/edit.component.spec.ts
```javascript
fit('通过学生ID调用M层来获取要编辑的学生信息 loadStudentById', () => {
console.log('测试准备');
spyOn(component, 'setFormGroupValue'); ✚
const studentServiceSpy: SpyObj<StudentService> = TestBed.get(StudentService);
const id = Math.floor(Math.random() * 100);
const mockResultStudent = new Student();
studentServiceSpy.getById.and.returnValue(of(mockResultStudent));
console.log('调用方法。并断言参数传值正确,接收返回值正确');
component.loadStudentById(id);
expect(studentServiceSpy.getById).toHaveBeenCalledWith(id);
expect(component.student).toBe(mockResultStudent);
expect(component.setFormGroupValue).toHaveBeenCalledWith(mockResultStudent); ✚
});
```
接下来,开始单独测试该方法:
src/app/student/edit/edit.component.spec.ts
```javascript
fit('C层向V层绑定表单是否成功 setFormGroupValue', () => {
console.log('数据准备及方法调用');
const student = new Student();
student.name = Math.random().toString(36).slice(-10);
student.sno = Math.floor(Math.random() * 100).toString();
component.setFormGroupValue(student);
console.log('重新渲染V层,获取表单的值并进行断言');
fixture.detectChanges();
const nameInput: HTMLInputElement = fixture.debugElement.query(By.css('input[name="name"]')).nativeElement;
expect(nameInput.value).toEqual(student.name);
const snoInput: HTMLInputElement = fixture.debugElement.query(By.css('input[name="sno"]')).nativeElement;
expect(snoInput.value).toEqual(student.sno);
});
```
测试的步骤同其它的V层绑定测试:首先准备数据、接着将准备好的数据传给组件、最后重新渲染组件并进行断言。
# 用户重新编辑学生
获取到学生的信息并展示给用户后,用户可以编辑姓名、学号及班级信息。姓名与学号是通过绑定form的input来实现的。而班级信息则是通过选择班级组件来实现的。对于姓名与学号在前面已经做了数据绑定的测试,有了功能健壮性的保障。但选择班级组件在这里是否可以正常的工作,却没有得到验证。为避免正常的"不小心"错误引发的组件间交互失效的问题,笔者认为还应该为这种在组件中引用另一种组件的组件交互情况提供相应的单元测试支持。即:测试组件交互中的输入与输出是否符合预期。但笔者查阅了angular的官方教程,并未找到相关的资料。笔者**猜想**这可能是由于angular官方认为组件间的交互测试应该放到`e2e test`中而非`unit test`中的原因吧。
> 事实上,此时选择班级组件恰好有一个小的BUG。在后续的教程中我们会尝试使用一种非官方的方法来解决这个问题。
# 用户编辑完毕点击保存按钮
用户的交互操作(比如在V层中点击了保存按钮)往往需要两个单元来支撑。第一个单元测试来保障:用户点击保存按钮后成功的触发C层的方法。第二个单元测试来保障C层对应方法的逻辑正确性。按照这个理论,此处只需要测试点击保存按钮后成功的触发C层的方法即可。这样以来测试的思想简单的可以总结为:获取保存按钮,进行点击,断言C层的方法得到了触发。
src/app/student/edit/edit.component.spec.ts
```javascript
fit('点击保存按钮', () => {
spyOn(component, 'onSubmit');
});
```
和其它单元测试的思想一致。用户点击保存按钮后,预期应触发`onSubmit`方法,所以在此首先使用spyOn方法来在被测组件的`onSubmit`方法上创建一个替身。这样一来可以实现两个目标:1. 可以测试这个替身是否被调用过。 2. 当在测试过程中有需要调用`onSubmit`方法转而调用此替身,从而避免调用真正的`onSubmit`方法可能触发的异常。
但此时编辑器给我们了一个小的提示:

把鼠标滑上去会得到一个在component上没有`onSubmit`的方法的错误。聪明的编辑器正是如此,和编辑器提示的相同:虽然在V层中设置了`(ngSubmit)`,但在C层初始化的过程中,我们并没有对应的`onSubmit`方法。除此以外,在嵌套的班级选择组件中的`selected`对应的`onSelectKlass()`方法同样也没有存在于C层中。此时如果不够仔细,则相当于给集成测试挖了一个大不大小的坑。
> 期望angular后续版本的单元测试能直接告之我这个错误。
按编辑器的提示增加`onSubmit`方法:
src/app/student/edit/edit.component.ts
```javascript
onSubmit() {
}
```
然后继续补充单元测试如下:
src/app/student/edit/edit.component.spec.ts
```javascript
fit('点击保存按钮', () => {
spyOn(component, 'onSubmit');
const button: HTMLButtonElement = fixture.debugElement.query(By.css('button')).nativeElement;
button.click();
expect(component.onSubmit).toHaveBeenCalled();
});
```
# 获取编辑后的学生信息
C层的方法并成功触发后,接下来的工作便是收集用户编辑后的学生信息,为下一步向M层发送要更新的学生信息做准备。也就是要测试刚刚讲过的第二点:保障C层对应方法的逻辑正确性:
测试点:成功将表单及班级选择组件中的值更新到学生信息中。
src/app/student/edit/edit.component.spec.ts
```javascript
fit('onSubmit', () => {
// 设置formGroup的值
// 设置班级选择组件的值
// 调用onSubmit方法
// 断言已使用formGroup及班级选择组件的值更新了学生信息
});
```
按注释继续被充测试内容:
```javascript
fit('onSubmit', () => {
// 设置formGroup的值
const name = Math.random().toString(36).slice(-10);
const sno = Math.random().toString(36).slice(-10);
component.formGroup.get('name').setValue(name);
component.formGroup.get('sno').setValue(sno);
// 设置班级选择组件的值
// todo: 在官方文档中暂未找到相应的示例代码
// 调用onSubmit方法
component.onSubmit();
// 断言已使用formGroup及班级选择组件的值更新了学生信息
expect(component.student.name).toBe(name);
expect(component.student.sno).toBe(sno);
// expect(component.student.klass).toBe(null); todo: 原则上这里要测试发射值
});
```
功能代码:
src/app/student/edit/edit.component.ts
```javascript
onSubmit() {
this.student.name = this.formGroup.get('name').value;
this.student.sno = this.formGroup.get('sno').value;
this.student.klass = this.student.klass; ①
}
```
* ① 此行代码没有作用,在此谨表示在获取更新的信息时
# 向M层传入更新的学生ID及更新的学生信息
与获取用户的信息调用M层的思想相同,更新学生时也应该调用M层而避免直接向后台发起请求。
> 单元测试的关键在于:先Thinking, 再coding。在学习的过程中,如果感觉先有单元测试的这种开发方法让自己没有头绪,那么原因可能有2点:1.对普通的业务还不熟悉。2.急于求成,在继续阅读前没有静心思索功能的实际过程。
src/app/student/edit/edit.component.ts
```javascript
fit('onSubmit', () => {
......
// 断言调用 向M层传入更新的学生ID及更新的学生信息 方法
});
fit('向M层传入更新的学生ID及更新的学生信息', () => {
// 在M层对应的方法上建立间谍
// 为间谍准备返回值
// 方法调用
// 断言间谍调用成功,间谍接收参数符合预期
// 断言接收返回值符合预期
});
```
src/app/student/edit/edit.component.ts
```javascript
update(student: Student) {
}
```
src/app/service/student.service.ts
```javascript
/**
* 更新学生
* @param id id
* @param student 学生
*/
update(id: number, student: Student): Observable<Student> {
return null;
}
```
按注释补充代码:
```javascript
beforeEach(async(() => {
const studentServiceSpy: SpyObj<StudentService> = jasmine.createSpyObj<StudentService>(['getById', 'update'✚ ①]);
...
fit('向M层传入更新的学生ID及更新的学生信息', () => {
// 在M层对应的方法上建立间谍 (见foreach)
// 为间谍准备返回值
const studentService: SpyObj<StudentService> = TestBed.get(StudentService);
const student = new Student();
studentService.update.and.returnValue(of(student));
// 方法调用
const student1 = new Student();
student1.id = Math.floor(Math.random() * 100);
component.update(student1);
// 断言间谍调用成功,间谍接收参数符合预期
expect(studentService.update).toHaveBeenCalledWith(student1.id, student1);
// 断言接收返回值符合预期
expect(component.student).toBe(student);
});
```
* ① 为studentService间谍再增加一个update方法
* 此处需要提前思维的量较大,建立先查看功能实现代码。功能实现代码完成后,再回看单元测试代码。
充分的理解单元测试代码后,功能性的代码便显得十分简单了,当然这也正是我们想要的效果。
src/app/student/edit/edit.component.ts
```javascript
/**
* 更新学生
* @param student 学生
*/
update(student: Student) {
this.studentService.update(student.id, student)
.subscribe((result) => {
this.student = result; ①
});
}
```
* ① 将返回值赋值给this.student,主要的作用的是增加可测试性
单元测试通过。继续补充M层的功能。
# StudentService -> getByid
先thinking
src/app/service/student.service.spec.ts
```javascript
fit('getById', () => {
// 调用方法并订阅
// 断言发起了http请求
// 断言请求的参数及方法符合预期
// 模拟返回数据
// 断言接收数据
});
```
再coding
```javascript
fit('getById', () => {
// 调用方法并订阅
const id = Math.floor(Math.random() * 100);
let resultStudent;
service.getById(id)
.subscribe((student) => {
resultStudent = student;
});
// 断言发起了http请求
const httpTestingController: HttpTestingController = TestBed.get(HttpTestingController);
const req = httpTestingController.expectOne(`http://localhost:8080/Student/${id}`);
// 断言请求的参数及方法符合预期
expect(req.request.method).toEqual('GET');
// 模拟返回数据
const mockStudent = new Student();
req.flush(mockStudent);
// 断言接收数据
expect(resultStudent).toBe(mockStudent);
});
```
功能代码:
src/app/service/student.service.ts
```javascript
/**
* 获取某个学生
* @param id 学生ID
*/
getById(id: number): Observable<Student> {
const url = `http://localhost:8080/Student/${id}`;
return this.httpClient.get<Student>(url);
}
```
# StudentSErvice -> udpate
先Thinking
```javascript
fit('update', () => {
// 调用方法并订阅
// 断言发起了http请求
// 断言请求的参数及方法符合预期
// 模拟返回数据
// 断言接收数据
});
```
再coding
```javascript
fit('update', () => {
// 调用方法并订阅
const student = new Student();
student.id = Math.floor(Math.random() * 100);
let resultStudent;
service.update(student.id, student)
.subscribe(result => {
resultStudent = result;
});
// 断言发起了http请求
const httpTestingController: HttpTestingController = TestBed.get(HttpTestingController);
const req = httpTestingController.expectOne(`http://localhost:8080/Student/${student.id}`);
// 断言请求的参数及方法符合预期
expect(req.request.method).toEqual('PUT');
expect(req.request.body).toBe(student);
// 模拟返回数据
const mockStudent = new Student();
req.flush(mockStudent);
// 断言接收数据
expect(resultStudent).toBe(mockStudent);
});
```
相对简单的功能性代码:
```javascript
/**
* 更新学生
* @param id id
* @param student 学生
*/
update(id: number, student: Student): Observable<Student> {
const url = `http://localhost:8080/Student/${id}`;
return this.httpClient.put<Student>(url, student);
}
```
# 总结
本小节中并没有涉及的新的语法或是开发思想。在开发过程中,我们尽量地降低单个方法中的代码长度,缩小被测试代码的粒度。这样以来,整个开发的过程就像搭积木一样。我猜想这便是一些开源的有名气的框架每个方法都很简洁的原因之一吧。
# 参考文档
| 名称 | 链接 | 预计学习时长(分) |
| --- | --- | --- |
| 源码地址 | [https://github.com/mengyunzhi/spring-boot-and-angular-guild/releases/tag/step4.7.3](https://github.com/mengyunzhi/spring-boot-and-angular-guild/releases/tag/step4.7.3) | - |
- 序言
- 第一章:Hello World
- 第一节:Angular准备工作
- 1 Node.js
- 2 npm
- 3 WebStorm
- 第二节:Hello Angular
- 第三节:Spring Boot准备工作
- 1 JDK
- 2 MAVEN
- 3 IDEA
- 第四节:Hello Spring Boot
- 1 Spring Initializr
- 2 Hello Spring Boot!
- 3 maven国内源配置
- 4 package与import
- 第五节:Hello Spring Boot + Angular
- 1 依赖注入【前】
- 2 HttpClient获取数据【前】
- 3 数据绑定【前】
- 4 回调函数【选学】
- 第二章 教师管理
- 第一节 数据库初始化
- 第二节 CRUD之R查数据
- 1 原型初始化【前】
- 2 连接数据库【后】
- 3 使用JDBC读取数据【后】
- 4 前后台对接
- 5 ng-if【前】
- 6 日期管道【前】
- 第三节 CRUD之C增数据
- 1 新建组件并映射路由【前】
- 2 模板驱动表单【前】
- 3 httpClient post请求【前】
- 4 保存数据【后】
- 5 组件间调用【前】
- 第四节 CRUD之U改数据
- 1 路由参数【前】
- 2 请求映射【后】
- 3 前后台对接【前】
- 4 更新数据【前】
- 5 更新某个教师【后】
- 6 路由器链接【前】
- 7 观察者模式【前】
- 第五节 CRUD之D删数据
- 1 绑定到用户输入事件【前】
- 2 删除某个教师【后】
- 第六节 代码重构
- 1 文件夹化【前】
- 2 优化交互体验【前】
- 3 相对与绝对地址【前】
- 第三章 班级管理
- 第一节 JPA初始化数据表
- 第二节 班级列表
- 1 新建模块【前】
- 2 初识单元测试【前】
- 3 初始化原型【前】
- 4 面向对象【前】
- 5 测试HTTP请求【前】
- 6 测试INPUT【前】
- 7 测试BUTTON【前】
- 8 @RequestParam【后】
- 9 Repository【后】
- 10 前后台对接【前】
- 第三节 新增班级
- 1 初始化【前】
- 2 响应式表单【前】
- 3 测试POST请求【前】
- 4 JPA插入数据【后】
- 5 单元测试【后】
- 6 惰性加载【前】
- 7 对接【前】
- 第四节 编辑班级
- 1 FormGroup【前】
- 2 x、[x]、{{x}}与(x)【前】
- 3 模拟路由服务【前】
- 4 测试间谍spy【前】
- 5 使用JPA更新数据【后】
- 6 分层开发【后】
- 7 前后台对接
- 8 深入imports【前】
- 9 深入exports【前】
- 第五节 选择教师组件
- 1 初始化【前】
- 2 动态数据绑定【前】
- 3 初识泛型
- 4 @Output()【前】
- 5 @Input()【前】
- 6 再识单元测试【前】
- 7 其它问题
- 第六节 删除班级
- 1 TDD【前】
- 2 TDD【后】
- 3 前后台对接
- 第四章 学生管理
- 第一节 引入Bootstrap【前】
- 第二节 NAV导航组件【前】
- 1 初始化
- 2 Bootstrap格式化
- 3 RouterLinkActive
- 第三节 footer组件【前】
- 第四节 欢迎界面【前】
- 第五节 新增学生
- 1 初始化【前】
- 2 选择班级组件【前】
- 3 复用选择组件【前】
- 4 完善功能【前】
- 5 MVC【前】
- 6 非NULL校验【后】
- 7 唯一性校验【后】
- 8 @PrePersist【后】
- 9 CM层开发【后】
- 10 集成测试
- 第六节 学生列表
- 1 分页【后】
- 2 HashMap与LinkedHashMap
- 3 初识综合查询【后】
- 4 综合查询进阶【后】
- 5 小试综合查询【后】
- 6 初始化【前】
- 7 M层【前】
- 8 单元测试与分页【前】
- 9 单选与多选【前】
- 10 集成测试
- 第七节 编辑学生
- 1 初始化【前】
- 2 嵌套组件测试【前】
- 3 功能开发【前】
- 4 JsonPath【后】
- 5 spyOn【后】
- 6 集成测试
- 7 @Input 异步传值【前】
- 8 值传递与引入传递
- 9 @PreUpdate【后】
- 10 表单验证【前】
- 第八节 删除学生
- 1 CSS选择器【前】
- 2 confirm【前】
- 3 功能开发与测试【后】
- 4 集成测试
- 5 定制提示框【前】
- 6 引入图标库【前】
- 第九节 集成测试
- 第五章 登录与注销
- 第一节:普通登录
- 1 原型【前】
- 2 功能设计【前】
- 3 功能设计【后】
- 4 应用登录组件【前】
- 5 注销【前】
- 6 保留登录状态【前】
- 第二节:你是谁
- 1 过滤器【后】
- 2 令牌机制【后】
- 3 装饰器模式【后】
- 4 拦截器【前】
- 5 RxJS操作符【前】
- 6 用户登录与注销【后】
- 7 个人中心【前】
- 8 拦截器【后】
- 9 集成测试
- 10 单例模式
- 第六章 课程管理
- 第一节 新增课程
- 1 初始化【前】
- 2 嵌套组件测试【前】
- 3 async管道【前】
- 4 优雅的测试【前】
- 5 功能开发【前】
- 6 实体监听器【后】
- 7 @ManyToMany【后】
- 8 集成测试【前】
- 9 异步验证器【前】
- 10 详解CORS【前】
- 第二节 课程列表
- 第三节 果断
- 1 初始化【前】
- 2 分页组件【前】
- 2 分页组件【前】
- 3 综合查询【前】
- 4 综合查询【后】
- 4 综合查询【后】
- 第节 班级列表
- 第节 教师列表
- 第节 编辑课程
- TODO返回机制【前】
- 4 弹出框组件【前】
- 5 多路由出口【前】
- 第节 删除课程
- 第七章 权限管理
- 第一节 AOP
- 总结
- 开发规范
- 备用