# 如何在 Eclipse IDE 中创建和运行 Servlet
> 原文: [https://beginnersbook.com/2017/07/how-to-create-and-run-servlet-in-eclipse-ide/](https://beginnersbook.com/2017/07/how-to-create-and-run-servlet-in-eclipse-ide/)
这是安装 Eclipse,设置 apache tomcat 服务器和运行第一个 hello world servlet 应用的完整指南。
## 下载 Eclipse IDE
**在 Windows 上安装 Eclipse**
转到此链接 [https://www.eclipse.org/downloads](https://www.eclipse.org/downloads) 。在“获取 Eclipse Oxygen”下单击“下载软件包”下载“Eclipse IDE for Java Developers”。您会在右侧看到两个选项(32 位和 64 位),如果系统是 32 位,则单击 32 位,否则单击 64 位。这将在您的系统上下载压缩文件。
要安装 Eclipse,请解压缩下载的文件并将解压缩的文件夹复制到所需的位置。
**在 Mac OS X 上安装 Eclipse**
转到此链接 [https://www.eclipse.org/downloads](https://www.eclipse.org/downloads) 。在“获取 Eclipse Oxygen”下单击“下载软件包”❯下载“Eclipse IDE for Java Developers”。要下载点击 64 位,它将下载一个 TAR 文件。
下载完成后,双击 TAR 文件,它会将文件的内容提取到一个文件夹中。将文件夹拖到“Applications”文件夹。
**要启动 Eclipse** ,请单击 Eclipse 文件夹中的 Eclipse 图标。 Mac 用户可以将其拖到停靠区域以从桌面快速启动 Eclipse,类似 Windows 可以在桌面上创建 Eclipse 的快捷方式。
## 在 Eclipse 中安装和配置 Apache tomcat 服务器
要在 Eclipse IDE 中运行 Servlet,您需要在 Eclipse IDE 中配置 Apache tomcat Server。
> 如果您没有它,请参阅本教程:[如何在 Eclipse IDE](https://beginnersbook.com/2017/06/how-to-configure-apache-tomcat-server-in-eclipse-ide/) 中下载和配置 Apache Tomcat 服务器。
注意:我上面提供的链接属于 JSP 教程,但 Servlet 的步骤也是如此。
## 在 Eclipse IDE 中创建 Servlet
### 第 1 步:创建项目:
让我们在 Eclipse 中创建一个 Servlet 应用。打开 Eclipse,然后单击“文件❯新建❯动态 Web 项目”。
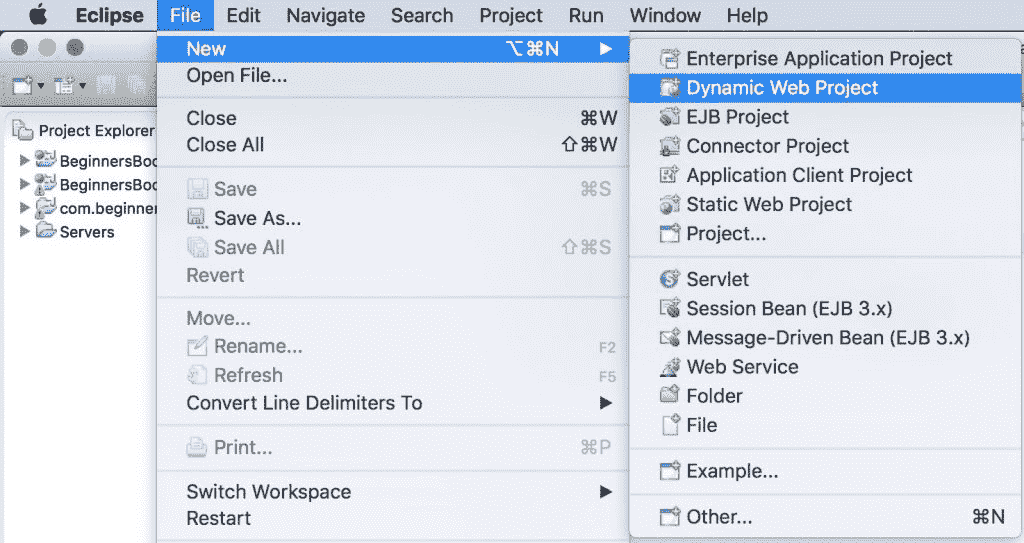
> 如果您在 Eclipse 中没有看到动态 Web 项目选项,请参阅本教程:[如何修复 Eclipse 问题中缺少的“动态 Web 项目”](https://beginnersbook.com/2017/06/how-to-fix-dynamic-web-project-missing-in-eclipse-issue/)
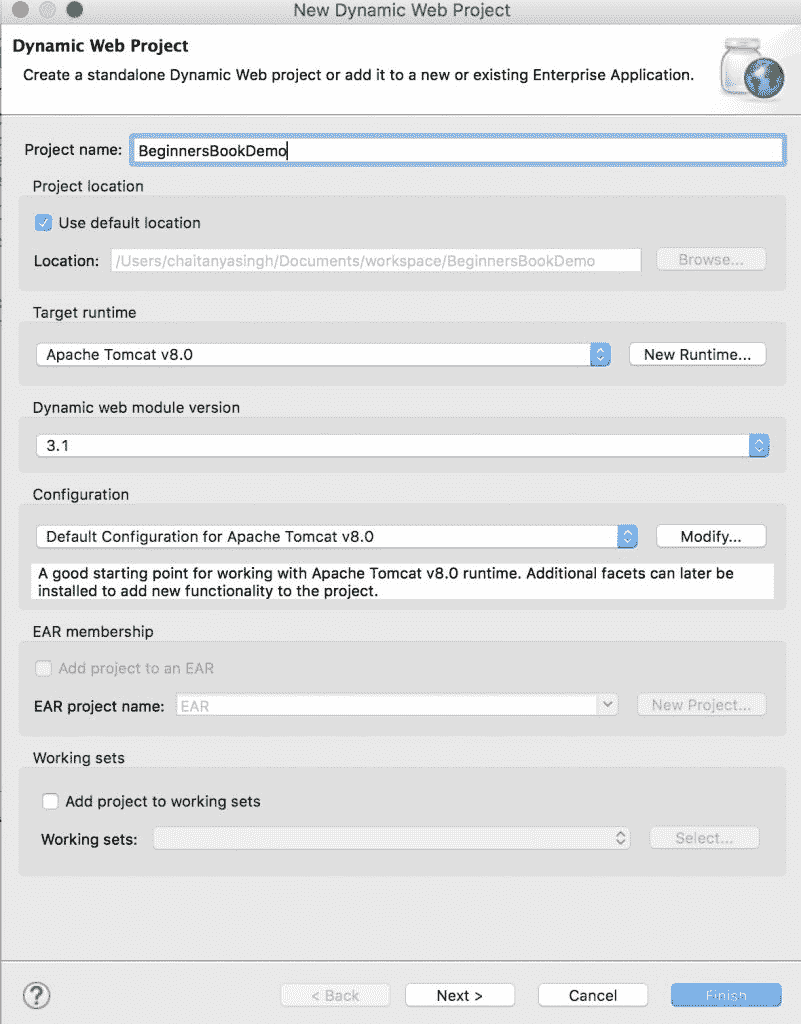
提供项目名称,然后单击下一步
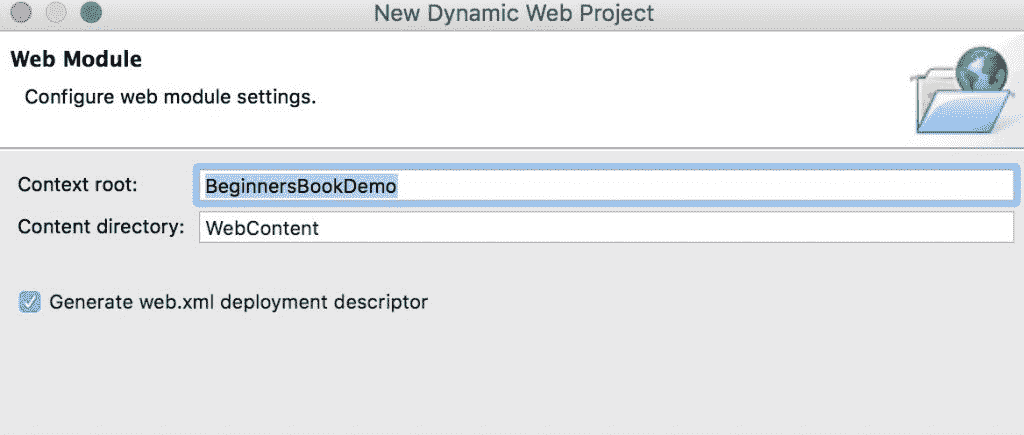
勾选显示**生成`web.xml`部署描述符**的复选框
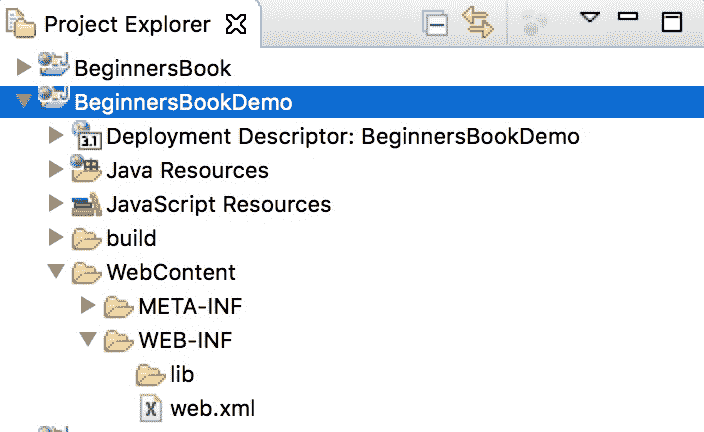
**初始项目结构:**
项目创建后,层次结构(项目结构)如下所示:
### 第 2 步:创建 Servlet 类:
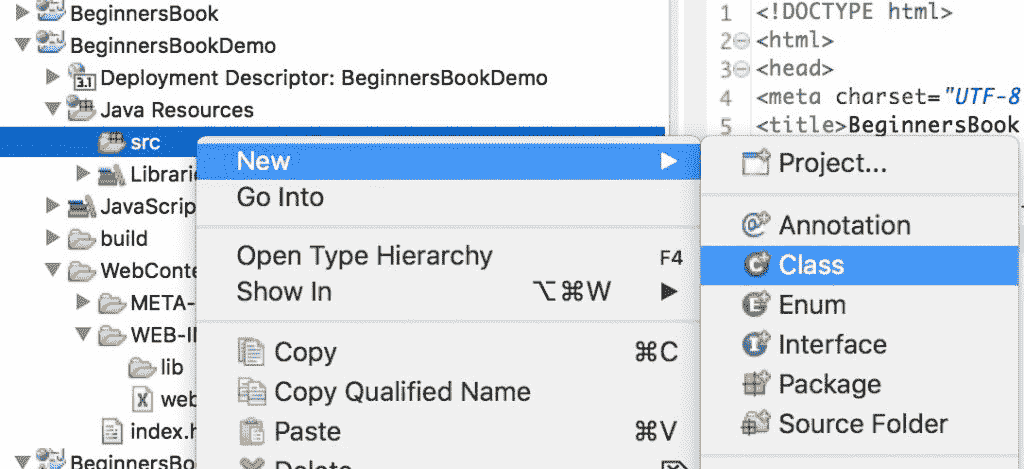
我们通过扩展`HttpServlet`类来创建一个`HttpServlet`。右键单击`src`文件夹并创建一个新的类文件,将该文件命名为`MyServletDemo`。文件路径应如下所示:`Java Resources/src/default package/MyServletDemo.java`
`MyServletDemo.java`
```java
import java.io.*;
import javax.servlet.*;
import javax.servlet.http.*;
// Extend HttpServlet class to create Http Servlet
public class MyServletDemo extends HttpServlet {
private String mymsg;
public void init() throws ServletException {
mymsg = "Hello World!";
}
public void doGet(HttpServletRequest request,
HttpServletResponse response)
throws ServletException, IOException
{
// Setting up the content type of webpage
response.setContentType("text/html");
// Writing message to the web page
PrintWriter out = response.getWriter();
out.println("<h1>" + mymsg + "</h1>");
}
public void destroy() {
/* leaving empty for now this can be
* used when we want to do something at the end
* of Servlet life cycle
*/
}
}
```
### 第 3 步:创建一个 html 页面来调用网页上的 servlet 类
我们正在创建一个 html 文件,一旦我们点击网页上的链接就会调用 servlet。在`WebContent`文件夹中创建此文件。文件的路径应如下所示:`WebContent/index.html`
`index.html`
```java
<!DOCTYPE html>
<html>
<head>
<meta charset="UTF-8">
<title>BeginnersBook Servlet Demo</title>
</head>
<body>
<a href="welcome">Click to call Servlet</a>
</body>
</html>
```
**编辑`web.xml`文件**
此文件可在此路径`WebContent/WEB-INF/web.xml`中找到。在此文件中,我们将使用特定 URL 映射 Servlet。由于我们在单击`index.html`页面上的链接时调用欢迎页面,因此我们将欢迎页面映射到我们上面创建的 Servlet 类。
```java
<web-app>
<display-name>BeginnersBookDemo</display-name>
<welcome-file-list>
<welcome-file>index.html</welcome-file>
<welcome-file>index.htm</welcome-file>
<welcome-file>index.jsp</welcome-file>
<welcome-file>default.html</welcome-file>
<welcome-file>default.htm</welcome-file>
<welcome-file>default.jsp</welcome-file>
</welcome-file-list>
<servlet>
<servlet-name>MyHttpServletDemo</servlet-name>
<servlet-class>MyServletDemo</servlet-class>
</servlet>
<servlet-mapping>
<servlet-name>MyHttpServletDemo</servlet-name>
<url-pattern>/welcome</url-pattern>
</servlet-mapping>
</web-app>
```
**最终项目结构**
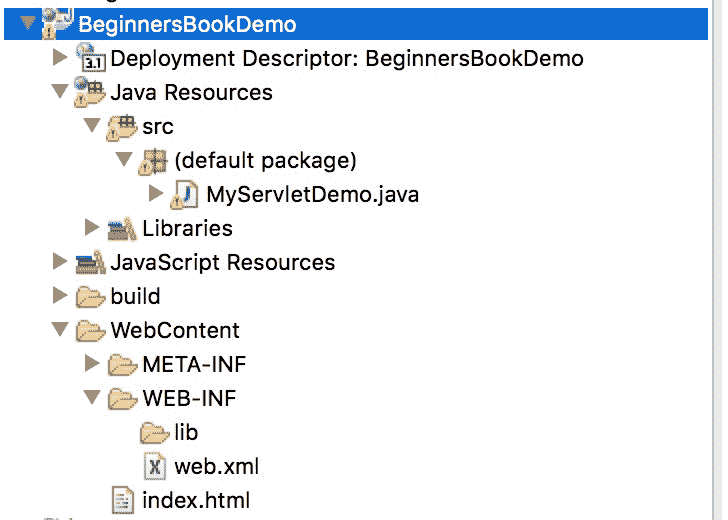
**运行项目:**
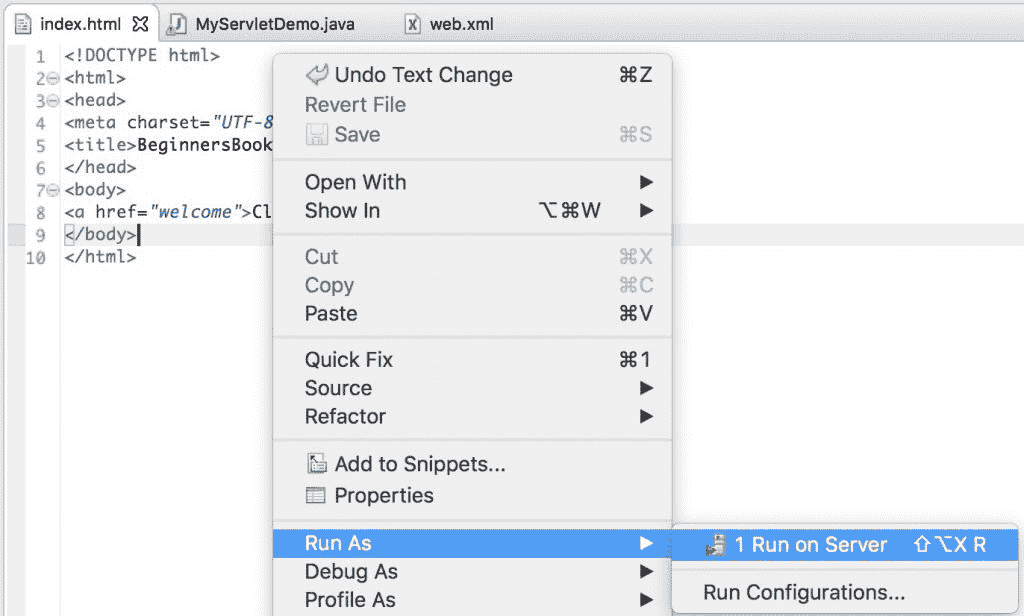
右键单击`index.html`,在服务器上运行。
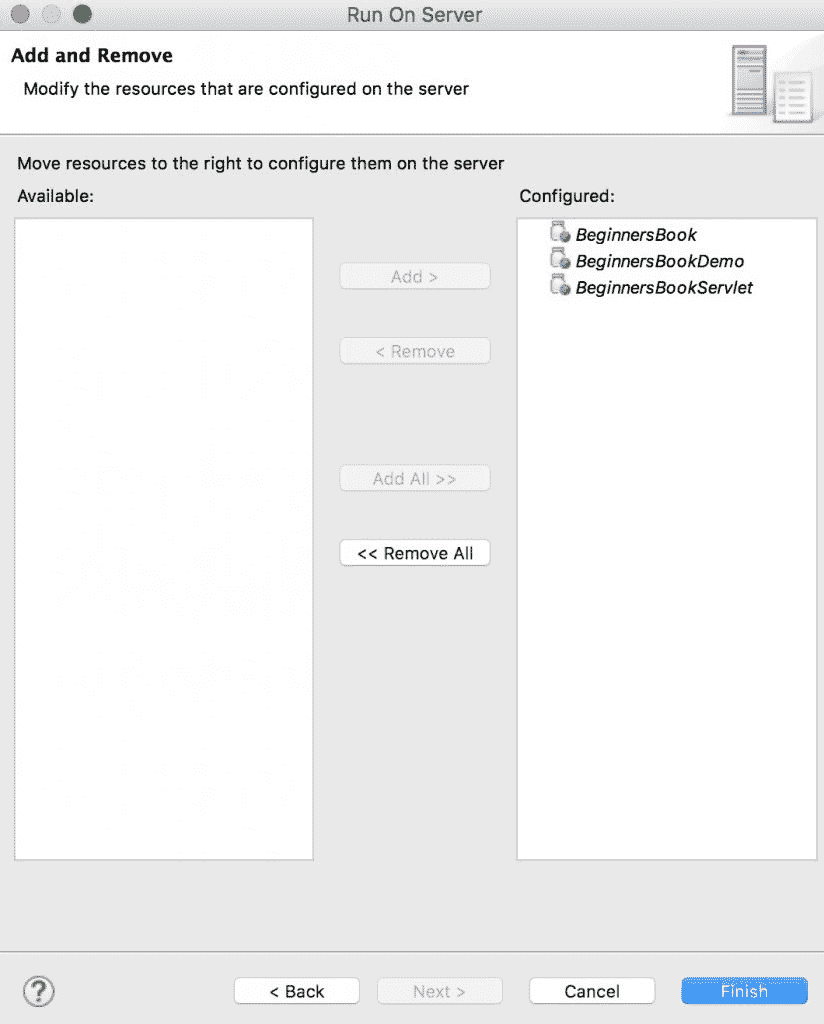
单击“全部添加”以在服务器上部署项目。单击完成
**输出:**

单击链接后,您将看到此屏幕:

- BeginnersBook C 语言教程
- 首先学习 C 基础知识
- 如何安装 Turbo C++:编译并运行 C 程序
- C 程序结构 - 第一个 C 程序
- C 关键词 - 保留字
- C 中的决策控制语句
- C 编程中的if语句
- C - if..else,嵌套if..else 和 else..if语句
- C 编程的switch-case语句
- C 中的循环
- C 编程中for的循环
- C 编程中的while循环
- C 编程的do-while循环
- C - 循环控制语句
- C 编程中的break语句
- C - continue语句
- C - goto语句
- C 中的数组教程
- C 编程中的数组
- C 编程中的二维(2D)数组
- C 编程中的指针和数组
- 在 C 编程中将数组传递给函数
- C - 字符串
- C - 字符串和字符串函数
- C 中的函数
- C 编程中的函数
- C 编程中的按值函数调用
- C 编程中的按引用函数调用
- 结构体
- C 编程中的结构
- C 编程中的指针
- C 编程中的指针
- C - 指向指针的指针(双重指针)
- C - 函数指针
- 将指针传递给 C 中的函数
- 文件 I/O
- 在 C 编程中进行文件 I/O
- 运算符优先级表
- C 编程语言中的运算符优先级和关联性
- C 示例
- 带输出的 C 编程示例
- C 库函数教程
- C strcat()函数
- C strncat()函数
- C strchr()函数
- C strcmp()函数
- C strncmp()函数
- C strcoll()函数
- C strcpy()函数
- C strncpy()函数
- C strrchr()函数
- C strspn()函数
- C strstr()函数
- C strcspn()函数
- C strlen()函数
- BeginnersBook C 语言示例
- 简单的 C 程序
- C 语言中的 Hello World 程序
- C 程序:检查给定的整数是正还是负
- C 程序:使用递归函数反转给定的数字
- C 程序:查找最大的三个数字
- C 程序:显示 Fibonacci 序列
- C 程序:使用递归查找数字的阶乘
- C 程序:查找给定范围内的素数
- C 程序:检查阿姆斯特朗数
- C 程序:检查数字是否为回文数
- C 程序:查找给定范围内的回文数
- C 程序:检查数字是偶数还是奇数
- C 程序:查找字符的 ASCII 值
- C 程序:查找int,float,double和char的大小
- C 程序:检查字母是元音还是辅音
- CC 程序:检查闰年
- C 程序:查找前 n 个自然数的和
- 字符串程序
- C 程序:将大写字符串转换为小写字符串
- C 程序:将小写字符串转换为大写字符串
- C 程序:按字母顺序对字符串集进行排序
- C 程序:在不使用函数strlen()的情况下查找字符串的长度
- C 程序:在不使用strcat的情况下连接两个字符串
- C 程序:使用递归来反转字符串
- 数组程序
- C 程序:按升序排列数字
- C 程序:查找数组的最大元素
- C 程序:使用指针,递归和函数来查找数组元素的总和
- C 程序:查找数组中的元素数
- 排序程序
- C 冒泡排序程序
- C 中的插入排序程序
- C 中的选择排序程序
- C 中的快速排序程序
- C 指针程序
- C 程序:使用指针查找最大的三个数字
- C 程序:使用指针计算字符串中的元音和辅音
- C 程序:使用指针打印字符串
- C 程序:使用指针交换两个数字
- C 程序:创建,初始化和访问指针变量
- 计算程序
- C 程序:计算并打印 nPr 的值
- C 程序:计算并打印 nCr 的值
- C 程序:两个浮点数相乘
- C 程序:查找商和余数
- C 程序查找两个数字的平均值
- 数字系统转换程序
- C 程序:将二进制数转换为十进制数
- C 程序:将十进制数转换为二进制数
- C 程序:将十进制数转换为八进制数
- C 程序:将八进制数转换为十进制数
- C 程序:将二进制数转换为八进制数
- C 程序:将八进制数转换为二进制数
- 查找几何图形区域的程序
- C 程序:计算圆的面积和周长
- C 程序:计算等边三角形的面积
- BeginnersBook C++ 教程
- 基础
- Hello World - 第一个 C++ 程序
- C++ 中的变量
- C++ 中的数据类型
- C++ 中的运算符
- 控制语句
- C++ 中的if语句
- C++ 中的switch-case语句
- C++ 中的for循环
- C++ 中的while循环
- C++ 中的do-while循环
- C++ 中的continue语句
- C++ 中的break语句
- C++ 中的goto语句
- 函数
- C++ 中的函数
- C++ 函数中的默认参数
- C++ 递归
- 数组
- C++ 中的数组
- C++ 中的多维数组
- 在 C++ 中将数组传递给函数
- C++ 中的字符串
- 指针
- C++ 中的指针
- C++ this指针
- OOP
- C++ 中的 OOP 概念
- C++ 中的构造函数
- C++ 中的析构函数
- C++ 中的结构
- C++ 中的结构和函数
- C++ 中的枚举
- C++ 中的继承
- C++ 中的多态
- C++ 中的函数重载
- C++ 函数覆盖
- C++ 中的虚函数:运行时多态
- C++ 封装
- C++ 中的抽象
- C++ 中的接口:抽象类
- 从 C++ 中的函数传递和返回对象
- C++ 中的友元类和友元函数
- BeginnersBook 数据库教程
- DBMS 简介
- 数据库应用 - DBMS
- DBMS 优于文件系统的优点
- DBMS 架构
- DBMS - 三层架构
- DBMS 中的数据视图
- DBMS 中的数据抽象
- DBMS 中的实例和模式
- DBMS 中的数据模型
- 实体关系图 - DBMS 中的 ER 图
- DBMS 泛化
- DBMS 特化
- DBMS 聚合
- DBMS 中的关系模型
- RDBMS 概念
- DBMS 中的分层模型
- DBMS 语言
- DBMS 关系代数
- DBMS 关系演算
- DBMS 中的键
- DBMS 中的主键
- DBMS 中的超键
- DBMS 中的候选键
- DBMS 中的替代键
- DBMS 中的复合键
- DBMS 中的外键
- DBMS 中的约束
- DBMS 中的域约束
- DBMS 中的映射约束
- DBMS 中的基数
- DBMS 中的函数依赖
- DBMS 中的平凡函数依赖
- DBMS 中的非平凡函数依赖
- DBMS 中的多值依赖
- DBMS 中的传递依赖
- DBMS 中的范式:数据库中的 1NF,2NF,3NF 和 BCNF
- DBMS 中的事务管理
- DBMS 中的 ACID 属性
- DBMS 事务状态
- DBMS 调度和调度类型
- DBMS 可串行化
- DBMS 冲突可串行化
- DBMS 查看可串行化
- DBMS 中的死锁
- DBMS 中的并发控制
- BeginnersBook Java 教程
- Java 基础知识教程
- Java 编程简介
- Java 虚拟机(JVM),JDK 差异,JRE 和 JVM - 核心 Java
- 如何编译和运行您的第一个 Java 程序
- Java 中的变量
- Java 中的数据类型
- Java 中的运算符
- Java 中的if和if-else语句
- Java 中的switch-case语句
- Java 中的for循环
- Java 中的while循环
- Java 中的 do-while 循环示例
- Java continue语句
- Java 中的break语句
- Java OOP 教程
- Java 中的构造函数 - 一个完整的研究
- Java - 静态类,块,方法和变量
- Java 编程中的继承
- Java 中的继承类型:单一,多重,多级和混合
- OOP 概念 - 什么是 java 中的聚合?
- OOP 概念 - java 中的关联是什么?
- java 中的super关键字
- Java 中的方法重载
- java 中的方法覆盖
- java 中方法重载和覆盖之间的区别
- Java 中的多态
- java 的多态类型 - 运行时和编译时多态
- java 中的静态和动态绑定
- Java 中的抽象类
- Java 中的抽象方法
- java 中的接口
- Java 中抽象类和接口的区别
- Java 中的封装
- java 中的包以及如何使用它们
- Java 访问修饰符 - 公共、私有、受保护和默认
- Java 中的垃圾收集
- Java 中的final关键字 - final变量,方法和类
- Java 异常处理教程
- java 中的异常处理
- Java 中的try-catch - 异常处理
- Java finally块 - 异常处理
- 如何在 java 中抛出异常
- java 中的用户定义的异常
- Java 异常处理
- Java 注解,枚举和正则表达式教程
- Java 枚举教程
- Java 注解教程
- Java 正则表达式教程
- 其它核心 Java 教程
- Java - String类及其方法
- java 多线程
- Java 序列化
- Java AWT 初学者教程
- 适合初学者的 Java Swing 教程
- Java 自动装箱和拆箱
- Java 中的包装类
- Java 8 教程
- Java Lambda 表达式教程
- Java 8 中的方法引用
- Java 函数式接口
- Java 8 流教程
- Java 8 流过滤器
- Java 8 接口更改 - 默认方法和静态方法
- Java 8 forEach方法
- Java 8 - Stream Collectors类
- Java 8 StringJoiner
- Java 8 Optional类
- Java 8 - 数组并行排序
- Java 9 特性
- Java 9 JShell(Java Shell) - REPL
- Java 9 - 创建不可变List的工厂方法
- Java 9 - 创建不可变Set的工厂方法
- Java 9 - 用于创建不可变Map的工厂方法
- Java 9 - 接口中的私有方法
- Java 9 - try-with-resource改进
- Java 9 - 匿名内部类和菱形运算符
- Java 9 - @SafeVarargs注解
- Java 9 - 流 API 改进
- 在 15 分钟内学习 Java 9 模块
- BeginnersBook Java 集合教程
- Java 集合 - List
- ArrayList
- ArrayList基础知识
- java 中的ArrayList - 集合框架
- 如何初始化ArrayList
- 如何在 Java 中遍历ArrayList
- 如何在 Java 中查找ArrayList的长度
- ArrayList排序
- 如何在 Java 中对ArrayList进行排序
- 如何在 Java 中按降序对ArrayList进行排序
- Java ArrayList对象排序(Comparable和Comparator)
- ArrayList添加/删除
- Java ArrayList add()方法
- Java ArrayList add(int index, E element)
- Java ArrayList addAll(Collection c)方法
- 如何在 Java 中将所有List元素复制并添加到ArrayList
- Java ArrayList addAll(int index, Collection c)方法
- Java ArrayList remove(int index)方法
- Java ArrayList remove(Object obj)方法
- 在ArrayList中获取/搜索
- 如何获取ArrayList的子列表
- JavaArrayList lastIndexOf(Object Obj)方法
- Java ArrayList get()方法
- Java ArrayList indexOf()方法
- Java ArrayList contains()方法
- 关于ArrayList的其他教程
- 如何在 Java 中比较两个ArrayList
- 如何在 java 中同步ArrayList
- 如何交换ArrayList中的两个元素
- 如何在 Java 中覆盖ArrayList的toString方法
- 如何在 java 中序列化ArrayList
- 如何在 java 中连接/组合两个ArrayList
- 如何将ArrayList克隆到另一个ArrayList
- 如何在 Java 中清空ArrayList
- Java ArrayList isEmpty()方法
- Java ArrayList trimToSize()方法
- Java ArrayList set()方法示例
- Java ArrayList ensureCapacity()方法
- ArrayList转换
- 如何在 java 中将ArrayList转换为字符串数组
- 如何在 java 中将数组转换为ArrayList
- 差异
- java 中ArrayList和Vector之间的区别
- Java 中ArrayList和HashMap的区别
- Java 中ArrayList和LinkedList的区别
- 链表
- LinkedList基础知识
- Java 中的LinkedList
- 如何在 Java 中遍历LinkedList
- LinkedList添加/删除
- 使用add(E e)方法向LinkedList添加元素
- Java - 在LinkedList的特定索引处添加元素
- Java - 在LinkedList的开头和结尾添加元素
- 在 Java 中将LinkedList添加到LinkedList的前面
- Java - 从LinkedList删除第一个和最后一个元素
- Java - 从LinkedList的特定索引删除元素
- Java - 从LinkedList删除特定元素
- Java - 从LinkedList删除所有元素
- 将List的所有元素附加到LinkedList
- 在链表中获取/搜索
- Java - 从LinkedList获取第一个和最后一个元素
- Java - 从LinkedList的特定索引获取元素
- Java - 在LinkedList中搜索元素
- Java - 从LinkedList获取子列表
- LinkedList Iterator / ListIterator
- Java - LinkedList Iterator
- Java - LinkedList ListIterator
- 以反向顺序迭代LinkedList
- LinkedList上的其他教程
- Java - 替换LinkedList中的元素
- Java - 检查LinkedList中是否存在特定元素
- 在 Java 中克隆一个通用的LinkedList
- Java - 获取LinkedList中元素的最后一次出现的索引
- LinkedList push()和pop()方法
- Java - LinkedList poll(),pollFirst()和pollLast()方法
- Java - LinkedList peek(),peekFirst()和peekLast()方法
- 转换
- Java - 将LinkedList转换为ArrayList
- 如何使用 Java 中的toArray()将LinkedList转换为数组
- Vector
- Vector基础知识
- Java 中的Vector
- 如何在 java 中获取Vector的子列表
- 如何使用 Java 中的Collections.sort对Vector进行排序
- 使用索引在 Java 中搜索元素
- 将一个Vector的所有元素复制到另一个Vector
- Vector中的删除/排序/替换
- 删除Vector元素
- 如何在 java 中使用索引删除Vector元素
- 从 Java 中的Vector中删除所有元素
- 使用索引替换Vector元素
- 如何设置Vector大小
- Iterator/ListIterator/Enum
- Java 中的Vector Enumeration
- Java 中的Vector迭代器
- Java 中的Vector ListIterator
- 转换
- Java - 将Vector转换为List
- Java - 将Vector转换为ArrayList
- 如何在 java 中将Vector转换为字符串数组
- Java 集合 - Set
- HashSet
- Java 中的HashSet类
- 从HashSet中删除所有元素
- 如何迭代Set/HashSet
- 将HashSet转换为数组
- 如何将HashSet转换为TreeSet
- 将HashSet转换为List / ArrayList
- HashSet和HashMap之间的区别
- LinkedHashSet
- Java 中的LinkedHashSet类
- Java 中List和Set之间的区别
- TreeSet
- Java 中的TreeSet类
- HashSet和TreeSet之间的区别
- Java 集合 - Map
- HashMap
- HashMap基础知识
- Java 中的HashMap
- 如何在 java 中循环HashMap
- 如何按键和值对 Java 中的HashMap进行排序
- Java - 获取HashMap的大小
- Java - 从HashMap中删除映射
- Java - 从HashMap中删除所有映射
- 如何检查HashMap是否为空?
- 在HashMap中获取/搜索
- Java - 检查HashMap中是否存在特定键
- Java - 检查HashMap中是否存在特定值
- 序列化/同步
- 如何在 java 中序列化HashMap
- 如何在 Java 中同步HashMap
- 差异
- HashMap和Hashtable之间的区别
- HashSet和HashMap之间的区别
- 关于HashMap的其他教程
- Java - HashMap Iterator
- 何将一个hashmap内容复制到另一个hashmap
- HashMap - 从键中获取值
- Java - 从HashMap获取键集视图
- 用 Java 克隆HashMap
- TreeMap
- Java 中的TreeMap
- TreeMap Iterator示例 - Java
- 如何在 java 中按值对TreeMap进行排序
- 如何在 Java 中以相反的顺序迭代TreeMap
- 如何从TreeMap中获取子映射 - Java
- LinkedHashMap
- Java 中的LinkedHashMap
- HashTable
- java 中的Hashtable
- Java 集合 - Iterator/ListIterator
- Java Iterator
- Java 中的ListIterator
- Comparable和Comparator接口
- Java 中的Comparable接口
- Java 中的Comparator接口
- 集合面试问题
- Java 集合面试问题和解答
- BeginnersBook Java 示例
- Java 基础程序
- Java 程序:相加两个数字
- Java 程序:检查偶数或奇数
- Java 程序:相加两个二进制数
- Java 程序:相加两个复数
- Java 程序:乘以两个数字
- Java 程序:检查闰年
- Java 程序:使用Switch Case检查元音或辅音
- Java 程序:计算复合利率
- Java 程序:计算简单利率
- Java 程序:查找商和余数
- Java 字符串程序
- 如何在 Java 中将字符串转换为char
- Java 程序:在String中查找重复的字符
- java 程序:使用Stack,Queue,for或while循环检查回文串
- Java 程序:按字母顺序排序字符串
- Java 程序:反转String中的单词
- Java 程序:对字符串执行冒泡排序
- Java 程序:查找字符串中字符的出现
- Java 程序:计算字符串中的元音和辅音
- Java 数组程序
- Java 程序:使用数组计算平均值
- Java 程序:汇总数组的元素
- Java 程序:反转数组
- Java 程序:按升序排序数组
- 如何在 Java 中将char数组转换为字符串?
- Java 递归程序
- Java 程序:使用for,while和递归来反转一个数字
- java 程序:使用递归检查回文字符串
- Java 程序:使用递归来反转字符串
- java 程序:使用递归查找给定数字的阶乘
- Java 数字程序
- Java 程序:显示前n个或前 100 个素数
- Java 程序:显示 1 到 100 和 1 到n的素数
- Java 程序:将Integer分解为数字
- Java 程序:检查素数
- Java 程序:检查给定数字是否为完美平方
- Java 程序:不使用sqrt查找数字的平方根
- Java 程序:在给定范围之间打印 Armstrong 数字
- Java 程序:查找自然数之和
- Java 程序:用于检查数字是正还是负
- Java 程序:生成随机数
- Java 程序:检查 Armstrong 数
- Java 程序:查找两个数字的 GCD
- Java 程序:找到三个数字中最大的一个
- Java 程序:使用按位 XOR 运算符交换两个数字
- Java 程序:使用三元运算符查找最小的三个数字
- Java 程序:使用三元运算符查找三个数字中的最大数字
- Java 程序:打印备用素数
- Java 程序:打印 1 到n或 1 到 100 的偶数
- Java 程序:打印 1 到n或 1 到 100 的奇数
- Java 输入/输出程序
- Java 程序:从标准输入读取整数值
- Java 程序:获取 IP 地址
- Java 程序:从用户获取输入
- Java 程序:几何计算
- Java 程序:计算矩形面积
- Java 程序:计算正方形的面积
- Java 程序:计算三角面积
- Java 程序:计算圆的面积和周长
- Java 排序/搜索程序
- Java 程序:升序和降序的冒泡排序
- Java 程序:线性搜索
- Java 程序:执行二分搜索
- Java 程序:选择排序
- Java 转换程序
- Java 程序:八进制到十进制的转换
- Java 程序:十进制到八进制的转换
- Java 程序:十六进制到十进制的转换
- Java 程序:十进制到十六进制的转换
- Java 程序:二进制到八进制的转换
- Java 程序:String到boolean的转换
- Java 程序:布尔值到String的转换
- Java 程序:int到char的转换
- Java 程序:char到int的转换
- Java 程序:char到String的转换
- Java 程序:long到int的转换
- Java 程序:int到long的转换
- Java 程序:十进制到二进制的转换
- Java 程序:二进制到十进制的转换
- Java 程序:查找字符的 ASCII 值
- Java 程序:String到int的转换
- Java 程序:int到String的转换
- Java 程序:String到double的转换
- Java 程序:double到字符串的转换
- Java 程序:字符串到long的转换
- Java 程序:long到字符串的转换
- 其他 Java 程序
- Java 程序:打印 Floyd 三角形
- Java 程序:打印 Pascal 三角形
- Java 程序:使用循环显示 Fibonacci 序列
- Java 程序:使用For和While循环查找阶乘
- Java 程序:使用Switch Case制作计算器
- Java 程序:计算和显示学生成绩
- Java 程序:使用方法重载执行算术运算
- Java 程序:使用方法重载查找几何图形的面积
- BeginnersBook Java IO 教程
- 如何在 Java 中创建文件
- 如何在 Java 中读取文件 - BufferedInputStream
- 如何在 java 中使用FileOutputStream写入文件
- 使用BufferedWriter,PrintWriter,FileWriter附加到 java 中的文件
- 如何在 Java 中删除文件 - delete()方法
- 如何以 GZIP 格式压缩文件
- 如何使用 Java 将文件复制到另一个文件
- 如何在 java 中获取文件的最后修改日期
- 如何在 Java 中创建只读文件
- 如何在 Java 中检查文件是否隐藏
- BeginnersBook Java 字符串教程
- Java 字符串方法
- Java String charAt()方法
- Java Stringequals()和equalsIgnoreCase()方法
- Java String compareTo()方法
- Java String compareToIgnoreCase()方法
- Java String startsWith()方法
- Java String endsWith()方法
- Java String trim()和hashCode()方法
- Java String indexOf()方法
- Java String lastIndexOf()方法
- Java - String substring()方法
- Java String concat()方法
- Java String replace(),replaceFirst()和replaceAll()方法
- Java String contains()方法
- Java - String toLowerCase()和toUpperCase()方法
- Java String intern()方法
- Java String isEmpty()方法
- Java String join()方法
- Java 正则表达式教程
- Java String split()方法
- Java String format()方法
- Java - String toCharArray()方法
- Java - String copyValueOf()方法
- Java - String getChars()方法
- Java String valueOf()方法
- Java - String contentEquals()方法
- Java - String regionMatches()方法
- Java - String getBytes()方法
- Java String length()方法
- Java - String matches()方法
- 流行的 Java 字符串教程
- Java 程序:String到int的转换
- Java 程序:int到String的转换
- Java 程序:String到double的转换
- Java 程序:double到字符串的转换
- Java 程序:字符串到long的转换
- Java 程序:long到字符串的转换
- 如何在 Java 中将InputStream转换为字符串
- String和StringBuffer之间的区别
- Java 程序:String到boolean的转换
- Java 程序:布尔值到String的转换
- 在 Java 中将String对象转换为Boolean对象
- 如何在 Java 中仅删除字符串的尾随空格
- java - 使用空格和零左填充字符串
- java - 使用空格和零右填充字符串
- Java 程序:在String中查找重复的字符
- 如何在 Java 中将字符串转换为字符
- 如何在 Java 中将char数组转换为字符串?
- 在 Java 中将String转换为日期
- 在 Java 中将Date转换为String
- Java - ASCII 到String的转换
- Java - float到String的转换
- Java - StackTrace到String的转换
- Java - Writer到String的转换
- Java - String到ArrayList转换
- Java 8 StringJoiner
- Java 程序:反转String中的单词
- Java 程序:使用递归来反转字符串
- BeginnersBook JSP 教程
- 概述
- Java 服务器页面简介
- Java 服务器页面(JSP)生命周期
- 指令
- JSP 指令 - page,include和TagLib
- JSP 中的Include指令
- JSP 带参数的include指令
- Scriptlets
- JSP Scriptlets
- 动作标签
- JSP 动作
- JSP include动作标签
- JSP 带参数的include动作
- JSP forward动作标签
- jsp:useBean,jsp:setProperty和jsp:getProperty动作标签
- 表达式
- JSP 表达式标签
- 声明
- JSP 声明标签 - JSP 教程
- JSP 隐式对象
- Jsp 隐式对象
- JSP 中的out隐式对象
- JSP 中的request隐式对象
- JSP 中的response隐式对象
- JSP 中的Session隐式对象
- JSP 中的application隐式对象
- JSP 中的exception隐式对象
- JSP 中的pageContext隐式对象
- JSP 中的config隐式对象
- JSP 中的表达式语言(EL)
- JSP 表达式语言(EL)
- 异常处理
- JSP 中的异常处理
- 自定义标签
- JSP 自定义标签
- 如何访问自定义标签的主体
- BeginnersBook JSTL 教程
- JSTL 核心标签
- JSTL<c:out>核心标签
- JSTL<c:set>核心标签
- JSTL<c:delete>核心标签
- JSTL<c:if>核心标签
- JSTL<c:choose>,<c:when>,<c:otherwise>核心标签
- JSTL<c:catch>核心标签
- JSTL<c:import>核心标签
- JSTL<c:forEach>和<c:forTokens>核心标签
- JSTL<c:param>核心标签
- JSTL<c:url>核心标签
- JSTL<c:redirect>核心标签
- JSTL 函数
- fn:contains() - JSTL 函数
- fn:containsIgnoreCase() - JSTL 函数
- fn:indexOf() - JSTL 函数
- fn:escapeXml() - JSTL 函数
- fn:join()和fn:split()JSTL 函数
- fn:length() - JSTL 函数
- fn:trim()和fn:startsWith()JSTL 函数
- fn:endsWith() - JSTL 函数
- fn:substring(),fn:substringAfter()和fn:substringBefore()函数
- fn:toUpperCase() - JSTL 函数
- fn:toLowerCase() - JSTL 函数
- fn:replace() - JSTL 函数
- BeginnersBook Kotlin 教程
- BeginnersBook MongoDB 教程
- NoSQL 数据库简介
- MongoDB 简介
- 将关系数据库映射到 MongoDB
- 如何为 Windows 安装和配置 MongoDB
- 在 MongoDB 中创建数据库
- 删除 MongoDB 中的数据库
- 在 MongoDB 中创建集合
- 删除 MongoDB 中的集合
- MongoDB 插入文档
- MongoDB 使用find()方法查询文档
- MongoDB - 更新集合中的文档
- MongoDB 从集合中删除文档
- MongoDB 投影
- MongoDB - limit()和skip()方法
- MongoDB sort()方法
- MongoDB 索引教程
- BeginnersBook Perl 教程
- 在 Windows,Mac,Linux 和 Unix 上安装 Perl
- 第一个 Perl 计划
- Perl 语法
- Perl 中的数据类型
- Perl 变量
- my关键字 - Perl 中的本地和全局变量
- Perl 中的标量
- Perl 中的use strict和use warnings
- Perl - 列表和数组
- Perl 中的哈希
- Perl 运算符 - 完整指南
- Perl 中的条件语句
- Perl 中的if语句
- Perl 中的if-else语句
- perl 中的if-elsif-else语句
- Perl 中的unless语句
- Perl 中的unless-else语句
- Perl 中的unless-elsif语句
- Perl 中的Switch Case
- Perl 中的given-when-default语句
- Perl 中的循环和循环控制语句
- Perl 中的for循环
- Perl while循环
- Perl - do-while循环
- Perl - foreach循环
- Perl 中的until循环
- Perl 中的子程序
- Perl - 字符串
- Perl 字符串转义序列
- BeginnersBook Servlet 教程
- 适用于初学者的 Servlet 教程
- Servlet API
- Servlet接口解释
- GenericServlet类
- HttpServlet类
- 如何在 Eclipse IDE 中创建和运行 Servlet
- Servlet 生命周期
- Servlet 的工作原理
- 项目的web.xml文件中的welcome-file-list标签
- 如何在web.xml文件中使用load-on-startup标签
- ServletRequest接口
- Servlet 中的RequestDispatcher方法
- ServletConfig接口
- ServletContext接口
- ServletResponse接口
- Servlet 中的HttpSession
- Servlet 中的Cookie
- Servlet 面试问答
