## **Pro v2.0 版本nignx服务器客服端配置说明**
1.复制以下内容
~~~
#PROXY-START/
location ~* \.(php|jsp|cgi|asp|aspx)$
{
proxy_pass http://127.0.0.1:20199;
proxy_set_header Host $host;
proxy_set_header X-Real-IP $remote_addr;
proxy_set_header X-Forwarded-For $proxy_add_x_forwarded_for;
proxy_set_header REMOTE-HOST $remote_addr;
}
location /
{
if (!-e $request_filename) {
proxy_pass http://127.0.0.1:20199;
}
proxy_http_version 1.1;
proxy_read_timeout 360s;
proxy_redirect off;
proxy_set_header Upgrade $http_upgrade;
proxy_set_header Connection "upgrade";
proxy_set_header Host $host;
proxy_set_header X-Real-IP $remote_addr;
proxy_set_header X-Forwarded-For $proxy_add_x_forwarded_for;
proxy_set_header REMOTE-HOST $remote_addr;
add_header X-Cache $upstream_cache_status;
#Set Nginx Cache
add_header Cache-Control no-cache;
expires 12h;
}
#PROXY-END/
~~~
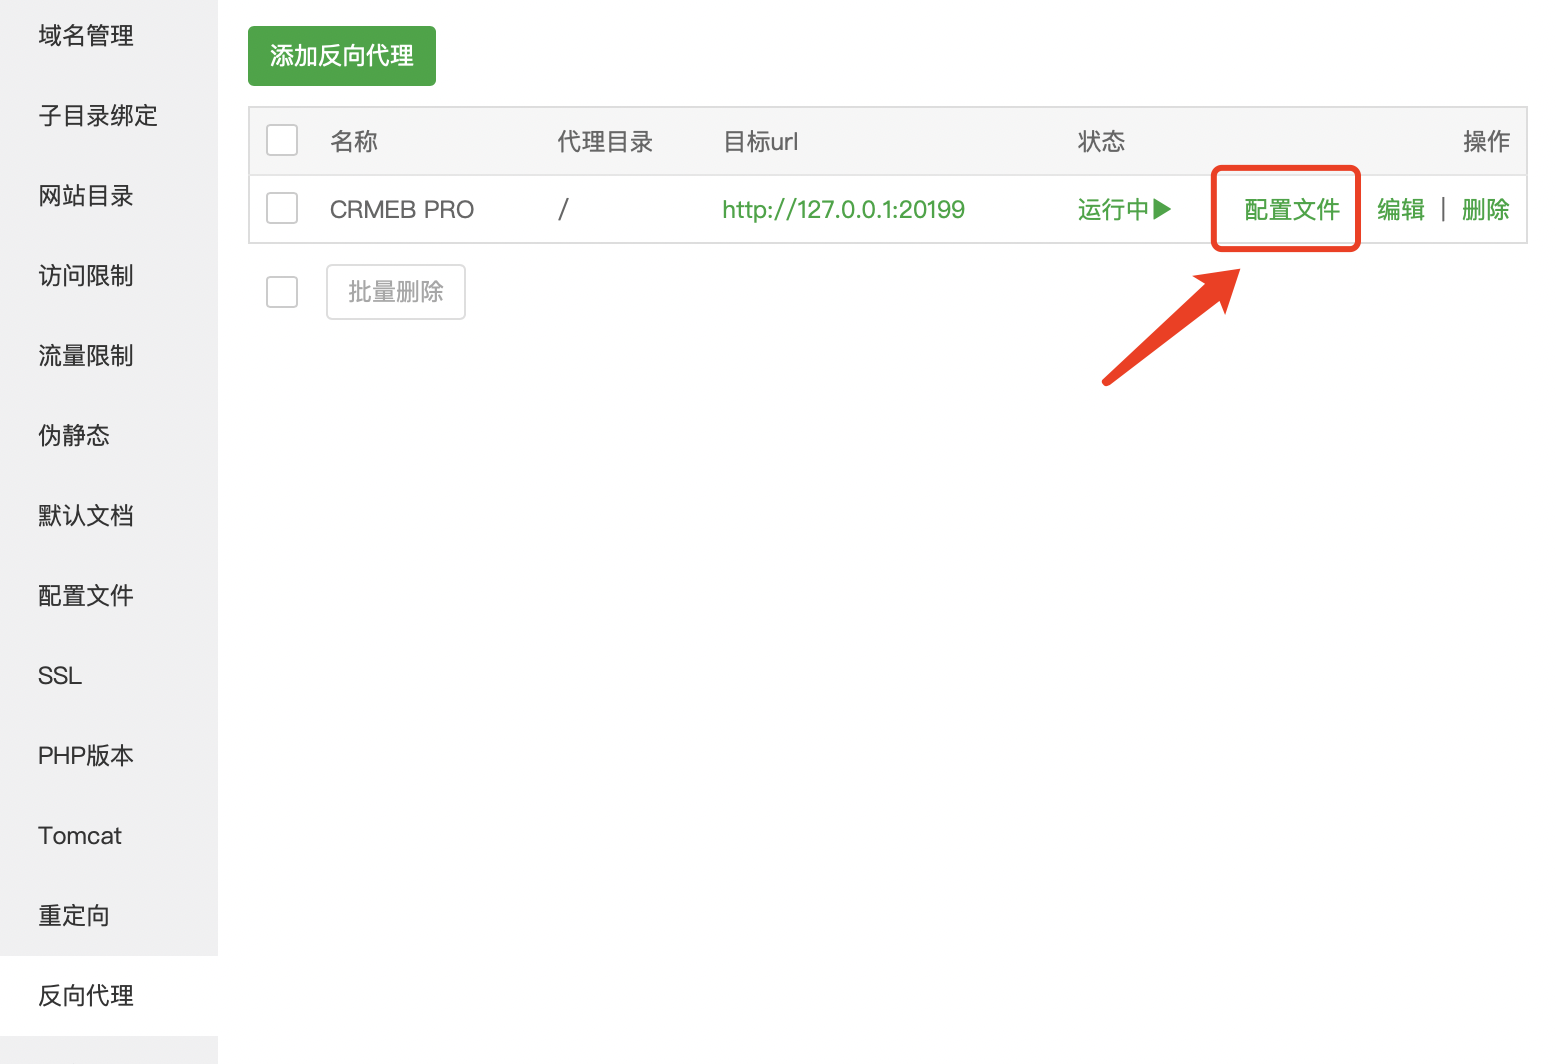
2.点击刚添加的反向代理,后方的**配置文件**

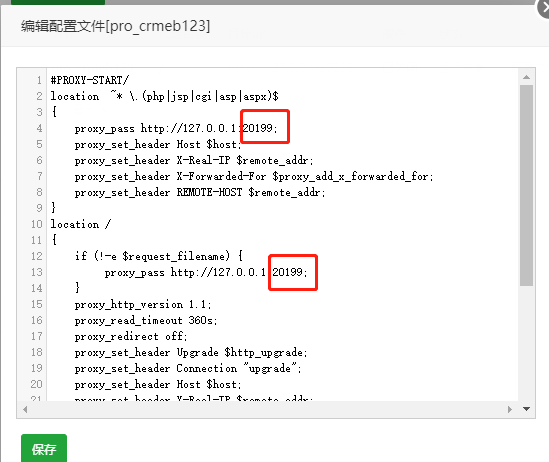
3.替换配置文件 (全部配置)并修改端口号

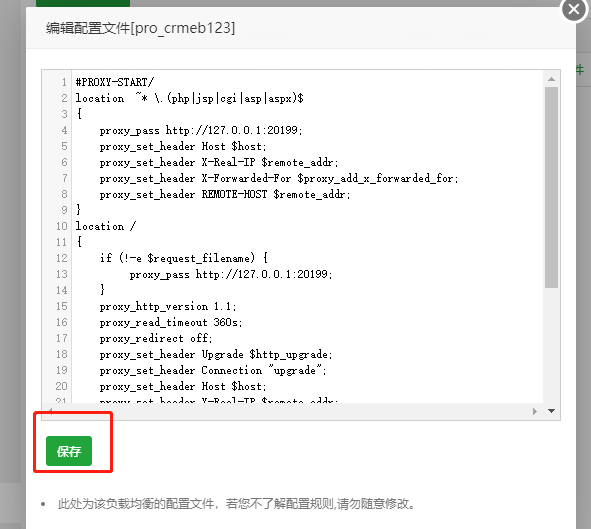
替换后,点击保存

nignx反向代理设置完毕。
- 🌲 序言
- 💬 前言
- 系统介绍
- 线上交流
- 商业授权
- 🧭 快速入门
- 安装指南
- 运行环境
- 服务器及域名设置
- 服务器购买
- 服务器端口
- 域名购买
- 域名解析
- SSL证书申请
- 商品采集
- 证书申请注意事项
- 宝塔申请SSL
- 阿里云申请SSL
- 腾讯云申请SSL
- https域名配置
- 新手推荐-宝塔安装教程
- 1.服务器配置
- 阿里云
- 腾讯云
- 2.登录宝塔
- 3.环境配置
- 软件安装
- PHP设置
- 4.源码上传
- 5.站点配置
- 6.反向代理
- NGINX反向代理
- Apache反向代理
- 7.添加守护进程
- 8.程序一键安装
- 9.安装完成重启守护进程
- Linux安装教程
- Linux命令行配置
- 手动安装、重装、多站点安装
- 安装完检测
- 配置指南
- 账号相关介绍
- 应用配置
- 公众号配置
- 1.公众号配置
- 2.公众号开发配置
- 小程序配置
- 1.微信平台配置
- 2.CRMEB后台配置
- 3.打包上传
- 前端提交审核(2.1及之后版本)
- 前端提交审核(2.1之前版本)
- 4.确认发布
- PC端
- PC介绍
- PC安装
- PC设置
- APP端
- 支付配置
- 微信支付
- 支付宝支付
- 一号通
- 一号通账户
- 短信
- 物流查询
- 电子面单
- 云存储
- 存储说明
- 阿里云OSS
- 腾讯云COS
- 七牛云存储
- 其他配置
- 小程序直播配置
- 公众号模板消息
- 小程序订阅消息
- 小票打印机配置
- 多系统配置
- 升级指南
- 2.0升级帮助
- 2.0.1升级帮助
- 📖 使用手册
- 商品管理
- 商品分类
- 商品规格
- 商品添加
- 商品采集
- 商品评价
- 订单管理
- 订单发货
- 订单退款
- 订单打印
- 订单提醒
- 订单收银
- 用户管理
- 用户等级
- 付费会员
- 客服管理
- 客服功能
- 客服接待
- 营销管理
- 优惠券
- 拼团
- 秒杀
- 砍价
- 积分
- 积分介绍
- 积分设置
- 积分签到
- 积分商城
- 积分抽奖
- 九宫格抽奖
- 优惠套餐
- 分销管理
- 分销介绍
- 分销配置
- 分销等级
- 分销员管理
- 佣金提现
- 门店管理
- 平台管理
- 运营状况
- 门店管理
- 门店订单
- 门店财务
- 门店登录
- 商品
- 商品管理
- 商品评价
- 订单
- 门店收银
- 订单管理
- 售后退款
- 用户
- 用户管理
- 用户标签
- 员工
- 店员管理
- 店员列表
- 店员业绩统计
- 配送员管理
- 配送员列表
- 配送员业绩统计
- 财务
- 门店流水
- 账单记录
- 转账申请
- 财务设置
- 设置
- 系统设置
- 门店设置
- 管理员
- 移动端管理
- 店员
- 配送员
- 扫码核销
- 商城装修
- 主页装修
- 页面配置
- 主题风格
- PC页面
- 商城邮费
- 邮费结构
- 运费设置
- 运费模板
- 🔧 开发手册
- 开发规范
- 目录结构
- 数据字典
- 开发教程视频
- 移动端路由
- 事件
- 系统配置
- 后台表单说明
- 后端路由
- 门店路由
- 对外接口路由
- 付费采集
- 后台前端说明
- 后台前端开发
- 前端配置说明
- 前端添加页面
- 前端引用组件
- 前端构建和发布
- 后台页面打包
- 对外接口
- 🚀 更新记录
- PRO v2.0
