## **一、初始化项目**
D:\nodejs\application新建文件夹shoppigust
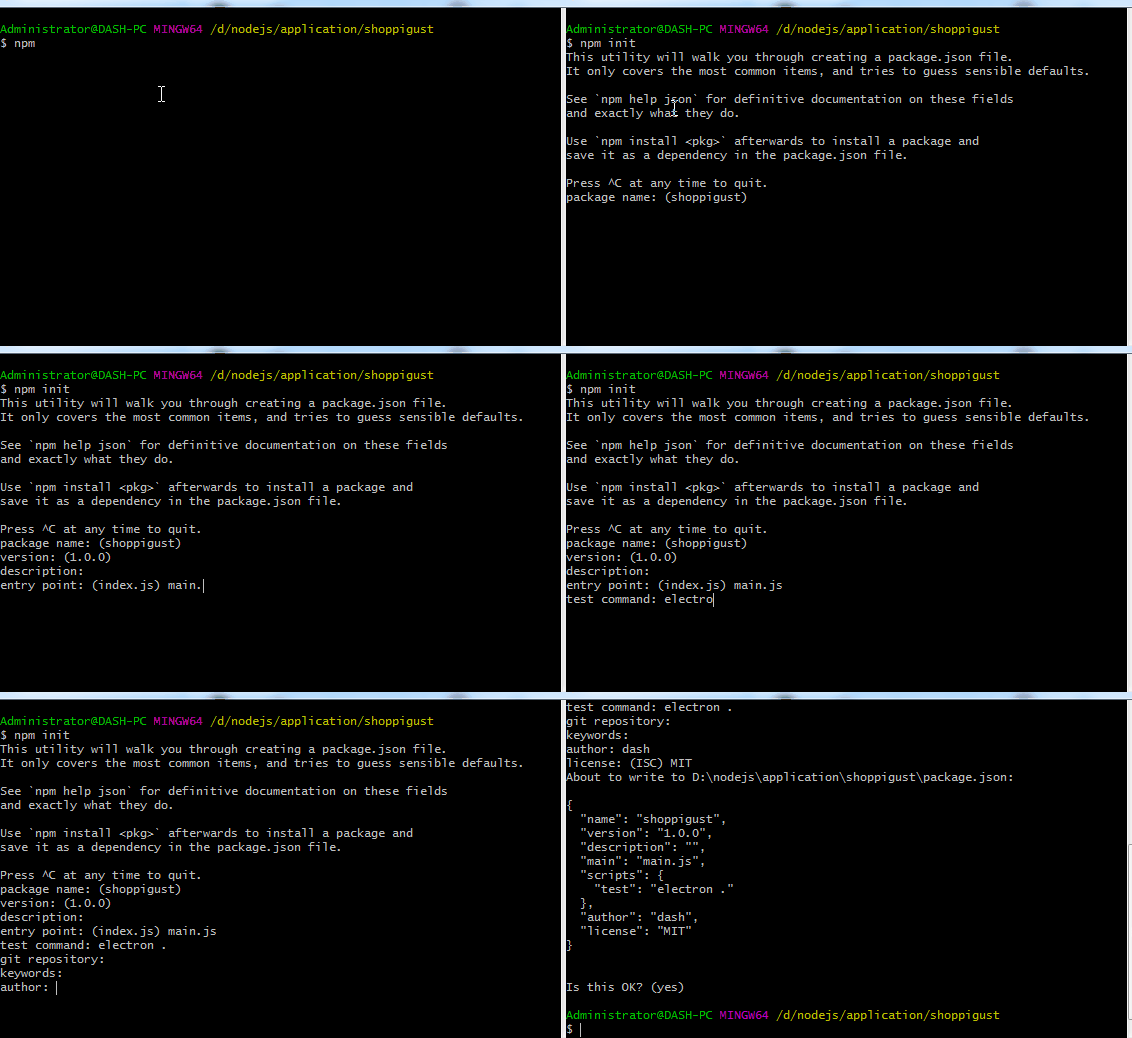
cli命令窗口进入shoppigust目录执行
```
npm init
```

完成后生成package.json文件的内容如下
```
{
"name": "shoppigust",
"version": "1.0.0",
"description": "",
"main": "main.js",
"scripts": {
"test": "electron ."
},
"author": "dash",
"license": "MIT"
}
```
[package.json](https://docs.npmjs.com/files/package.json#name)可能包含的参数
## **二、准备工作**
**安装镜像源管理工具**
```
//安装yrm
npm install yrm -g
//查看所有镜像
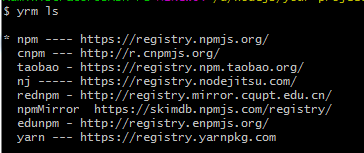
yrm ls
//切换镜像
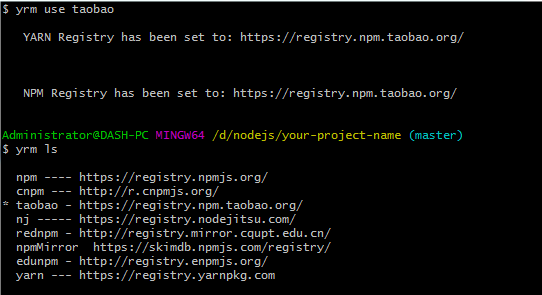
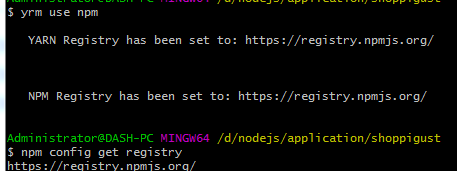
yrm use taobao
```


~~~
npm config set ELECTRON_MIRROR="https://npm.taobao.org/mirrors/electron/"
~~~
**yarn的安装:**
下载node.js,使用npm安装
~~~
npm install -g yarn
~~~
查看版本:
~~~
yarn --version
~~~
安装node.js,下载yarn的安装程序:
提供一个.msi文件,在运行时将引导您在Windows上安装Yarn
Yarn 淘宝源安装,分别复制粘贴以下代码行到黑窗口运行即可
~~~
yarn config set registry https://registry.npm.taobao.org -g
yarn config set sass_binary_site http://cdn.npm.taobao.org/dist/node-sass -g
~~~
**yarn的常用命令:**
~~~
//安装yarn
npm install -g yarn
//安装成功后,查看版本号:
yarn --version
//创建文件夹 yarn
md yarn
//进入yarn文件夹
cd yarn
//初始化项目
yarn init // 同npm init,执行输入信息后,会生成package.json文件
//yarn的配置项:
yarn config list // 显示所有配置项
yarn config get <key> //显示某配置项
yarn config delete <key> //删除某配置项
yarn config set <key> <value> [-g|--global] //设置配置项
//安装包:
yarn install 或者 yarn//安装package.json里所有包,并将包及它的所有依赖项保存进yarn.lock
yarn install --flat //安装一个包的单一版本
yarn install --force //强制重新下载所有包
yarn install --production //只安装dependencies里的包
yarn install --no-lockfile //不读取或生成yarn.lock
yarn install --pure-lockfile //不生成yarn.lock
//新增包(会更新package.json和yarn.lock):
yarn add [package] // 在当前的项目中添加一个依赖包,会自动更新到package.json和yarn.lock文件中
yarn add [package]@[version] // 安装指定版本,这里指的是主要版本,如果需要精确到小版本,使用-E参数
yarn add [package]@[tag] // 安装某个tag(比如beta,next或者latest)
//不指定依赖类型默认安装到dependencies里,你也可以指定依赖类型:
yarn add --dev/-D // 加到 devDependencies
yarn add --peer/-P // 加到 peerDependencies
yarn add --optional/-O // 加到 optionalDependencies
//默认安装包的主要版本里的最新版本,下面两个命令可以指定版本:
yarn add --exact/-E // 安装包的精确版本。例如yarn add foo@1.2.3会接受1.9.1版,但是yarn add foo@1.2.3 --exact只会接受1.2.3版
yarn add --tilde/-T // 安装包的次要版本里的最新版。例如yarn add foo@1.2.3 --tilde会接受1.2.9,但不接受1.3.0
//发布包
yarn publish
//移除一个包
yarn remove <packageName>//移除一个包,会自动更新package.json和yarn.lock
//更新一个依赖
yarn upgrade //用于更新包到基于规范范围的最新版本
//运行脚本
yarn run //用来执行在 package.json 中 scripts 属性下定义的脚本 如 yarn run test
//显示某个包的信息
yarn info <packageName> 可以用来查看某个模块的最新版本信息
//缓存
yarn cache
yarn cache list # 列出已缓存的每个包
yarn cache dir # 返回 全局缓存位置
yarn global bin//检查当前yarn 的 bin的 位置
yarn cache dir//检查当前 yarn 的 全局安装位置
yarn cache clean # 清除缓存
//改变 yarn 全局安装位置
yarn config set global-folder "你的磁盘路径"
//改变 yarn 缓存位置
yarn config set cache-folder "D:\Software\yarn\cache"
~~~
安装Electron的时候,经常会#在node install.js卡住
查看electron/npm/install.js

`install.js`,里面的下载是依赖于`electron-download`这个模块
查看npm的配置找到.npmrc文件
```
npm config ls -l
```

打开此文件加上
~~~
registry=https://registry.npm.taobao.org
electron_mirror="https://npm.taobao.org/mirrors/electron/"
~~~
或者命令行执行
```
set ELECTRON_MIRROR="https://npm.taobao.org/mirrors/electron/"
```
最新的url地址变了,我用的是这个
electron\_mirror="[https://cdn.npm.taobao.org/dist/electron/"](https://cdn.npm.taobao.org/dist/electron/%22)
## **三、在此目录安装本地electron**
electron 是运行时需要的模块所以参数是--save 而不是 --save-dev
```
npm install --save electron
//推荐
yarn add electron [--dev]
```
离线下载
[v6.0.12](https://links.jianshu.com/go?to=https%3A%2F%2Fgithub.com%2Felectron%2Felectron%2Freleases%2Ftag%2Fv6.0.12)下载[chromedriver-v6.0.12-win32-x64.zip](https://github.com/electron/electron/releases/download/v6.0.12/chromedriver-v6.0.12-win32-x64.zip)
将下载的zip文件复制到 C:\Users\{Administrator}\AppData\Local\electron\Cache
在执行上面的安装命令则会读取本地的安装包
以上的安装命令安装成功后多出dependencies参数
```
{
"name": "shoppigust",
"version": "1.0.0",
"description": "",
"main": "main.js",
"scripts": {
"test": "electron ."
},
"author": "dash",
"license": "MIT",
"dependencies": {
"electron": "^7.1.11"
}
}
```
npm install --save-dev electron与yarn add electron --dev 则多出devDependencies
```
{
"name": "shoppigust",
"version": "1.0.0",
"description": "",
"main": "main.js",
"scripts": {
"test": "electron ."
},
"author": "dash",
"license": "MIT",
"devDependencies": {
"electron": "^7.1.11"
}
}
```
注意果存在多次重复安装electron,则需要删除node_modules里的electron目录后再次执行安装命令否则会报错`Error: Electron failed to install correctly, please delete node_modules/electron
and try installing again`
不行则删除整个node_modules 在执行yarn install和yarn add electron
再不行就参照这个
1、到 [https://github.com/electron/electron/releases/](https://github.com/electron/electron/releases/) 下载对应版本的electron(例如我下载的是electron-v7.1.9-win32-x64.zip);
2、解压缩到node\_modules/electron/dist/目录里;
3、在node\_modules/electron/里创建一个叫path.txt的文件里面,在里面写上electron.exe保存。
## **打包**
向package.json添加打包的build配置参数
```
{
"name": "shoppigust",
"version": "1.0.0",
"description": "",
"main": "main.js",
"scripts": {
"test": "electron .",
"pack": "electron-builder --dir",
"dist": "electron-builder"
},
"author": "dash",
"license": "MIT",
"dependencies": {
},
"devDependencies": {
"electron": "^7.1.11",
"electron-builder": "^22.3.2"
},
"build": {
"productName":"xxxx",
"appId": "com.xxx.xxxxx",
"copyright":"xxxx",
"directories": {
"output": "build"
},
"nsis": {
"oneClick": false,
"allowElevation": true,
"allowToChangeInstallationDirectory": true,
"installerIcon": "./build/icons/aaa.ico",
"uninstallerIcon": "./build/icons/bbb.ico",
"installerHeaderIcon": "./build/icons/aaa.ico",
"createDesktopShortcut": true,
"createStartMenuShortcut": true,
"shortcutName": "xxxx",
"include": "build/script/installer.nsh"
},
"win": {
"icon": "icon/icon.ico",
"target": [
{
"target": "nsis"
}
]
}
}
}
```
运行打包命令
`yarn dist`(以可分发的格式打包(例如dmg,windows安装程序,deb软件包))
`yarn pack`(仅生成软件包目录而不进行实际打包。这对于测试非常有用)
对于将要交付生产的应用程序,您应该签署您的应用程序。请参阅[在哪里购买代码签名证书](https://www.electron.build/code-signing#where-to-buy-code-signing-certificate)
为了确保您的本机依赖性始终与electron版本匹配只需将
`"postinstall": "electron-builder install-app-deps"`添加到`package.json`
如果您自己的本地插件属于应用程序(不作为依赖项),请将nodeGypRebuild设置为true。
请注意,默认情况下,所有内容都打包到asar存档中,在resources目录中。
[打包详解](https://github.com/QDMarkMan/CodeBlog/blob/master/Electron/electron-builder%E6%89%93%E5%8C%85%E8%AF%A6%E8%A7%A3.md)
[https://www.php.cn/div-tutorial-411690.html](https://www.php.cn/div-tutorial-411690.html)
[http://blog.joylau.cn/2019/09/14/Electron-Electron-Builder/](http://blog.joylau.cn/2019/09/14/Electron-Electron-Builder/)
[https://segmentfault.com/a/1190000012904543](https://segmentfault.com/a/1190000012904543)
- npm
- 基础
- Api
- 安装
- node_modules本地安装与全局安装
- Inspector
- 模块
- hello world
- 使用nodejs开发桌面客户端应用
- Electron
- api
- 使用 Node.js 的 API
- 事件
- 安装
- 调试
- 读取本地文件
- 调用Html5的拖放api
- 官方示例下载
- WebView内嵌窗口
- window.open弹出子窗口及其操作
- BrowserWindow渲染主窗口
- 主进程与渲染进程的通信
- 菜单
- 网络
- 与react结合
- 打包
- 前言
- 对比
- electron-forge
- 打包工具一:electron-packager
- 打包工具二:electron-builder
- Boilerplates样板工程
- 通用配置文档
- NW.js
- 阿斯达岁的
- npm install、npm install --save与npm install --save-dev区别
