# 网络服务器
> 原文: [https://pythonbasics.org/webserver/](https://pythonbasics.org/webserver/)
Python 中的网络服务器可以通过两种方式设置。 Python 开箱即用地支持 Web 服务器。 您可以使用一个衬垫启动 Web 服务器。
但是,您也可以创建具有独特功能的自定义 Web 服务器。 在本文中,您将学习如何做到这一点。
此示例中的 Web 服务器只能在本地网络上访问。 它可以是`localhost`或其他网络主机。 您可以使用 VPN 跨位置投放。
## 示例
### 内置网络服务器
要启动网络服务器,请运行以下命令:
```py
python3 -m http.server
```
这将在端口 8080 上打开 Web 服务器。然后,您可以在 [http://127.0.0.1:8080/](http://127.0.0.1:8080/) 中打开浏览器。
也可以使用您的`192.168.*.*`地址通过网络访问 Web 服务器。
这是默认服务器,可用于从计算机下载文件。
### Web 服务器
运行以下代码以启动自定义 Web 服务器。 要创建自定义 Web 服务器,我们需要使用 HTTP 协议。
通过设计,http 协议有一个“获取”请求,该请求返回服务器上的文件。 如果找到该文件,它将返回 200。
服务器将从端口 8080 开始,并接受默认的 Web 浏览器请求。
```py
# Python 3 server example
from http.server import BaseHTTPRequestHandler, HTTPServer
import time
hostName = "localhost"
serverPort = 8080
class MyServer(BaseHTTPRequestHandler):
def do_GET(self):
self.send_response(200)
self.send_header("Content-type", "text/html")
self.end_headers()
self.wfile.write(bytes("<html><head><title>https://pythonbasics.org</title></head>", "utf-8"))
self.wfile.write(bytes("<p>Request: %s</p>" % self.path, "utf-8"))
self.wfile.write(bytes("<body>", "utf-8"))
self.wfile.write(bytes("<p>This is an example web server.</p>", "utf-8"))
self.wfile.write(bytes("</body></html>", "utf-8"))
if __name__ == "__main__":
webServer = HTTPServer((hostName, serverPort), MyServer)
print("Server started http://%s:%s" % (hostName, serverPort))
try:
webServer.serve_forever()
except KeyboardInterrupt:
pass
webServer.server_close()
print("Server stopped.")
```
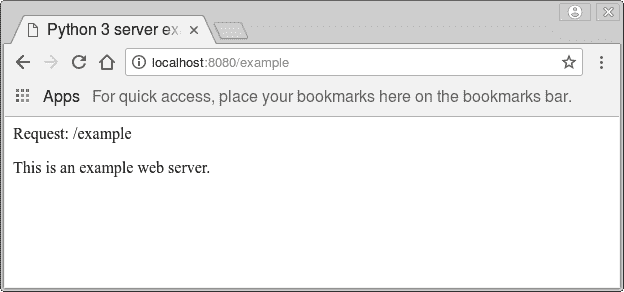
如果打开类似 [http://127.0.0.1/example](http://127.0.0.1/example) 的网址,则会调用`do_GET()`方法。 我们通过这种方法手动发送网页。

变量`self.path`返回所请求的 Web 浏览器 URL。 在这种情况下,它将是`/example`
[下载示例和练习](https://gum.co/dcsp)
- 介绍
- 学习 python 的 7 个理由
- 为什么 Python 很棒
- 学习 Python
- 入门
- 执行 Python 脚本
- 变量
- 字符串
- 字符串替换
- 字符串连接
- 字符串查找
- 分割
- 随机数
- 键盘输入
- 控制结构
- if语句
- for循环
- while循环
- 数据与操作
- 函数
- 列表
- 列表操作
- 排序列表
- range函数
- 字典
- 读取文件
- 写入文件
- 嵌套循环
- 切片
- 多个返回值
- 作用域
- 时间和日期
- try except
- 如何使用pip和 pypi
- 面向对象
- 类
- 构造函数
- 获取器和设置器
- 模块
- 继承
- 静态方法
- 可迭代对象
- Python 类方法
- 多重继承
- 高级
- 虚拟环境
- 枚举
- Pickle
- 正则表达式
- JSON 和 python
- python 读取 json 文件
- 装饰器
- 网络服务器
- 音频
- 用 Python 播放声音
- python 文字转语音
- 将 MP3 转换为 WAV
- 转录音频
- Tkinter
- Tkinter
- Tkinter 按钮
- Tkinter 菜单
- Tkinter 标签
- Tkinter 图片
- Tkinter 画布
- Tkinter 复选框
- Tkinter 输入框
- Tkinter 文件对话框
- Tkinter 框架
- Tkinter 列表框
- Tkinter 消息框
- Tkinter 单选按钮
- Tkinter 刻度
- 绘图
- Matplotlib 条形图
- Matplotlib 折线图
- Seaborn 分布图
- Seaborn 绘图
- Seaborn 箱形图
- Seaborn 热力图
- Seaborn 直线图
- Seaborn 成对图
- Seaborn 调色板
- Seaborn Pandas
- Seaborn 散点图
- Plotly
- PyQt
- PyQt
- 安装 PyQt
- PyQt Hello World
- PyQt 按钮
- PyQt QMessageBox
- PyQt 网格
- QLineEdit
- PyQT QPixmap
- PyQt 组合框
- QCheckBox
- QSlider
- 进度条
- PyQt 表格
- QVBoxLayout
- PyQt 样式
- 编译 PyQt 到 EXE
- QDial
- QCheckBox
- PyQt 单选按钮
- PyQt 分组框
- PyQt 工具提示
- PyQt 工具箱
- PyQt 工具栏
- PyQt 菜单栏
- PyQt 标签小部件
- PyQt 自动补全
- PyQt 列表框
- PyQt 输入对话框
- Qt Designer Python
- 机器学习
- 数据科学
- 如何从机器学习和 AI 认真地起步
- 为什么要使用 Python 进行机器学习?
- 机器学习库
- 什么是机器学习?
- 区分机器学习,深度学习和 AI?
- 机器学习
- 机器学习算法比较
- 为什么要使用 Scikit-Learn?
- 如何在 Python 中加载机器学习数据
- 机器学习分类器
- 机器学习回归
- Python 中的多项式回归
- 决策树
- k 最近邻
- 训练测试拆分
- 人脸检测
- 如何为 scikit-learn 机器学习准备数据
- Selenium
- Selenium 浏览器
- Selenium Cookie
- Selenium 执行 JavaScript
- Selenium 按 ID 查找元素
- Selenium 无头 Firefox
- Selenium Firefox
- Selenium 获取 HTML
- Selenium 键盘
- Selenium 最大化
- Selenium 截图
- Selenium 向下滚动
- Selenium 切换到窗口
- Selenium 等待页面加载
- Flask 教程
- Flask 教程:Hello World
- Flask 教程:模板
- Flask 教程:路由
