[TOC]
## 1. 开始
vuex作为一个vue状态(数据)管理的管理模式。尤其在中大型前端应用中,多组件共享状态处理时应用效果最佳。
1. 组件发起事件
2. Actions接收到状态变化事件,commit一个Mutation(变化)
3. 导致state中数据变化,然后渲染都组件
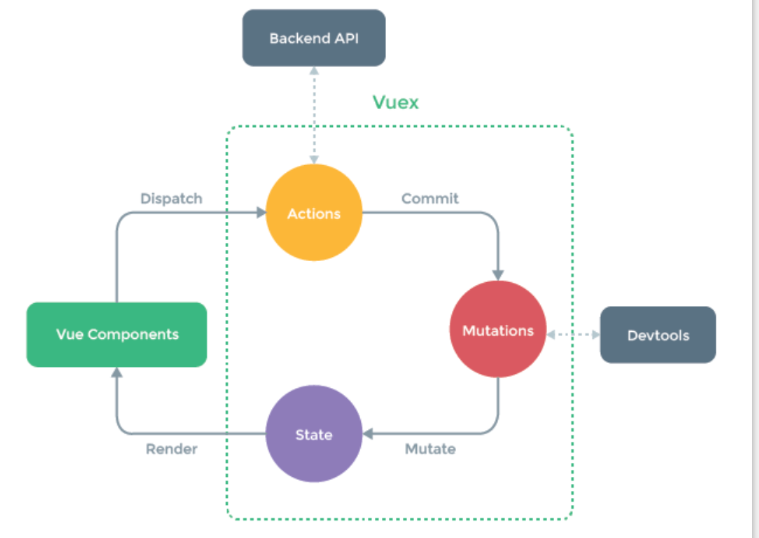
* [ ] state:数据存储
* [ ] action:事件处理,可以写处理逻辑(可以异步),然后调用mutation
* [ ] mutation:修改state中数据
### 1.1 安装
**1.安装webpack**
~~~
npm i webpack -g
~~~
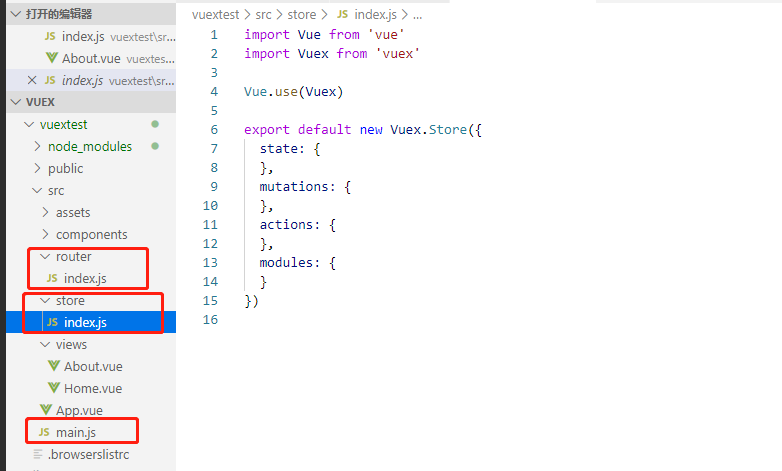
**2. 新建一个test工程**
再创建项目时,选择了store,router,所以有以下文件默认生成
```
vue create test
```
### **1.2 state数据获取**
* [ ] 组件获取state中数据
1)this.$store.state.count
2)或者mapState辅助函数
```
// computed: mapState({ //写法一
// count: 'count',})
computed: {
...mapState([
'count', //多个用逗号分开,写法二
]),
},
```
**1. 构建一个store对象,并导出**
在vue cli创建的项目中,默认加载store目录下的index.js文件
**定义state对象,内涵数据count**
```
importVuefrom"vue";
importVuexfrom"vuex";
Vue.use(Vuex);
exportdefaultnewVuex.Store({
state: {
count:0,
},
mutations: {},
actions: {},
modules: {}
});
```
**2. main.js文件导入store**
```
import Vue from "vue";
import App from "./App.vue";
import router from "./router";
import store from "./store"; // 1.引入store
Vue.config.productionTip = false;
new Vue({
router,
store,
render: h => h(App) //将组件渲染到index.html
}).$mount("#app");
```
**3. app.vue中使用state中数据**
中通过计算属性关联state,在组件中通过
方法一、通过`this.$store.state.count` 使用数据
```
<template>
<div id="app">
<div id="nav">
<router-link to="/">Home</router-link> |
<router-link to="/about">About</router-link>
<!-- 1.使用计算属性 -->
<h1>count:{{count}}</h1>
</div>
<router-view />
</div>
</template>
<script>
export default {
computed: {
count() {
//2.获取state数据
return this.$store.state.count
}
}
}
</script>
```
**方法二,使用mapstate辅助函数获取state数据**
app.vue组件中
```
import { mapState } from'vuex'
exportdefault {
// computed:
// //获取state数据方式一
// count() {
// return this.$store.state.count
// }
// }
computed:mapState({ // 获取state数据方式二
count:'count',})
}
```
mapState还可以这么写
```
computed: {
...mapState([
'count', //多个用逗号分开
]),
},
```
### **1.3 mutation中方法触发**
**mutation中的方法用于修改state中的值**
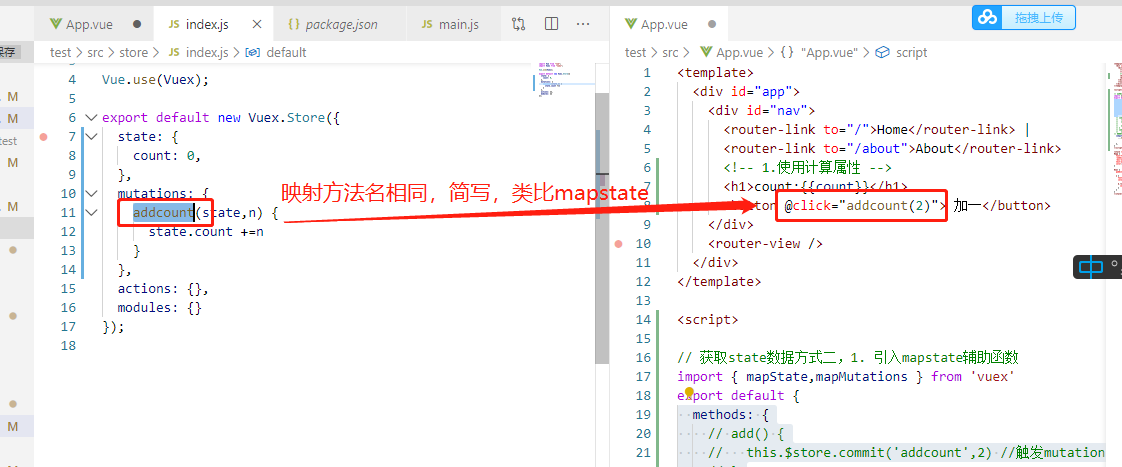
方式一、`$store.commit('mutationName')` 触发状态值的改变
方式二、mapMutations辅助函数进行映射,就是将vuex中的函数,映射到当前组件当中,通过this来调用
```
methods: {
// add() {
// this.$store.commit('addcount',2) //触发mutation中方法,方式一
// }
...mapMutations({
'add': 'addcount' // 将 `this.add()` 映射为 `this.$store.commit('addcount', n)`
})
},
```
映射方法名相同可以简写
```
...mapMutations(['addcount'])
```
**1. 在store的mutation中定义方法**
```
mutations: {
addcount(state) {
state.count ++
}
},
```
2. vue.app中
```
<!-- 1.使用计算属性 -->
<h1>count:{{count}}</h1>
<button @click="add"> 加一</button>
methods: {
add() {
this.$store.commit('addcount') //触发mutation中方法
}
},
```
也可以提交载荷,即为传参
```
this.$store.commit('addcount',2) //app.vue 触发mutation中方法,每次加2
mutations: {
addcount(state,n) {
state.count +=n
}
},
```

写法二
```
methods: {
// add() {
// this.$store.commit('addcount',2) //触发mutation中方法,方式一
// }
// ...mapMutations({
// 'add': 'addcount' // 将 `this.add()` 映射为 `this.$store.commit('addcount', n)`
// })
...mapMutations(['addcount']) // //触发mutation中方法,方式二,如果映射的方法名相同,则可以如此简写
},
```
### 1.4 action
**Action 类似于 mutation,不同在于:**
* Action 提交的是 mutation,而不是在组件中直接变更状态, 通过它间接更新 state(action可以写一下逻辑业务处理)。
* 在组件中通过 this.$store.dispatch('actionName') 触发状态值间接改变
* Action 也支持载荷
* Action 可以包含任意异步操
1. 在store中index.js添加函数
```
actions: {
add(context, n) {
context.commit('addcount',n)
},
decrement({commit,state},n){ //es6写法,直接从context中获取commit
commit('decrementcount',n)
}
},
```
2. app.vue 中
方法中映射action函数
```
<template>
<div id="app">
<div id="nav">
<router-link to="/">Home</router-link> |
<router-link to="/about">About</router-link>
<!-- 1.使用计算属性 -->
<h1>count:{{count}}</h1>
<!-- <button @click="addcount(2)"> 加一</button> -->
<button @click="add(2)">加二</button>
<button @click="decrement(3)">减三</button>
</div>
<router-view />
</div>
</template>
import { mapState,mapMutations, mapActions } from'vuex'
exportdefault {
methods: {
// add() {
// this.$store.commit('addcount',2) //触发mutation中方法,方式一
// }
// ...mapMutations({
// 'add': 'addcount' // 将 `this.add()` 映射为 `this.$store.commit('addcount', n)`
// })
...mapMutations(['addcount']), // //触发mutation中方法,方式二,如果映射的方法名相同,则可以如此简写
...mapActions(['add','decrement'])
},
}
```
### 1.3 派生属性getter
1. 当需要从 store 中的 state 中派生出一些状态。 例如:count值大于10,显示加多了,大于12显示加太多了。这时我们就需要用到 getter 为我们解决。
2. getter 其实就类似于计算属性(get)的对象.
3. 组件中读取 $store.getters.xxx
store/index.js
```
getters: {
desc(state) {
if (state.count > 10 && state.count <= 12) {
return '加多了'
} else if (state.count > 12) {
return '加太多了'
} else {
return '加的一般'
}
}
}
```
app.vue
写法一,`$store.getters.xxx`获取值
```
<template>
<div id="app">
<div id="nav">
<router-link to="/">Home</router-link> |
<router-link to="/about">About</router-link>
<!-- 1.使用计算属性 -->
<h1>count:{{count}}</h1>
<!-- <button @click="addcount(2)"> 加一</button> -->
<button @click="add(2)">加二</button>
<button @click="decrement(3)">减三</button>
getter-desc:{{$store.getters.desc}}
</div>
<router-view />
</div>
</template>
```

**写法二,通过mapGetters辅助函数获取值**
```
getter-desc:{{desc}}
// app.vue首先引入mapGetters
import { mapState,mapMutations, mapActions,mapGetters } from 'vuex'
computed: {
...mapState([
'count', //多个用逗号分开
]),
...mapGetters(['desc'])
},
```
### 1.4 子组件中如何获取值
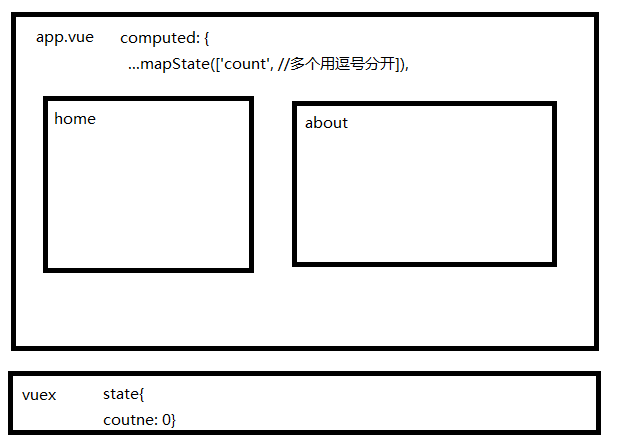
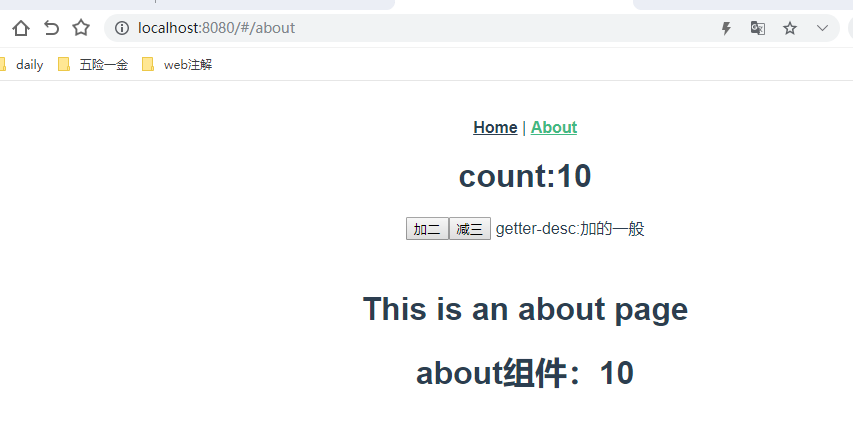
如上图,home和about如何获取state中的值呢?
一、组件传值肯定是可以的
子组件props声明一下
```
props:['count']
```
父组件
```
<子组件 :count="count"></子组件>
computed: {
...mapState([
'count', //多个用逗号分开
]),
...mapGetters(['desc'])
},
```
2. 通app.vue组件一样,获得vuex状态
```
<template>
<div class="about">
<h1>This is an about page</h1>
<h1>about组件:{{count}}</h1>
</div>
</template>
<script>
import { mapState, mapGetters } from "vuex";
export default {
computed: {
...mapState([
"count" //多个用逗号分开
]),
...mapGetters(["desc"])
}
};
</script>
```
## **2. state的值与input和select表单绑定**
**vuex 强调的是Unidirection Dataflow,state中数据应该只能被读取,写入应该由mutation完成。**
因此通过v-model绑定state值,并通过表单元素进行修改,是不建议的,当然可以成功改变,但是控制台会输出错误信息,如下:
~~~
<el-form-item prop="rdn">
<el-col :span="12">
<el-input v-model="currentOrg.rdn" placeholder="" size="small"
@input="cnKeyUp"></el-input>
</el-col>
</el-form-item>
computed: {
...orgState({currentOrg: 'current', orgItems: 'items', tmpData: 'tmpData'}),
isNew() {
return Boolean(this.currentOrg && this.currentOrg.id);
},
~~~
```
vue.js:1897 Error: [vuex] do not mutate vuex store state outside mutation handlers.
at assert (vuex.esm.js?be43:90)
at Vue.store._vm.$watch.deep (vuex.esm.js?be43:793)
at Watcher.run (vue.js:4561)
at Watcher.update (vue.js:4535)
at Dep.notify (vue.js:745)
at Object.reactiveSetter [as rdn] (vue.js:1070)
at Proxy.set (vue.js:1091)
at callback (eval at ./node_modules/cache-loader/dist/cjs.js?{"cacheDirectory":"node_modules/.cache/vue-loader","cacheIdentifier":"d1305b30-vue-loader-template"}!./node_modules/vue-loader/lib/loaders/templateLoader.js?!./node_modules/cache-loader/dist/cjs.js?!./node_modules/vue-loader/lib/index.js?!./src/parts/system/org/org-tabs.vue?vue&type=template&id=12c5e28c&scoped=true& (xms_user.js:4808), <anonymous>:62:45)
at invokeWithErrorHandling (vue.js:1863)
at VueComponent.invoker (vue.js:2184)
```
### **2.1 通过computed的set和get解决**
computed中计算数据
1. get从vuex中获取数据
2. set调用mutation修改数据
~~~
<template>
<div>
<div>
<input type="text" v-model="name">
</div>
<div>
{{ name }}
</div>
</div>
</template>
<script>
/** computed */
const name = {
get() {
return this.$store.state.name;
},
set(value) {
this.$store.commit('setName', value);
},
};
const computed = {
name,
};
export default {
name: 'HelloWorld',
computed,
};
</script>
~~~
### 2.2 组件mounted时,深拷贝
~~~
<el-form :model="currentOrgIns" ref="orgForm" :inline="true" label-position="left" class="demo-form-inline"
label-width="90px" :rules="rules">
<el-form-item label="机构类别" prop="type">
<el-select v-model="currentOrgIns.type" placeholder="请选择加密设备" size="small" @change="typeChange">
<el-option label="CA" value="ca"></el-option>
<el-option label="RA" value="ra"></el-option>
</el-select>
</el-form-item>
<el-form-item label="额外属性" prop="dnAttrCo">
<el-input v-model="currentOrgIns.dnAttrCo" placeholder="" size="small"></el-input>
</el-form-item>
<el-form-item label="备注" prop="roMemo">
<el-input v-model="currentOrgIns.roMemo" placeholder="" size="small"></el-input>
</el-form-item>
</el-form>
import _ from "lodash";
data() {
return {
currentOrgIns: {},
},
// 组件mounted后,将state中的数据currentOrg深拷贝给data中数据
async mounted() {
this.currentOrgIns = _.cloneDeep(this.currentOrg);
},
computed: {
...orgState({currentOrg: 'current', orgItems: 'items', tmpData: 'tmpData'}),
},
~~~
# vuex中action和mutations (this.$store.dispatch和this.$store.commit)的区别
dispatch:含有异步操作,例如向后台提交数据,写法: this.$store.dispatch('action方法名',值)
commit:同步操作,写法:this.$store.commit('mutations方法名',值)
action:
1、用于通过提交mutation改变数据
2、会默认将自身封装为一个Promise
3、可以包含任意的异步操作
mutations:
1、通过提交commit改变数据
2、只是一个单纯的函数
3、不要使用异步操作,异步操作会导致变量不能追踪。也就是说,用action中的函数调用mutations中的函数,进行异步操作state中的数据
- vue
- 为什么要学vue
- 数据双向绑定
- vue指令
- v-bind创建HTML节点属性
- v-on绑定事件
- v-cloak
- v-text
- v-for和key属性
- v-if和v-show
- 案例1
- 自定义指令
- vue样式
- vue生命周期
- vue过滤器
- 自定义键盘修饰符
- 跨域请求
- vue组件
- 组件基础
- 引入vue文件组件
- 引入render函数作为组件
- 兄弟间组件通信
- 组件函数数据传递练习
- 路由
- 数据监听
- webpack
- vue校验
- vue笔记
- form表单中input前部分默认输入,切不可修改
- mixins
- 部署到nginx
- scope
- render
- 下载文件
- vue动态组件
- axios
- Promise
- vue进阶
- node-vue-webpack搭建
- vue事件
- 插槽
- vuex
- vuex基础
- vuex命名空间
- HTML递归?
- this.$nextTick异步更新dom
- elementui
- table
- 修改element ui样式
- form
- 优质博客
- vuex state数据与form元素绑定
- es6
- Promise
