[TOC]
>[success] # 初始化并且开发路由
* **初始化路由** :根据之前的 [技术方案](https://www.kancloud.cn/wangjiachong/nodejs/2649930) 的设计,做出路由
* **返回假数据**: **将路由和假数据处理分离**,以符合设计原则
* **这里有2个问题** :
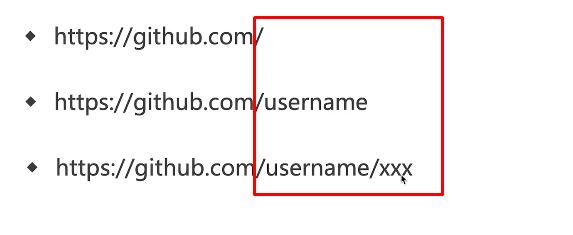
1. **什么是路由?路由其实就是接口** , 下面斜线后面的都算是 **路由(接口)**

2. **为什么要返回假数据呢?** 因为 **目前还没有学到数据库,这是一个循循渐进的过程** ,暂时先使用返回假数据,后期学完数据库后把假数据替换成真数据。
>[success] ## 初始化路由

之前在 **项目需求分析** 时候,我们就了解到接口需要这么多,总共分为 **2 个类型** ,一个是 **blog 博客类型** ,一个是 **user 类型** ,所以我们要通过 **2 个文件(模块)** 来实现这 **6** 个接口(**blog 博客类型 5个接口** ,**user 类型 1个接口**),接下来我们在项目文件夹中创建一个 **src** 文件夹,然后在 **src** 下创建 **router 文件夹**,然后在 **router 文件夹** 中创建 **blog.js** 与 **user.js**
**文件目录结构**:
~~~
blog-1 // 项目文件夹
|__ bin // 可执行文件文件夹
| |__ www.js // 项目启动入口文件
|__ src // 放接口的文件夹
| |__ router // 路由(接口)文件夹
| |__ blog.js // 【博客类型】有关的接口都写在这里
| |__ user.js // 【用户类型】有关的接口都写在这里
|
|__ app.js // 处理server业务逻辑的方法的文件
|__ package.json // 初始化项目文件
~~~
**src/router/blog.js**:
~~~
const handleBlogRouter = (req, res) => {
const method = req.method // GET POST
// 获取博客列表
if(method === 'GET' && req.path === '/api/blog/list'){
return {
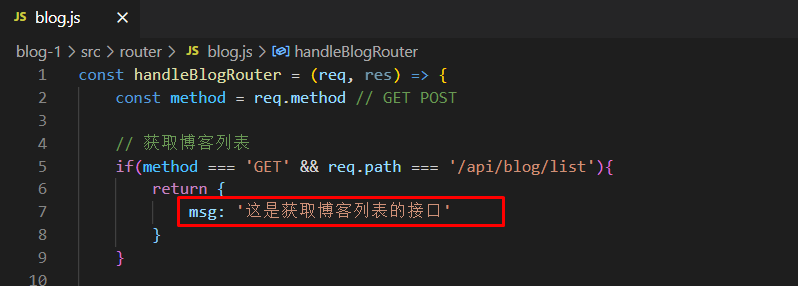
msg: '这是获取博客列表的接口' // 后期从数据库中取数据返回给前端
}
}
// 获取博客详情
if(method === 'GET' && req.path === '/api/blog/detail'){
return {
msg: '这是获取博客详情的接口'
}
}
// 新建一篇博客
if(method === 'POST' && req.path === '/api/blog/new'){
return {
msg: '这是新建博客的接口'
}
}
// 更新一篇博客
if(method === 'POST' && req.path === '/api/blog/update'){
return {
msg: '这是更新博客的接口'
}
}
// 删除一篇博客
if(method === 'POST' && req.path === '/api/blog/delete'){
return {
msg: '这是删除博客的接口'
}
}
}
module.exports = handleBlogRouter
~~~
**src/router/user.js**:
~~~
const handleUserRouter = (req, res) => {
const method = req.method // GET POST
// 登陆
if(method === 'POST' && req.path === '/api/user/login'){
return {
msg: '这是登陆博客的接口'
}
}
}
module.exports = handleUserRouter
~~~
然后在 **app.js** 中引入这两个方法,虽然目前在 **app.js** 中 **处理 blog 与 user 路由** 这种每次都需要判断的方法不是非常的正规,会觉得非常的繁琐,这就是 **原生 nodejs 不使用任何框架** 开发的不好处,后期用 **express** 或者 **Koa2** 开发时候就好了,先忍耐一下。
**app.js** :
~~~
// 引入处理路由文件
const handleBlogRouter = require('./src/router/blog')
const handleUserRouter = require('./src/router/user')
const serverHandle = (req, res) => {
// 设置返回格式 JSON
res.setHeader('Content-type', 'application/json')
// 获取 path
const url = req.url
req.path = url.split('?')[0]
// 处理 blog 路由
const blogData = handleBlogRouter(req, res)
if(blogData){
res.end(
JSON.stringify(blogData)
)
return // 这里需要return,不然返回数据后还会往下走
}
// 处理 user 路由
const userData = handleUserRouter(req, res)
if(userData){
res.end(
JSON.stringify(userData)
)
return
}
// 未命中路由,返回 404
res.writeHead(404, {"Content-type": "text/plain"}) // 把响应头状态码设置为404,然后Content-type: text/plain是纯文本,为了覆盖上面的json类型
// 返回内容
res.write('404 Not Found\n')
res.end()
}
module.exports = serverHandle
~~~
此时就可以测试一下是否好用了,试一下访问详情接口, `http://127.0.0.1:8000/api/blog/detail`

接下来访问一下 **404 页面** ,直接浏览器输入 `http://127.0.0.1:8000`

可以看到进入了 **404 页面** ,这样我们的初步就算完成了。
>[success] ## 开发路由
在开发路由之前,我们先创建一个 **数据模型** ,什么是 **数据模型** ?
**数据模型:就是用来描述数据、组织数据和对数据进行操作** ,然后 **通过一个方法或者一个类返回一个我们想要的一个数据格式,可以理解成就是一个方法可以返回我们想要的数据结构**,例如:**下面代码块中,假如 data 是我们从数据库中查出来的数据,我们把查出来的数据通过这个数据模型的方法处理之后,就会返回一个既有 data 也有 errno 字段的固定数据结构的对象** 。
**成功时返回的数据结构**
~~~
{
data: [...]
errno: 0,
message: "获取成功"
}
~~~
**失败时返回的数据结构**
~~~
{
errno: -1
message: "获取失败,系统错误"
}
~~~
这样前端就可以很方便的通过 **errno** 属性来判断获取数据是成功还是失败, **成功了就展示数据,错误了就提示 massage 中的错误提示**。
>[success] ### 创建数据模型
接下来 **创建** 一个 **存放数据模型代码的文件夹和文件** ,在原有项目中 **src文件夹** 下 **创建 model 文件夹 和 resModel.js 文件**
**文件目录结构**:
~~~
blog-1 // 项目文件夹
|__ bin // 可执行文件文件夹
| |__ www.js // 项目启动入口文件
|
|__ src // 放接口的文件夹
| |__ router // 路由(接口)文件夹
| | |__ blog.js // 【博客类型】有关的接口都写在这里
| | |__ user.js // 【用户类型】有关的接口都写在这里
| |
| |__ model // 【存放数据模型】的文件夹
| |__ resModel.js // 【数据模型类】文件
|
|__ app.js // 处理server业务逻辑的方法的文件
|__ package.json // 初始化项目文件
~~~
**src/model/resModel.js**
~~~
// 基类
class BaseModel {
constructor(data, message) {
if(typeof data === 'string'){ // 这里是做一个兼容
this.message = data
data = null
message = null
}
if(data){
this.data = data
}
if(message){
this.message =message
}
}
}
// 成功返回时使用的数据模型类
class SuccessModel extends BaseModel {
constructor(data, message){
super(data, message) // 执行一遍父类的内容
this.errno = 0
}
}
// 失败返回时使用的数据模型类
class ErrorModel extends BaseModel {
constructor(data, message){
super(data, message) // 执行一遍父类的内容
this.errno = -1
}
}
module.exports = {
SuccessModel,
ErrorModel
}
~~~
>[success] ### 使用数据模型
**数据模型** 是在给前端返回数据时才会用到,想返回数据就需要先根据请求参数去数据库取数据,所以我们先着手接口,接口在使用时候 **需要解析参数** ,我们之前写的 **app.js** 中还没有解析 **query 参数 与 post data 参数** ,首先我们需要改一下 **app.js**
1. **解析 query 参数** 跟 **post data 参数**
**app.js**
~~~
const querystring = require('querystring')
// 引入处理路由文件
const handleBlogRouter = require('./src/router/blog')
const handleUserRouter = require('./src/router/user')
// 用于处理 post data
const getPostData = (req) => {
const promise = new Promise((resolve, reject) => {
if(req.method !== 'POST'){ // 不等于 post 请求
resolve({})
return
}
if(req.headers['content-type'] !== 'application/json'){ // 传入的数据格式不是 application/json ,可能是form-data的参数
resolve({})
return
}
// 1. POST通过数据流方式接收数据
let postData = ''
// 2. 给req注册data事件,当有数据提交过来就会触发,事件的作用是接收数据,接收大量数据的时候,是分块接收的
req.on('data', chunk => {
postData += chunk.toString()
})
// 3. 给req注册end事件,当数据全部接收完毕,会触发
req.on('end', () => {
if(!postData){ // 无数据返回空对象
resolve({})
return
}
resolve(
JSON.parse(postData)
)
})
})
return promise
}
const serverHandle = (req, res) => {
// 设置返回格式 JSON
res.setHeader('Content-type', 'application/json')
// 获取 path
const url = req.url
req.path = url.split('?')[0]
// 解析query 参数
req.query = querystring.parse(url.split('?')[1])
// 处理 post data 参数
getPostData(req).then(postData => {
req.body = postData
// 处理 blog 路由
const blogData = handleBlogRouter(req, res)
if(blogData){
res.end(
JSON.stringify(blogData)
)
return // 这里需要return,不然返回数据后还会往下走
}
// 处理 user 路由
const userData = handleUserRouter(req, res)
if(userData){
res.end(
JSON.stringify(userData)
)
return
}
// 未命中路由,返回 404
res.writeHead(404, {"Content-type": "text/plain"}) // 把响应头状态码设置为404,然后Content-type: text/plain是纯文本,为了覆盖上面的json类型
// 返回内容
res.write('404 Not Found\n')
res.end()
})
}
module.exports = serverHandle
~~~
解析完了 **query 与 post data 参数** ,来看下图,我们 **处理 router 文件夹中的路由接口的文件** 中返回的数据都是当初写死的,要获取数据还是要从数据库中获取,但是 **直接在这个文件中写获取数据的处理数据逻辑会很混乱** ,这时候,就要 **分出来一个 controller 文件来专门处理数据**

所以我们新建一个 **controller 文件夹** ,然后在里面创建 **blog.js** 和 **user.js** 文件
~~~
blog-1 // 项目文件夹
|__ bin // 可执行文件文件夹
| |__ www.js // 项目启动入口文件
|
|__ src // 放接口的文件夹
| |__ router // 路由(接口)文件夹
| | |__ blog.js // 【博客类型】有关的接口都写在这里
| | |__ user.js // 【用户类型】有关的接口都写在这里
| |
| |__ model // 【存放数据模型】的文件夹
| | |__ resModel.js // 【数据模型类】文件
| |
| |__ controller // 【从数据库取出数据,然后处理数据,返回给路由层】
| |__ blog.js // 【博客类型】处理数据的文件
| |__ user.js // 【用户类型】处理数据的文件
|
|__ app.js // 处理server业务逻辑的方法的文件
|__ package.json // 初始化项目文件
~~~
然后在 **controller 中的 blog.js 与 user.js文件** 中进行 **从数据库(controller 这里先假装使用数据库查询出来的数据)获取数据的操作,以及处理数据的逻辑,处理完成后再返回给对应路由的方法中**
**src/controller/blog.js**
~~~
/**
* 获取博客列表
* @param {string} author - 作者
* @param {string} keyword - 搜索关键字
*/
const getList = (author, keyword) => {
// 先返回假数据(格式是正确的)
// author, keyword这2个参数等开始学习数据库查询时候会用到,目前先假装已经使用了author, keyword 属性查出来的下列数据。
return [
{
id: 1,
title: '标题A',
content: '内容A',
createTime: '1645696670000',
author: 'zhangsan'
},
{
id: 2,
title: '标题B',
content: '内容B',
createTime: '1645696790000',
author: 'lisi'
}
]
}
/**
* 获取博客详情
* @param {number} id - 博客列表 item id
*/
const getDetail = (id) => {
return {
id: 1,
title: '标题A',
content: '内容A',
createTime: '1645696670000',
author: 'zhangsan'
}
}
/**
* 新增博客
* @param {object} blogData - blogData 是一个博客对象,包含 title content author 属性
*/
const newBlog = (blogData = {}) => {
// 这里假装已经向数据库进行了新增操作
return {
id: 3 // 表示新建博客,插入到数据表里面的id
}
}
/**
* 更新博客
* @param {number} id - 要更新的博客的id
* @param {object} blogData - blogData 是一个博客对象,包含 title content 属性
*/
const updateBlog = (id, blogData = {}) => {
// 这里假装已经向数据库进行了更新操作
return true
}
/**
* 删除博客
* @param {number} id - 要删除的博客的id
* @param {string} author - 作者身份,因为不可以越权删除,所以要加作者
*/
const deleteBlog = (id) => {
// 这里假装已经向数据库进行了删除操作
return true
}
module.exports = {
getList,
getDetail,
newBlog,
updateBlog,
deleteBlog
}
~~~
**src/controller/user.js**
~~~
/**
* 登陆
* @param {string} username - 用户名
* @param {string} password - 密码
*/
const login = (username, password) => {
// 先使用假数据
if(username === 'zhangsan' && password === '123'){
return true
}
return false
}
module.exports = { login }
~~~
2. 开始使用 **数据模型**
在 **blog 和 user** 这2个路由文件中使用数据模型 **SuccessModel** 和 **ErrorModel** 这2个类来处理数据格式
**src/router/blog.js**
~~~
// 从 controller 中获取数据
const { getList,
getDetail,
newBlog,
updateBlog,
deleteBlog } = require('../controller/blog')
// 引入数据模型
const { SuccessModel, ErrorModel } = require('../model/resModel')
const handleBlogRouter = (req, res) => {
const method = req.method // GET POST
const id = req.query.id
// 获取博客列表
if(method === 'GET' && req.path === '/api/blog/list'){
// 取得参数
const author = req.query.author || ''
const keyword = req.query.keyword || ''
// 从 controller 中获取数据
const listData = getList(author, keyword)
// 通过数据模型加工数据返回带有 erron 属性的对象数据
return new SuccessModel(listData)
}
// 获取博客详情
if(method === 'GET' && req.path === '/api/blog/detail'){
const data = getDetail(id)
return new SuccessModel(data)
}
// 新建一篇博客
if(method === 'POST' && req.path === '/api/blog/new'){
const data = newBlog(req.body)
return new SuccessModel(data)
}
// 更新一篇博客
if(method === 'POST' && req.path === '/api/blog/update'){
const result = updateBlog(id, req.body)
if(result){ // 更新成功
return new SuccessModel()
} else {
return new ErrorModel('更新博客失败')
}
}
// 删除一篇博客
if(method === 'POST' && req.path === '/api/blog/delete'){
const result = deleteBlog(id)
if(result){ // 删除成功
return new SuccessModel()
} else {
return new ErrorModel('删除博客失败')
}
}
}
module.exports = handleBlogRouter
~~~
**src/router/user.js**
~~~
// 从 controller 中获取数据
const { login } = require('../controller/user')
// 引入数据模型
const { SuccessModel, ErrorModel } = require('../model/resModel')
const handleUserRouter = (req, res) => {
const method = req.method // GET POST
// 登陆
if(method === 'POST' && req.path === '/api/user/login'){
const { username, password } = req.body
const result = login(username, password)
if(result){ // 登陆成功
return new SuccessModel()
} else {
return new ErrorModel('登陆失败')
}
}
}
module.exports = handleUserRouter
~~~
>[success] ## 总结
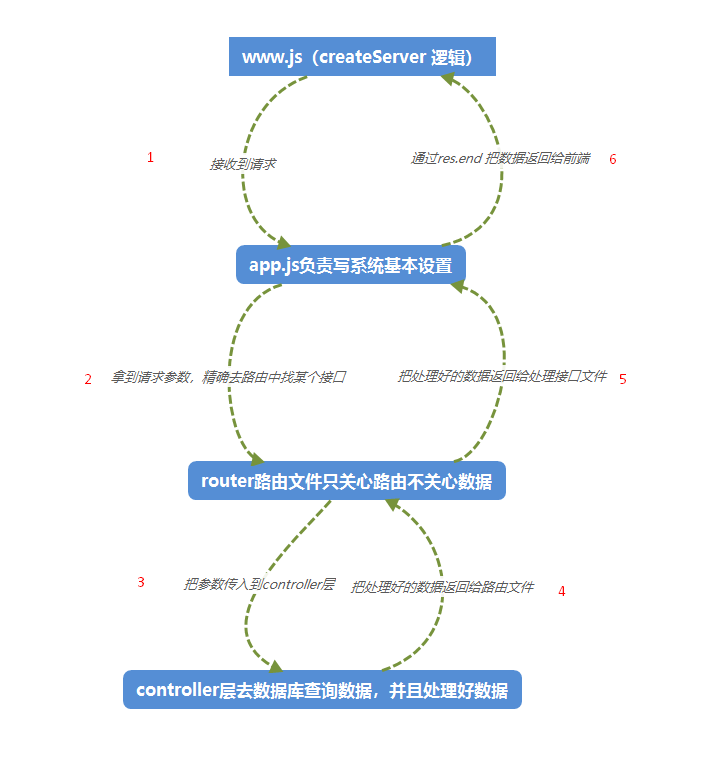
我们目前分了 **4 层结构, 每层都有自己的职责划分,处理每层的事务**
1. **www.js** 都是一些 **createServer** 逻辑
2. **app.js** 是系统基本设置的一个文件,例如:**设置数据返回类型 、获取path、解析query、处理路由、处理未命中 404**
3. **router 里面只管路由,返回给正确的格式数据,至于数据返回的是什么、如何计算的、怎么筛选的它不管,它只关心和路由有关的事情,具体的数据,怎么摘出来,怎么筛选出来,数据是正确还是错误的它都不管**
4. **controller 层是最关心数据的一层,在 controller 中会进行数据库的查询以及对数据的计算和筛选等处理**
我们接收到一个请求后会按照这个流程 **www.js 》app.js 》router路由 》controller** 来走,从 **www.js 一步步到 controller**,再从 **controller** 取到数据后层层向上传递直到传到 **www.js** ,再通过 **www.js** 的 **res.end** 方法将数据返回给浏览器客户端,这一切就仿佛在画一个圆圈一样,**从起点画到终点,再从终点往回画到起点**。

- NodeJS基础
- 什么是NodeJS
- npm
- Node.js+Express+Koa2+开发Web Server博客
- 下载和安装node
- nodejs和js的区别
- commonjs-演示
- nodejs如何debugger
- server端与前端的区别
- 项目需求分析
- 开发接口(不使用任何框架)
- http-概述
- 处理get请求
- 处理post请求
- 处理http请求的综合示例
- 搭建开发环境
- 初始化并且开发路由
- 开发博客项目之数据存储
- MySql介绍
- 数据库操作(创建和增、删、查)
- Nodejs 操作 Mysql
- Nodejs 链接 mysql 做成工具
- API 对接 MySQL
- 开发博客项目之登陆
- cookie-介绍
- cookie用于登录验证
- cookie做限制
