
[TOC]
# 概述
* OkHttpClient将请求参数信息封装到Request对象中,创建一个Call对象后,发起请求
* 发起请求时,使用责任链模式,将请求依次传递给各个拦截器进行处理
* 最后由CallServerInterceptor完成网络请求并返回结果
# OkHttpClient
首先从 OkHttpClient 的构建说起。由官方文档可知,在绝大多数 App 中,我们都应该只拥有一个 OkHttpClient 对象,这样所有的 Http 请求可以共用 Response 缓存、共用线程池以及共用连接池,达到节省延迟和内存的目的。
关于 OkHttpClient 我们暂时只关注两点:Builder 模式和 Call 接口。
## Builder 模式
OkHttpClient 使用了建造者模式,我们可以使用 new OkHttpClient() 来构建默认配置的 OkHttpClient 对象,也可以使用 OkHttpClient.Builder 来构建自定义配置的客户端。在此处提及一下建造者模式的优点:
* 客户端在初始化时只需初始化必须参数即可,其他参数可选
* 和 Java bean 类型的初始化相比,可以保证初始化过程中对象的线程安全
* 代码易编易读
所以当类的构造器有许多参数时,可以考虑使用 Builder 模式。
## Call 接口
一个标准的 OkHttp 请求格式为 `mClient.newCall(request).enqueue(callback);` 那么我们先来从这里入手开始分析。
OkHttpClient 实现了 Call.Factory 接口:
```java
public interface Call extends Cloneable {
...
interface Factory {
Call newCall(Request request);
}
}
```
具体实现如下:
```java
@Override
public Call newCall(Request request) {
return RealCall.newRealCall(this, request, false /* for web socket */);
}
```
在看 RealCall 之前先来看看 Call 接口,因为 RealCall 实现了 Call 接口,Call 是整个网络请求过程中的功能核心类,负责请求过程的执行、取消。其接口定义如下:
```java
public interface Call extends Cloneable {
// 返回原始请求
Request request();
// 同步执行请求
Response execute() throws IOException;
// 异步执行请求
void enqueue(Callback responseCallback);
// 退出未完成的请求
void cancel();
boolean isExecuted();
boolean isCanceled();
Call clone();
// 工厂类
interface Factory {
Call newCall(Request request);
}
}
```
注释已经描述的很清晰了,接下来看看它的实现类 RealCall,先来看看刚才的 newRealCall 方法,newRealCall 是一个静态方法,根据 OkHttpClient 对象、Request 对象来创建最终执行任务的 RealCall:
```java
static RealCall newRealCall(OkHttpClient client, Request originalRequest, boolean forWebSocket) {
// Safely publish the Call instance to the EventListener.
RealCall call = new RealCall(client, originalRequest, forWebSocket);
call.eventListener = client.eventListenerFactory().create(call);
return call;
}
```
可以看到此处调用 RealCall 的构造器返回了 RealCall 对象,后面我们执行的请求、取消等方法都是操作的这个 RealCall 对象。现在在看 OkHttp 的请求方法就很清晰了:
* 首先使用建造者模式创建 OkHttpClient 对象
* 由于 OkHttpClient 实现了 Call.Factory 接口(newCall 方法),调用 OkHttpClient 对象的 newCall 方法返回一个 RealCall 对象
* 然后就可以操作 RealCall 对象执行请求、取消等一系列操作。
# Get 请求
在 get 请求这一部分我们主要关注 Request 类、拦截器链条以及所应用到的责任链模式。
## Request 类
一个标准的 OkHttp get 请求示例如下:
```java
public void get(String url, Callback callback) {
Request request = new Request.Builder()
.url(url)
.build();
mClient.newCall(request).enqueue(callback);
}
```
可以看到在创建 RealCall 对象时会传递一个 Request 对象给其进行初始化,Request 顾名思义代表一个 http 请求,来看看 Request 的代码:
```java
public final class Request {
final HttpUrl url;
final String method;
final Headers headers;
final @Nullable RequestBody body;
final Object tag;
// getters and setters...
public static class Builder {
...
}
}
```
Request 的构建也使用了建造者模式,它的成员变量包括请求地址(url)、请求方法(method)、请求头(headers)、请求体(body)以及用于取消请求的 tag。
## 请求执行过程
### execute 同步请求
在上面 OkHttpClient 的 newCall 实现方法中,OkHttpClient 将其自身以及 Request 对象都传递给了创建出来的 RealCall 对象。接着调用 execute 方法或 enqueue 方法执行请求,先来看看 RealCall 类 execute 方法的源码:
```java
@Override
public Response execute() throws IOException {
synchronized (this) {
// 判断是否已执行过
if (executed) throw new IllegalStateException("Already Executed");
executed = true;
}
captureCallStackTrace();
// 回调事件监听器的开始执行方法
eventListener.callStart(this);
try {
// 将当前 Call 加入 Dispatcher 的同步执行任务队列中
client.dispatcher().executed(this);
// 在当前线程中通过拦截器链条获取返回数据 Response
Response result = getResponseWithInterceptorChain();
if (result == null) throw new IOException("Canceled");
// 返回请求结果
return result;
} catch (IOException e) {
// 请求异常
eventListener.callFailed(this, e);
throw e;
} finally {
// 将 Call 从 Dispatcher 的同步执行队列移除
client.dispatcher().finished(this);
}
}
```
先根据 executed 变量判断这个 RealCall 是否已经执行过,执行过则抛出异常。接着回调当前 Call 的事件监听器告知请求开始执行,同时 Dispatcher 会在同步执行任务队列中记录当前 Call。然后就是在当前线程直接获取返回数据了,最后会将 Call 从 Dispatcher 的同步执行队列中移除。
### getResponseWithInterceptorChain 方法
#### 责任链模式
分析拦截器链条前,我们先来复习下责任链模式:
> 责任链模式是一种对象的行为模式。在责任链模式里,很多对象由每一个对象对其下家的引用而连接起来形成一条链。请求在这个链上传递,直到链上的某一个对象决定处理此请求。发出这个请求的客户端并不知道链上的哪一个对象最终处理这个请求,这使得系统可以在不影响客户端的情况下动态地重新组织和分配责任
接下来重点看看在 getResponseWithInterceptorChain 方法中拦截器链条是如何工作的。
```java
Response getResponseWithInterceptorChain() throws IOException {
// 添加所有需要的拦截器
List<Interceptor> interceptors = new ArrayList<>();
interceptors.addAll(client.interceptors());
interceptors.add(retryAndFollowUpInterceptor);
interceptors.add(new BridgeInterceptor(client.cookieJar()));
interceptors.add(new CacheInterceptor(client.internalCache()));
interceptors.add(new ConnectInterceptor(client));
if (!forWebSocket) {
interceptors.addAll(client.networkInterceptors());
}
interceptors.add(new CallServerInterceptor(forWebSocket));
// 构建一个具体的拦截器链条
Interceptor.Chain chain = new RealInterceptorChain(interceptors, null, null, null, 0,
originalRequest, this, eventListener, client.connectTimeoutMillis(),
client.readTimeoutMillis(), client.writeTimeoutMillis());
return chain.proceed(originalRequest);
}
```
可以看到,首先创建了一个拦截器的集合并添加了一些拦截器。接着根据这些拦截器和其他一些参数创建了 Chain 对象,调用了 Chain 对象的 proceed 方法拿到请求结果。这里拦截器链条是典型的责任链模式。接下来下面我们一点点分析来看:
#### 拦截器链条
通过阅读官方 Wiki,先来看看拦截器链条的整体工作流程:
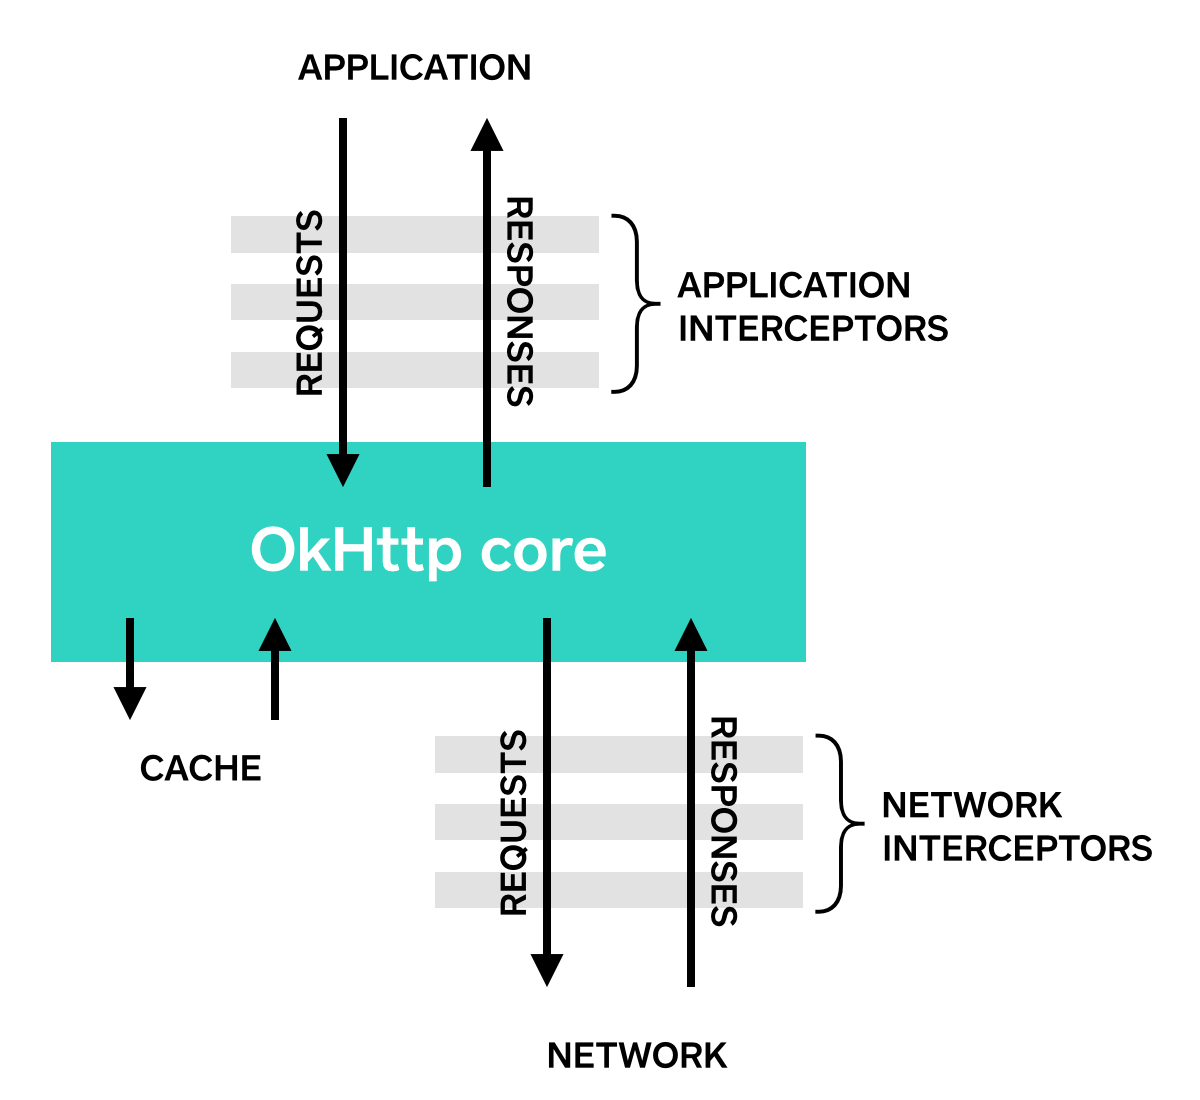
可以看到,一个完整的拦截器链条(Interceptor Chain)包括:应用拦截器、OkHttp 核心、网络拦截器以及最终的网络请求(CallServerInterceptor)。
##### 拦截器(Interceptor)
先来看看拦截器是什么?来自 Interceptor 源码注释
> 观察,修改并优化性地缩短发出的请求,并返回相应的响应。拦截器通常会在请求或响应中添加,删除或转换头部。
Interceptor 接口源码如下:
```java
public interface Interceptor {
Response intercept(Chain chain) throws IOException;
interface Chain {
...
}
}
```
仅有一个方法 intercept,接收一个 Chain 参数,并返回相应的响应结果。
OkHttp 默认提供了一些拦截器的实现,比如 CacheInterceptor 来实现缓存,我们也可以自己添加自定义的拦截器来实现特定功能,比如扇贝网开源的这个 Mock 库 [mock-api](https://github.com/shanbay/mock-api) 就是通过拦截器来实现的,大家可以看看其源码实现。
##### 链条(Chain)
接下来看看 Chain:
```java
interface Chain {
Request request();
Response proceed(Request request) throws IOException;
@Nullable Connection connection();
Call call();
int connectTimeoutMillis();
Chain withConnectTimeout(int timeout, TimeUnit unit);
int readTimeoutMillis();
Chain withReadTimeout(int timeout, TimeUnit unit);
int writeTimeoutMillis();
Chain withWriteTimeout(int timeout, TimeUnit unit);
}
```
Chain 的实现类可以获取到当前 Reauest、Call、超时时间等等,以便传递给责任链中下一个处理者使用。
##### 流程分析
1、由 getResponseWithInterceptorChain 方法源码最后一句 `return chain.proceed(originalRequest);`看到,请求最终的 Response 是调用 RealInterceptorChain 对象的 proceed 方法得到的。RealInterceptorChain 是一个具体的拦截器链条实现,可以把它理解为链条中的一个锁链,包括了所有的应用拦截器、OkHttp 核心、网络拦截器以及最终网络请求的全部实现。

2、来看看 RealInterceptorChain 的 proceed 方法,其中比较关键的代码为下面这一段:
```java
// 此处省略其他代码...
// Call the next interceptor in the chain.
RealInterceptorChain next = new RealInterceptorChain(interceptors, streamAllocation, httpCodec,
connection, index + 1, request, call, eventListener, connectTimeout, readTimeout,
writeTimeout);
Interceptor interceptor = interceptors.get(index);
Response response = interceptor.intercept(next);
// 此处省略其他代码...
```
在RealInterceptorChain的proceed方法中,创建了一个新的 RealInterceptorChain 对象,index 加 1。并取到 index 为 0 的拦截器,也就是我们手动添加的拦截器里的第一个(没添加过就默认为 RetryAndFollowUpInterceptor),执行了第一个拦截器的 intercept 方法,并将刚刚创建的RealInterceptorChain传入。这样就完成了第一个拦截器的执行工作。
3、假设第一个拦截器为 RetryAndFollowUpInterceptor,我们来看看它的 intercept 方法拿到拦截器链条究竟做了些什么?来看关键代码:
```java
@Override
public Response intercept(Chain chain) throws IOException {
Request request = chain.request();
// 向下转型为 RealInterceptorChain 对象
RealInterceptorChain realChain = (RealInterceptorChain) chain;
// ...
while (true) {
// 执行 RealInterceptorChain 对象的 proceed 方法
try {
response = realChain.proceed(request, streamAllocation, null, null);
releaseConnection = false;
} catch (IOException e) {
// ...
}
}
// ...
}
```
可以看到,RetryAndFollowUpInterceptor 在它的 intercept 方法中调用了刚刚传递过来的 Chain 的 proceed 方法。由于刚才 index 已经加 1,所以这时就会调用整个拦截器链条里的第二个拦截器,就像剥洋葱一样,依此循环。直到最终调用到 CallServerInterceptor 完成网络请求。
归纳来看(2019.08更新):
* RealInterceptorChain包括了所有的应用拦截器、OkHttp 核心、网络拦截器以及最终网络请求
* RealInterceptorChain对象顺着链条往下进行传递,携带有需执行拦截器的index
* interceptor的intercept方法从传递过来的RealInterceptorChain对象取出相关信息,并做相应修改后,调用RealInterceptorChain的proceed方法(该方法会调用下一个interceptor的intercept方法),依次传递
从整个流程中也可以看出,拦截器链条是非常经典的责任链模式。Android 中另一个责任链模式的经典应用就是事件分发机制,详情可以看这两篇博文:[Android 事件分发机制源码分析(一)触摸事件](http://xuchongyang.com/2017/07/30/Android%20%E4%BA%8B%E4%BB%B6%E5%88%86%E5%8F%91%E6%9C%BA%E5%88%B6%E6%BA%90%E7%A0%81%E5%88%86%E6%9E%90%EF%BC%88%E4%B8%80%EF%BC%89%E8%A7%A6%E6%91%B8%E4%BA%8B%E4%BB%B6/)、[Android 事件分发机制源码分析(二)按键事件](http://xuchongyang.com/2017/08/03/Android%20%E4%BA%8B%E4%BB%B6%E5%88%86%E5%8F%91%E6%9C%BA%E5%88%B6%E6%BA%90%E7%A0%81%E5%88%86%E6%9E%90%EF%BC%88%E4%BA%8C%EF%BC%89%E6%8C%89%E9%94%AE%E4%BA%8B%E4%BB%B6/)。
### enqueue 异步请求
```java
@Override
public void enqueue(Callback responseCallback) {
synchronized (this) {
// 判断是否已经执行过
if (executed) throw new IllegalStateException("Already Executed");
executed = true;
}
captureCallStackTrace();
// 回调事件监听器
eventListener.callStart(this);
// 将当前 Call 加入 Dispatcher 的异步执行任务队列中
client.dispatcher().enqueue(new AsyncCall(responseCallback));
}
```
直接将 Call 加入到了 Dispatcher 的异步执行队列中。
先来看看 AsyncCall 的代码:
```java
final class AsyncCall extends NamedRunnable {
private final Callback responseCallback;
AsyncCall(Callback responseCallback) {
super("OkHttp %s", redactedUrl());
this.responseCallback = responseCallback;
}
...
@Override protected void execute() {
boolean signalledCallback = false;
try {
Response response = getResponseWithInterceptorChain();
if (retryAndFollowUpInterceptor.isCanceled()) {
signalledCallback = true;
responseCallback.onFailure(RealCall.this, new IOException("Canceled"));
} else {
signalledCallback = true;
// 回调请求结果
responseCallback.onResponse(RealCall.this, response);
}
} catch (IOException e) {
if (signalledCallback) {
// Do not signal the callback twice!
Platform.get().log(INFO, "Callback failure for " + toLoggableString(), e);
} else {
// 请求异常
eventListener.callFailed(RealCall.this, e);
responseCallback.onFailure(RealCall.this, e);
}
} finally {
// 将当前 Call 从 Dispatcher 的异步执行队列中移除
client.dispatcher().finished(this);
}
}
}
```
可以看到,在 exeucte 方法中,依旧是调用 getResponseWithInterceptorChain 方法获取到请求 Response,并回调 Callback 的相应方法。
其中 AsyncCall 继承自 NamedRunnable,NamedRunnable 实现如下:
```java
public abstract class NamedRunnable implements Runnable {
protected final String name;
public NamedRunnable(String format, Object... args) {
this.name = Util.format(format, args);
}
@Override
public final void run() {
String oldName = Thread.currentThread().getName();
Thread.currentThread().setName(name);
try {
execute();
} finally {
Thread.currentThread().setName(oldName);
}
}
protected abstract void execute();
}
```
NamedRunnable 的 run 方法会调用 execute 方法,所以 AsyncCall 被执行时,execute 方法就会调用。那么 AsyncCall 何时会被执行呢?接着看传入 AsyncCall 后的操作。
Dispatcher 的 enqueue 方法如下:
```java
synchronized void enqueue(AsyncCall call) {
if (runningAsyncCalls.size() < maxRequests && runningCallsForHost(call) < maxRequestsPerHost) {
runningAsyncCalls.add(call);
executorService().execute(call);
} else {
readyAsyncCalls.add(call);
}
}
```
其中 maxRequests 的值为 64,maxRequestsPerHost 的值为 5。可以看到,先判断当前异步执行队列 Call 数量是否达到最大请求数量 64,以及当前主机正在处理的请求数 是否大于 5,没有达到最大数量时,直接将当前 Call 加入线程池队列进行执行,否则先添加到另一个队列进行等待。
# Post 请求
关于 post 请求,我们重点关注 RequestBody。
一个标准的 post String 请求如下所示:
```java
private static final MediaType MEDIA_TYPE_TEXT = MediaType.parse("text/plain");
public void postString() {
Request request = new Request.Builder()
.url(url)
.post(RequestBody.create(MEDIA_TYPE_TEXT, "test_string"))
.build();
mClient.newCall(request).enqueue(callback);
}
```
## RequestBody
在上面的 post 请求示例中可以看到,我们在构建 Request 对象时,有一个 post(RequestBody)方法,会在这个方法中为 Request 的请求体赋值。
RequestBody 是一个抽象类,源码组成很简单,由两个抽象方法、一个普通方法和一些静态工厂方法组成:
```java
public abstract class RequestBody {
// 返回媒体类型
public abstract @Nullable MediaType contentType();
// 返回向 sink 写入数据的长度,未知则为 -1
public long contentLength() throws IOException {
return -1;
}
// 把当前请求的内容写入 sink
public abstract void writeTo(BufferedSink sink) throws IOException;
...
// 一些静态工厂方法
}
```
在看请求体的使用流程前,我们先来看看 RequestBody 的几个静态工厂方法,这几个方法也同时对应着我们 post 请求的类型。
OkHttp 的底层实现基于 Okio 库,关于 Okio 库可以看这篇文章进行简单了解。[Android IO简化之Okio库](http://www.jianshu.com/p/295073aa554a)
### RequestBody 的创建
RequsetBody 的 create 方法重载如下:
```java
// 通过 byte 数组
public static RequestBody create(final @Nullable MediaType contentType, final byte[] content);
// 通过 byte 数组
public static RequestBody create(final @Nullable MediaType contentType, final byte[] content, final int offset, final int byteCount);
// 通过 String
public static RequestBody create(@Nullable MediaType contentType, String content);
// 通过 ByteString
public static RequestBody create(final @Nullable MediaType contentType, final ByteString content);
// 通过文件
public static RequestBody create(final @Nullable MediaType contentType, final File file);
```
其中第一个方法调用了第二个方法,所以我们只看下面四种方法即可。
#### 通过 byte 数组
```java
public static RequestBody create(final @Nullable MediaType contentType, final byte[] content,final int offset, final int byteCount) {
if (content == null) throw new NullPointerException("content == null");
Util.checkOffsetAndCount(content.length, offset, byteCount);
return new RequestBody() {
@Override public @Nullable MediaType contentType() {
return contentType;
}
@Override public long contentLength() {
return byteCount;
}
@Override public void writeTo(BufferedSink sink) throws IOException {
sink.write(content, offset, byteCount);
}
};
}
```
代码很简单,首先判断是非空,接着检查数组边界,最后返回一个 RequestBody 的匿名内部类对象。
#### 通过 String
```java
public static RequestBody create(@Nullable MediaType contentType, String content) {
Charset charset = Util.UTF_8;
if (contentType != null) {
charset = contentType.charset();
if (charset == null) {
charset = Util.UTF_8;
contentType = MediaType.parse(contentType + "; charset=utf-8");
}
}
byte[] bytes = content.getBytes(charset);
return create(contentType, bytes);
}
```
如果未指定字符编码格式,则默认为 UTF_8 格式。接着根据字符编码格式将 String 内容转换为 byte 数组,并调用方法一进行 RequestBody 对象的创建。
#### 通过 ByteString
```java
public static RequestBody create(final @Nullable MediaType contentType, final ByteString content) {
return new RequestBody() {
@Override public @Nullable MediaType contentType() {
return contentType;
}
@Override public long contentLength() throws IOException {
return content.size();
}
@Override public void writeTo(BufferedSink sink) throws IOException {
sink.write(content);
}
};
}
```
对于 ByteString 类型,Sink 可以直接写入。
#### 通过文件
```java
public static RequestBody create(final @Nullable MediaType contentType, final File file) {
if (file == null) throw new NullPointerException("content == null");
return new RequestBody() {
@Override public @Nullable MediaType contentType() {
return contentType;
}
@Override public long contentLength() {
return file.length();
}
@Override public void writeTo(BufferedSink sink) throws IOException {
Source source = null;
try {
source = Okio.source(file);
sink.writeAll(source);
} finally {
Util.closeQuietly(source);
}
}
};
}
```
File 也可以直接转换为输出流,直接写入 sink。
综上可以看到,我们可以通过二进制、字符串、文件以及 ByteString 来创建 RequestBody 对象,这些也同时是我们 post 请求可以提交的类型。
RequestBody 还有两个子类 FormBody 和 MultipartBody,我们来看看。
### FormBody
FormBody 通常用来在请求体中像提交表单一样提交数据,示例如下:
```java
public void postForm() {
RequestBody formBody = new FormBody.Builder()
.add("search", "tom")
.build();
Request request = new Request.Builder()
.url(url)
.post(formBody)
.build();
mClient.newCall(request).enqueue(callback);
}
```
FormBody 依旧采用了 Builder 模式来构建,这样可以很方便的添加表单中的键值对数据。
### MultipartBody
当我们要提交键值对数据时,可以使用 FormBody 来构建。但是假如我们需要一次提交多条信息,比如一张图片和一条评论,此时 FormBody 就无法满足需求了,需要使用到 RequestBody 的另一个子类 MultipartBody。
MultipartBody 的每一块都是一个请求体,通过 Content-Type 的 boundary 分隔符进行分割。
一个请求示例如下:
```java
public void postMultipartBody() {
RequestBody requestBody = new MultipartBody.Builder()
.setType(MultipartBody.FORM)
.addFormDataPart("name", "Tom")
.addFormDataPart("avatar", "avatar.png", RequestBody.create(
MEDIA_TYPE_PNG, new File("web/avatar.png")))
.build();
Request request = new Request.Builder()
.url(url)
.post(requestBody)
.build();
mClient.newCall(request).enqueue(callback);
}
```
由于 MultipartBody 的 MediaType 类型默认为 Multipart.MIX,我们需要手动设置为 MultipartBody.FORM 类型。
MultipartBody 源码如下:
```java
public final class MultipartBody extends RequestBody {
...
private final ByteString boundary;
private final MediaType originalType;
private final MediaType contentType;
private final List<Part> parts;
MultipartBody(ByteString boundary, MediaType type, List<Part> parts) {...}
...
@Override
public void writeTo(BufferedSink sink) throws IOException {
writeOrCountBytes(sink, false);
}
private long writeOrCountBytes(BufferedSink sink, boolean countBytes) throws IOException {
...
// 循环写入每一个请求体
for (int p = 0, partCount = parts.size(); p < partCount; p++) {
Part part = parts.get(p);
Headers headers = part.headers;
RequestBody body = part.body;
sink.write(DASHDASH);
sink.write(boundary);
sink.write(CRLF);
// 写入请求头
if (headers != null) {
for (int h = 0, headerCount = headers.size(); h < headerCount; h++) {
sink.writeUtf8(headers.name(h))
.write(COLONSPACE)
.writeUtf8(headers.value(h))
.write(CRLF);
}
}
// 写入 Content-Type
MediaType contentType = body.contentType();
if (contentType != null) {
sink.writeUtf8("Content-Type: ")
.writeUtf8(contentType.toString())
.write(CRLF);
}
// 写入 Content-Length
long contentLength = body.contentLength();
if (contentLength != -1) {
sink.writeUtf8("Content-Length: ")
.writeDecimalLong(contentLength)
.write(CRLF);
} else if (countBytes) {
// We can't measure the body's size without the sizes of its components.
byteCountBuffer.clear();
return -1L;
}
sink.write(CRLF);
if (countBytes) {
byteCount += contentLength;
} else {
// 写入请求体
body.writeTo(sink);
}
sink.write(CRLF);
}
sink.write(DASHDASH);
sink.write(boundary);
sink.write(DASHDASH);
sink.write(CRLF);
...
return byteCount;
}
}
public static final class Builder {...}
public static final class Part {...}
```
在调用 writeTo 方法时,会循环写入每一个请求体的内容。
MultipartBody 依旧采用了 Builder 模式,并对每个请求体进行了抽象为 Part 类。MultipartBody 的 builder 提供了以下几种方法添加 Part 对象:
```java
// 方法一
public Builder addPart(RequestBody body);
// 方法二
public Builder addPart(Headers headers, RequestBody body);
// 方法三
public Builder addFormDataPart(String name, String value);
// 方法四
public Builder addFormDataPart(String name, String filename, RequestBody body);
// 方法五
public Builder addPart(Part part);
```
前面四种方法都会根据传入的参数构建出 Part 对象后,调用方法五添加到请求体集合中。我们调用时常用方法三和方法四。
先来看看方法三和方法四的源码如下:
```java
public Builder addFormDataPart(String name, String value) {
return addPart(Part.createFormData(name, value));
}
public Builder addFormDataPart(String name, @Nullable String filename, RequestBody body) {
return addPart(Part.createFormData(name, filename, body));
}
```
都是分别调用了 Part.createFormData 方法创建 Part 对象,然后添加到 Multipart 所维护的 Part 集合列表。那么上面两种创建 Part 方法的重载有什么不同呢?
```java
public static Part createFormData(String name, String value) {
return createFormData(name, null, RequestBody.create(null, value));
}
public static Part createFormData(String name, @Nullable String filename, RequestBody body) {
if (name == null) {
throw new NullPointerException("name == null");
}
// 拼接请求头
StringBuilder disposition = new StringBuilder("form-data; name=");
appendQuotedString(disposition, name);
// 拼接请求头
if (filename != null) {
disposition.append("; filename=");
appendQuotedString(disposition, filename);
}
// 由请求头和请求体创建 Part 对象
return create(Headers.of("Content-Disposition", disposition.toString()), body);
}
```
可以看到,第一个方法调用了第二个方法,文件名称传值 null,创建 RequestBody 时媒体类型传值 null,仅仅由 value 参数创建出 RequestBody。
而第二个方法则主要用于上传文件。
未完待续!
# 参考文档
[OkHttp 之 MultipartBody 上传文件](http://www.liziyang.top/2016/12/05/OkHttp%E4%B9%8BMultipartBody%E4%B8%8A%E4%BC%A0%E6%96%87%E4%BB%B6/)
[OKHttp 源码解析](http://frodoking.github.io/2015/03/12/android-okhttp/)
- 导读
- Java知识
- Java基本程序设计结构
- 【基础知识】Java基础
- 【源码分析】Okio
- 【源码分析】深入理解i++和++i
- 【专题分析】JVM与GC
- 【面试清单】Java基本程序设计结构
- 对象与类
- 【基础知识】对象与类
- 【专题分析】Java类加载过程
- 【面试清单】对象与类
- 泛型
- 【基础知识】泛型
- 【面试清单】泛型
- 集合
- 【基础知识】集合
- 【源码分析】SparseArray
- 【面试清单】集合
- 多线程
- 【基础知识】多线程
- 【源码分析】ThreadPoolExecutor源码分析
- 【专题分析】volatile关键字
- 【面试清单】多线程
- Java新特性
- 【专题分析】Lambda表达式
- 【专题分析】注解
- 【面试清单】Java新特性
- Effective Java笔记
- Android知识
- Activity
- 【基础知识】Activity
- 【专题分析】运行时权限
- 【专题分析】使用Intent打开三方应用
- 【源码分析】Activity的工作过程
- 【面试清单】Activity
- 架构组件
- 【专题分析】MVC、MVP与MVVM
- 【专题分析】数据绑定
- 【面试清单】架构组件
- 界面
- 【专题分析】自定义View
- 【专题分析】ImageView的ScaleType属性
- 【专题分析】ConstraintLayout 使用
- 【专题分析】搞懂点九图
- 【专题分析】Adapter
- 【源码分析】LayoutInflater
- 【源码分析】ViewStub
- 【源码分析】View三大流程
- 【源码分析】触摸事件分发机制
- 【源码分析】按键事件分发机制
- 【源码分析】Android窗口机制
- 【面试清单】界面
- 动画和过渡
- 【基础知识】动画和过渡
- 【面试清单】动画和过渡
- 图片和图形
- 【专题分析】图片加载
- 【面试清单】图片和图形
- 后台任务
- 应用数据和文件
- 基于网络的内容
- 多线程与多进程
- 【基础知识】多线程与多进程
- 【源码分析】Handler
- 【源码分析】AsyncTask
- 【专题分析】Service
- 【源码分析】Parcelable
- 【专题分析】Binder
- 【源码分析】Messenger
- 【面试清单】多线程与多进程
- 应用优化
- 【专题分析】布局优化
- 【专题分析】绘制优化
- 【专题分析】内存优化
- 【专题分析】启动优化
- 【专题分析】电池优化
- 【专题分析】包大小优化
- 【面试清单】应用优化
- Android新特性
- 【专题分析】状态栏、ActionBar和导航栏
- 【专题分析】应用图标、通知栏适配
- 【专题分析】Android新版本重要变更
- 【专题分析】唯一标识符的最佳做法
- 开源库源码分析
- 【源码分析】BaseRecyclerViewAdapterHelper
- 【源码分析】ButterKnife
- 【源码分析】Dagger2
- 【源码分析】EventBus3(一)
- 【源码分析】EventBus3(二)
- 【源码分析】Glide
- 【源码分析】OkHttp
- 【源码分析】Retrofit
- 其他知识
- Flutter
- 原生开发与跨平台开发
- 整体归纳
- 状态及状态管理
- 零碎知识点
- 添加Flutter到现有应用
- Git知识
- Git命令
- .gitignore文件
- 设计模式
- 创建型模式
- 结构型模式
- 行为型模式
- RxJava
- 基础
- Linux知识
- 环境变量
- Linux命令
- ADB命令
- 算法
- 常见数据结构及实现
- 数组
- 排序算法
- 链表
- 二叉树
- 栈和队列
- 算法时间复杂度
- 常见算法思想
- 其他技术
- 正则表达式
- 编码格式
- HTTP与HTTPS
- 【面试清单】其他知识
- 开发归纳
- Android零碎问题
- 其他零碎问题
- 开发思路