
[TOC]
# 布局优化
布局优化的思想很简单,就是尽量减少布局文件的层级。主要从以下几个方面入手:
* 善于重用布局文件
* 使用ViewStub仅在需要时才加载
* 删除无用的控件和布局
* 使用性能较好的ViewGroup
## 重用布局文件
### \<include>标签
\<include>标签可以允许在一个布局当中引入另外一个布局,那么比如说我们程序的所有界面都有一个公共的部分,这个时候最好的做法就是将这个公共的部分提取到一个独立的布局文件当中,然后在每个界面的布局文件当中来引用这个公共的布局。
```xml
<?xml version="1.0" encoding="utf-8"?>
<LinearLayout xmlns:android="http://schemas.android.com/apk/res/android"
android:layout_width="match_parent"
android:layout_height="match_parent"
android:orientation="vertical" >
<include
android:layout_width="match_parent"
android:layout_height="wrap_content"
layout="@layout/titlebar" />
......
</LinearLayout>
```
其中,在\<include>标签当中,我们是可以覆写所有layout属性的,即include中指定的layout属性将会覆盖掉titlebar中指定的layout属性。
我们可以覆写titlebar中的任何一个layout属性,如layout_gravity、layout_margin等,而非layout属性则无法在\<include>标签当中进行覆写。需要注意的是,如果想要在\<include>标签当中覆写layout属性,必须要将layout_width和layout_height这两个属性也进行覆写,否则覆写效果将不会生效。
### \<merge>标签
\<merge>标签是作为\<include>标签的一种辅助扩展来使用的,它的主要作用是为了防止在引用布局文件时产生多余的布局嵌套。
比如说我们需要编写一个确定取消按钮的公共布局,这样任何一个界面需要确定和取消功能时就不用再单独编写了,新建ok\_cancel\_layout.xml,代码如下所示:
```xml
<?xml version="1.0" encoding="utf-8"?>
<LinearLayout xmlns:android="http://schemas.android.com/apk/res/android"
android:layout_width="match_parent"
android:layout_height="wrap_content"
android:orientation="vertical" >
<Button
android:id="@+id/ok"
android:layout_width="match_parent"
android:layout_height="wrap_content"
android:layout_marginLeft="20dp"
android:layout_marginRight="20dp"
android:text="OK" />
<Button
android:id="@+id/cancel"
android:layout_width="match_parent"
android:layout_height="wrap_content"
android:layout_marginLeft="20dp"
android:layout_marginRight="20dp"
android:layout_marginTop="10dp"
android:text="Cancel" />
</LinearLayout>
```
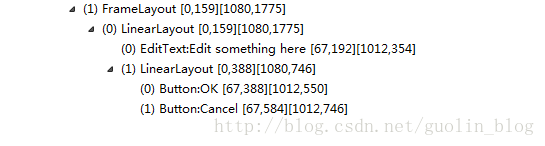
但是把这个布局文件通过\<include>标签引入时,会造成布局嵌套,也就是又多了一层LinearLayout。布局层次如下:
使用\<merge>标签可以解决这个问题:
```xml
<?xml version="1.0" encoding="utf-8"?>
<merge xmlns:android="http://schemas.android.com/apk/res/android">
<Button
android:id="@+id/ok"
android:layout_width="match_parent"
android:layout_height="wrap_content"
android:layout_marginLeft="20dp"
android:layout_marginRight="20dp"
android:text="OK" />
<Button
android:id="@+id/cancel"
android:layout_width="match_parent"
android:layout_height="wrap_content"
android:layout_marginLeft="20dp"
android:layout_marginRight="20dp"
android:layout_marginTop="10dp"
android:text="Cancel" />
</merge>
```
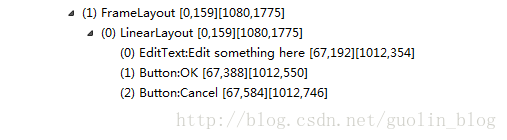
此时布局层次如下:
## ViewStub仅在需要时才加载
有的时候我们会遇到这样的场景,就是某个布局当中的元素非常多,但并不是所有元素都一起显示出来的,而是普通情况下只显示部分常用的元素,而那些不常用的元素只有在用户进行特定操作的情况下才会显示出来。
Android为此提供了一种非常轻量级的控件:ViewStub。ViewStub虽说也是View的一种,但是它没有大小,没有绘制功能,也不参与布局,资源消耗非常低,将它放置在布局当中基本可以认为是完全不会影响性能的。
ViewStub 的使用很简单,在布局文件中像引入其他控件一样引入 ViewStub:
```xml
<ViewStub android:id="@+id/stub"
android:inflatedId="@+id/subTree"
android:layout="@layout/mySubTree"
android:layout_width="120dip"
android:layout_height="40dip" />
```
需要展示 ViewStub 所引用的视图时,通过 id 获取到 ViewStub:
```java
ViewStub stub = (ViewStub) findViewById(R.id.stub);
View inflated = stub.inflate();
// stub.setVisibility(View.VISIBLE);
```
除了调用 inflate 方法,还可以调用 setVisible 方法来展示 ViewStub 所引用的 View。
关于ViewStub的使用,可以参考[ViewStub源码分析](http://wiki.xuchongyang.com/1262571)
## 使用性能较好的ViewGroup
* 删除无用的控件和层级
* 不需要嵌套时优先使用LinearLayout和FrameLayout,需要嵌套或者复杂布局时使用ConstraintLayout代替RelativeLayout
* LinearLayout、RelativeLayout、FrameLayout、ConstraintLayout几种布局的区别
* RelativeLayout 子 View 的排列方式是基于彼此的依赖关系,所以在测量时会在横向和纵向上分别测量一次
* LinearLayout 为线性排列,在没有设置 weight 属性时只测量一次,设置了 weight 属性也是测量两次
* FrameLayout会默认把所有控件摆放在布局的左上角,并覆盖在前一控件的上层,当然可以通过 layout\_gravity 属性来指定对齐方式
* ConstraintLayout 使用约束的方式来指定各个控件的位置和关系,View 的位置受到三类约束:其他 View、父容器、基准线,并且支持设置比例。可以使布局完全扁平化,性能更高
# 参考
《Android开发艺术探索》任玉刚 著
- 导读
- Java知识
- Java基本程序设计结构
- 【基础知识】Java基础
- 【源码分析】Okio
- 【源码分析】深入理解i++和++i
- 【专题分析】JVM与GC
- 【面试清单】Java基本程序设计结构
- 对象与类
- 【基础知识】对象与类
- 【专题分析】Java类加载过程
- 【面试清单】对象与类
- 泛型
- 【基础知识】泛型
- 【面试清单】泛型
- 集合
- 【基础知识】集合
- 【源码分析】SparseArray
- 【面试清单】集合
- 多线程
- 【基础知识】多线程
- 【源码分析】ThreadPoolExecutor源码分析
- 【专题分析】volatile关键字
- 【面试清单】多线程
- Java新特性
- 【专题分析】Lambda表达式
- 【专题分析】注解
- 【面试清单】Java新特性
- Effective Java笔记
- Android知识
- Activity
- 【基础知识】Activity
- 【专题分析】运行时权限
- 【专题分析】使用Intent打开三方应用
- 【源码分析】Activity的工作过程
- 【面试清单】Activity
- 架构组件
- 【专题分析】MVC、MVP与MVVM
- 【专题分析】数据绑定
- 【面试清单】架构组件
- 界面
- 【专题分析】自定义View
- 【专题分析】ImageView的ScaleType属性
- 【专题分析】ConstraintLayout 使用
- 【专题分析】搞懂点九图
- 【专题分析】Adapter
- 【源码分析】LayoutInflater
- 【源码分析】ViewStub
- 【源码分析】View三大流程
- 【源码分析】触摸事件分发机制
- 【源码分析】按键事件分发机制
- 【源码分析】Android窗口机制
- 【面试清单】界面
- 动画和过渡
- 【基础知识】动画和过渡
- 【面试清单】动画和过渡
- 图片和图形
- 【专题分析】图片加载
- 【面试清单】图片和图形
- 后台任务
- 应用数据和文件
- 基于网络的内容
- 多线程与多进程
- 【基础知识】多线程与多进程
- 【源码分析】Handler
- 【源码分析】AsyncTask
- 【专题分析】Service
- 【源码分析】Parcelable
- 【专题分析】Binder
- 【源码分析】Messenger
- 【面试清单】多线程与多进程
- 应用优化
- 【专题分析】布局优化
- 【专题分析】绘制优化
- 【专题分析】内存优化
- 【专题分析】启动优化
- 【专题分析】电池优化
- 【专题分析】包大小优化
- 【面试清单】应用优化
- Android新特性
- 【专题分析】状态栏、ActionBar和导航栏
- 【专题分析】应用图标、通知栏适配
- 【专题分析】Android新版本重要变更
- 【专题分析】唯一标识符的最佳做法
- 开源库源码分析
- 【源码分析】BaseRecyclerViewAdapterHelper
- 【源码分析】ButterKnife
- 【源码分析】Dagger2
- 【源码分析】EventBus3(一)
- 【源码分析】EventBus3(二)
- 【源码分析】Glide
- 【源码分析】OkHttp
- 【源码分析】Retrofit
- 其他知识
- Flutter
- 原生开发与跨平台开发
- 整体归纳
- 状态及状态管理
- 零碎知识点
- 添加Flutter到现有应用
- Git知识
- Git命令
- .gitignore文件
- 设计模式
- 创建型模式
- 结构型模式
- 行为型模式
- RxJava
- 基础
- Linux知识
- 环境变量
- Linux命令
- ADB命令
- 算法
- 常见数据结构及实现
- 数组
- 排序算法
- 链表
- 二叉树
- 栈和队列
- 算法时间复杂度
- 常见算法思想
- 其他技术
- 正则表达式
- 编码格式
- HTTP与HTTPS
- 【面试清单】其他知识
- 开发归纳
- Android零碎问题
- 其他零碎问题
- 开发思路