# 十四、生成对抗网络
生成模型被训练以生成与他们训练的数据类似的更多数据,并且训练对抗模型以通过提供对抗性示例来区分真实数据和假数据。
**生成对抗网络**(**GAN**)结合了两种模型的特征。 GAN 有两个组成部分:
* 生成模型,用于学习如何生成类似数据的
* 判别模型,用于学习如何区分真实数据和生成数据(来自生成模型)
GAN 已成功应用于各种复杂问题,例如:
* 从低分辨率图像生成照片般逼真的高分辨率图像
* 在文本中合成图像
* 风格迁移
* 补全不完整的图像和视频
在本章中,我们将学习以下主题,以学习如何在 TensorFlow 和 Keras 中实现 GAN:
* 生成对抗网络
* TensorFlow 中的简单 GAN
* Keras 中的简单 GAN
* TensorFlow 和 Keras 中的深度卷积 GAN
# 生成对抗网络 101
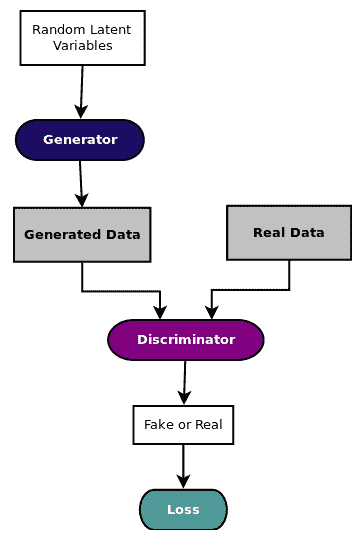
如下图所示,生成对抗网络(通常称为 GAN)有两个同步工作模型,用于学习和训练复杂数据,如图像,视频或音频文件:

直观地,生成器模型从随机噪声开始生成数据,但是慢慢地学习如何生成更真实的数据。生成器输出和实际数据被馈送到判别器,该判别器学习如何区分假数据和真实数据。
因此,生成器和判别器都发挥对抗性游戏,其中生成器试图通过生成尽可能真实的数据来欺骗判别器,并且判别器试图不通过从真实数据中识别伪数据而被欺骗,因此判别器试图最小化分类损失。两个模型都以锁步方式进行训练。
在数学上,生成模型`G(z)`学习概率分布`p(z)`,使得判别器`D(G(z), x)`无法在概率分布`p(z)`和`p(x)`之间进行识别。 GAN 的目标函数可以通过下面描述值函数`V`的等式来描述,(来自[此链接](https://papers.nips.cc/paper/5423-generative-adversarial-nets.pdf)):

[可以在此链接中找到 IAN Goodfellow 在 NIPS 2016 上关于 GAN 的开创性教程](https://arxiv.org/pdf/1701.00160.pdf)。
这个描述代表了一个简单的 GAN(在文献中也称为香草 GAN),[由 Goodfellow 在此链接提供的开创性论文中首次介绍](https://arxiv.org/abs/1406.2661)。从那时起,在基于 GAN 推导不同架构并将其应用于不同应用领域方面进行了大量研究。
例如,在条件 GAN 中,为生成器和判别器网络提供标签,使得条件 GAN 的目标函数可以通过以下描述值函数`V`的等式来描述:

[描述条件 GAN 的原始论文位于此链接](https://arxiv.org/abs/1411.1784)。
应用中使用的其他几种衍生产品及其原始论文,如文本到图像,图像合成,图像标记,样式转移和图像转移等,如下表所示:
| **GAN 衍生物** | **原始文件** | **示例应用** |
| --- | --- | --- |
| StackGAN | <https://arxiv.org/abs/1710.10916> | 文字到图像 |
| StackGAN++ | <https://arxiv.org/abs/1612.03242> | 逼真的图像合成 |
| DCGAN | <https://arxiv.org/abs/1511.06434> | 图像合成 |
| HR-DCGAN | <https://arxiv.org/abs/1711.06491> | 高分辨率图像合成 |
| 条件 GAN | <https://arxiv.org/abs/1411.1784> | 图像标记 |
| InfoGAN | <https://arxiv.org/abs/1606.03657> | 风格识别 |
| Wasserstein GAN | <https://arxiv.org/abs/1701.07875> <https://arxiv.org/abs/1704.00028> | 图像生成 |
| 耦合 GAN | <https://arxiv.org/abs/1606.07536> | 图像转换,域适应 |
| BEGAN | <https://arxiv.org/abs/1703.10717> | 图像生成 |
| DiscoGAN | <https://arxiv.org/abs/1703.05192> | 风格迁移 |
| CycleGAN | <https://arxiv.org/abs/1703.10593> | 风格迁移 |
让我们练习使用 MNIST 数据集创建一个简单的 GAN。在本练习中,我们将使用以下函数将 MNIST 数据集标准化为介于`[-1, +1]`之间:
```py
def norm(x):
return (x-0.5)/0.5
```
我们还定义了 256 维的随机噪声,用于测试生成器模型:
```py
n_z = 256
z_test = np.random.uniform(-1.0,1.0,size=[8,n_z])
```
显示将在本章所有示例中使用的生成图像的函数:
```py
def display_images(images):
for i in range(images.shape[0]): plt.subplot(1, 8, i + 1)
plt.imshow(images[i])
plt.axis('off')
plt.tight_layout()
plt.show()
```
# 建立和训练 GAN 的最佳实践
对于我们为此演示选择的数据集,判别器在对真实和假图像进行分类方面变得非常擅长,因此没有为生成器提供梯度方面的大量反馈。因此,我们必须通过以下最佳实践使判别器变弱:
* 判别器的学习率保持远高于生成器的学习率。
* 判别器的优化器是`GradientDescent`,生成器的优化器是`Adam`。
* 判别器具有丢弃正则化,而生成器则没有。
* 与生成器相比,判别器具有更少的层和更少的神经元。
* 生成器的输出是`tanh`,而判别器的输出是 sigmoid。
* 在 Keras 模型中,对于实际数据的标签,我们使用 0.9 而不是 1.0 的值,对于伪数据的标签,我们使用 0.1 而不是 0.0,以便在标签中引入一点噪声
欢迎您探索并尝试其他最佳实践。
# TensorFlow 中的简单的 GAN
您可以按照 Jupyter 笔记本中的代码`ch-14a_SimpleGAN`。
为了使用 TensorFlow 构建 GAN,我们使用以下步骤构建三个网络,两个判别器模型和一个生成器模型:
1. 首先添加用于定义网络的超参数:
```py
# graph hyperparameters
g_learning_rate = 0.00001
d_learning_rate = 0.01
n_x = 784 # number of pixels in the MNIST image
# number of hidden layers for generator and discriminator
g_n_layers = 3
d_n_layers = 1
# neurons in each hidden layer
g_n_neurons = [256, 512, 1024]
d_n_neurons = [256]
# define parameter ditionary
d_params = {}
g_params = {}
activation = tf.nn.leaky_relu
w_initializer = tf.glorot_uniform_initializer
b_initializer = tf.zeros_initializer
```
1. 接下来,定义生成器网络:
```py
z_p = tf.placeholder(dtype=tf.float32, name='z_p',
shape=[None, n_z])
layer = z_p
# add generator network weights, biases and layers
with tf.variable_scope('g'):
for i in range(0, g_n_layers): w_name = 'w_{0:04d}'.format(i)
g_params[w_name] = tf.get_variable(
name=w_name,
shape=[n_z if i == 0 else g_n_neurons[i - 1],
g_n_neurons[i]],
initializer=w_initializer())
b_name = 'b_{0:04d}'.format(i)
g_params[b_name] = tf.get_variable(
name=b_name, shape=[g_n_neurons[i]],
initializer=b_initializer())
layer = activation(
tf.matmul(layer, g_params[w_name]) + g_params[b_name])
# output (logit) layer
i = g_n_layers
w_name = 'w_{0:04d}'.format(i)
g_params[w_name] = tf.get_variable(
name=w_name,
shape=[g_n_neurons[i - 1], n_x],
initializer=w_initializer())
b_name = 'b_{0:04d}'.format(i)
g_params[b_name] = tf.get_variable(
name=b_name, shape=[n_x], initializer=b_initializer())
g_logit = tf.matmul(layer, g_params[w_name]) + g_params[b_name]
g_model = tf.nn.tanh(g_logit)
```
1. 接下来,定义我们将构建的两个判别器网络的权重和偏差:
```py
with tf.variable_scope('d'):
for i in range(0, d_n_layers): w_name = 'w_{0:04d}'.format(i)
d_params[w_name] = tf.get_variable(
name=w_name,
shape=[n_x if i == 0 else d_n_neurons[i - 1],
d_n_neurons[i]],
initializer=w_initializer())
b_name = 'b_{0:04d}'.format(i)
d_params[b_name] = tf.get_variable(
name=b_name, shape=[d_n_neurons[i]],
initializer=b_initializer())
#output (logit) layer
i = d_n_layers
w_name = 'w_{0:04d}'.format(i)
d_params[w_name] = tf.get_variable(
name=w_name, shape=[d_n_neurons[i - 1], 1],
initializer=w_initializer())
b_name = 'b_{0:04d}'.format(i)
d_params[b_name] = tf.get_variable(
name=b_name, shape=[1], initializer=b_initializer())
```
1. 现在使用这些参数,构建将真实图像作为输入并输出分类的判别器:
```py
# define discriminator_real
# input real images
x_p = tf.placeholder(dtype=tf.float32, name='x_p',
shape=[None, n_x])
layer = x_p
with tf.variable_scope('d'):
for i in range(0, d_n_layers): w_name = 'w_{0:04d}'.format(i)
b_name = 'b_{0:04d}'.format(i)
layer = activation(
tf.matmul(layer, d_params[w_name]) + d_params[b_name])
layer = tf.nn.dropout(layer,0.7)
#output (logit) layer
i = d_n_layers
w_name = 'w_{0:04d}'.format(i)
b_name = 'b_{0:04d}'.format(i)
d_logit_real = tf.matmul(layer,
d_params[w_name]) + d_params[b_name]
d_model_real = tf.nn.sigmoid(d_logit_real)
```
1. 接下来,使用相同的参数构建另一个判别器网络,但提供生成器的输出作为输入:
```py
# define discriminator_fake
# input generated fake images
z = g_model
layer = z
with tf.variable_scope('d'):
for i in range(0, d_n_layers): w_name = 'w_{0:04d}'.format(i)
b_name = 'b_{0:04d}'.format(i)
layer = activation(
tf.matmul(layer, d_params[w_name]) + d_params[b_name])
layer = tf.nn.dropout(layer,0.7)
#output (logit) layer
i = d_n_layers
w_name = 'w_{0:04d}'.format(i)
b_name = 'b_{0:04d}'.format(i)
d_logit_fake = tf.matmul(layer,
d_params[w_name]) + d_params[b_name]
d_model_fake = tf.nn.sigmoid(d_logit_fake)
```
1. 现在我们已经建立了三个网络,它们之间的连接是使用损失,优化器和训练函数完成的。在训练生成器时,我们只训练生成器的参数,在训练判别器时,我们只训练判别器的参数。我们使用`var_list`参数将此指定给优化器的`minimize()`函数。以下是为两种网络定义损失,优化器和训练函数的完整代码:
```py
g_loss = -tf.reduce_mean(tf.log(d_model_fake))
d_loss = -tf.reduce_mean(tf.log(d_model_real) + tf.log(1 - d_model_fake))
g_optimizer = tf.train.AdamOptimizer(g_learning_rate)
d_optimizer = tf.train.GradientDescentOptimizer(d_learning_rate)
g_train_op = g_optimizer.minimize(g_loss,
var_list=list(g_params.values()))
d_train_op = d_optimizer.minimize(d_loss,
var_list=list(d_params.values()))
```
1. 现在我们已经定义了模型,我们必须训练模型。训练按照以下算法完成:
```py
For each epoch:
For each batch: get real images x_batch
generate noise z_batch
train discriminator using z_batch and x_batch
generate noise z_batch
train generator using z_batch
```
笔记本电脑的完整训练代码如下:
```py
n_epochs = 400
batch_size = 100
n_batches = int(mnist.train.num_examples / batch_size)
n_epochs_print = 50
with tf.Session() as tfs:
tfs.run(tf.global_variables_initializer())
for epoch in range(n_epochs):
epoch_d_loss = 0.0
epoch_g_loss = 0.0
for batch in range(n_batches):
x_batch, _ = mnist.train.next_batch(batch_size)
x_batch = norm(x_batch)
z_batch = np.random.uniform(-1.0,1.0,size=[batch_size,n_z])
feed_dict = {x_p: x_batch,z_p: z_batch}
_,batch_d_loss = tfs.run([d_train_op,d_loss],
feed_dict=feed_dict)
z_batch = np.random.uniform(-1.0,1.0,size=[batch_size,n_z])
feed_dict={z_p: z_batch}
_,batch_g_loss = tfs.run([g_train_op,g_loss],
feed_dict=feed_dict)
epoch_d_loss += batch_d_loss
epoch_g_loss += batch_g_loss
if epoch%n_epochs_print == 0:
average_d_loss = epoch_d_loss / n_batches
average_g_loss = epoch_g_loss / n_batches
print('epoch: {0:04d} d_loss = {1:0.6f} g_loss = {2:0.6f}'
.format(epoch,average_d_loss,average_g_loss))
# predict images using generator model trained
x_pred = tfs.run(g_model,feed_dict={z_p:z_test})
display_images(x_pred.reshape(-1,pixel_size,pixel_size))
```
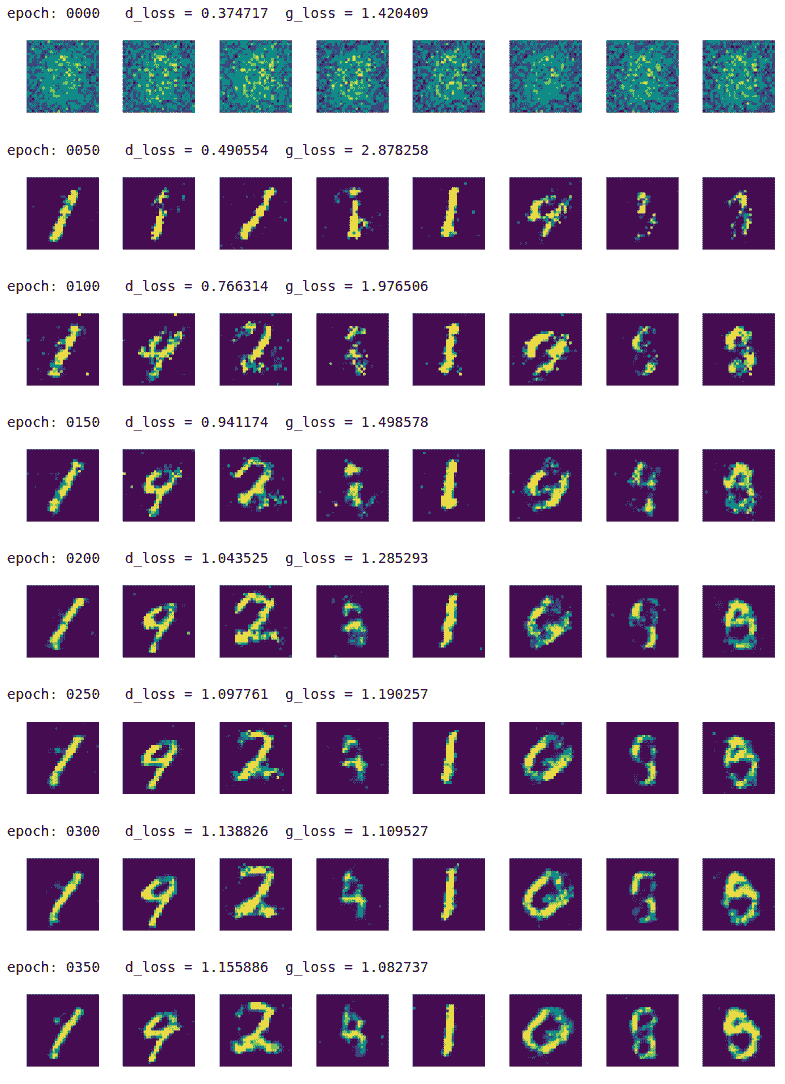
我们每 50 个周期印刷生成的图像:

正如我们所看到的那样,生成器在周期 0 中只产生噪声,但是在周期 350 中,它经过训练可以产生更好的手写数字形状。您可以尝试使用周期,正则化,网络架构和其他超参数进行试验,看看是否可以产生更快更好的结果。
# Keras 中的简单的 GAN
您可以按照 Jupyter 笔记本中的代码`ch-14a_SimpleGAN`。
现在让我们在 Keras 实现相同的模型:
1. 超参数定义与上一节保持一致:
```py
# graph hyperparameters
g_learning_rate = 0.00001
d_learning_rate = 0.01
n_x = 784 # number of pixels in the MNIST image
# number of hidden layers for generator and discriminator
g_n_layers = 3
d_n_layers = 1
# neurons in each hidden layer
g_n_neurons = [256, 512, 1024]
d_n_neurons = [256]
```
1. 接下来,定义生成器网络:
```py
# define generator
g_model = Sequential()
g_model.add(Dense(units=g_n_neurons[0],
input_shape=(n_z,),
name='g_0'))
g_model.add(LeakyReLU())
for i in range(1,g_n_layers):
g_model.add(Dense(units=g_n_neurons[i],
name='g_{}'.format(i)
))
g_model.add(LeakyReLU())
g_model.add(Dense(units=n_x, activation='tanh',name='g_out'))
print('Generator:')
g_model.summary()
g_model.compile(loss='binary_crossentropy',
optimizer=keras.optimizers.Adam(lr=g_learning_rate)
)
```
这就是生成器模型的样子:
```py
Generator:
_________________________________________________________________
Layer (type) Output Shape Param #
=================================================================
g_0 (Dense) (None, 256) 65792
_________________________________________________________________
leaky_re_lu_1 (LeakyReLU) (None, 256) 0
_________________________________________________________________
g_1 (Dense) (None, 512) 131584
_________________________________________________________________
leaky_re_lu_2 (LeakyReLU) (None, 512) 0
_________________________________________________________________
g_2 (Dense) (None, 1024) 525312
_________________________________________________________________
leaky_re_lu_3 (LeakyReLU) (None, 1024) 0
_________________________________________________________________
g_out (Dense) (None, 784) 803600
=================================================================
Total params: 1,526,288
Trainable params: 1,526,288
Non-trainable params: 0
_________________________________________________________________
```
1. 在 Keras 示例中,我们没有定义两个判别器网络,就像我们在 TensorFlow 示例中定义的那样。相反,我们定义一个判别器网络,然后将生成器和判别器网络缝合到 GAN 网络中。然后,GAN 网络仅用于训练生成器参数,判别器网络用于训练判别器参数:
```py
# define discriminator
d_model = Sequential()
d_model.add(Dense(units=d_n_neurons[0],
input_shape=(n_x,),
name='d_0'
))
d_model.add(LeakyReLU())
d_model.add(Dropout(0.3))
for i in range(1,d_n_layers):
d_model.add(Dense(units=d_n_neurons[i],
name='d_{}'.format(i)
))
d_model.add(LeakyReLU())
d_model.add(Dropout(0.3))
d_model.add(Dense(units=1, activation='sigmoid',name='d_out'))
print('Discriminator:')
d_model.summary()
d_model.compile(loss='binary_crossentropy',
optimizer=keras.optimizers.SGD(lr=d_learning_rate)
)
```
这是判别器模型的外观:
```py
Discriminator:
_________________________________________________________________
Layer (type) Output Shape Param #
=================================================================
d_0 (Dense) (None, 256) 200960
_________________________________________________________________
leaky_re_lu_4 (LeakyReLU) (None, 256) 0
_________________________________________________________________
dropout_1 (Dropout) (None, 256) 0
_________________________________________________________________
d_out (Dense) (None, 1) 257
=================================================================
Total params: 201,217
Trainable params: 201,217
Non-trainable params: 0
_________________________________________________________________
```
1. 接下来,定义 GAN 网络,并将判别器模型的可训练属性转换为`false`,因为 GAN 仅用于训练生成器:
```py
# define GAN network
d_model.trainable=False
z_in = Input(shape=(n_z,),name='z_in')
x_in = g_model(z_in)
gan_out = d_model(x_in)
gan_model = Model(inputs=z_in,outputs=gan_out,name='gan')
print('GAN:')
gan_model.summary()
```
```py
gan_model.compile(loss='binary_crossentropy',
optimizer=keras.optimizers.Adam(lr=g_learning_rate)
)
```
这就是 GAN 模型的样子:
```py
GAN:
_________________________________________________________________
Layer (type) Output Shape Param #
=================================================================
z_in (InputLayer) (None, 256) 0
_________________________________________________________________
sequential_1 (Sequential) (None, 784) 1526288
_________________________________________________________________
sequential_2 (Sequential) (None, 1) 201217
=================================================================
Total params: 1,727,505
Trainable params: 1,526,288
Non-trainable params: 201,217
_________________________________________________________________
```
1. 太好了,现在我们已经定义了三个模型,我们必须训练模型。训练按照以下算法进行:
```py
For each epoch:
For each batch: get real images x_batch
generate noise z_batch
generate images g_batch using generator model
combine g_batch and x_batch into x_in and create labels y_out
set discriminator model as trainable
train discriminator using x_in and y_out
generate noise z_batch
set x_in = z_batch and labels y_out = 1
set discriminator model as non-trainable
train gan model using x_in and y_out,
(effectively training generator model)
```
为了设置标签,我们分别对真实和假图像应用标签 0.9 和 0.1。通常,建议您使用标签平滑,通过为假数据选择 0.0 到 0.3 的随机值,为实际数据选择 0.8 到 1.0。
以下是笔记本电脑训练的完整代码:
```py
n_epochs = 400
batch_size = 100
n_batches = int(mnist.train.num_examples / batch_size)
n_epochs_print = 50
for epoch in range(n_epochs+1):
epoch_d_loss = 0.0
epoch_g_loss = 0.0
for batch in range(n_batches):
x_batch, _ = mnist.train.next_batch(batch_size)
x_batch = norm(x_batch)
z_batch = np.random.uniform(-1.0,1.0,size=[batch_size,n_z])
g_batch = g_model.predict(z_batch)
x_in = np.concatenate([x_batch,g_batch])
y_out = np.ones(batch_size*2)
y_out[:batch_size]=0.9
y_out[batch_size:]=0.1
d_model.trainable=True
batch_d_loss = d_model.train_on_batch(x_in,y_out)
z_batch = np.random.uniform(-1.0,1.0,size=[batch_size,n_z])
x_in=z_batch
y_out = np.ones(batch_size)
d_model.trainable=False
batch_g_loss = gan_model.train_on_batch(x_in,y_out)
epoch_d_loss += batch_d_loss
epoch_g_loss += batch_g_loss
if epoch%n_epochs_print == 0:
average_d_loss = epoch_d_loss / n_batches
average_g_loss = epoch_g_loss / n_batches
print('epoch: {0:04d} d_loss = {1:0.6f} g_loss = {2:0.6f}'
.format(epoch,average_d_loss,average_g_loss))
# predict images using generator model trained
x_pred = g_model.predict(z_test)
display_images(x_pred.reshape(-1,pixel_size,pixel_size))
```
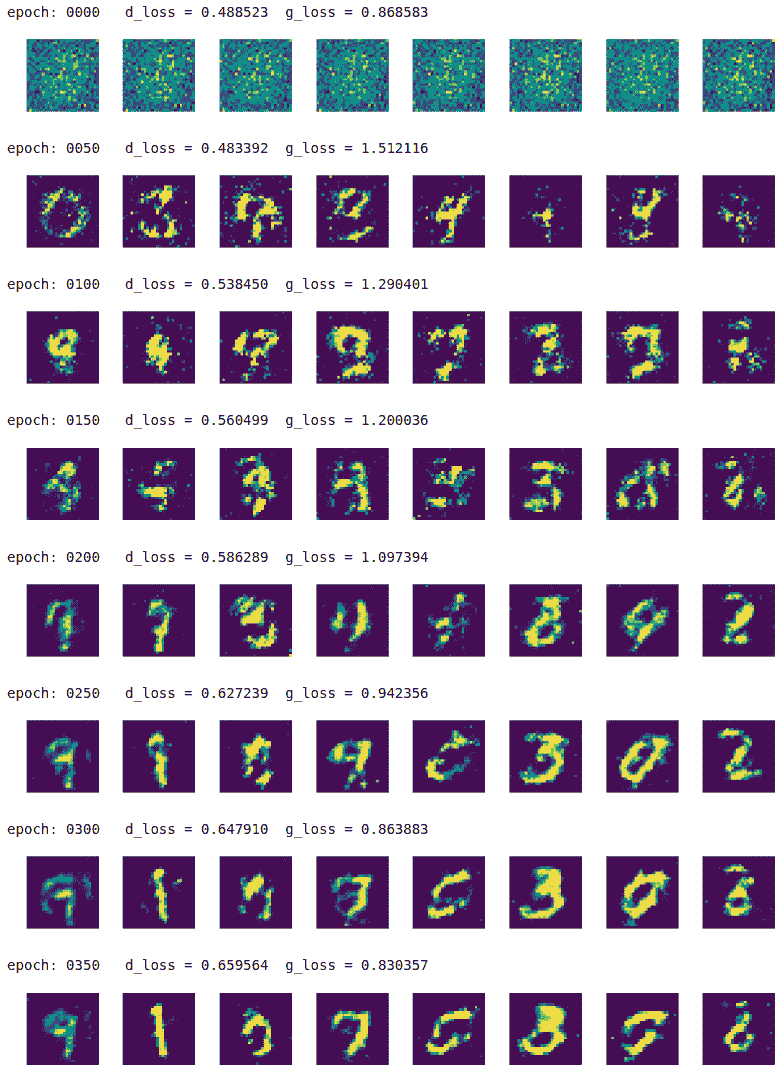
我们每 50 个周期印刷结果,最多 350 个周期:

该模型慢慢地学习从随机噪声中生成高质量的手写数字图像。
GAN 有如此多的变化,它将需要另一本书来涵盖所有不同类型的 GAN。但是,实现技术几乎与我们在此处所示的相似。
# TensorFlow 和 Keras 中的深度卷积 GAN
您可以按照 Jupyter 笔记本中的代码`ch-14b_DCGAN`。
在 DCGAN 中,判别器和生成器都是使用深度卷积网络实现的:
1. 在此示例中,我们决定将生成器实现为以下网络:
```py
Generator:
_________________________________________________________________
Layer (type) Output Shape Param #
=================================================================
g_in (Dense) (None, 3200) 822400
_________________________________________________________________
g_in_act (Activation) (None, 3200) 0
_________________________________________________________________
g_in_reshape (Reshape) (None, 5, 5, 128) 0
_________________________________________________________________
g_0_up2d (UpSampling2D) (None, 10, 10, 128) 0
_________________________________________________________________
g_0_conv2d (Conv2D) (None, 10, 10, 64) 204864
_________________________________________________________________
g_0_act (Activation) (None, 10, 10, 64) 0
_________________________________________________________________
g_1_up2d (UpSampling2D) (None, 20, 20, 64) 0
_________________________________________________________________
g_1_conv2d (Conv2D) (None, 20, 20, 32) 51232
_________________________________________________________________
g_1_act (Activation) (None, 20, 20, 32) 0
_________________________________________________________________
g_2_up2d (UpSampling2D) (None, 40, 40, 32) 0
_________________________________________________________________
g_2_conv2d (Conv2D) (None, 40, 40, 16) 12816
_________________________________________________________________
g_2_act (Activation) (None, 40, 40, 16) 0
_________________________________________________________________
g_out_flatten (Flatten) (None, 25600) 0
_________________________________________________________________
g_out (Dense) (None, 784) 20071184
=================================================================
Total params: 21,162,496
Trainable params: 21,162,496
Non-trainable params: 0
```
1. 生成器是一个更强大的网络,有三个卷积层,然后是 tanh 激活。我们将判别器网络定义如下:
```py
Discriminator:
_________________________________________________________________
Layer (type) Output Shape Param #
=================================================================
d_0_reshape (Reshape) (None, 28, 28, 1) 0
_________________________________________________________________
d_0_conv2d (Conv2D) (None, 28, 28, 64) 1664
_________________________________________________________________
d_0_act (Activation) (None, 28, 28, 64) 0
_________________________________________________________________
d_0_maxpool (MaxPooling2D) (None, 14, 14, 64) 0
_________________________________________________________________
d_out_flatten (Flatten) (None, 12544) 0
_________________________________________________________________
d_out (Dense) (None, 1) 12545
=================================================================
Total params: 14,209
Trainable params: 14,209
Non-trainable params: 0
_________________________________________________________________
```
1. GAN 网络由判别器和生成器组成,如前所述:
```py
GAN:
_________________________________________________________________
Layer (type) Output Shape Param #
=================================================================
z_in (InputLayer) (None, 256) 0
_________________________________________________________________
g (Sequential) (None, 784) 21162496
_________________________________________________________________
d (Sequential) (None, 1) 14209
=================================================================
Total params: 21,176,705
Trainable params: 21,162,496
Non-trainable params: 14,209
_________________________________________________________________
```
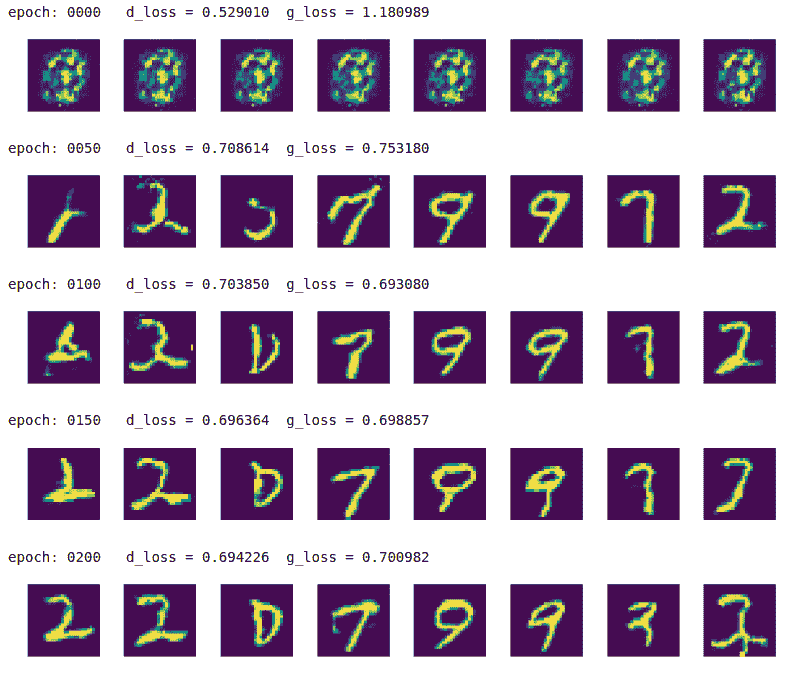
当我们运行这个模型 400 个周期时,我们得到以下输出:

如您所见,DCGAN 能够从周期 100 本身开始生成高质量的数字。 DGCAN 已被用于样式转移,图像和标题的生成以及图像代数,即拍摄一个图像的一部分并将其添加到另一个图像的部分。 MNIST DCGAN 的完整代码在笔记本`ch-14b_DCGAN`中提供。
# 总结
在本章中,我们了解了生成对抗网络。我们在 TensorFlow 和 Keras 中构建了一个简单的 GAN,并将其应用于从 MNIST 数据集生成图像。我们还了解到,许多不同的 GAN 衍生产品正在不断推出,例如 DCGAN,SRGAN,StackGAN 和 CycleGAN 等等。我们还建立了一个 DCGAN,其中生成器和判别器由卷积网络组成。我们鼓励您阅读并尝试不同的衍生工具,以了解哪些模型适合他们试图解决的问题。
在下一章中,我们将学习如何使用 TensorFlow 集群和多个计算设备(如多个 GPU)在分布式集群中构建和部署模型。
- TensorFlow 1.x 深度学习秘籍
- 零、前言
- 一、TensorFlow 简介
- 二、回归
- 三、神经网络:感知器
- 四、卷积神经网络
- 五、高级卷积神经网络
- 六、循环神经网络
- 七、无监督学习
- 八、自编码器
- 九、强化学习
- 十、移动计算
- 十一、生成模型和 CapsNet
- 十二、分布式 TensorFlow 和云深度学习
- 十三、AutoML 和学习如何学习(元学习)
- 十四、TensorFlow 处理单元
- 使用 TensorFlow 构建机器学习项目中文版
- 一、探索和转换数据
- 二、聚类
- 三、线性回归
- 四、逻辑回归
- 五、简单的前馈神经网络
- 六、卷积神经网络
- 七、循环神经网络和 LSTM
- 八、深度神经网络
- 九、大规模运行模型 -- GPU 和服务
- 十、库安装和其他提示
- TensorFlow 深度学习中文第二版
- 一、人工神经网络
- 二、TensorFlow v1.6 的新功能是什么?
- 三、实现前馈神经网络
- 四、CNN 实战
- 五、使用 TensorFlow 实现自编码器
- 六、RNN 和梯度消失或爆炸问题
- 七、TensorFlow GPU 配置
- 八、TFLearn
- 九、使用协同过滤的电影推荐
- 十、OpenAI Gym
- TensorFlow 深度学习实战指南中文版
- 一、入门
- 二、深度神经网络
- 三、卷积神经网络
- 四、循环神经网络介绍
- 五、总结
- 精通 TensorFlow 1.x
- 一、TensorFlow 101
- 二、TensorFlow 的高级库
- 三、Keras 101
- 四、TensorFlow 中的经典机器学习
- 五、TensorFlow 和 Keras 中的神经网络和 MLP
- 六、TensorFlow 和 Keras 中的 RNN
- 七、TensorFlow 和 Keras 中的用于时间序列数据的 RNN
- 八、TensorFlow 和 Keras 中的用于文本数据的 RNN
- 九、TensorFlow 和 Keras 中的 CNN
- 十、TensorFlow 和 Keras 中的自编码器
- 十一、TF 服务:生产中的 TensorFlow 模型
- 十二、迁移学习和预训练模型
- 十三、深度强化学习
- 十四、生成对抗网络
- 十五、TensorFlow 集群的分布式模型
- 十六、移动和嵌入式平台上的 TensorFlow 模型
- 十七、R 中的 TensorFlow 和 Keras
- 十八、调试 TensorFlow 模型
- 十九、张量处理单元
- TensorFlow 机器学习秘籍中文第二版
- 一、TensorFlow 入门
- 二、TensorFlow 的方式
- 三、线性回归
- 四、支持向量机
- 五、最近邻方法
- 六、神经网络
- 七、自然语言处理
- 八、卷积神经网络
- 九、循环神经网络
- 十、将 TensorFlow 投入生产
- 十一、更多 TensorFlow
- 与 TensorFlow 的初次接触
- 前言
- 1. TensorFlow 基础知识
- 2. TensorFlow 中的线性回归
- 3. TensorFlow 中的聚类
- 4. TensorFlow 中的单层神经网络
- 5. TensorFlow 中的多层神经网络
- 6. 并行
- 后记
- TensorFlow 学习指南
- 一、基础
- 二、线性模型
- 三、学习
- 四、分布式
- TensorFlow Rager 教程
- 一、如何使用 TensorFlow Eager 构建简单的神经网络
- 二、在 Eager 模式中使用指标
- 三、如何保存和恢复训练模型
- 四、文本序列到 TFRecords
- 五、如何将原始图片数据转换为 TFRecords
- 六、如何使用 TensorFlow Eager 从 TFRecords 批量读取数据
- 七、使用 TensorFlow Eager 构建用于情感识别的卷积神经网络(CNN)
- 八、用于 TensorFlow Eager 序列分类的动态循坏神经网络
- 九、用于 TensorFlow Eager 时间序列回归的递归神经网络
- TensorFlow 高效编程
- 图嵌入综述:问题,技术与应用
- 一、引言
- 三、图嵌入的问题设定
- 四、图嵌入技术
- 基于边重构的优化问题
- 应用
- 基于深度学习的推荐系统:综述和新视角
- 引言
- 基于深度学习的推荐:最先进的技术
- 基于卷积神经网络的推荐
- 关于卷积神经网络我们理解了什么
- 第1章概论
- 第2章多层网络
- 2.1.4生成对抗网络
- 2.2.1最近ConvNets演变中的关键架构
- 2.2.2走向ConvNet不变性
- 2.3时空卷积网络
- 第3章了解ConvNets构建块
- 3.2整改
- 3.3规范化
- 3.4汇集
- 第四章现状
- 4.2打开问题
- 参考
- 机器学习超级复习笔记
- Python 迁移学习实用指南
- 零、前言
- 一、机器学习基础
- 二、深度学习基础
- 三、了解深度学习架构
- 四、迁移学习基础
- 五、释放迁移学习的力量
- 六、图像识别与分类
- 七、文本文件分类
- 八、音频事件识别与分类
- 九、DeepDream
- 十、自动图像字幕生成器
- 十一、图像着色
- 面向计算机视觉的深度学习
- 零、前言
- 一、入门
- 二、图像分类
- 三、图像检索
- 四、对象检测
- 五、语义分割
- 六、相似性学习
- 七、图像字幕
- 八、生成模型
- 九、视频分类
- 十、部署
- 深度学习快速参考
- 零、前言
- 一、深度学习的基础
- 二、使用深度学习解决回归问题
- 三、使用 TensorBoard 监控网络训练
- 四、使用深度学习解决二分类问题
- 五、使用 Keras 解决多分类问题
- 六、超参数优化
- 七、从头开始训练 CNN
- 八、将预训练的 CNN 用于迁移学习
- 九、从头开始训练 RNN
- 十、使用词嵌入从头开始训练 LSTM
- 十一、训练 Seq2Seq 模型
- 十二、深度强化学习
- 十三、生成对抗网络
- TensorFlow 2.0 快速入门指南
- 零、前言
- 第 1 部分:TensorFlow 2.00 Alpha 简介
- 一、TensorFlow 2 简介
- 二、Keras:TensorFlow 2 的高级 API
- 三、TensorFlow 2 和 ANN 技术
- 第 2 部分:TensorFlow 2.00 Alpha 中的监督和无监督学习
- 四、TensorFlow 2 和监督机器学习
- 五、TensorFlow 2 和无监督学习
- 第 3 部分:TensorFlow 2.00 Alpha 的神经网络应用
- 六、使用 TensorFlow 2 识别图像
- 七、TensorFlow 2 和神经风格迁移
- 八、TensorFlow 2 和循环神经网络
- 九、TensorFlow 估计器和 TensorFlow HUB
- 十、从 tf1.12 转换为 tf2
- TensorFlow 入门
- 零、前言
- 一、TensorFlow 基本概念
- 二、TensorFlow 数学运算
- 三、机器学习入门
- 四、神经网络简介
- 五、深度学习
- 六、TensorFlow GPU 编程和服务
- TensorFlow 卷积神经网络实用指南
- 零、前言
- 一、TensorFlow 的设置和介绍
- 二、深度学习和卷积神经网络
- 三、TensorFlow 中的图像分类
- 四、目标检测与分割
- 五、VGG,Inception,ResNet 和 MobileNets
- 六、自编码器,变分自编码器和生成对抗网络
- 七、迁移学习
- 八、机器学习最佳实践和故障排除
- 九、大规模训练
- 十、参考文献
