# 表单与控件元素
[toc]
- 表单分为表单元素与控件元素二部分
- 表单元素仅一个: `<form>`
- 表单控件元素,根据类型不同,有多个
## 1. 表单元素`<form>`
### 1.1 常用属性
| 序号 | 属性 | 描述 |
| ---- | --------- | --------------------------------------- |
| 1 | `action` | 表单提交的 URL 地址(处理表单请求的脚本) |
| 2 | `method` | 表单提交类型:`GET/POST` |
| 3 | `enctype` | 设置表单提交数据的编码方式 |
| 4 | `name` | 表单唯一名称,与 ID 同义 |
| 5 | `target` | 打开请求 URL 的方式,如果`_blank` |
### 1.2 请求类型`method`
- web 请求方式有二种: 超链接与表单提交
- 超链接就是使用`<a>`标签发起请求,其实就是`GET`请求
- 表单提交默认就是`GET`请求,但例用最多的是`POST`
- 请求类型属性`action`的取值
| 序号 | 允许值 | 描述 |
| ---- | ------ | ----------------------------------------------------------- |
| 1 | `GET` | 默认值,表单数据以请求参数形式通过 URL 提交, 数据量最大 `2K` |
| 2 | `POST` | 表单数据放在请求体中发送,数据量更大也更安全 |
### 1.3 编码方式`enctype`
| 序号 | 允许值 | 适用场景 | 描述 |
| ---- | ----------------------------------- | ------------- | -------------------------------------------------------- |
| 1 | `application/x-www-form-urlencoded` | 接收`value`值 | 默认值,使用 URL 编码,GET/POST 均适合 |
| 2 | `multipart/form-data` | 文件上传 | 采用二进制流处理,会把文件域中的内容封装到请求参数中,适合 |
| 3 | `text/plain` | 电子邮件 | 如`action="mailto:URL` |
### 1.4 表单名称`name`
| 序号 | 功能 | 描述 |
| ---- | ------------ | --------------------------------------------- |
| 1 | 标识表单元素 | 与`id`一样,用来唯一标识该表单元素 |
| 2 | 绑定表单元素 | 用于表单控件元素的 form 属性,用来绑定所属表单 |
| 3 | 访问表单元素 | 快捷访问内部控件元素,如`form.input.value` |
### 1.5 打开方式`target`
| 序号 | 允许值 | 描述 |
| ---- | --------- | ----------------------------- |
| 1 | `_self` | 默认值,当前窗口打开提交的 URL |
| 2 | `_blank` | 新窗口打开提交的 URL |
| 3 | `_parent` | 父窗口打开提交的 URL |
| 4 | `_top` | 顶层窗口打开提交的 URL |
---
## 2. 表单控件元素`<input>`
### 2.1 常用属性
| 序号 | 属性 | 描述 |
| ---- | -------------- | -------------------------------------------------------- |
| 1 | `type` | 控件类型,如文本框, 复选框... |
| 2 | `name` | 请求参数的名称,对应于脚本处理的变量名 |
| 3 | `value` | 请求参数的值,对应于脚本处理的变量值,使用预定义值控件无效 |
| 4 | `form` | 控件所属表单 |
| 5 | `placeholder` | 仅限输入框`text`和`password`,输入框的提示信息 |
| 6 | `list` | 仅限输入框`text`和`password`,下拉框智能提示 |
| 7 | `autocomplate` | 仅限输入框`text`和`password`,自动完成(历史记录) |
| 8 | `maxlength` | 仅限输入框`text/password`, 允许输入最大字符数量 |
| 9 | `checked` | 仅限单选框`radio`, 复选框`checkbox`(布尔属性) |
| 10 | `readonly` | 元素只读,但通过 JavaScript 可修改(布尔属性) |
| 11 | `disabled` | 元素禁用,(布尔属性) |
| 12 | `autofocus` | 自动获取焦点,一个表单仅限一个控件 |
| 13 | `src` | 仅限图像域`images`, 图像 URL 地址 |
| 14 | `width` | 仅限图像域`images`, 图像宽度 |
| 15 | `height` | 仅限图像域`images`, 图像高度 |
### 2.2 `type`类型
- **常用类型**
| 序号 | 类型 | 描述 |
| ---- | ------------------------- | ------------------- |
| 1 | `<input type="text">` | 单行文本框 (默认值) |
| 2 | `<input type="password">` | 密码输入框 |
| 3 | `<input type="radio">` | 单选框 |
| 4 | `<input type="checkbox">` | 复选框 |
| 5 | `<input type="image">` | 图像域/提交表单 |
| 6 | `<input type="file">` | 文件上传域 |
| 7 | `<input type="hidden">` | 隐藏域 |
- **html5 新增类型**
| 序号 | 类型 | 描述 |
| ---- | ------------------------------- | ------------ |
| 1 | `<input type="email">` | 电子邮件 |
| 2 | `<input type="data">` | 日期 |
| 2 | `<input type="data">` | 日期 |
| 4 | `<input type="datetime-local">` | 本地日期时间 |
| 5 | `<input type="tel">` | 电话号码 |
| 6 | `<input type="url">` | URL 地址 |
| 7 | `<input type="number">` | 数值 |
| 8 | `<input type="range">` | 范围拖动条 |
| 9 | `<input type="search">` | 搜索框/移动 |
| 10 | `<input type="color">` | 拾色器 |
### 2.3 常用事件属性
| 序号 | 事件属性 | 描述 |
| ---- | ----------- | ------------------------------ |
| 1 | `onfocus` | 获取焦点时触发 |
| 2 | `onblur` | 失去焦点时触发 |
| 3 | `onchange` | 失去焦点,且值发生变化时触发 |
| 4 | `oninput` | 值发生变化(不等失去焦点)时触发 |
| 5 | `onkeydown` | 按下键盘时触发 |
| 6 | `onkeyup` | 抬起键盘时触发 |
| 7 | `onclick` | 鼠标单击时触发 |
| 8 | `onselect` | 选择内容文本时触发 |
### 2.4 示例
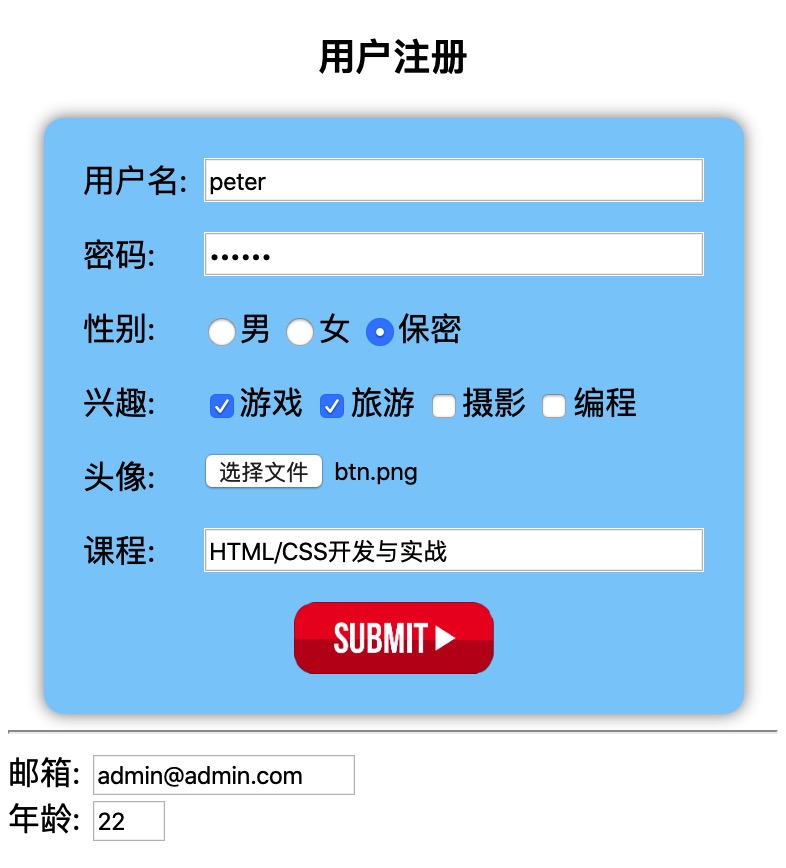
```html
<!DOCTYPE html>
<html lang="en">
<head>
<meta charset="UTF-8" />
<meta name="viewport" content="width=device-width, initial-scale=1.0" />
<title>表单之input</title>
<style>
form {
padding: 20px;
width: 350px;
box-shadow: 0 0 8px #888;
border-radius: 10px;
box-sizing: border-box;
margin: auto;
background-color: lightskyblue;
display: grid;
gap: 15px;
}
form > section {
display: grid;
grid-template-columns: 60px 1fr;
}
h3 {
text-align: center;
}
input[type="image"] {
justify-self: center;
}
</style>
</head>
<body>
<h3>用户注册</h3>
<form
action="handle.php"
method="post"
enctype="application/x-www-form-urlencoded"
id="register"
>
<!-- 单行文本输入框 -->
<section>
<label for="username">用户名:</label>
<!-- 必选且自动获取焦点 -->
<input
type="text"
name="username"
id="username"
maxlength="20"
placeholder="不少于6位"
required
autofocus
/>
</section>
<!-- 密码输入框 -->
<section>
<label for="password">密码:</label>
<input
type="password"
name="password"
id="password"
size="10"
placeholder="不少于8位"
required
/>
</section>
<!-- 单选框 -->
<section>
<label for="secret">性别:</label>
<div>
<!-- 只允许返回一个值,多个input的name属性值必须相同 -->
<input type="radio" name="gender" id="male" value="male" /><label
for="male"
>男</label
>
<input type="radio" name="gender" id="female" value="female" /><label
for="male"
>女</label
>
<!-- checked: 默认选项 -->
<input
type="radio"
name="gender"
id="secret"
value="female"
checked
/><label for="secret">保密</label>
</div>
</section>
<!-- 复选框 -->
<section>
<label for="programme">兴趣:</label>
<div>
<!-- 允许返回多个值,属性名采用数组格式,便于后端处理 -->
<input type="checkbox" name="hobby[]" id="game" checked /><label
for="game"
>游戏</label
>
<input type="checkbox" name="hobby[]" id="travel" checked /><label
for="travel"
>旅游</label
>
<input
type="checkbox"
name="hobby[]"
value="shoot"
id="shoot"
/><label for="shoot">摄影</label>
<input
type="checkbox"
name="hobby[]"
value="programme"
id="programme"
checked
/><label for="programme">编程</label>
</div>
</section>
<!-- 文件域 -->
<section>
<label for="userpic">头像:</label>
<!-- 设置<form enctype="multipart/form-data">,且为POST提交 才有效-->
<input type="file" name="user_pic" id="userpic" />
<!-- 隐藏域: 限制上传文件大小不超过8M -->
<input type="hidden" name="MAX_FILE_SIZE" value="8388608" />
</section>
<!-- 预定义复合框 -->
<section>
<label for="course">课程:</label>
<input type="text" name="course" list="course" />
<datalist id="course">
<!-- 此<option>使用单标签,与<select>中不同 -->
<option value="HTML/CSS开发与实战"> </option>
<option value="JavaScript基础与实战"> </option>
<option value="PHP开发基础"> </option>
<option value="Laravel基础与实战"> </option>
</datalist>
</section>
<!-- 图像域: 提交按钮为图像 -->
<!-- 返回点击图片的x/坐标,推荐加上name属性,返回有语义坐标 -->
<!-- 测试提交,启动一个本地Web服务器: php -S localhost:8888 -->
<input
type="image"
src="btn.png"
alt="submit"
name="submit"
width="100"
/>
</form>
<hr />
<!-- 表单控件元素不一定必须写到<form>标签内 -->
<!-- 表单控件使用form属性,将它与所属表单绑定 -->
<section>
<label for="email">邮箱:</label>
<input type="email" name="email" id="email" form="register" />
</section>
<section>
<label for="age">年龄:</label>
<input
type="number"
name="age"
id="age"
form="register"
min="18"
max="60"
step="2"
value="22"
/>
</section>
</body>
</html>
```
---
## 3. 控件标签元素`<label>`
- `<label>`元素没有`name`和`value`属性,不会创建请求参数
- 它存在的意义就是关联控件,当点击它时将焦点自动落在关联控件内部
- 语法: `<label for="关联控件的id属性值">`(也支持三大通用属性)
- `<label>`有二种方式与控件元素进行关联/绑定
| 序号 | 关联方式 | 示例代码 |
| ---- | -------- | ------------------------------------------------------------------ |
| 1 | 显式关联 | `<label for="email">Email:</label><input type="email" id="email">` |
| 1 | 隐式关联 | `<label>Email:</label><input type="email"></label>` |
> 推荐使用**显式关联**, 案例参考`<input>`示例
---
## 4. 按钮控件元素`<button>`
### 4.1 与`<input>`对比
| 序号 | `<button>` | 替代的`<input>` |
| ---- | -------------------------------------- | -------------------------------------- |
| 1 | `<button type="...">按钮文本</button>` | `<input type="..." value="按钮文本">` |
| 2 | `<button><img src="..."></button>` | `<input type="image" src="...">`图像域 |
### 4.2 常用属性
| 序号 | 属性 | 描述 |
| ---- | ------------ | -------------------------------------------------- |
| 1 | `type` | 必须使用预定义的`submit`, `button`, `reset`之一 |
| 2 | `name` | 按钮的唯一名称,与 ID 等效 |
| 3 | `value` | 按钮文本初始值,可通过 JavaScript 修改 |
| 4 | `disabled` | 禁用按钮 |
| 5 | `form` | 按钮所属表单(此时按钮`type`默认类型为`submit`提交) |
| 6 | `formaction` | 设置不同按钮可将表单数据提交到不同的 URL 处理 |
| 7 | `form***` | 动态设置`<form>`属性值,如`formmethod="GET"` |
### 4.3 示例
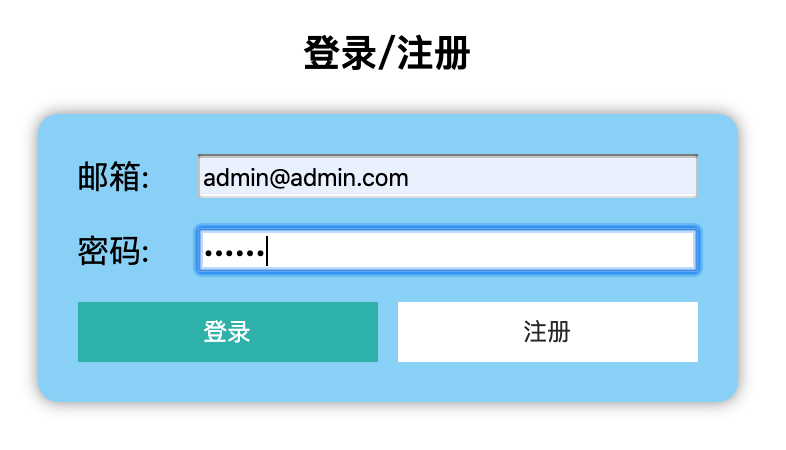
```html
<!DOCTYPE html>
<html lang="en">
<head>
<meta charset="UTF-8" />
<meta name="viewport" content="width=device-width, initial-scale=1.0" />
<title>按钮元素</title>
<style>
form {
padding: 20px;
width: 350px;
box-shadow: 0 0 8px #888;
border-radius: 10px;
box-sizing: border-box;
margin: auto;
background-color: lightskyblue;
display: grid;
gap: 15px;
}
form > section {
display: grid;
grid-template-columns: 60px 1fr;
}
h3 {
text-align: center;
}
section:last-of-type {
display: grid;
grid-template-columns: 1fr 1fr;
column-gap: 10px;
}
button {
height: 30px;
border: none;
outline: none;
}
button:hover {
background-color: lightseagreen;
color: white;
cursor: pointer;
}
</style>
</head>
<body>
<h3>登录/注册</h3>
<form action="register.php" method="post">
<section>
<label for="email">邮箱:</label>
<input type="email" name="email" id="email" required autofocus />
</section>
<section>
<label for="password">密码:</label>
<input type="password" name="password" id="password" required />
</section>
<section>
<!-- 注册与登录,使用不同的脚本进行处理,并动态设置提交类型,打开方式 -->
<button
type="submit"
formaction="login.php"
formmethod="POST"
formtarget="_blank"
>
登录
</button>
<button
type="submit"
formaction="register.php"
formmethod="GET"
formtarget="_blank"
>
注册
</button>
</section>
</form>
</body>
</html>
```
- `register.php`和`login.php`源码
```php
<?php
// 查看表单提交的请求参数
print_r($_REQUEST);
```
---
## 5. 下拉列表元素`<select>`
- 下拉列表使用`<select>` + `<optgroup>` + `<option>`组合元素实现
- 参数名`name`定义在`<select>`中,参数值`value`,定义在`<option>`中
### 5.1 `<select>`属性
| 序号 | 属性 | 描述 |
| ---- | ---------- | ---------------------- |
| 1 | `name` | 请求参数名称/变量名 |
| 2 | `multiple` | 是否允许多选(布尔属性) |
| 3 | `size` | 允许同时显示的列表项 |
| 3 | `disabled` | 是否禁用(布尔属性) |
### 5.2 `<optgroup>`属性
| 属性 | 描述 |
| ------- | ------------ |
| `label` | 列表分组名称 |
### 5.3 `<option>`属性
| 序号 | 属性 | 描述 |
| ---- | ---------- | ------------------ |
| 1 | `value` | 请求参数的值 |
| 2 | `label` | 默认选项文本值 |
| 3 | `selected` | 是否选中(布尔属性) |
| 3 | `disabled` | 是否禁用(布尔属性) |
### 5.4 `<select>`事件属性
| 序号 | 事件属性 | 描述 |
| ---- | ---------- | ---------------------------------- |
| 1 | `onchange` | 当下拉列表选项值发生变化时才会触发 |
| 2 | `onclick` | 只要点击就会触发(选项值可以不改变) |
### 5.5 示例
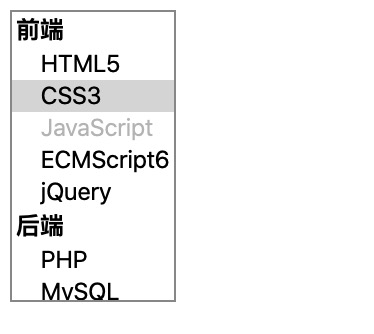
```html
<!DOCTYPE html>
<html lang="en">
<head>
<meta charset="UTF-8" />
<meta name="viewport" content="width=device-width, initial-scale=1.0" />
<title>下拉列表</title>
</head>
<body>
<form action="">
<!-- 当前默认选项值是"CSS3", 点击CSS3不会触发change事件,除此之外都会触发 -->
<!-- click事件不在乎当前值是否发生变化, 只要点击一定触发, 注意与change事件的区别 -->
<select
name=""
id=""
size="8"
multiple
onchange="alert(this.value)"
onclick="alert(this.value)"
>
<optgroup label="前端">
<option value="html5">HTML5</option>
<option value="css3" selected>CSS3</option>
<option value="javascript" disabled>JavaScript</option>
<!-- 使用label属性,可省略选项文本,并将option转为单标签 -->
<option value="es6" label="ECMScript6"> </option
><option value="jquery" label="jQuery"> </option
></optgroup>
<optgroup label="后端">
<option value="php" label="PHP"> </option
><option value="mysql" label="MySQL"> </option
><option value="javascript" label="Laravel"> </option
></optgroup>
</select>
</form>
</body>
</html>
```
---
## 6. 多行文本域元素`<textarea>`
### 6.1 常用属性
| 序号 | 属性 | 描述 |
| ---- | -------------- | ------------------------ |
| 1 | `cols` | 文本域可视宽度 |
| 2 | `rows` | 文本域可输入的行数 |
| 3 | `name` | 文本域参数名称 |
| 4 | `form` | 绑定所属表单元素 |
| 5 | `minlength` | 允许输入最小字符长度 |
| 6 | `maxlength` | 允许输入最大字符长度 |
| 7 | `maxlength` | 允许输入最大字符长度 |
| 8 | `placeholder` | 提示信息占位符 |
| 9 | `wrap` | 换行方式:`hard/soft默认` |
| 10 | `disabled` | 禁用(布尔属性) |
| 11 | `autofocus` | 自动获取焦点(布尔属性) |
| 12 | `autocomplete` | 自动完成(布尔属性) |
### 6.2 事件属性
| 序号 | 事件 | 描述 |
| ---- | ---------- | ---------------- |
| 1 | `onclick` | 点击时触发 |
| 2 | `onchange` | 文本被修改时触发 |
| 3 | `onselect` | 文本被选中时触发 |
> 提示: `<textarea>`是双标签,没有`value`属性,标签内部的文本就是参数值
### 6.3 示例
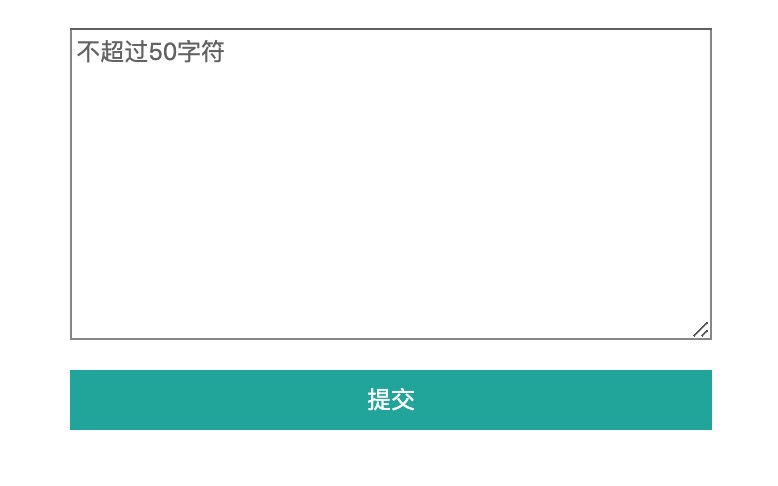
```html
<!DOCTYPE html>
<html lang="en">
<head>
<meta charset="UTF-8" />
<meta name="viewport" content="width=device-width, initial-scale=1.0" />
<title>文本域</title>
<style>
body {
width: 80%;
margin: auto;
display: grid;
row-gap: 15px;
}
button {
height: 30px;
border: none;
outline: none;
background-color: lightseagreen;
color: white;
}
button:hover {
background-color: blueviolet;
cursor: pointer;
}
</style>
</head>
<body>
<!-- 表单内部为空,控件全部使用form属性与之绑定 -->
<form action="" id="common"></form>
<!-- change:值改变时触发, select:选中文本时触发 -->
<textarea
name="reply"
id=""
cols="30"
rows="10"
minlength="5"
maxlength="50"
form="common"
placeholder="不超过50字符"
onchange="alert('内容改变了')"
onselect="this.style.color='red'"
></textarea>
<!-- 动态设置处理脚本与请求类型 -->
<button
type="submit"
form="common"
formaction="register.php"
formmethod="POST"
>
提交
</button>
</body>
</html>
```
---
## 7. 表单域分组元素`<fieldset>`
- 当表单字段非常多时,分组管理很有必要,例如将必填项与选填项分开
- 它只有一个子元素`<legend>`,设置分组标题
### 7.1 常用属性
| 序号 | 属性 | 描述 |
| ---- | ---------- | ----------------------------- |
| 1 | `name` | 分组名称 |
| 2 | `form` | 分组所属表单,默认是最近的表单 |
| 3 | `disabled` | 禁用分组(布尔属性) |
> `name`,`form`属性仅供参考,提交参数仍依赖内部控件中的`form`属性
### 7.2 示例
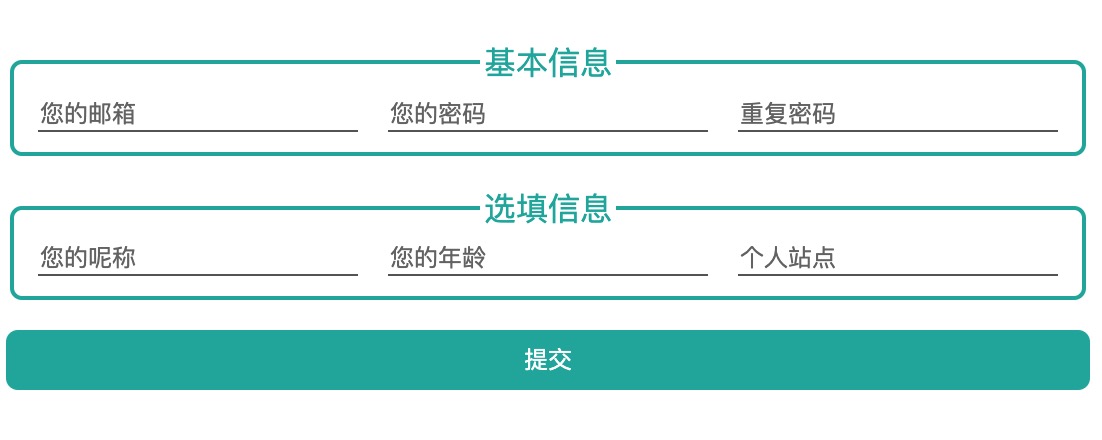
```html
<!DOCTYPE html>
<html lang="en">
<head>
<meta charset="UTF-8" />
<meta name="viewport" content="width=device-width, initial-scale=1.0" />
<title>表单域分组元素</title>
<style>
body {
display: grid;
row-gap: 15px;
}
fieldset {
color: lightseagreen;
border-radius: 6px;
border: 2px solid lightseagreen;
}
fieldset:hover {
background-color: lightcyan;
}
fieldset > section {
display: grid;
grid-template-columns: repeat(3, 1fr);
column-gap: 15px;
}
fieldset > legend {
text-align: center;
}
input {
border: none;
outline: none;
border-bottom: 1px solid #666;
background-color: transparent;
}
button {
height: 30px;
border: none;
outline: none;
border-radius: 6px;
background-color: lightseagreen;
color: white;
}
button:hover {
background-color: darkorchid;
cursor: pointer;
}
</style>
</head>
<body>
<!-- 提交设置通过<button>元素完成 -->
<form action="" id="register"></form>
<!-- 表单域分组1 -->
<fieldset name="base" form="register">
<legend>基本信息</legend>
<section>
<input
type="email"
name="email"
placeholder="您的邮箱"
form="register"
autofocus
/>
<input
type="password"
name="psw1"
placeholder="您的密码"
form="register"
/>
<input
type="password"
name="psw2"
placeholder="重复密码"
form="register"
/>
</section>
</fieldset>
<!-- 表单域分组2 -->
<fieldset name="other" form="register">
<legend>选填信息</legend>
<section>
<input
type="text"
name="nickname"
placeholder="您的呢称"
form="register"
/>
<input type="number" name="age" min="10" max="70" step="1"
form="register" / placeholder="您的年龄"> <input type="url" name="site"
placeholder="个人站点"" form="register"/>
</section>
</fieldset>
<button
type="submit"
form="register"
formaction="register.php"
formmethod="POST"
formtarget="_blank"
>
提交
</button>
</body>
</html>
```
- 教学大纲
- HTML5基础
- 1-html基础知识
- 2-语义化结构元素
- 3-语义化文本元素
- 4-链接/列表/图像元素
- 5-表格元素
- 6-表单与控件元素[重点]
- CSS3基础
- 1-css与html文档
- 2-css选择器
- 3-细说盒模型
- Flex布局[精简版]
- 1-Flex概论
- 2-Flex布局是什么
- 3-Flex基本概念
- 4-Flex容器属性
- 5-Flex项目属性
- Flex布局[细说版]
- 1-flex 布局概述
- 2-flex 容器与项目
- 3-flex 容器主轴方向
- 4-flex 容器主轴项目换行
- 5-flex 容器主轴与项目换行简写
- 6-flex 容器主轴项目对齐
- 7-flex 容器交叉轴项目对齐
- 8-flex 多行容器交叉轴项目对齐
- 9-flex 项目主轴排列顺序
- 10-flex 项目交叉轴单独对齐
- 11-flex 项目放大因子
- 12-flex 项目收缩因子
- 13-flex 项目计算尺寸
- 14-flex 项目缩放的简写
- Flex布局[案例版]
- 1-调整项目顺序
- Grid布局[精简版]
- 1. 常用术语
- 2. 容器属性
- 3. 项目属性
- 4. 布局实例
- 1. 经典三列布局
- 2. 媒体查询
- Grid布局[细说版]
- 1-必知术语
- 2-容器创建与行列划分
- 3-单元格常用单位
- 4-项目填充到单元格
- 5-项目填充到网格区域
- 6-对齐容器中的所有项目
- 7-对齐单元格中所有项目
- 8-对齐单元格中某个项目
- 9-容器中行与列之间的间距
